Articles
How To Do A Heated Driveway
Modified: August 28, 2024
Learn how to install a heated driveway with this comprehensive guide. Our articles provide step-by-step instructions and expert tips for a warm and snow-free driveway.
(Many of the links in this article redirect to a specific reviewed product. Your purchase of these products through affiliate links helps to generate commission for Storables.com, at no extra cost. Learn more)
Introduction
Having a heated driveway may seem like a luxury, but it can be a practical and beneficial addition to your home. If you live in an area with cold winters and frequent snowfall, a heated driveway can save you time and effort by melting the snow and ice automatically.
Imagine never having to shovel or plow your driveway again, or worrying about slipping and falling on icy surfaces. A heated driveway can provide you with the peace of mind and convenience you need during the winter months.
In this article, we will explore the various benefits of a heated driveway, the different types available, the materials and tools you need for installation, step-by-step instructions to install a heated driveway, common mistakes to avoid, and tips for maintaining and operating your heated driveway.
Whether you are considering installing a heated driveway yourself or hiring a professional, this article will provide you with all the information you need to make an informed decision and ensure a successful installation.
Key Takeaways:
- Say goodbye to shoveling and plowing with a heated driveway, enhancing safety and convenience during winter months. Enjoy a hassle-free winter and increase your property value with this practical addition to your home.
- Choose the right heated driveway system and avoid common installation mistakes to ensure efficient snow melting and long-term functionality. Regular maintenance and proper operation will maximize the benefits of your heated driveway, providing a safe and convenient winter experience.
Read more: How To Do A Brick Driveway
Benefits of a Heated Driveway
A heated driveway offers several advantages that can significantly improve your winter experience. Here are the key benefits of installing a heated driveway:
- No more snow removal: One of the biggest benefits of a heated driveway is that it eliminates the need for manual snow removal. Instead of shoveling snow or using a snowblower, the heated driveway melts the snow and ice, keeping your driveway clear and safe to use.
- Enhanced safety: Snow and ice accumulation on your driveway can create hazardous conditions, increasing the risk of slips and falls. With a heated driveway, you minimize the chance of accidents by preventing ice from forming. This feature is particularly beneficial for seniors, children, and individuals with mobility issues.
- Time and effort savings: By eliminating the need for snow removal, a heated driveway saves you valuable time and effort during the winter. Instead of spending hours shoveling or waiting for a snowplow, your driveway remains free of snow, allowing you to focus on more important tasks or enjoy your winter days without worrying about clearing the driveway.
- Increased property value: A heated driveway is a desirable feature that can boost the value of your property. Homebuyers appreciate the convenience and luxury offered by a heated driveway, making your home stand out in the real estate market.
- Cost-effective: While the initial installation cost of a heated driveway may seem significant, it can save you money in the long run. By eliminating the need for professional snow removal services or costly snowmelt chemicals, a heated driveway can reduce your winter maintenance expenses over time.
- Preserves the driveway: Snow and ice can cause damage to your driveway over time, including cracks and potholes. A heated driveway prevents snow and ice from accumulating, preserving the integrity and longevity of your driveway.
- Environmentally friendly: Unlike snowmelt chemicals that can harm plants, groundwater, and the environment, a heated driveway uses a more eco-friendly approach to melt snow and ice.
By installing a heated driveway, you can experience these benefits firsthand, making your winter months safer, more convenient, and enjoyable.
Types of Heated Driveways
There are a few different types of heated driveway systems available, each with its own advantages and considerations. Here are the most common types of heated driveways:
- Electric Heated Driveway: This type of heated driveway uses electric resistance cables or mats installed beneath the surface of the driveway. The cables or mats heat up when activated, melting the snow and ice. Electric heated driveways are easy to install and cost-effective for smaller driveways. However, they can have higher operational costs compared to other types and may require professional installation.
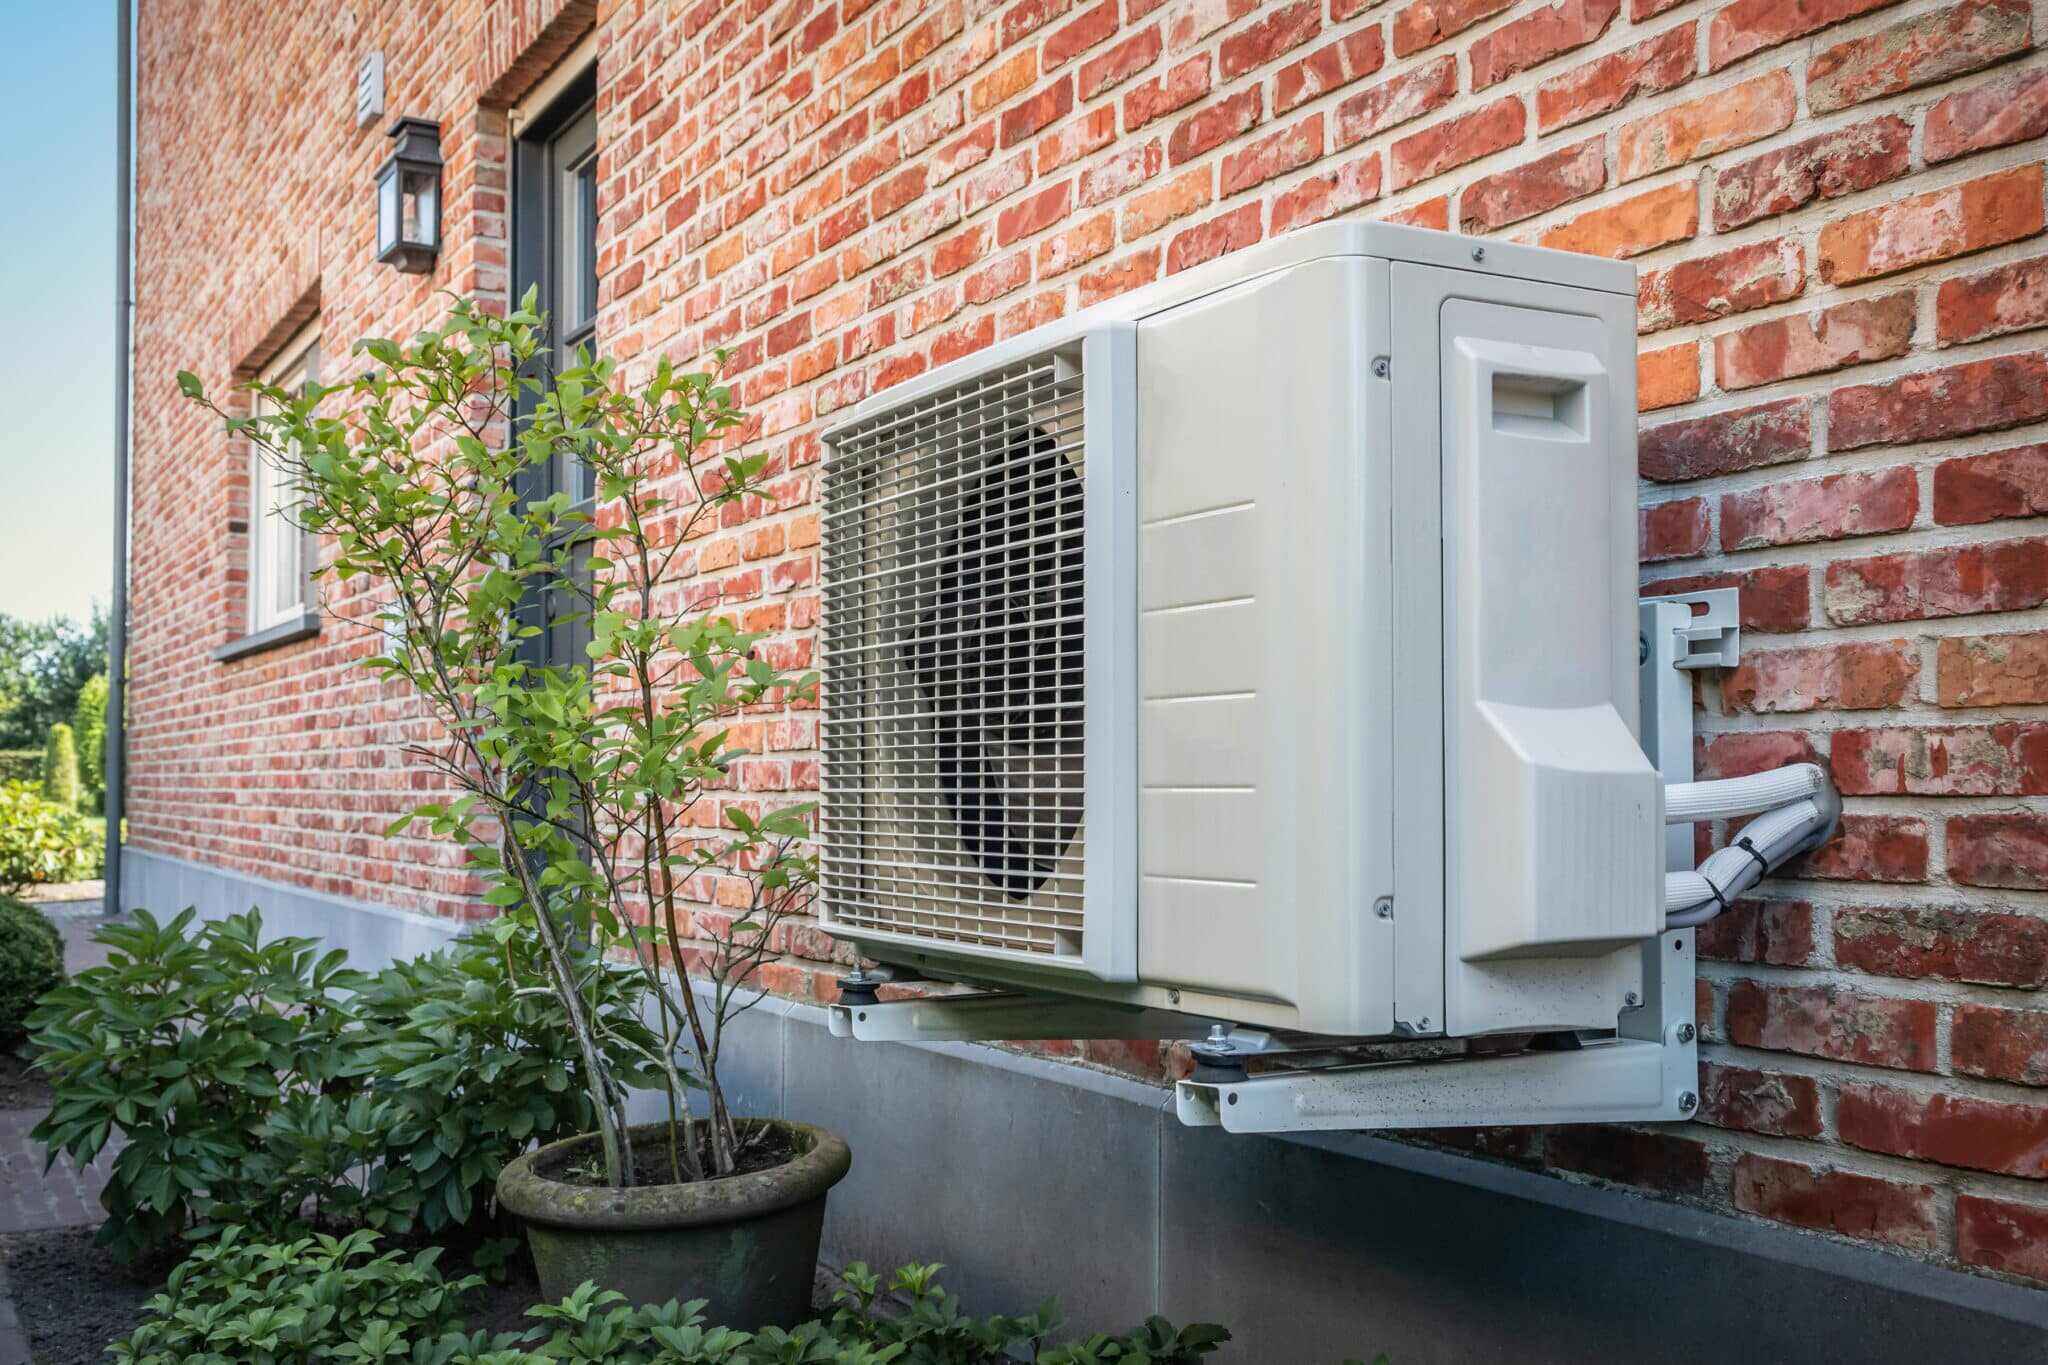
- Hydronic Heated Driveway: Hydronic heated driveways use a system of tubes or pipes that carry a heated fluid, such as water or antifreeze, under the driveway surface. The fluid is heated by a boiler or water heater and then circulated through the tubes, melting the snow and ice. Hydronic systems are efficient and cost-effective for larger driveways, but they require professional installation and are more complex to set up.
- Solar Heated Driveway: Solar heated driveways utilize the power of the sun to melt snow and ice. They feature solar panels that collect and convert sunlight into electricity, which is then used to power the heating elements under the driveway surface. Solar heated driveways are environmentally friendly and can save you money on energy costs. However, they may not be as effective in areas with limited sunlight or during extended periods of heavy snowfall.
- Hot Water Tubes Driveway: Also known as a radiant heat driveway, this system uses a network of tubes installed under the driveway to circulate hot water. The hot water is heated by a boiler or water heater and distributed through the tubes, melting the snow and ice. Hot water tube driveways are efficient, reliable, and suitable for various driveway sizes. However, they often require professional installation and are more expensive upfront.
When choosing a heated driveway system, consider factors such as the size of your driveway, installation complexity, operational costs, and your specific climate conditions. Consulting with a professional can help you determine the most suitable type of heated driveway for your needs and budget.
Required Materials and Tools
Before you can start installing a heated driveway, you will need to gather the necessary materials and tools. Here is a list of what you will typically need:
Materials:
- PVC or PEX tubing (for hydronic systems)
- Heating cables or mats (for electric systems)
- Heat-conductive grout or mortar
- Insulation boards
- Control unit or thermostat
- Junction boxes and wiring (for electric systems)
- Backfill material (sand or gravel)
- Concrete or asphalt (for driveway surface)
Tools:
- Measuring tape
- Shovel
- Wire cutters
- Drill
- Concrete mixer (if using concrete)
- Trowel
- Level
- Utility knife
- Pliers
- Hammer
- Nails or screws
- Safety goggles and gloves
It is important to note that the specific materials and tools required may vary depending on the type of heated driveway system you choose and the size of your driveway. Additionally, you may need additional materials like wire mesh or rebar for reinforcement if you are using concrete for the driveway surface.
Before starting the installation process, make sure you have all the necessary materials and tools on hand. This will help ensure a smooth and efficient installation process.
Step-by-Step Guide to Install a Heated Driveway
Installing a heated driveway requires careful planning and precise execution. Follow this step-by-step guide to ensure a successful installation:
1. Plan and Design:
Start by assessing your driveway and determining the layout for the heating system. Consider factors such as the size and shape of your driveway, the location of the control unit, and any obstacles or landscaping that may affect the installation process.
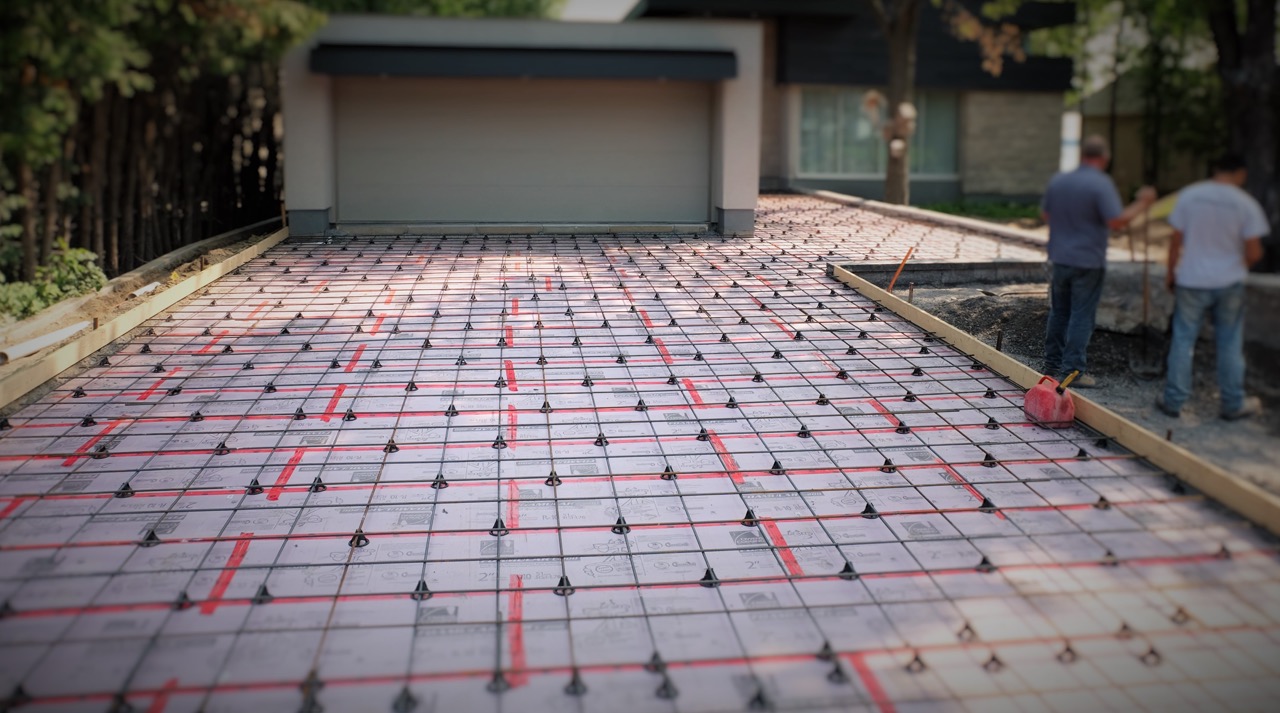
2. Excavation:
Use a shovel or excavation equipment to dig a trench along the desired path of the heated driveway. The depth of the trench should be based on the manufacturer’s guidelines for the heating system you choose. Make sure the trench is wide enough to accommodate the heating elements and any insulation required.
3. Install Insulation:
If your system requires insulation, lay the insulation boards in the trench, ensuring a snug fit. Insulation helps maximize the efficiency of the heating system by directing heat upwards instead of downward into the ground.
4. Lay Heating Elements:
If you are using an electric system, carefully lay the heating cables or mats according to the manufacturer’s instructions. Ensure even spacing and avoid overlapping or crossing the cables. For hydronic systems, install the PEX or PVC tubing in a serpentine pattern, securing it with clips or stakes.
5. Connect and Test the System:
For electric systems, connect the heating elements to the control unit or thermostat using junction boxes and wiring. Double-check all connections for accuracy and safety. For hydronic systems, connect the tubing to the boiler or water heater. Before burying the elements or tubing, test the system to ensure proper functionality.
6. Backfill and Compaction:
Carefully backfill the trench using sand or gravel, making sure to cover the heating elements and insulation. Compact the backfill material to provide stability and protection for the system.
Read more: How Much Do Driveway Gates Cost
7. Install Driveway Surface:
If using concrete, mix the concrete according to the manufacturer’s instructions and pour it over the backfilled trench, ensuring it covers the heating elements. Use a trowel to level and smooth the surface. If using asphalt, follow the standard procedures for asphalt installation and compact the surface to ensure a smooth finish.
8. Finishing Touches:
Allow the driveway surface to cure or set before use. Install any necessary control panels or thermostats, and ensure they are properly programmed and functioning.
Keep in mind that this guide provides a general overview of the installation process. It is recommended to consult the manufacturer’s instructions and, if needed, seek professional advice to ensure a safe and efficient installation of your heated driveway.
Common Mistakes to Avoid
When installing a heated driveway, it’s important to be aware of common mistakes that can compromise the functionality and effectiveness of the system. By avoiding these errors, you can ensure a successful installation and maximize the benefits of your heated driveway. Here are some common mistakes to avoid:
1. Incorrect System Sizing:
Ensure that the size and capacity of your heating system match the dimensions of your driveway. An undersized system may not provide sufficient heat to melt snow and ice effectively, while an oversized system can lead to unnecessary energy consumption and higher operational costs.
Read more: How Do You Set A Thermostat For Heat
2. Inadequate Insulation:
Proper insulation is crucial for optimizing the efficiency and performance of your heated driveway. Insufficient or improperly installed insulation can cause heat loss, reducing the effectiveness of the system and increasing energy requirements. Follow the manufacturer’s guidelines and ensure proper insulation installation.
3. Poor Planning and Design:
Take the time to carefully plan and design your heated driveway layout. Consider factors such as the direction of snow runoff, driveway slope, and the location of control units. Poor planning can result in uneven heating, inefficient snow melting, and difficulty in future maintenance and repairs.
4. Lack of Professional Installation:
While DIY installations are possible, it is recommended to seek professional help, especially if you lack experience with electrical or plumbing work. Professional installation ensures proper system setup, prevents safety hazards, and guarantees compliance with local building codes.
5. Failure to Test the System:
Before covering the heating elements or tubing, perform thorough system testing to identify any potential issues or malfunctions. Testing ensures that the system is working correctly and allows for adjustments or repairs before the driveway surface is completed.
Read more: How Much Driveway Sealer Do I Need
6. Using Improper Driveway Material:
Ensure that the driveway material you choose is compatible with a heated driveway system. Some materials, such as certain types of decorative concrete, may not be suitable for heating elements or tubing installation. Consult with professionals to select an appropriate driveway material.
7. Neglecting Regular Maintenance:
Maintaining your heated driveway is essential for prolonging its lifespan and preserving its functionality. Regularly inspect the system for any damages, clean the surface to remove debris and snowmelt chemicals, and perform routine maintenance tasks as recommended by the manufacturer.
By avoiding these common mistakes and following proper installation techniques, you can ensure that your heated driveway operates effectively, providing you with the expected benefits and convenience during the winter months.
Maintaining and Operating a Heated Driveway
Once your heated driveway is installed, proper maintenance and operation are essential to ensure its longevity and efficiency. Here are some tips for maintaining and operating your heated driveway:
1. Regular Inspections:
Perform regular inspections of your heated driveway to identify any signs of damage or malfunctions. Look for cracks in the driveway surface, exposed heating elements or tubing, and any areas where the snow is not melting. Address any issues promptly to prevent further damage or inefficiency.
2. Clearing Debris:
Regularly remove leaves, dirt, and debris from the surface of your heated driveway. Accumulated debris can obstruct the melting process and hinder the system’s efficiency. Use a broom or a leaf blower to clear the surface, ensuring unobstructed access to the heating elements or tubing.
3. Avoid Chemical Deicers:
Avoid using chemical deicers on your heated driveway, as they can negatively impact the system and reduce its effectiveness. Chemical deicers can damage the driveway surface, corrode the heating elements or tubing, and harm the environment. Instead, rely on the heat generated by the system to melt snow and ice naturally.
4. Proper Snow Removal:
While a heated driveway helps melt snow and ice, there may still be instances where snow accumulation exceeds the system’s capacity. In such cases, use a plastic shovel or snow blower to remove excess snow. Avoid using metal shovels or sharp objects that can damage the heating elements or tubing.
5. Seasonal Shut-Down:
If you live in an area with warmer seasons where snow and ice are not a concern, consider shutting down the heated driveway system during these times. Consult the manufacturer’s instructions or seek professional advice on how to properly shut down and re-activate the system for optimal performance.
Read more: How Long Do Quail Need A Heat Lamp
6. Regular Testing:
Periodically test the heating elements or tubing to ensure they are functioning properly. Use the control unit or thermostat to activate the system and observe the snow melting process. If you notice any issues or inconsistencies, contact a professional to troubleshoot and address the problem.
7. Professional Maintenance:
While you can perform regular maintenance tasks yourself, it is recommended to schedule professional inspections and maintenance at least once a year. A professional can perform a comprehensive check-up, clean the heating elements or tubing, and make any necessary repairs or adjustments.
By following these maintenance and operation tips, you can extend the lifespan of your heated driveway and enjoy its benefits for many years to come. Always refer to the manufacturer’s guidelines and consult professionals if you have any concerns or questions about maintaining and operating your heated driveway.
Conclusion
A heated driveway is a valuable addition to any home, especially in cold climates with heavy snowfall. By melting snow and ice automatically, a heated driveway saves you time and effort, enhances safety, and provides convenience during the winter months.
In this article, we explored the various benefits of a heated driveway, including the elimination of snow removal, enhanced safety, time and effort savings, increased property value, and cost-effectiveness. Additionally, we discussed the different types of heated driveways, such as electric, hydronic, solar, and hot water tube systems, along with the required materials and tools for installation.
We provided a step-by-step guide to help you install a heated driveway, emphasizing the importance of proper planning, insulation, and testing. We also highlighted common mistakes to avoid, such as incorrect sizing, poor insulation, and neglecting maintenance. Finally, we discussed the maintenance and operation of a heated driveway, emphasizing regular inspections, debris clearance, and avoiding chemical deicers.
By following the tips and guidelines outlined in this article, you can maximize the benefits of your heated driveway, ensure its longevity, and enjoy a safe and convenient winter experience. Remember to consult manufacturer instructions, seek professional help when needed, and prioritize regular maintenance to keep your heated driveway in optimal condition.
Investing in a heated driveway is a practical and worthwhile decision that adds value and convenience to your home. Say goodbye to strenuous snow removal and icy surfaces, and say hello to a hassle-free winter with a heated driveway.
Frequently Asked Questions about How To Do A Heated Driveway
Was this page helpful?
At Storables.com, we guarantee accurate and reliable information. Our content, validated by Expert Board Contributors, is crafted following stringent Editorial Policies. We're committed to providing you with well-researched, expert-backed insights for all your informational needs.


0 thoughts on “How To Do A Heated Driveway”