Articles
How To Store Bicycles
Modified: October 20, 2024
Discover the best way to store bicycles with our collection of informative articles. Learn proper storage techniques to keep your bikes in optimal condition for years to come.
(Many of the links in this article redirect to a specific reviewed product. Your purchase of these products through affiliate links helps to generate commission for Storables.com, at no extra cost. Learn more)
Introduction
Welcome to our comprehensive guide on how to store bicycles. If you’re an avid cyclist or simply enjoy the occasional ride, you know that finding the right storage solution for your bikes is essential. Whether you have limited indoor space or need to store your bike outdoors, we’ve got you covered.
Bicycles are not only valuable assets but also require proper storage to ensure their longevity and performance. Storing your bikes correctly not only protects them from potential damage but also saves you space and keeps your living area tidy.
In this guide, we will explore various options for storing bicycles, including wall mount storage, ceiling mount storage, floor stand storage, and outdoor storage solutions. We’ll also discuss some important maintenance tips to keep your bikes in top condition while in storage. So, let’s dive in!
Key Takeaways:
- Proper bicycle storage is essential for longevity and performance. Consider wall mount, ceiling mount, floor stand, or outdoor storage options based on space, accessibility, and protection needs.
- Regular maintenance, including cleaning, lubrication, and tire inflation, is crucial for preventing rust, corrosion, and other issues that may arise during bicycle storage.
Read more: How To Store A Bicycle Outside
Choosing the Right Storage Space
Before diving into the different storage options, it’s crucial to assess your available space and determine the most suitable storage area for your bicycles. Here are a few factors to consider:
- Indoor or Outdoor: Decide whether you want to store your bikes indoors or outdoors. Indoor storage provides better protection against the elements, while outdoor storage can be a convenient option if you have limited indoor space.
- Space Availability: Take stock of the available space in your home or garage. Consider the dimensions, layout, and any potential obstructions that may impact your storage options.
- Accessibility: Think about how frequently you use your bikes and how easily you want to access them. Consider whether you want your bikes on display or prefer them tucked away, yet easily accessible when needed.
Once you’ve evaluated these factors, you can move on to choosing the storage option that best suits your needs. Let’s explore some popular choices.
Wall Mount Storage Options
Wall-mounted bike storage is a popular choice for many cyclists, as it efficiently utilizes vertical space and keeps bicycles off the floor. Here are a few wall mount storage options to consider:
- Wall Hooks: Wall hooks are simple and affordable solutions for hanging your bike vertically. They usually consist of a sturdy hook attached to a wall bracket. To use them, you’ll need to lift your bike and hang it securely on the hook. Make sure to use hooks with rubber or padded surfaces to prevent damage to your bike.
- Vertical Bike Racks: Vertical bike racks are designed to hold your bike securely in an upright position. They often feature adjustable hooks or arms that can accommodate different bike sizes and styles. These racks are typically mounted to a wall stud or with heavy-duty wall anchors to ensure stability.
- Foldable Wall Racks: If you have limited space or multiple bikes to store, foldable wall racks can be a great option. These racks can be folded up against the wall when not in use, creating more space in your garage or storage area. They usually feature adjustable arms to accommodate different bike sizes and can be installed at various heights.
When installing wall mount storage options, make sure to secure them properly to the wall using appropriate screws, anchors, or brackets. Additionally, consider the weight capacity of the chosen storage solution to ensure it can support the weight of your bike.
Wall mount storage options are ideal if you want to save floor space, keep your bikes easily accessible, and add a stylish display element to your space. However, ensure that the chosen wall mount system is compatible with your bike’s frame and doesn’t cause any damage or stress on the structure of the bike.
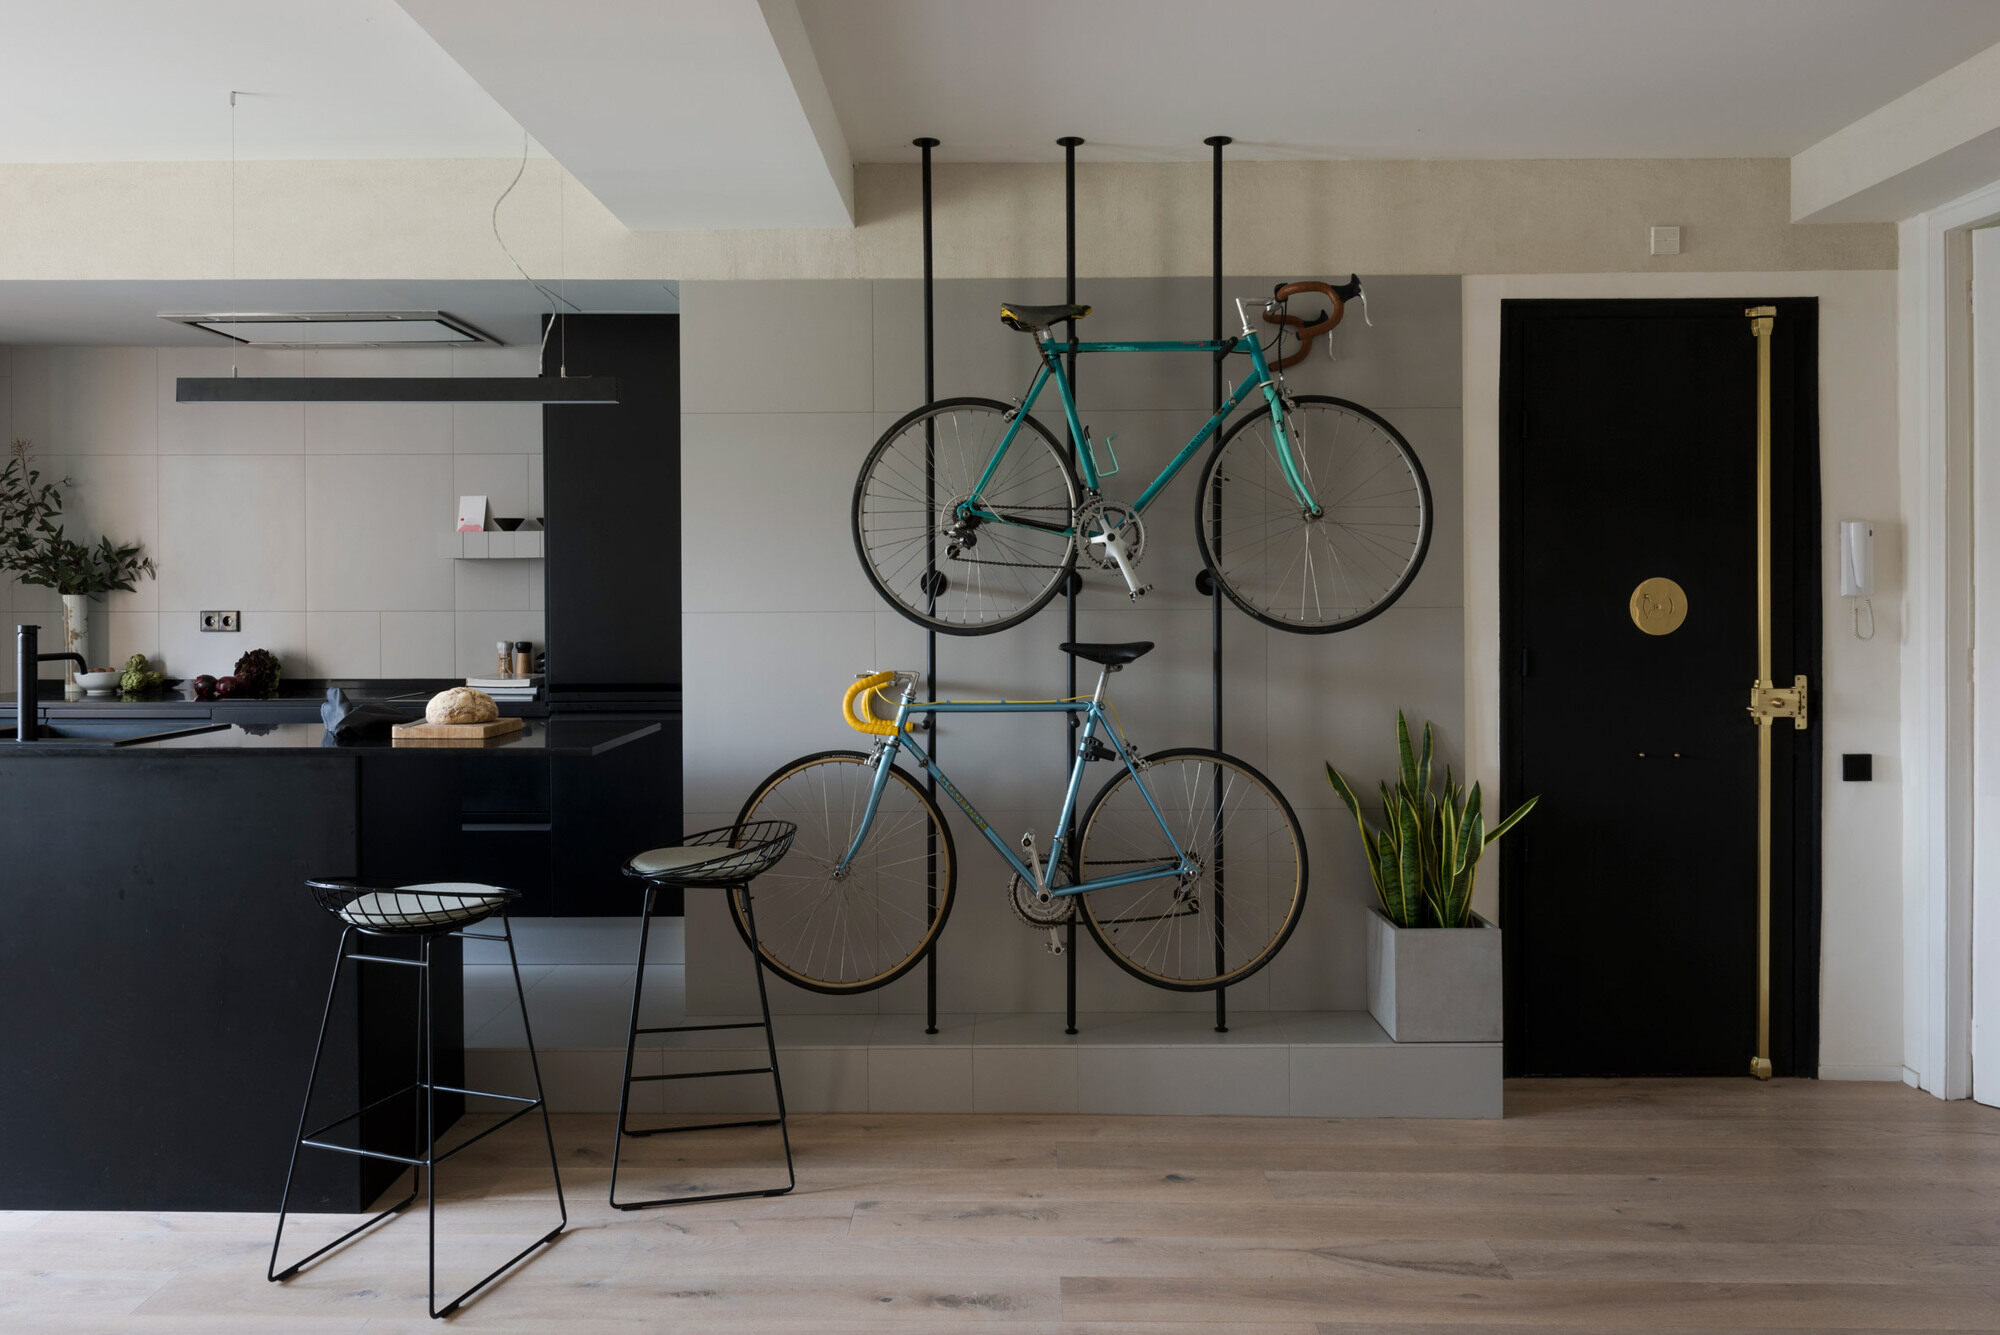
Ceiling Mount Storage Options
If you’re looking to maximize your storage space and keep your bikes completely out of the way, ceiling mount storage options are a great choice. These solutions utilize the often-overlooked area above your head. Here are a few ceiling mount storage options:
- Pulley Systems: Pulley systems are incredibly efficient for storing bikes overhead. They typically consist of a set of pulleys and ropes that allow you to hoist your bike up and out of the way. With a pulley system, you can easily raise and lower your bike whenever you need it.
- Ceiling Hooks: Ceiling hooks are a more straightforward option for ceiling mount storage. These hooks are screwed securely into a ceiling beam or joist, and you can hang your bike by its handlebars or saddle. Ceiling hooks offer a simple yet effective way to keep your bikes elevated and off the floor.
- Ceiling-Mounted Bike Lifts: Similar to pulley systems, ceiling-mounted bike lifts use a mechanical system to hoist your bike up and down. These lifts typically have a lock-off mechanism that securely holds your bike in place once raised. They are convenient and easy to use, allowing you to effortlessly store and retrieve your bike from the ceiling.
When selecting a ceiling mount storage option, ensure that you have enough ceiling height to accommodate the bikes and that the installation area is structurally sound. It’s essential to follow the manufacturer’s instructions carefully and use proper mounting hardware to ensure the safety and stability of your bikes.
Ceiling mount storage options are an excellent choice if you have limited floor space or if you want to keep your bikes completely out of the way. They offer a secure and organized solution, allowing you to free up valuable space in your garage or storage area.
Floor Stand Storage Options
If you prefer to keep your bikes on the ground and easily accessible, floor stand storage options are a practical and convenient choice. These solutions provide stability and support for your bicycles without the need for wall or ceiling installation. Here are a few floor stand storage options to consider:
- Freestanding Bike Racks: Freestanding bike racks are standalone structures that can hold multiple bikes in an upright position. They typically feature a sturdy base and adjustable arms or hooks to accommodate different bike sizes. These racks are easy to set up and can be moved around to different locations as needed.
- Bike Stands: Bike stands, also known as bike repair stands, are versatile options for storing your bikes. They provide a stable platform to hold your bike in an elevated position, making maintenance and repairs more convenient. Bike stands often have adjustable clamps or supports to securely hold your bike while ensuring its stability.
- Gravity Stands: Gravity stands are popular for their simplicity and ease of use. They rely on a weighted base and a hanger arm to hold your bike in place. With a gravity stand, you can simply lean your bike against the support arm, and the weight of the bike keeps it stable. These stands are ideal for garages or indoor spaces where you can lean the bikes against a wall for added stability.
When selecting a floor stand storage option, consider the number of bikes you need to store, the available floor space, and the stability of the stand. Make sure the stand is made from durable materials and offers adequate support for the weight of your bikes.
Floor stand storage options are a great choice if you want quick and easy access to your bikes without the need for installation. They can be placed in various locations, including your garage, basement, or even your living room, making it convenient to grab your bike and go whenever you’re ready to ride.
Consider using a wall-mounted bike rack to store bicycles off the ground and save space. This will help protect the bikes from damage and keep them organized.
Read more: How To Store A Bicycle For Winter
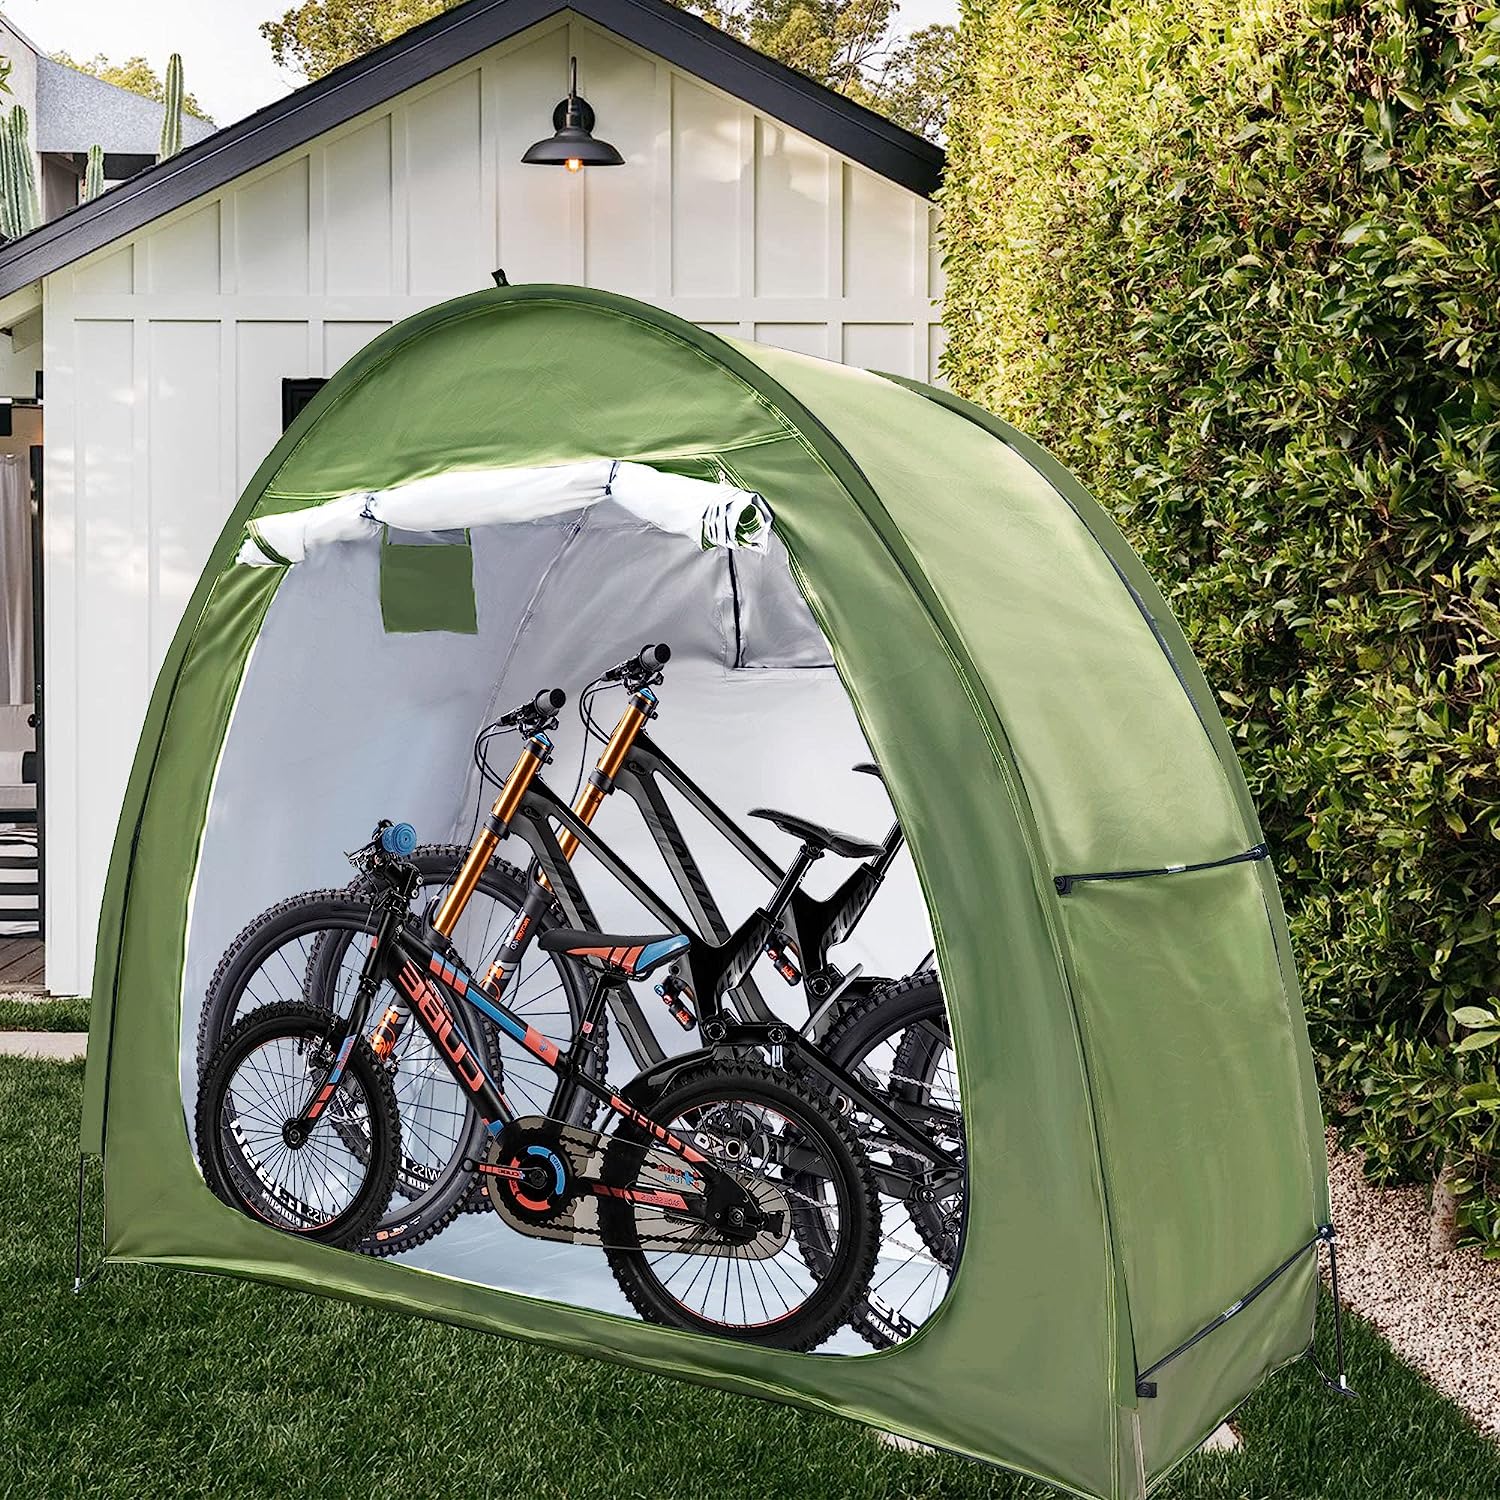
Outdoor Bicycle Storage Solutions
If you don’t have enough indoor space or prefer to store your bikes outside, there are several outdoor storage solutions available to protect your bicycles from the elements. Here are a few options to consider:
- Bike Sheds: Bike sheds are specially designed outdoor storage units that provide a secure and weather-resistant space for your bikes. They come in various sizes and styles and are made from durable materials such as steel, wood, or plastic. Bike sheds offer protection against rain, sun, and theft, keeping your bikes safe and in good condition.
- Bike Lockers: Bike lockers are individual storage units that offer enclosed protection for your bikes. These lockers typically feature a solid construction with a lockable door, ensuring the safety and security of your bikes. Bike lockers are a great option for apartment complexes, workplaces, or shared outdoor spaces.
- Bike Hoops: Bike hoops, also known as bike racks or bike stands, are commonly found in public spaces and can be installed in your own outdoor area as well. These structures allow you to lock your bike securely with a bike lock, keeping it upright and stable. Bike hoops come in various designs and can accommodate multiple bikes.
When considering outdoor storage solutions, it’s important to choose a location that provides some level of protection from the elements. Placing your bikes under a roof, near a wall, or in a shaded area can help shield them from direct sunlight, rain, and other weather conditions. Additionally, using a bike cover can provide an extra layer of protection against dust, debris, and UV rays.
Remember to lock your bikes securely using high-quality locks, such as U-locks or chain locks, to deter theft attempts. Consider anchoring storage units or racks to the ground for added security.
Outdoor bicycle storage solutions are suitable if you lack indoor space or prefer to keep your bikes outside for easy access. They offer protection against the elements and help maintain the overall condition and lifespan of your bicycles.
Bike Covers
When it comes to protecting your bike from the elements, one accessory that can be incredibly helpful is a bike cover. Bike covers are designed to shield your bicycle from rain, snow, UV rays, dust, and other outdoor elements. Here’s why using a bike cover is a smart choice for preserving your bike:
- Weather Protection: Bike covers are made from waterproof or water-resistant materials that provide a barrier against rain, snow, and moisture. This helps prevent rust and corrosion on metal parts, as well as damage to sensitive components such as gears and brakes.
- UV Protection: Exposure to direct sunlight can cause the paint on your bike to fade and deteriorate over time. A bike cover with UV protection helps shield your bike from harmful UV rays, preserving its vibrant colors and finish.
- Dust and Debris Protection: When bikes are left uncovered outdoors, they can accumulate dust, dirt, and other debris. These particles can find their way into moving parts, affecting performance and causing unnecessary wear. A bike cover keeps your bike clean and free from unwanted debris.
- Security: Using a bike cover adds an extra layer of security by concealing your bike from prying eyes. It can help deter theft attempts as potential thieves are less likely to target a covered bike compared to a visible one.
- Easy to Use and Store: Bike covers are lightweight and easily foldable, making them convenient for transportation and storage. They can be quickly slipped on and off your bike, allowing for effortless protection whenever needed.
When choosing a bike cover, consider the size and dimensions of your bike to ensure a proper fit. Look for covers that have elasticized hems or adjustable straps to secure it tightly around your bike, preventing it from blowing off in windy conditions.
It’s important to note that bike covers are not a substitute for proper indoor or sheltered storage. If possible, it’s still best to store your bikes indoors or in a covered area. However, for short-term outdoor storage or when access to indoor storage is limited, a bike cover can provide valuable protection.
Investing in a high-quality bike cover is a small investment that can go a long way in preserving the appearance, functionality, and lifespan of your bicycle.
Maintenance Tips for Storing Bicycles
Proper maintenance is crucial to keep your bikes in optimal condition, even while they are in storage. Here are some essential maintenance tips to follow when storing your bicycles:
- Clean and Dry: Before storing your bikes, give them a thorough cleaning to remove dirt, grime, and any residue. Use a mild detergent and water, along with a soft brush or cloth, to clean the frame, wheels, and components. Once clean, ensure that the bikes are completely dry to prevent rust and corrosion.
- Lubricate Moving Parts: Apply lubricant to the chain, derailleur, shifters, and other moving parts of your bike. This helps prevent rust and keeps the components functioning smoothly. Be sure to wipe off any excess lubricant to avoid attracting dirt and grit.
- Tire Maintenance: Check and inflate the tires to the recommended pressure before storing your bikes. This helps prevent flat spots and maintains proper tire shape. It’s also a good idea to rotate the position of the wheels occasionally during storage to avoid prolonged pressure on one spot.
- Suspension Forks and Shocks: If your bike has suspension forks or shocks, make sure to clean and lubricate them according to the manufacturer’s guidelines. This will help maintain their performance and prevent damage while in storage.
- Protective Measures: Consider using frame protectors or foam tubing to protect your bike frame from scratches or dings. These can be applied to areas that come into contact with walls or other surfaces during storage.
- Battery Maintenance (E-Bikes): If you have an e-bike with a removable battery, remove it before storing. Keep the battery in a cool and dry place, and ensure it is adequately charged to prolong its lifespan.
- Regular Inspection: Throughout the storage period, periodically check your bikes for any signs of damage or wear. Look for loose bolts, cables, or any other issues that may require attention. Addressing these concerns promptly can help prevent further damage or safety hazards.
Remember, it’s important to periodically take your bikes out of storage and give them a proper inspection and maintenance routine. This ensures that they are in good working condition and ready to hit the road when you’re ready to ride again.
By following these maintenance tips, you can ensure the longevity and performance of your bikes while they are in storage, allowing you to enjoy many more rides in the future.
Conclusion
Storing your bicycles properly is essential for maintaining their condition and extending their lifespan. By choosing the right storage space and utilizing the appropriate storage solutions, you can keep your bikes organized, protected, and easily accessible. Whether you opt for wall mount storage, ceiling mount storage, floor stand storage, or outdoor storage options, each solution offers its own benefits and considerations.
Wall mount storage options are ideal for saving floor space and adding a stylish element to your living area or garage. Ceiling mount storage solutions maximize storage space by utilizing the often-unused area above your head. Floor stand storage options provide convenience and accessibility, keeping your bikes on the ground and easy to grab when you’re ready to ride. Outdoor storage solutions, such as bike sheds or bike lockers, offer protection from the elements when indoor storage is not feasible.
Additionally, using a bike cover adds an extra layer of protection, shielding your bike from rain, UV rays, dust, and debris. Regular maintenance, including cleaning, lubrication, and tire inflation, is crucial for preventing rust, corrosion, and other issues that may arise during storage.
Remember, each bike is unique, and finding the right storage solution may require some experimentation and customization. Consider your available space, accessibility needs, and the number of bikes you need to store when selecting the appropriate storage options.
By following the guidelines and tips outlined in this guide, you can ensure that your bicycles remain in top-notch condition while they are in storage. So, prepare your storage space, choose the best storage solution for your needs, and with proper maintenance, your bikes will be ready for countless enjoyable rides in the future!
Frequently Asked Questions about How To Store Bicycles
Was this page helpful?
At Storables.com, we guarantee accurate and reliable information. Our content, validated by Expert Board Contributors, is crafted following stringent Editorial Policies. We're committed to providing you with well-researched, expert-backed insights for all your informational needs.


0 thoughts on “How To Store Bicycles”