Articles
How To Store Arepas
Modified: January 5, 2024
Learn the best techniques for storing homemade arepas in this helpful article. Keep your arepas fresh and delicious for longer with these simple tips and tricks.
(Many of the links in this article redirect to a specific reviewed product. Your purchase of these products through affiliate links helps to generate commission for Storables.com, at no extra cost. Learn more)
Introduction
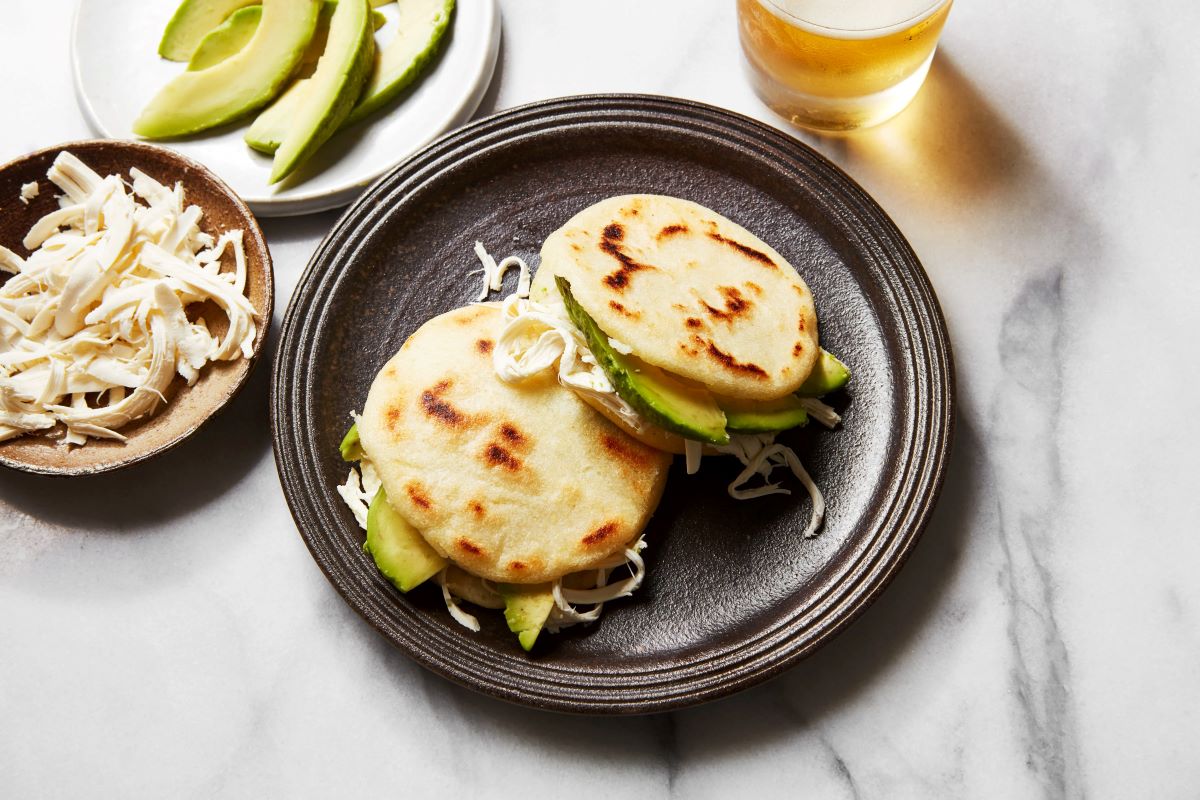
Are you a fan of Arepas? These delicious stuffed corn cakes are a staple in Latin American cuisine. Whether you enjoy them for breakfast, lunch, or dinner, one thing is for sure – they are incredibly satisfying.
If you’ve ever made a batch of homemade Arepas, you know that they can take some time and effort to prepare. So, what do you do if you have leftover Arepas or want to make a large batch in advance? The answer is simple – store them properly.
In this article, we will guide you on how to store Arepas to ensure their freshness and flavor is preserved. By following our tips, you can enjoy these delectable treats even when you’re short on time.
Key Takeaways:
- Store Arepas by wrapping them individually in plastic wrap or separate bags, then sealing in an airtight container. Refrigerate for short-term or freeze for long-term storage to maintain their freshness and flavor.
- Thaw and reheat stored Arepas properly to retain their texture and crispness. Follow essential tips for labeling, choosing proper storage containers, and checking for freshness before consuming.
Read more: How To Store Store-Bought Bread
Ingredients for Arepas
Before delving into the storage process, let’s quickly go over the basic ingredients needed to make Arepas:
- 2 cups pre-cooked cornmeal (also known as masa harina)
- 1 ½ cups warm water
- ½ teaspoon salt
- 1 tablespoon vegetable oil
These simple ingredients form the foundation of authentic homemade Arepas. Now, let’s move on to the step-by-step guide on making Arepas.
Key Takeaways:
- Store Arepas by wrapping them individually in plastic wrap or separate bags, then sealing in an airtight container. Refrigerate for short-term or freeze for long-term storage to maintain their freshness and flavor.
- Thaw and reheat stored Arepas properly to retain their texture and crispness. Follow essential tips for labeling, choosing proper storage containers, and checking for freshness before consuming.
Read more: How To Store Store-Bought Bread
Ingredients for Arepas
Before delving into the storage process, let’s quickly go over the basic ingredients needed to make Arepas:
- 2 cups pre-cooked cornmeal (also known as masa harina): This special type of corn flour is essential for making Arepas. It has a fine texture and is made from corn that has been cooked and ground.
- 1 ½ cups warm water: The warm water is used to hydrate the cornmeal and form the dough. It helps bind the ingredients together and create a smooth and pliable texture.
- ½ teaspoon salt: Salt is added to enhance the flavor of the Arepas. It gives them a savory taste that complements various fillings.
- 1 tablespoon vegetable oil: Vegetable oil is used to lightly coat the Arepas before cooking. It helps crisp up the outer layer and adds a touch of richness.
These simple ingredients form the foundation of authentic homemade Arepas. You can find pre-cooked cornmeal, such as masa harina, in most grocery stores or online. With these ingredients ready, let’s move on to the step-by-step guide on making Arepas.
Step-by-Step Guide to Making Arepas
Now that we have all the necessary ingredients, let’s dive into the process of making Arepas:
- Combine the cornmeal and salt: In a mixing bowl, whisk together the pre-cooked cornmeal (masa harina) and salt.
- Add the warm water: Gradually pour the warm water into the cornmeal mixture while stirring. Continue mixing until you obtain a dough-like consistency. If the dough feels too dry, add a little more water.
- Knead the dough: Transfer the dough to a clean surface and knead it for 2-3 minutes until it becomes smooth and pliable. This step helps activate the gluten in the cornmeal, giving the Arepas a better texture.
- Let the dough rest: Shape the dough into a ball and cover it with a clean kitchen towel. Allow it to rest for about 10-15 minutes. This resting time allows the cornmeal to fully absorb the moisture, making the dough easier to work with.
- Divide and shape the dough: After the resting period, divide the dough into equal-sized portions. Roll each portion into a ball and then flatten it to form a disc shape. You can make the Arepas as thick or thin as you prefer.
- Cook the Arepas: Heat a non-stick skillet or griddle over medium heat. Lightly brush the surface with vegetable oil. Place the Arepas on the skillet and cook for about 4-5 minutes on each side, or until golden brown. You can also bake the Arepas in a preheated oven at 350°F (175°C) for 15-20 minutes.
- Remove from heat and let them cool: Once cooked, transfer the Arepas to a wire rack or plate and allow them to cool completely before storing.
Now that you have freshly made Arepas, it’s time to move on to the storage process.
Store arepas in an airtight container or resealable plastic bag in the refrigerator for up to 3 days. You can also freeze them for up to 3 months, just make sure to wrap them tightly in plastic wrap or aluminum foil.
Cooking Arepas
Cooking Arepas is an essential step in the preparation process to ensure they are crispy on the outside and soft on the inside. Here’s a detailed guide on how to cook Arepas:
- Choose your cooking method: Arepas can be cooked on a stovetop using a skillet or griddle, or they can be baked in the oven. Both methods yield delicious results, so choose whichever is more convenient for you.
- Prepare the cooking surface: If you’re using a stovetop, preheat a non-stick skillet or griddle over medium heat. If you prefer baking them in the oven, preheat it to 350°F (175°C).
- Lightly oil the cooking surface: Before placing the Arepas onto the skillet, lightly brush the surface with vegetable oil. This helps prevent sticking and adds a touch of flavor to the Arepas.
- Cook the Arepas: Gently place the Arepas onto the preheated skillet or griddle. Cook them for about 4-5 minutes on each side, or until they turn golden brown. If you’re baking them in the oven, place them on a baking sheet lined with parchment paper and bake for 15-20 minutes, flipping halfway through.
- Check for doneness: To ensure the Arepas are fully cooked, you can insert a toothpick or skewer into the center. If it comes out clean and without any raw dough, then the Arepas are ready.
- Let them cool: Once the Arepas are cooked, transfer them to a wire rack or plate and allow them to cool completely. This step is crucial before storing them to prevent condensation that can make them soggy.
Cooking Arepas requires a bit of patience and attention, but the end result is definitely worth it. The golden, crispy exterior and soft, fluffy interior make for a delightful eating experience. Now it’s time to move on to storing the cooked Arepas to ensure their freshness.
Read more: How To Store Basil From Grocery Store
Storing Arepas
If you have leftover Arepas or want to make a large batch in advance, it’s important to store them properly to maintain their freshness and flavor. Here are some guidelines to follow when storing Arepas:
- Cool them completely: Before storing Arepas, make sure they have cooled down completely. Hot or warm Arepas can create condensation inside the storage container, making them soggy.
- Wrap individually: To prevent the Arepas from sticking together, wrap each Arepa individually in plastic wrap or place them in separate food storage bags.
- Seal in an airtight container: After wrapping each Arepa, place them in an airtight container or resealable plastic bag. This helps to maintain their freshness and prevents moisture from getting in.
- Refrigerate for short-term storage: If you plan to consume the Arepas within a few days, store them in the refrigerator. Properly stored Arepas can stay fresh in the refrigerator for up to 3-4 days.
- Freeze for long-term storage: If you want to store the Arepas for a longer period, freezing is the best option. Place the individually wrapped Arepas in a freezer-safe bag or container, and they can be stored in the freezer for up to 2-3 months.
When you’re ready to enjoy the stored Arepas, follow the appropriate thawing method. If you refrigerated them, simply let them come to room temperature before reheating. For frozen Arepas, thaw them overnight in the refrigerator and then reheat using your preferred method.
Properly stored Arepas can maintain their texture and taste, allowing you to enjoy them just as if they were freshly made. Whether you’re saving leftovers or preparing ahead of time, storing Arepas ensures you can savor the deliciousness whenever you want.
Next, let’s take a look at some essential tips for properly storing Arepas.
Tips for Properly Storing Arepas
To ensure your Arepas stay fresh and delicious, here are some handy tips for properly storing them:
- Allow them to cool completely: It’s essential to let your Arepas cool down completely before storing them. This helps prevent condensation and keeps them from becoming soggy.
- Wrap them individually: To prevent the Arepas from sticking together, wrap each one individually in plastic wrap or place them in separate food storage bags. This also makes it easier to take out and thaw only the number of Arepas you want.
- Label and date: If you’re storing Arepas in the freezer, label the container or bag with the date of storage. This will help you keep track of their freshness and ensure you use them within the recommended time.
- Use proper storage containers: Opt for airtight containers or resealable bags to store your Arepas. These containers will keep out air, moisture, and unpleasant odors, preserving the texture and flavor of the Arepas.
- Choose freezer-safe packaging: If you plan to freeze your Arepas, ensure that the containers or bags you use are specifically designed for freezer storage. These will provide an extra layer of protection against freezer burn and help maintain the quality of the Arepas.
- Keep them separate from fillings: If you plan to store Arepas that are already filled, it’s best to store the fillings separately. Fillings can sometimes become soggy when stored for a long period, so store them in separate containers and fill the Arepas before serving.
- Thaw properly: When you’re ready to enjoy your stored Arepas, it’s important to thaw them properly. If you refrigerated them, simply let them come to room temperature before reheating. For frozen Arepas, thaw them overnight in the refrigerator and then reheat using your preferred method.
- Reheat gently: To maintain the desired texture and crispy exterior, it’s recommended to reheat Arepas gently. You can use a skillet, toaster oven, or even an air fryer to warm them up. Avoid microwaving, as it can make them soft and less enjoyable.
- Check for freshness: Before consuming your stored Arepas, check for any signs of spoilage, such as an unpleasant odor or mold. If they don’t look or smell right, it’s best to discard them and make a fresh batch.
By following these tips, you can ensure that your Arepas stay fresh, flavorful, and ready to enjoy whenever you’re craving them. Properly stored Arepas will bring you the same joy as freshly made ones, even after days or weeks.
Now that you’re equipped with the knowledge of storing Arepas, you can confidently prepare and store them for future enjoyment. Whether you have leftovers or want to plan ahead, you can always have a supply of delicious Arepas on hand.
Conclusion
Storing Arepas properly is essential to maintain their freshness and flavor. By following the steps and tips provided in this article, you can enjoy homemade Arepas even when you have leftovers or want to make them in advance.
First off, ensure you have all the necessary ingredients for making Arepas, such as pre-cooked cornmeal, warm water, salt, and vegetable oil. With these ingredients, you can create the perfect dough and shape it into delicious Arepas.
Cooking the Arepas is just as important as storing them. You can choose between stovetop cooking or baking in the oven, both methods yielding crispy and flavorful results. Make sure to cool the cooked Arepas completely before moving on to the storage process.
When it comes to storing Arepas, follow the tips provided, including individually wrapping them in plastic wrap or separate bags to prevent sticking. Use airtight containers or freezer-safe packaging to seal in freshness. Refrigerate Arepas for short-term storage and freeze them for prolonged storage.
Thaw the Arepas properly before reheating, whether in the refrigerator or at room temperature. Gently heat them up to retain their texture and crispness. Always check for freshness before consuming stored Arepas.
By following these guidelines, you can ensure that your Arepas stay delicious and ready to enjoy whenever you desire. Whether you’re enjoying them as a quick meal on busy days or serving them to guests, properly stored Arepas will bring satisfaction and a taste of Latin American cuisine to your table.
Now, armed with the knowledge of how to store Arepas, you can confidently prepare and enjoy this flavorful treat whenever you please. So go ahead, make a batch of Arepas, store any leftovers, and indulge in the goodness at your convenience.
Cheers to tasty Arepas and happy storing!
Frequently Asked Questions about How To Store Arepas
Was this page helpful?
At Storables.com, we guarantee accurate and reliable information. Our content, validated by Expert Board Contributors, is crafted following stringent Editorial Policies. We're committed to providing you with well-researched, expert-backed insights for all your informational needs.


0 thoughts on “How To Store Arepas”