Articles
How To Store Fermented Vegetables
Modified: February 28, 2024
Learn how to properly store fermented vegetables with our informative articles. Discover the best methods and tips to keep your veggies fresh and flavorful for longer.
(Many of the links in this article redirect to a specific reviewed product. Your purchase of these products through affiliate links helps to generate commission for Storables.com, at no extra cost. Learn more)
Introduction
Fermented vegetables have been a staple in many traditional diets for thousands of years. This ancient preservation technique not only helps to extend the shelf life of vegetables, but it also enhances their flavor and nutritional value. With the resurgence of interest in natural and probiotic-rich foods, more and more people are discovering the joys of making and storing fermented vegetables at home.
There are numerous benefits to incorporating fermented vegetables into your diet. Firstly, the fermentation process increases the availability of nutrients in the vegetables, making them easier to digest and absorb. Fermented vegetables are also packed with beneficial bacteria, enzymes, and organic acids that promote gut health and support the immune system. Additionally, they can add a burst of vibrant flavors and unique textures to your meals.
Before you embark on your fermentation journey, it’s important to choose the right vegetables. Opt for fresh, organic produce whenever possible, as the quality and taste of your final product depend on the quality of the ingredients. Leafy greens like cabbage, kale, and spinach are popular choices, as well as crunchy vegetables like carrots, cucumbers, and radishes. You can also experiment with different combinations to create your own signature blend.
Preparing the vegetables for fermentation is a critical step. Start by washing and chopping them into the desired size and shape. For cabbage, remove the tough outer leaves and core, then slice or shred the remaining leaves. Vegetables like carrots and radishes can be cut into thin rounds or julienne strips. The goal is to create uniform pieces that will ferment evenly.
Key Takeaways:
- Fermenting vegetables at home not only enhances flavor but also provides a plethora of health benefits, from improved digestion to immune system support. Embrace the art of fermentation for a flavorful and nutritious culinary adventure.
- Proper preparation, seasoning, and storage are essential for successful fermentation. Experiment with different vegetables and flavors, and savor the probiotic goodness of homemade fermented vegetables in diverse culinary creations.
Read more: How To Store A Scoby
Benefits of Fermented Vegetables
Fermented vegetables offer a wide range of health benefits that make them a valuable addition to your diet. Here are some of the key benefits of incorporating fermented vegetables into your meals:
- Promotes Digestive Health: Fermented vegetables are rich in probiotics, which are beneficial bacteria that support a healthy gut flora. These probiotics can aid in digestion, improve nutrient absorption, and promote a balanced and efficient digestive system.
- Boosts Immune System: The fermented vegetables’ beneficial bacteria stimulate the production of antibodies and activate immune cells, thereby strengthening your immune system’s response. This can help defend against common illnesses and infections.
- Anti-Inflammatory Properties: Fermented vegetables contain a range of organic acids such as lactic acid, acetic acid, and butyric acid. These acids have anti-inflammatory properties and help reduce inflammation in the body, which is linked to various chronic conditions.
- Enhances Nutrient Absorption: The fermentation process breaks down complex nutrients into simpler forms, making them easier for your body to absorb. This means that the vitamins, minerals, and antioxidants present in the vegetables become more bioavailable, providing your body with a wider range of nutrients.
- Improves Digestive Enzymes: Fermentation increases the activity of digestive enzymes in vegetables, making them more readily digestible. This can be particularly beneficial for individuals with digestive issues or those who have difficulty breaking down certain foods.
- Aids Weight Management: By supporting a healthy gut flora and enhancing nutrient absorption, fermented vegetables can help maintain a healthy weight and improve metabolism. The fiber in the vegetables also adds bulk to the diet, promoting feelings of fullness and reducing cravings.
- Preserves Food: Fermenting vegetables is a natural preservation method that allows you to extend their shelf life without the need for artificial additives or preservatives. This can help reduce food waste and ensure a steady supply of nutrient-rich vegetables throughout the year.
Overall, incorporating fermented vegetables into your diet provides a wide range of health benefits, from improved digestion and enhanced immune function to increased nutrient absorption and weight management support. Plus, they add a burst of flavor and variety to your meals, making them a delicious and nutritious addition to any meal.
Choosing the Right Vegetables for Fermentation
When it comes to fermenting vegetables, choosing the right ones is crucial for achieving the best flavor and texture in your final product. Here are some tips to help you select the ideal vegetables for fermentation:
- Freshness: Start with fresh, high-quality vegetables. Look for produce that is firm, without any signs of wilting or decay. Ideally, choose organic vegetables to avoid any pesticides or chemicals that may interfere with the fermentation process.
- Texture: Crispy and crunchy vegetables work best for fermentation. Think of vegetables like cabbage, carrots, radishes, cucumbers, and bell peppers. These vegetables retain their texture and crunch even after fermentation, providing a satisfying bite in every spoonful.
- Flavor: Consider the taste of the vegetables you choose. Some vegetables, like cabbage and radishes, have a natural sweetness that develops during fermentation. Others, like onions or garlic, add a pungent or savory flavor. Experiment with different combinations of vegetables to create your desired flavor profile.
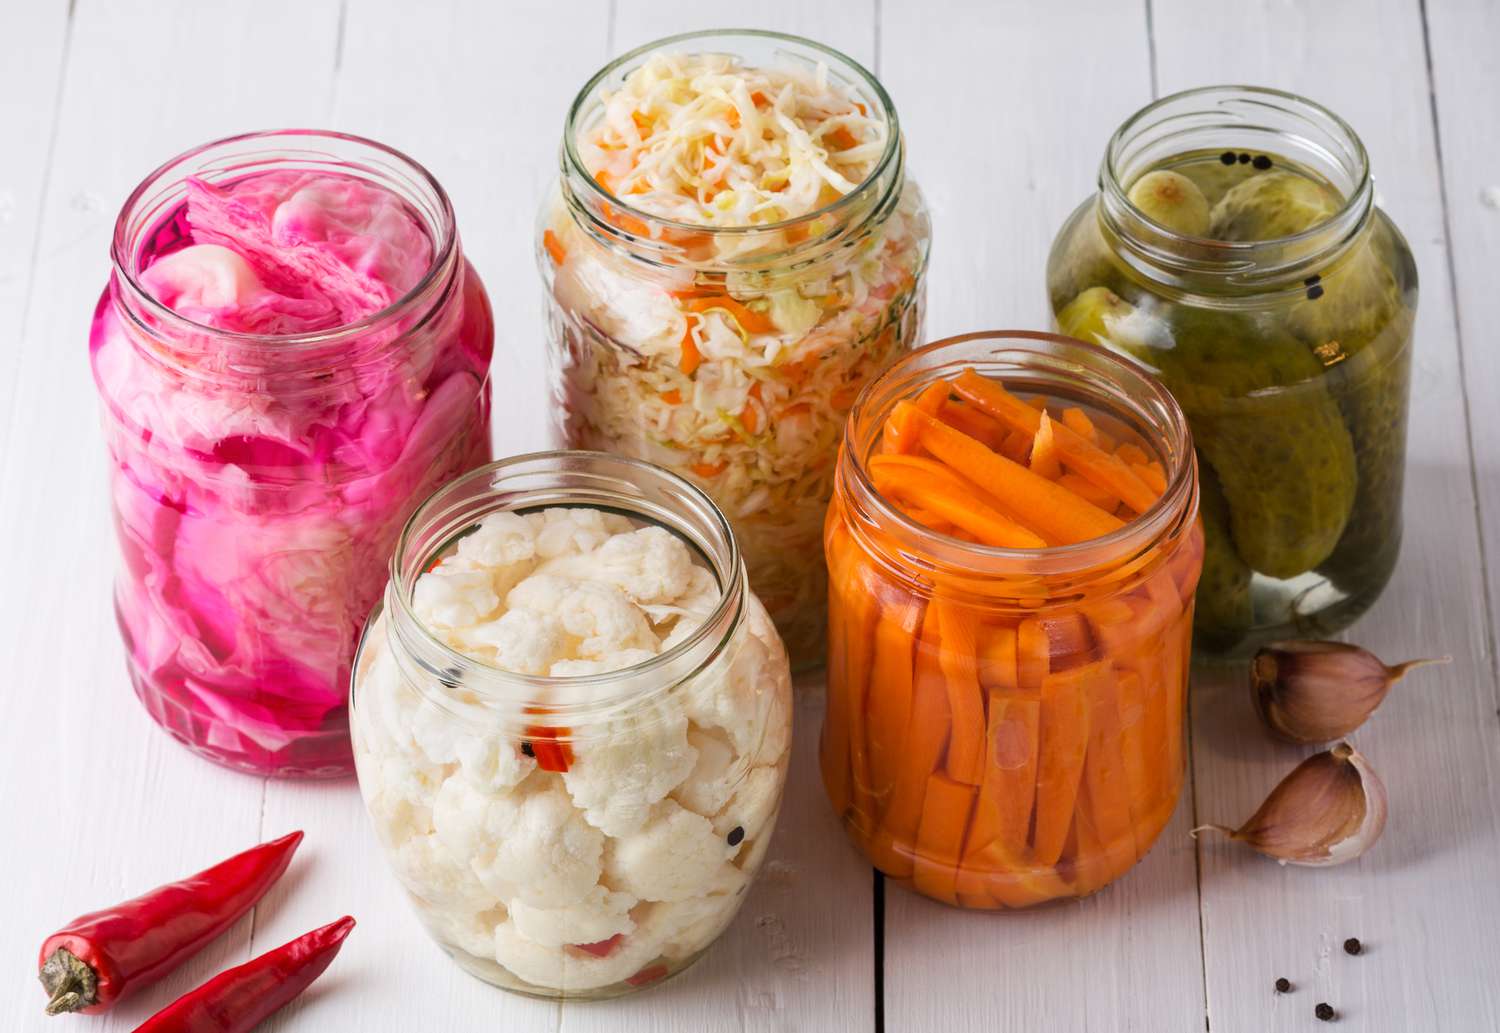
- Color: Opt for a mix of colorful vegetables to make your fermented delights visually appealing. The vibrant hues of different vegetables not only make your fermentation jars look beautiful but also indicate a variety of nutrients and antioxidants.
- Seasonality: Take advantage of seasonal produce when fermenting vegetables. Seasonal vegetables are likely to be at their peak flavor and nutritional value, making them an excellent choice for fermentation. Plus, buying in-season vegetables often means supporting local farmers and reducing your carbon footprint.
- Variety: Don’t be afraid to mix and match different vegetables. Combining contrasting flavors and textures can create a more complex and enjoyable fermented vegetable medley. Experiment with combinations like cabbage and carrots, radishes and beets, or cucumbers and dill.
- Avoid: Certain vegetables are not suitable for fermentation due to their high water content or enzymatic activity. Avoid vegetables like lettuce, zucchini, and tomatoes, as they can become mushy or lose their texture during fermentation.
Remember, the beauty of fermentation is that you can get creative and customize your blends of vegetables to suit your taste preferences. Don’t be afraid to experiment and try new combinations to discover your perfect fermented vegetable medley. Enjoy the process and the pleasure of enjoying your own homemade, probiotic-rich creations!
Preparing the Vegetables for Fermentation
Proper preparation of the vegetables is essential for successful fermentation and ensuring the best flavor and texture in your fermented vegetables. Here’s a step-by-step guide on how to prepare your vegetables for fermentation:
- Wash the Vegetables: Start by washing the vegetables thoroughly under cold running water. This helps remove any dirt, debris, or potential contaminants. Scrub root vegetables like carrots or radishes with a vegetable brush to ensure they are clean.
- Cut or Shred: Depending on the type of vegetable and your desired texture, chop or shred them into the desired size. Cabbage, for example, can be thinly sliced, shredded, or chopped into bite-sized pieces. Carrots can be cut into rounds, matchsticks, or grated. Consider the texture you want in your final product when deciding on the size and shape.
- Remove Tough Parts: For certain vegetables like cabbage, remove any outer leaves that may be tough or wilted. Trim off any tough stems or cores, as they can interfere with the fermentation process. You want to work with the freshest and most tender parts of the vegetables.
- Add Salt: Salting the vegetables is crucial for fermentation as it helps draw out the moisture and creates an environment that promotes the growth of beneficial bacteria while inhibiting the growth of harmful bacteria. Sprinkle salt over the vegetables and mix well to distribute it evenly.
- Massage or Pound: To aid in extracting moisture from the vegetables, massage or pound them gently. This process helps break down the cell walls, releasing their natural juices, and facilitating the fermentation process. Use your hands or a wooden spoon to massage or pound the vegetables until they start to soften and release some liquid.
- Wait for Brine Formation: After massaging or pounding, let the vegetables sit for some time. As they release moisture, a natural brine will start forming, which is essential for the fermentation process. This can take anywhere from 10 minutes to an hour, depending on the vegetable and the amount of salt used.
- Pack into Fermentation Vessel: Once the brine is formed, transfer the vegetables and the liquid into a clean fermentation vessel. Pack the vegetables tightly, ensuring there are no air pockets. A properly packed vessel helps create an anaerobic environment, which is necessary for fermentation.
- Submerge the Vegetables: To prevent exposure to air, it’s important to keep the vegetables submerged in the brine during fermentation. Use weights, fermentation discs, or a cabbage leaf to weigh down the vegetables and keep them under the brine. This helps prevent any mold formation on the surface.
Follow these steps to properly prepare your vegetables for fermentation, ensuring a successful and delicious batch of fermented vegetables. The next step is selecting the right fermentation vessel to continue the fermentation process.
Selecting the Right Fermentation Vessel
Choosing the right fermentation vessel is important for creating the ideal conditions for the fermentation process and ensuring the success of your homemade fermented vegetables. Here are some factors to consider when selecting a fermentation vessel:
- Material: The material of the fermentation vessel is crucial, as it can impact the flavor and safety of your fermented vegetables. Glass, ceramic, or food-grade stainless steel vessels are commonly used and are considered safe for fermentation. Avoid using containers made of reactive materials like aluminum or plastic, as they can leach chemicals into the fermentation process.
- Size: Consider the size of the vessel based on the amount of vegetables you plan to ferment. You want to choose a vessel that allows enough space for the vegetables to be packed tightly, while still leaving some headspace for fermentation gases to accumulate. A vessel that is too large can lead to excessive exposure to air, while a vessel that is too small may not accommodate all the vegetables.
- Airtightness: Look for a fermentation vessel that can be sealed tightly to create an anaerobic environment, which is essential for the fermentation process. Some vessels come with built-in airlocks or fermentation lids that allow the release of carbon dioxide gases while preventing oxygen from entering. Airtightness helps prevent mold formation and produces better fermentation results.
- Easy to Clean: Choose a vessel that is easy to clean and sanitize. It should have a wide mouth or an opening large enough to allow you to reach all corners and crevices with a cleaning brush. Avoid vessels with complicated or hard-to-reach parts that may harbor bacteria or residue from previous fermentations.
- Transparency: Opt for a transparent or translucent fermentation vessel, such as glass, that allows you to monitor the fermentation process without the need to open the vessel. This way, you can observe the changes in color, texture, and bubbles to gauge the progress of fermentation without risking contamination.
- Weighted Options: Some fermentation vessels come with built-in weights or mechanisms to keep the vegetables submerged in the brine. These weighted options can be convenient and help ensure that all the vegetables stay below the brine level throughout the fermentation process. However, if your chosen vessel doesn’t have this feature, you can use fermentation weights or improvised methods like sterilized rocks or fermentation discs to keep the vegetables submerged.
Consider these factors when selecting your fermentation vessel to create an optimal and safe environment for your fermented vegetables. Remember, investing in a high-quality fermentation vessel is a worthwhile investment to ensure the success and deliciousness of your homemade fermented creations.
Read more: How To Store Wines
Preparing the Brine Solution
A brine solution is a key component of the fermentation process as it provides the necessary moisture and creates an environment that promotes the growth of beneficial bacteria while inhibiting the growth of harmful bacteria. Here’s a step-by-step guide on how to prepare the brine solution for fermenting your vegetables:
- Measurements: Start by determining the ratio of salt to water for your brine solution. A common ratio is 2 tablespoons of salt per quart (950 ml) of water. You can adjust the amount of salt based on your taste preference, but be cautious not to use too little, as it may lead to spoilage, or too much, as it may hinder fermentation.
- Water: Use filtered water or tap water that has been left out overnight to allow any chlorine or other chemicals to evaporate. It’s important to use non-chlorinated water, as chlorine can inhibit the fermentation process and negatively affect the flavor of the vegetables.
- Heat the Water: Heat a portion of the water in a saucepan until it reaches a gentle simmer. This step helps dissolve the salt and ensures that it is evenly distributed in the brine solution. Avoid boiling the water, as excessive heat can kill the beneficial bacteria.
- Add Salt: Once the water is simmering, add the measured salt into the saucepan. Stir the mixture continuously until the salt is completely dissolved. This may take a few minutes. Avoid using iodized salt, as the iodine can interfere with the fermentation process and discolor the vegetables.
- Cool the Brine Solution: Remove the saucepan from the heat and let the brine solution cool completely. You can speed up the cooling process by placing the saucepan in an ice bath or transferring the brine solution to a heat-safe container and refrigerating it until it reaches room temperature.
- Optional Flavorings: At this stage, you can add optional flavorings to enhance the taste of your fermented vegetables. Common flavorings include herbs, spices, garlic, ginger, or chili flakes. Infusing the brine solution with these flavorings adds depth and complexity to your final product.
- Note the Salinity: It’s important to note the salinity level of your brine solution, as it helps ensure a favorable fermentation environment. Using a hydrometer or a digital refractometer, measure the salinity of the brine solution, aiming for around 2-3% salt concentration. This will help prevent spoilage and encourage the growth of beneficial bacteria.
Following these steps will result in a properly prepared brine solution that provides the necessary moisture and optimal environment for the fermentation process. The next step is to add the seasoning and flavoring to enhance the taste of your fermented vegetables.
Adding Seasoning and Flavoring to Your Fermented Vegetables
One of the great things about fermenting vegetables is the ability to infuse them with a wide range of flavors and seasonings. Adding seasoning and flavoring not only enhances the taste of your fermented vegetables but also adds depth and complexity to your final product. Here are some tips for adding seasoning and flavoring to your fermented vegetables:
- Herbs and Spices: Experiment with different herbs and spices to create a unique flavor profile. Common options include dill, coriander seeds, mustard seeds, black peppercorns, turmeric, cumin, or fennel seeds. The choice of herbs and spices can vary based on personal preference and the type of vegetables being fermented.
- Garlic and Ginger: Garlic and ginger are classic additions to fermented vegetables as they add a delicious savory and aromatic flavor. Chop or slice fresh garlic cloves and ginger pieces and distribute them among the vegetables before adding the brine solution. Adjust the quantity according to your taste preference.
- Chili Heat: If you enjoy spicy foods, adding chili flakes or fresh chili peppers to your fermented vegetables can provide a delightful kick. Experiment with different types of chili peppers, such as jalapenos, serranos, or habaneros, to achieve your desired level of heat.
- Fermented South East Asian Flavors: To create a vibrant and tangy flavor, consider adding Southeast Asian-inspired ingredients like lemongrass, lime zest, or kaffir lime leaves. These additions can give your fermented vegetables a refreshing and citrusy twist.
- Sweetness: For a touch of sweetness, you can add a small amount of natural sweeteners like honey or maple syrup, or even fruits like apples or pears. Keep in mind that too much sweetness can affect the fermentation process, so use these ingredients sparingly.
- Experiment and Customize: Don’t be afraid to get creative and customize your flavorings based on your preferences and culinary inspirations. Feel free to try new combinations and explore unique flavors that you enjoy. The beauty of fermenting vegetables is the ability to experiment and create flavors that suit your taste.
When adding seasoning and flavoring to your fermented vegetables, it’s important to distribute the ingredients evenly among the vegetables to ensure consistent flavor throughout. You can sprinkle the herbs, spices, and other seasonings on top of the packed vegetables or mix them in with the vegetables before adding the brine solution.
Remember, the flavor intensity will develop and change during the fermentation process. Start with a moderate amount of seasoning and allow the flavors to develop over time. Taste your fermented vegetables periodically during the fermentation process and adjust the seasonings if needed.
Adding seasoning and flavoring is a fun and creative part of fermenting vegetables. It allows you to tailor the flavors to your preferences and create unique combinations that will add a burst of taste to your homemade fermented vegetables.
Store fermented vegetables in airtight containers in the refrigerator to slow down the fermentation process and preserve their flavor and texture. Make sure to use clean utensils to prevent contamination.
Pack the Vegetables into the Fermentation Vessel
Once you have prepared your vegetables and chosen your seasoning and flavorings, it’s time to pack them into the fermentation vessel. Properly packing the vegetables is crucial for ensuring even fermentation and creating a flavorful and crunchy end result. Follow these steps to pack your vegetables into the fermentation vessel:
- Prepare the Fermentation Vessel: Ensure that your fermentation vessel is clean and sanitized. Wash it with hot soapy water or run it through the dishwasher to remove any potential contaminants. Rinse well to remove any soap residue.
- Add Vegetables Gradually: Begin by adding a small amount of vegetables to the fermentation vessel. Take handfuls of the prepared vegetables and gently pack them into the vessel. Avoid cramming or squishing the vegetables too tightly, as this can hinder the fermentation process.
- Press Firmly: As you add more vegetables, press them down firmly to eliminate any air pockets and create a tightly packed layer. Use your hands, a kitchen utensil, or a clean fermentation weight to apply even pressure. This helps create an anaerobic environment and ensures that the vegetables remain submerged in the brine.
- Alternate Layers: If you are fermenting different types of vegetables or adding flavorings, create alternating layers. For example, you can layer sliced cabbage, shredded carrots, and garlic cloves. This helps distribute the flavors evenly and creates a visually appealing final product.
- Add Brine Solution: Slowly pour the prepared brine solution into the fermentation vessel, ensuring that the vegetables are completely submerged. Leave some headspace at the top to allow room for the buildup of fermentation gases. The brine solution should cover the vegetables by at least 1 inch (2.5 cm).
- Weigh Down the Vegetables: To keep the vegetables submerged in the brine during fermentation, use fermentation weights, a sterilized cabbage leaf, or a fermentation disc. Place the weight on top of the vegetables to ensure they stay below the brine level. This helps prevent the growth of mold and creates an optimal fermentation environment.
- Seal the Vessel: If your fermentation vessel has an airtight lid or airlock, secure it tightly to create a sealed environment. This allows for the release of carbon dioxide produced during fermentation while preventing the entry of oxygen, which can hinder the fermentation process.
Remember, the key is to achieve a tightly packed vessel with the vegetables completely submerged in the brine solution. This creates the ideal environment for fermentation and ensures the development of complex flavors and textures in your fermented vegetables.
After packing the vegetables, it’s time to start the fermentation process. Place the vessel in a cool, dark place and allow the magic of fermentation to begin. Be patient and keep an eye on the progress of fermentation by observing the color, bubbles, and texture changes. The fermentation timeline will depend on the vegetables and ambient temperature, so follow a recipe or check the vegetables regularly to determine their readiness.
Fermentation Process and Timeline
The fermentation process is a natural and transformative journey that converts your fresh vegetables into tangy, probiotic-rich delights. Understanding the fermentation process and its timeline can help you ensure the successful and delicious completion of your homemade fermented vegetables. Here’s a general overview of the fermentation process and its timeline:
- Initial Stage: In the first few days of fermentation, the vegetables undergo an anaerobic fermentation process. Lactic acid bacteria, naturally present on the vegetables and in the environment, start to multiply and convert the sugars in the vegetables into lactic acid. This drop in pH helps create an environment that preserves the vegetables and inhibits the growth of harmful bacteria.
- Bubbling and Activity: During the fermentation process, you may notice bubbles or fizziness in the brine. This is a sign of the active fermentation taking place. It indicates that the lactic acid bacteria are thriving, producing carbon dioxide as a byproduct. The level of bubbling can vary depending on the temperature and the vegetables being fermented.
- Flavor Development: As the fermentation progresses, the flavor of the vegetables will transform. The tangy and slightly acidic taste of fermentation develops gradually over time. The length of fermentation will impact the intensity of the flavor. Taste your fermented vegetables periodically to determine your preferred level of tanginess.
- Tenderness and Texture: The texture of the vegetables will also change during fermentation. Over time, the vegetables may become softer and more tender. This can vary depending on the type of vegetables used and personal preference. Fermented vegetables can maintain some crunch or become fully softened during fermentation.
- Fermentation Timeline: The duration of fermentation can range from a few days to several weeks, depending on various factors such as the types of vegetables, ambient temperature, and desired flavor profile. A general guideline is to ferment for at least 3-7 days initially, but you can ferment for longer if you prefer a stronger flavor or if the ambient temperature is cooler.
- Monitoring the Fermentation: Throughout the fermentation process, it’s important to monitor your fermented vegetables for any signs of spoilage or undesirable changes. Keep an eye out for mold growth, foul smells, or slimy textures, which may indicate a problem. If anything seems off, it’s best to discard the batch and start again with fresh vegetables and proper hygiene practices.
- Refrigeration and Aging: Once your fermented vegetables have reached your desired level of tanginess and texture, it’s time to slow down the fermentation process by placing them in the refrigerator. The lower temperature helps preserve the flavor and texture while maintaining the probiotic benefits. Fermented vegetables can continue to mellow and develop in flavor even while stored in the refrigerator.
Keep in mind that the fermentation process and timeline can vary depending on factors like temperature, salt concentration, and personal taste preferences. It’s always recommended to taste and assess your fermented vegetables regularly to ensure they are fermenting to your liking. Remember, experimentation and observation are key to achieving the perfect balance of flavors and textures in your homemade fermented vegetables.
Read more: How To Store Hennessy
Checking for Readiness and Troubleshooting
Checking for readiness and troubleshooting during the fermentation process ensures that your homemade fermented vegetables turn out delicious and safe to consume. Here are some tips for assessing the readiness of your fermented vegetables and troubleshooting common issues:
- Visual Inspection: Observe the appearance of your fermented vegetables. The color of the vegetables may change during fermentation, with some vegetables becoming more vibrant and others turning slightly duller. Look for any signs of mold growth, sliminess, or off-putting odors, as these may indicate spoilage.
- Taste Test: Taste your fermented vegetables to determine if they have reached your desired level of tanginess. The flavor should be pleasantly tangy, slightly acidic, and have a depth of flavor from the seasonings and seasonings used. If the taste is too mild, continue fermenting for a longer period. Conversely, if the taste is overly sour, you may have fermented for too long.
- Texture Check: Assess the texture of the fermented vegetables. They should have a tender, yet slightly crisp texture. The vegetables should not be overly soft or mushy. If the texture is not to your liking, you can adjust the fermentation time in future batches to achieve your preferred consistency.
- Gas Release: Listen for a “pop” or hissing sound when opening the fermentation vessel. This indicates that carbon dioxide gas has been released during fermentation, providing a satisfying auditory confirmation of the fermenting process.
- Deal with Mold: If you notice mold growth on the surface of your fermented vegetables, it’s important to take action to prevent further contamination. Remove the moldy portion along with some surrounding vegetables, making sure you remove all traces of the mold. Re-weigh the remaining vegetables to ensure they stay submerged in the brine, and continue fermenting if the majority of the batch is unaffected.
- Prevent Softening: If your fermented vegetables are turning out too soft, it could be due to insufficient salt or improper packing. Ensure that you’re using the correct salt-to-water ratio for the brine solution and that the vegetables are adequately packed to expel air and maintain texture.
- Adjusting Brine Level: If the brine level drops below the vegetables during fermentation, you can make a brine solution (using the same salt-to-water ratio) and carefully add it to the vessel to bring the level back up. Just ensure the brine solution is cooled to room temperature before adding it to avoid disrupting the fermentation process.
- Start Again If Needed: If you notice persistent problems such as a foul smell, sliminess, or an off taste, it’s best to discard the batch and start anew. Troubleshooting and adjusting can be helpful, but certain issues may indicate a more serious problem that cannot be easily rectified.
Remember that every batch of fermented vegetables can be a learning experience. Documenting your observations and making adjustments along the way will help you refine your technique and achieve the perfect balance of flavors and textures in your future batches.
Enjoy the process of fermentation and embrace the delicious results of your homemade fermented vegetables. Sharing your creations with friends and family can be a wonderful way to showcase the rewards of your fermentation journey!
Storing and Preserving Fermented Vegetables
Once your fermented vegetables have reached the desired level of tanginess and texture, it’s time to store and preserve them to maintain their flavor and probiotic goodness. Follow these guidelines to ensure the longevity and enjoyment of your homemade fermented vegetables:
- Refrigeration: After the fermentation process is complete, transfer your fermented vegetables to clean, airtight containers and place them in the refrigerator. The lower temperature of the refrigerator slows down the fermentation process, preserving the flavors and textures while maintaining the beneficial bacteria.
- Labeling: Properly label your containers with the date of fermentation. This helps you keep track of the aging process and ensures that you consume the fermented vegetables within a reasonable timeframe. Most fermented vegetables can be stored in the refrigerator for several months.
- Bloating Prevention: As fermented vegetables continue to ferment in the refrigerator, some carbon dioxide gas may still be produced. To prevent excessive pressure buildup, “burp” the containers by slightly opening them every few days to release any accumulated gas. This helps prevent the containers from bloating or potentially bursting.
- Brine Storage: It’s a good practice to save some of the brine solution from your fermented vegetables. This can be useful for topping up the brine if needed when storing the vegetables long-term. Store the excess brine in a separate, clean container in the refrigerator.
- Flavor Mellowing: Over time, the flavors of fermented vegetables may mellow and become more complex. If you prefer a milder flavor, allow the fermented vegetables to age in the refrigerator for a few more weeks. However, keep monitoring their taste and consistency to ensure they don’t become overly soft or develop off flavors.
- Enjoy the Variety: Different types of fermented vegetables have varying storage times and flavor profiles. Some, like sauerkraut, kimchi, or pickles, can generally be stored for longer periods and tend to develop richer flavors over time. Others, such as lacto-fermented carrots or cucumbers, may retain more of their crunch and vibrant flavor when consumed sooner.
- Quality Check Before Consumption: Before consuming your fermented vegetables, inspect them visually and smell them to ensure that they still appear fresh and have a pleasant aroma. If you notice any signs of mold growth, sliminess, or off odors, it’s best to discard the batch to avoid any potential health risks.
Remember that the texture and flavors of fermented vegetables may continue to evolve as they age in the refrigerator. Enjoy them as a side dish, topping, or incorporation into your favorite recipes. Adding a tablespoon of fermented vegetables to your meals can provide a boost of tangy flavor and beneficial microbes.
By properly storing and preserving your fermented vegetables, you can savor their deliciousness and reap the nutritional benefits for an extended period. Remember to experiment with different vegetables and flavor combinations to keep your fermentation journey exciting and diverse.
Enjoying Your Homemade Fermented Vegetables
After the time and effort invested in fermenting your own vegetables, it’s time to sit back, savor the flavors, and enjoy the fruits of your labor. Here are some tips for maximizing your enjoyment of homemade fermented vegetables:
- Pairing Possibilities: Fermented vegetables add a delightful tang and depth of flavor to a variety of dishes. Use them as a condiment or topping to enhance sandwiches, burgers, tacos, or salads. They can also be enjoyed alongside grilled meats, as a side dish to your favorite main course, or as a flavorful addition to grain bowls or Buddha bowls.
- Creative Culinary Uses: Experiment with incorporating fermented vegetables into your recipes. Add them to omelets or frittatas, blend them into salad dressings or sauces, or use them as a filling in wraps or sushi rolls. The possibilities are endless, so let your creativity guide you.
- Probiotic Boost: Remember that homemade fermented vegetables are teeming with beneficial bacteria that promote gut health and support overall wellness. By incorporating them into your meals, you’re nourishing your body with live cultures and probiotics that can boost digestion and strengthen your immune system.
- Variety is the Spice of Life: Don’t limit yourself to just one type of fermented vegetable. Experiment with different vegetables, flavor combinations, and fermentation durations to enjoy a wide range of tastes and textures. Rotate your batches of fermented vegetables to keep your options diverse and your palate intrigued.
- Sharing and Exchanging: Share the joy of homemade fermented vegetables with family, friends, and fellow fermenting enthusiasts. Gift jars of your creations, exchange them for other homemade goods, or host a tasting party to showcase the different flavors and styles of fermented vegetables.
- Continual Learning: The art of fermentation is a lifelong learning experience. Keep experimenting, refining your techniques, and trying new recipes. Explore fermentation cookbooks, join online fermenting communities, or attend workshops to enhance your knowledge and expand your skills.
- Health and Safety Reminder: While fermented vegetables offer numerous health benefits, it’s important to remember that they are a perishable food. Always practice proper hygiene and storage techniques for your homemade fermented vegetables to ensure their safety and freshness. Trust your senses and be aware of any signs of spoilage before consuming.
Savor the complex flavors, unique textures, and nutritional benefits of your homemade fermented vegetables. Every batch is a testament to your culinary creativity and dedication to incorporating probiotic-rich foods into your diet. So, sit back, enjoy the tangy goodness, and revel in the satisfaction of a successful fermentation journey.
Bon appétit!
Conclusion
Embarking on the journey of fermenting your own vegetables is not only a rewarding endeavor but also a way to enhance your culinary skills and improve your overall well-being. With patience, creativity, and a little experimentation, you can create a wide array of homemade fermented vegetables that are packed with flavor, nutrients, and probiotics.
We have explored the benefits of fermented vegetables, the selection and preparation of the vegetables, choosing the right fermentation vessel, preparing the brine solution, adding seasonings and flavorings, packing the vegetables, and the fermentation process and timeline. Additionally, we have discussed how to check for readiness, troubleshoot any issues that may arise, properly store and preserve the fermented vegetables, and ultimately, enjoy the fruits of your labor.
Remember, the art of fermentation is both a science and an art form that allows you to unleash your creativity in the kitchen. Through the process of fermentation, you can transform simple vegetables into complex and tangy delights that brighten up your meals and provide a much-needed boost to your gut health.
Continue to learn, explore, and experiment with different vegetables, flavors, and recipes. Share your fermented creations with loved ones, exchange them with fellow fermenters, and revel in the joy of homemade probiotic goodness.
However, always prioritize safety and hygiene throughout the fermentation process. Trust your senses and be attentive to any signs of spoilage or off odors. With proper care and attention, you can confidently create delicious and wholesome fermented vegetables that nourish your body and please your taste buds.
So, roll up your sleeves, gather your vegetables, and start fermenting! Embrace the transformative power of fermentation, and enjoy the delightful, tangy, and probiotic-rich homemade fermented vegetables that will grace your table and bring a new level of taste and vibrancy to your meals.
Frequently Asked Questions about How To Store Fermented Vegetables
Was this page helpful?
At Storables.com, we guarantee accurate and reliable information. Our content, validated by Expert Board Contributors, is crafted following stringent Editorial Policies. We're committed to providing you with well-researched, expert-backed insights for all your informational needs.


0 thoughts on “How To Store Fermented Vegetables”