Articles
How To Store Garden Tools In Garage
Modified: October 28, 2024
Discover the best methods for storing your garden tools in your garage with our helpful articles. Maximize space and keep your tools organized for easy access.
(Many of the links in this article redirect to a specific reviewed product. Your purchase of these products through affiliate links helps to generate commission for Storables.com, at no extra cost. Learn more)
Introduction
Welcome to your comprehensive guide on how to effectively store garden tools in your garage. Whether you’re an avid gardener or just a casual enthusiast, having a well-organized and accessible storage system will not only help protect your tools but also make it easier for you to locate and use them when needed. With a few simple steps and some creative organization ideas, you can transform your garage into an efficient and functional space for storing your garden tools.
Before diving into the practical aspects of storing garden tools, it’s important to assess the available space in your garage. Take some time to evaluate the size, layout, and existing storage options in your garage. This will give you a better understanding of how to make the most of the available space and plan your tool storage accordingly.
Once you’ve assessed your garage space, the next step is to clean and prepare your tools for storage. Remove any dirt, debris, or rust from the tools, and make sure they are properly dried before storing. This will help prevent any damage or corrosion that can occur when tools are stored without proper cleaning. Additionally, inspect your tools for any signs of damage or wear and consider repairing or replacing them as necessary.
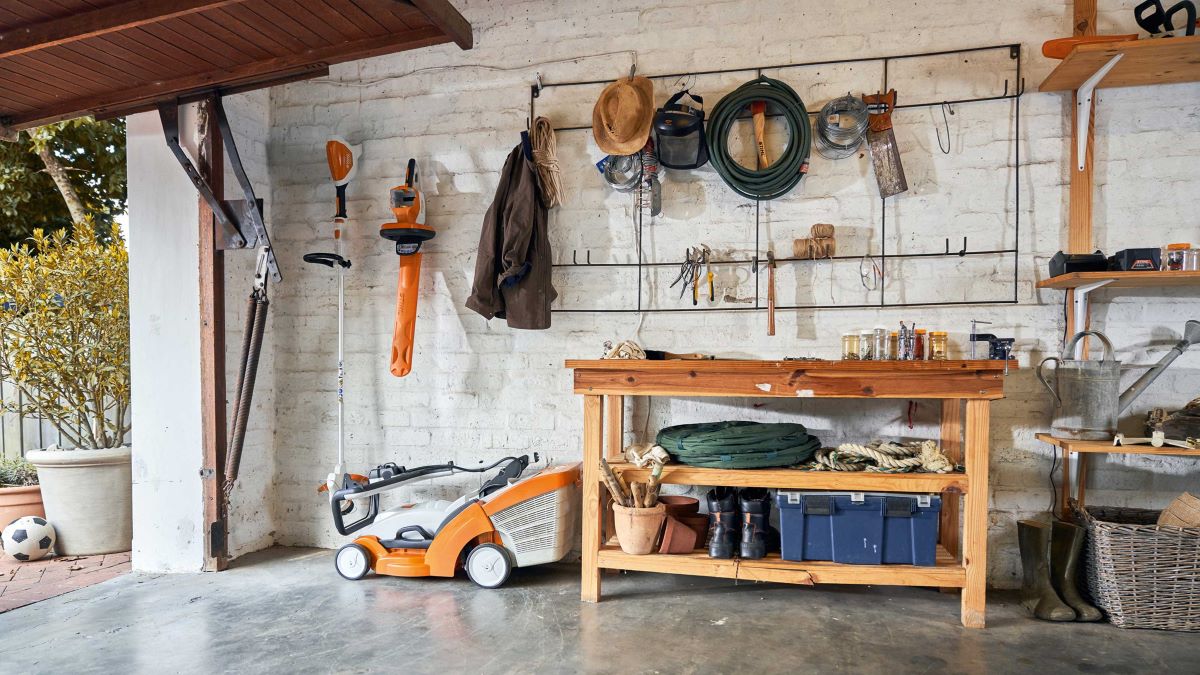
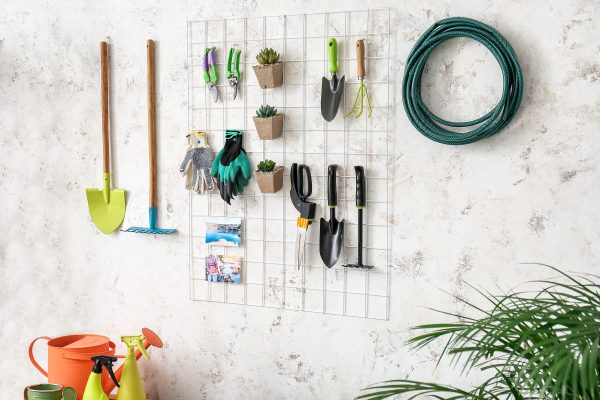
Now that your tools are clean and ready to be stored, it’s time to start organizing them. One popular and efficient method is to use a pegboard. A pegboard allows you to hang your tools on hooks, making them easily accessible and visible. You can arrange the hooks strategically to match the size and shape of each tool, ensuring a secure and organized display. Labeling the hooks or outlining the tool shapes on the pegboard can add an extra level of organization and make it even easier to find the tools you need.
In addition to a pegboard, consider utilizing wall-mounted racks and hooks for storing larger garden tools like shovels, rakes, and hoes. Wall-mounted racks can be easily installed and provide a space-saving solution for these longer tools. Hang them vertically to maximize the available space and keep them within reach. Hooks can also be used for hanging smaller items like hand trowels and pruning shears.
If you have a larger collection of garden tools or need more storage space, you may want to consider building or purchasing a garden tool storage shed. A shed offers a dedicated space for storing your tools, protecting them from the elements and keeping them secure. Selecting a shed with ample shelving, hooks, and storage compartments will help you maximize the space and keep your tools organized.
For smaller tools and accessories, storage bins and containers can be a practical solution. Opt for clear bins with lids to keep dust and moisture out while allowing you to easily identify the contents. Group similar items together, such as gloves, small hand tools, and gardening accessories, so you can quickly find what you need when working in the garden.
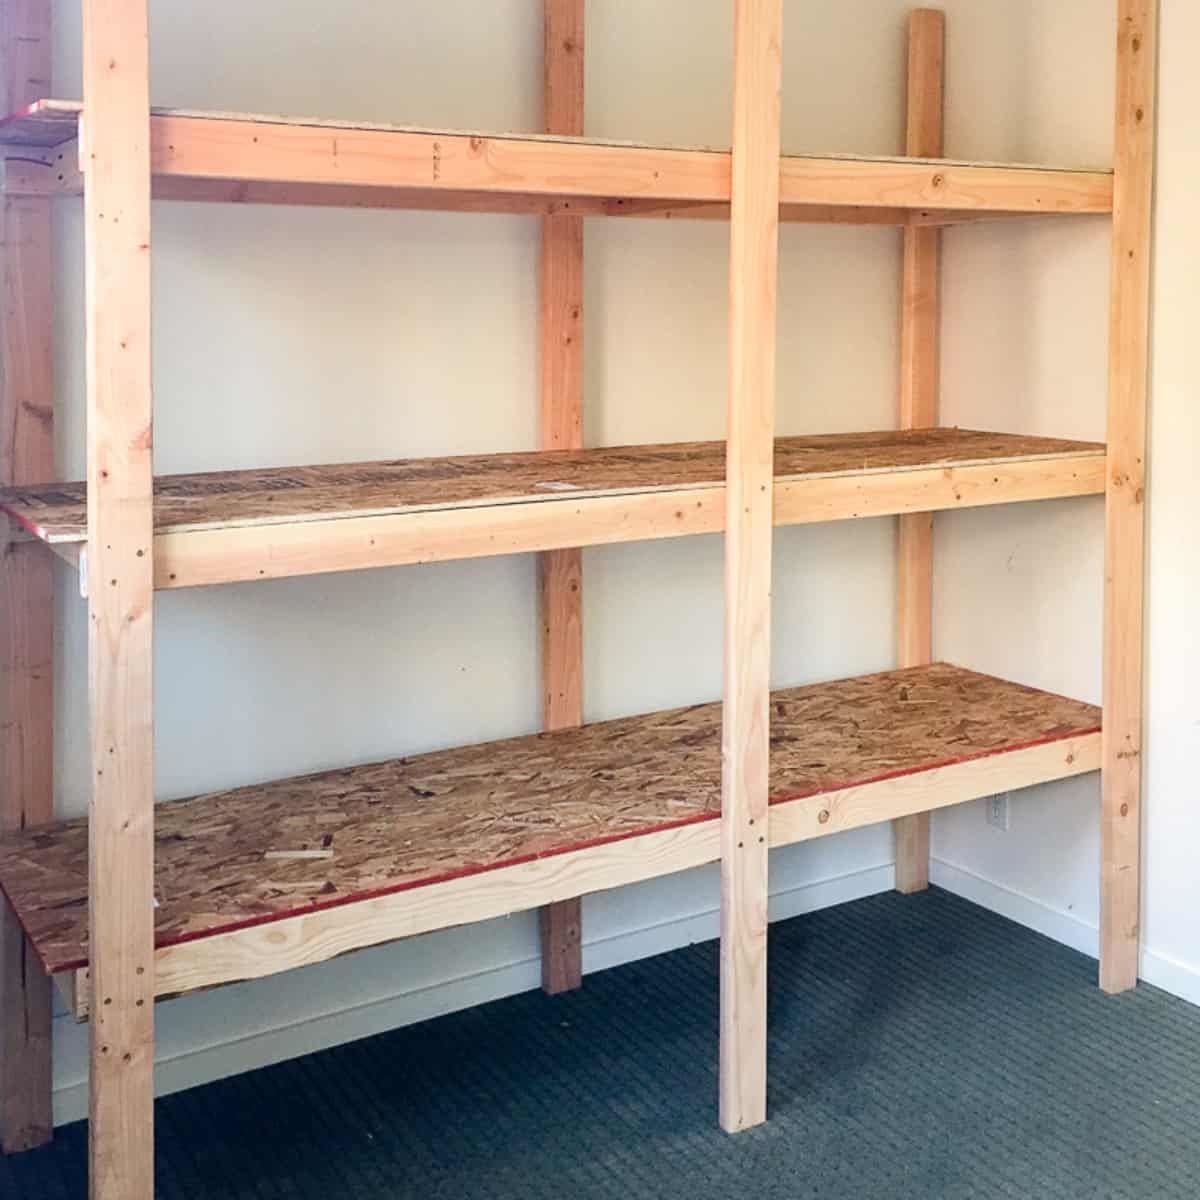
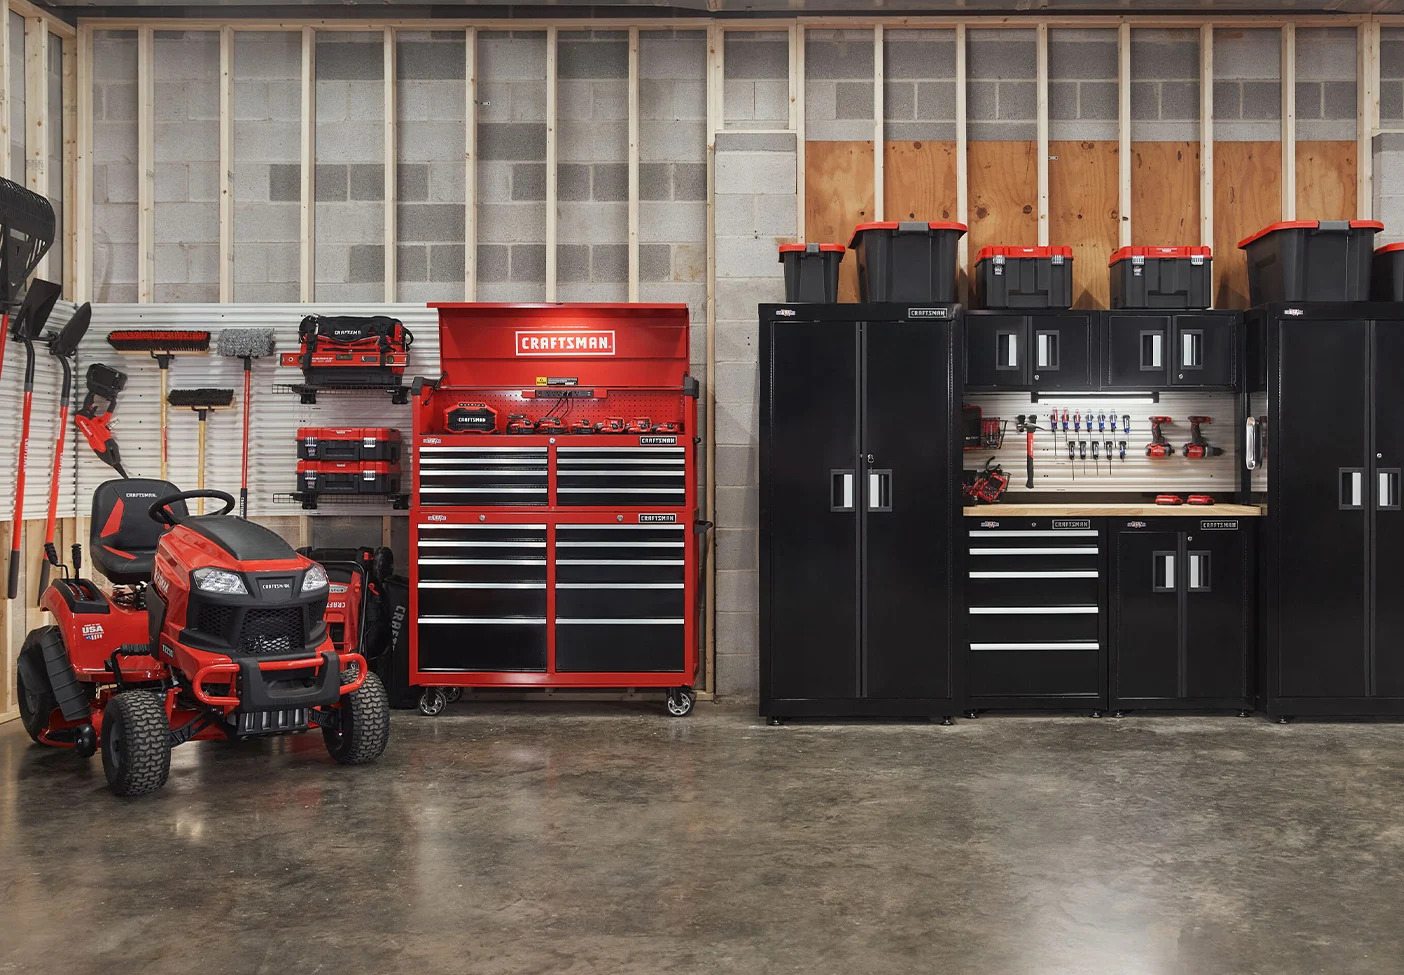
Creating a designated tool storage area within your garage can also be a great way to keep your tools organized. This can include a workbench with tool drawers or cabinets, a dedicated wall shelf, or even a rolling tool cart. Having a specific place to store and display your tools not only keeps them organized, but it also serves as a constant reminder to put them back in their designated spot after each use.
Lastly, it’s important to maintain and care for your tools regularly. Clean and dry them after each use, lubricate any moving parts, and sharpen blades as needed. Proper maintenance not only extends the lifespan of your tools but also ensures that they perform at their best when you need them.
With these tips and ideas, you’re well on your way to creating an organized and efficient tool storage system in your garage. By taking the time to assess your space, clean and prepare your tools, and utilize creative storage solutions, you’ll be able to enjoy hassle-free gardening and easily find the tools you need for each project. Happy gardening!
Key Takeaways:
- Efficiently store garden tools in your garage by utilizing wall-mounted racks, pegboards, and storage bins. Proper maintenance and care ensure tools are ready for use, making gardening tasks a breeze.
- Create a designated tool storage area in your garage to keep garden tools organized and easily accessible. Building or purchasing a garden tool storage shed provides a dedicated space for larger tool collections, protecting them from the elements.
Read more: How To Store Chainsaws In Garage
Assessing your garage space
Before you start organizing your garden tools in your garage, it’s important to assess the available space and determine the best storage solutions for your needs. Here are some key steps to take when assessing your garage space:
- Measure your garage dimensions: Start by measuring the length, width, and height of your garage. This will give you a clear idea of the space you have to work with and help you decide on the right storage options.
- Identify existing storage areas: Take note of any existing shelves, cabinets, or hooks in your garage. These can serve as valuable storage space for your garden tools. Evaluate their condition and capacity to determine if they need any repairs or upgrades.
- Clear out clutter: Remove any unnecessary items from your garage to create more space for your garden tools. Donate or discard items that you no longer use or need. This will help declutter your garage and make it easier to organize your tools effectively.
- Consider your accessibility needs: Think about how often you will need to access your garden tools and how quickly you will need to retrieve them. Plan storage solutions that allow for easy access and minimize the need to move other items or tools in order to reach them.
- Take advantage of vertical space: Look for opportunities to utilize the walls and ceiling of your garage for storage. Consider installing wall-mounted shelves, pegboards, and hooks to maximize vertical space. This will help you make the most of your available square footage.
- Assess lighting and ventilation: Adequate lighting and ventilation are important for a functional and comfortable garage space. Ensure that your work area is well-lit and properly ventilated to create a pleasant environment for working with your tools.
By carefully assessing your garage space, you can determine the right storage options for your garden tools. Remember to consider your specific needs and preferences, as well as any limitations or constraints within your garage. With a well-thought-out plan, you can create an organized and efficient storage system that will make gardening tasks a breeze.
Cleaning and preparing your tools
Before storing your garden tools in your garage, it’s important to clean and prepare them properly. This ensures that your tools are in good condition and ready for use when you need them. Follow these steps to clean and prepare your tools:
- Remove dirt and debris: Start by removing any dirt, mud, or plant debris from your tools. Use a stiff brush or a hose to scrub away the dirt. For stubborn dirt or rust spots, you can use a mixture of water and mild detergent to clean the tools.
- Dry the tools: After cleaning, make sure to thoroughly dry your tools. Moisture can lead to rust and corrosion, so it’s essential to remove all excess water. Use a clean cloth or towel to dry the tools, paying attention to hard-to-reach areas.
- Check for damage: Inspect each tool for any signs of damage or wear. Look for cracks, bent blades, or loose handles. If you notice any damage, consider repairing or replacing the tool before storing it. This will prevent further damage and ensure the tool’s effectiveness.
- Sharpen blades: If your garden tools have blades, such as pruning shears or shovels, it’s a good idea to sharpen them before storing. Sharp tools make gardening tasks easier and more efficient. Use a sharpening stone or file to restore the blades’ sharpness. Follow manufacturer instructions or seek professional help if needed.
- Oil moving parts: For tools with moving parts, such as pruners or loppers, apply a light coat of oil to prevent rust and keep the parts functioning smoothly. Use a lubricant or machine oil and apply it to the pivot points or joints of the tool.
- Organize smaller tools: For smaller hand tools, consider organizing them in a tool roll or carrying case. This helps keep the tools organized and protected from scratches and damage. Label or mark each tool compartment for easy identification.
By cleaning and preparing your garden tools before storing them, you ensure that they are in optimal condition and ready for use when you need them. Proper maintenance and care of your tools not only extend their lifespan but also contribute to smoother and more enjoyable gardening experiences. Take the time to clean, dry, inspect, and sharpen your tools, and you’ll be rewarded with efficient and reliable garden tools for years to come.
Organizing tools on a pegboard
One of the most popular and efficient ways to store and organize garden tools in your garage is by using a pegboard. A pegboard is a versatile storage solution that allows you to hang your tools on hooks, keeping them easily accessible and visible. Follow these steps to effectively organize your tools on a pegboard:
- Choose the right pegboard: Start by selecting a pegboard that suits your needs. Consider the size of your garage space and the number of tools you have. Pegboards come in various sizes, so choose one that provides enough space to accommodate all your tools.
- Prepare the pegboard: Before mounting the pegboard, ensure that it is clean and smooth. Inspect it for any imperfections or rough spots and sand them if necessary. This will prevent any damage to your tools and ensure a secure and stable mounting surface.
- Mount the pegboard: Position the pegboard on the wall where you want to install it. Use a level to ensure it is straight. Mark the positions of the mounting holes on the wall, then drill pilot holes. Attach the pegboard to the wall using screws or wall anchors, based on the type of wall and the weight of the tools.
- Organize the tools: Assess your tool collection and determine the best placement for each tool on the pegboard. Larger tools such as shovels and rakes can be hung on hooks directly, while smaller hand tools like pruning shears and trowels may benefit from using tool holders or clips to secure them. Arrange the tools based on size and frequency of use, placing the most frequently used tools within easy reach.
- Label the pegboard: To enhance organization and ease of use, consider labeling the pegboard. You can use small adhesive labels or markers to indicate where each tool should be placed. This makes it easier to find and return tools to their proper spots, minimizing the risk of misplacing or losing them.
- Add additional accessories: Pegboards offer a range of accessory options to further optimize your tool organization. Hang baskets or bins on the pegboard to store smaller items like gloves or seed packets. Attach tool holders or magnetic strips to keep frequently used items within reach. Customize your pegboard with additional hooks, shelves, or specialized holders based on your specific tool collection.
Organizing your tools on a pegboard not only keeps them easily accessible but also serves as a visual display, allowing you to quickly identify and locate the tool you need. Utilize the available space efficiently by arranging your tools strategically and making use of additional accessories for smaller items. With a well-organized pegboard system, you’ll have your garden tools neatly displayed and ready for use whenever you need them.
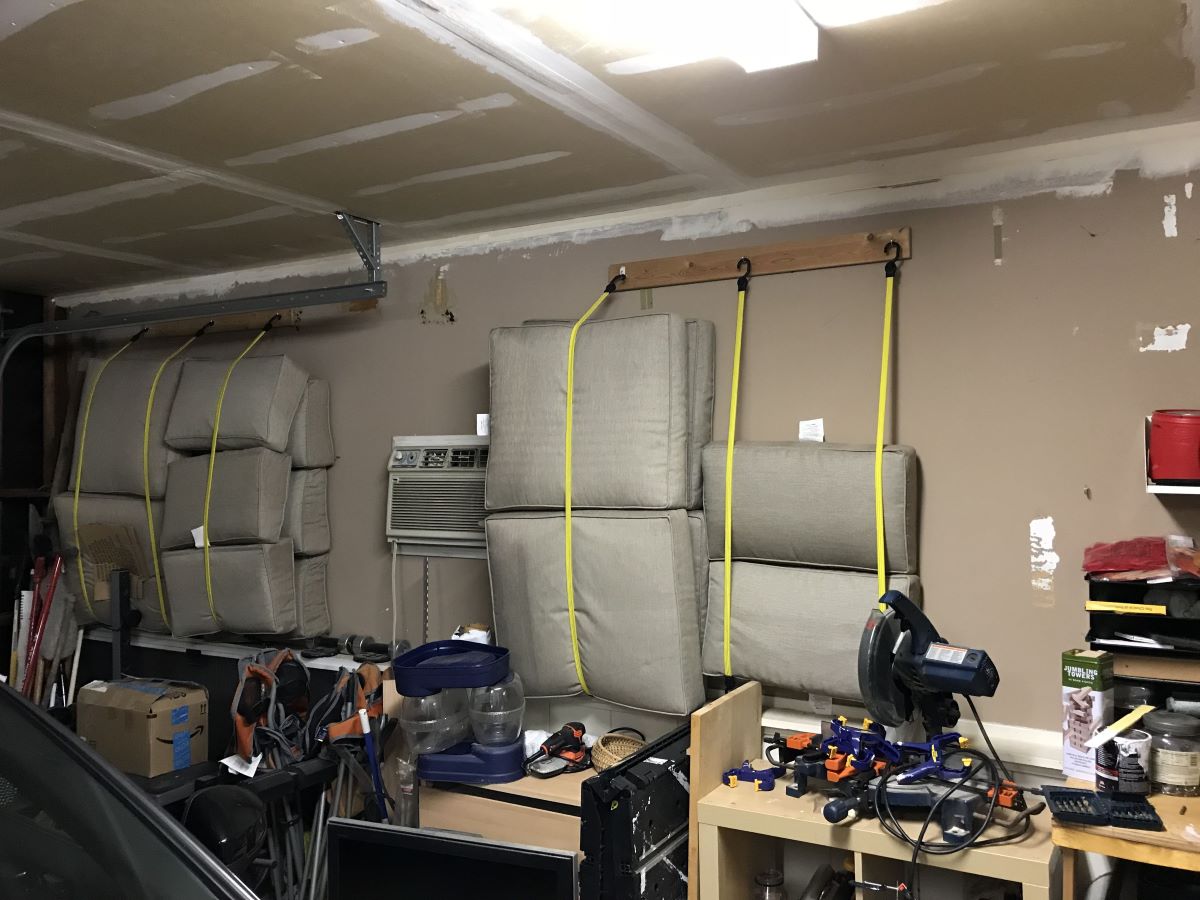
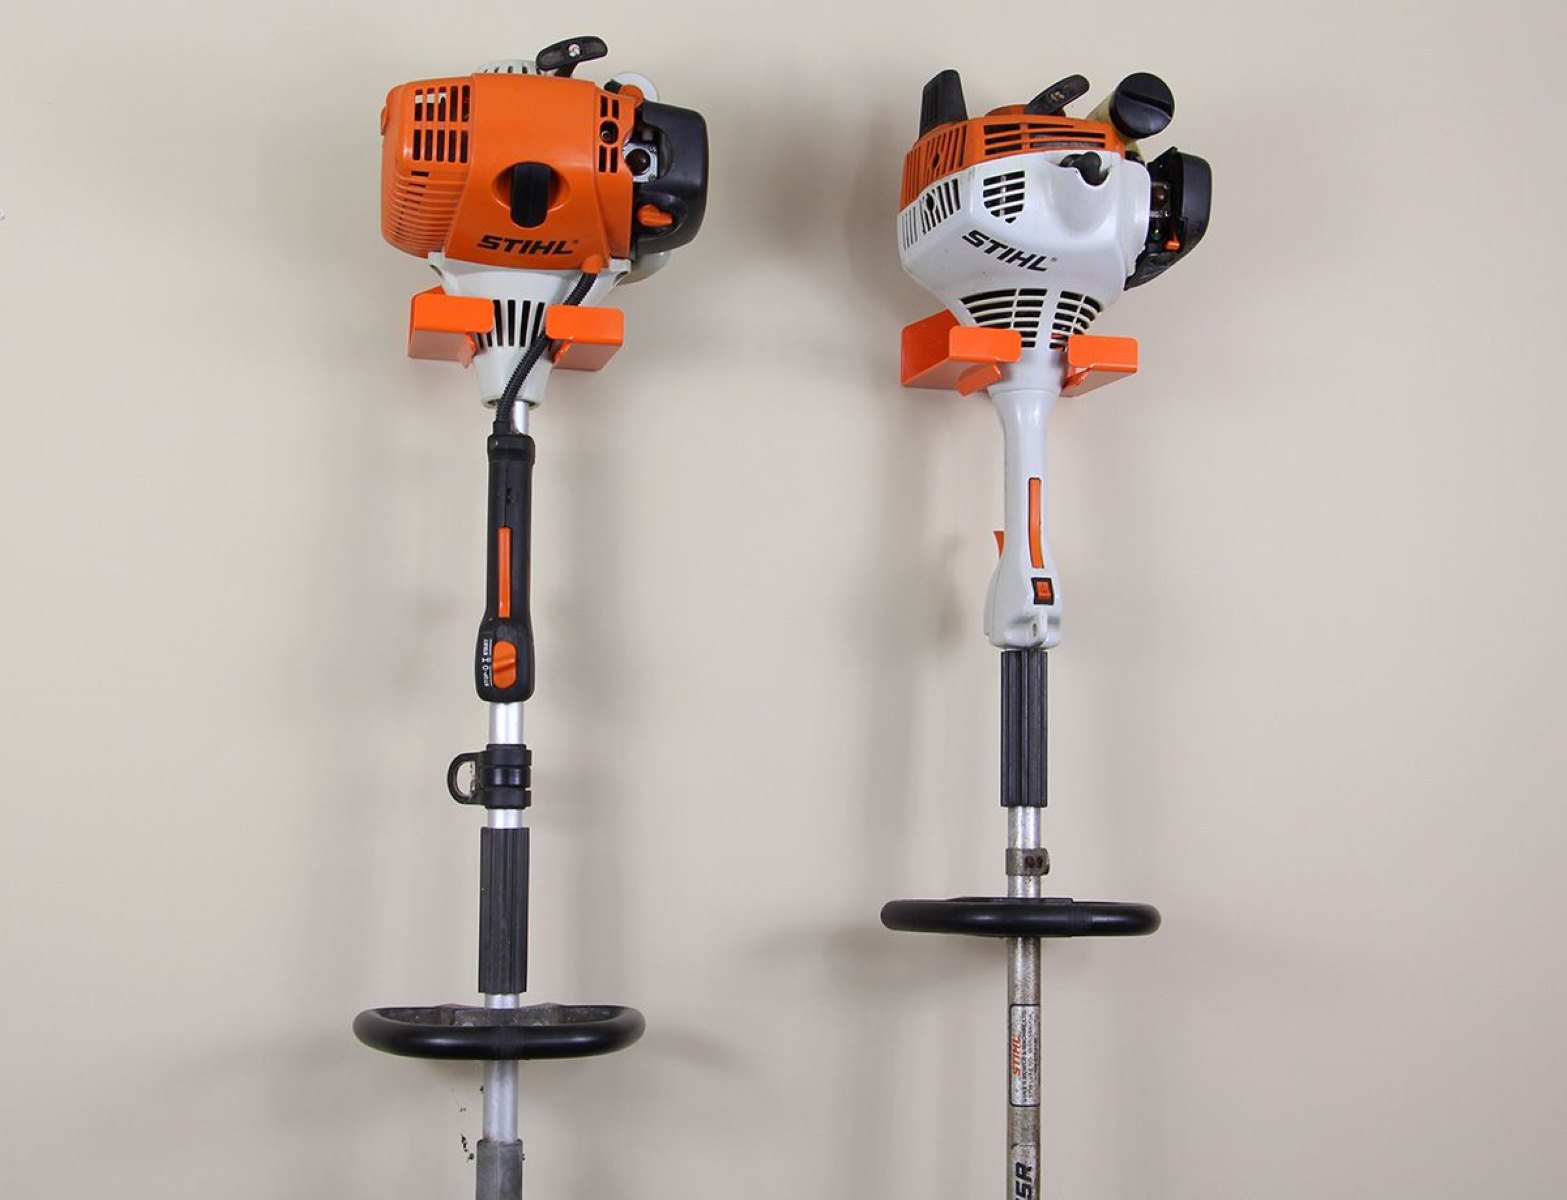
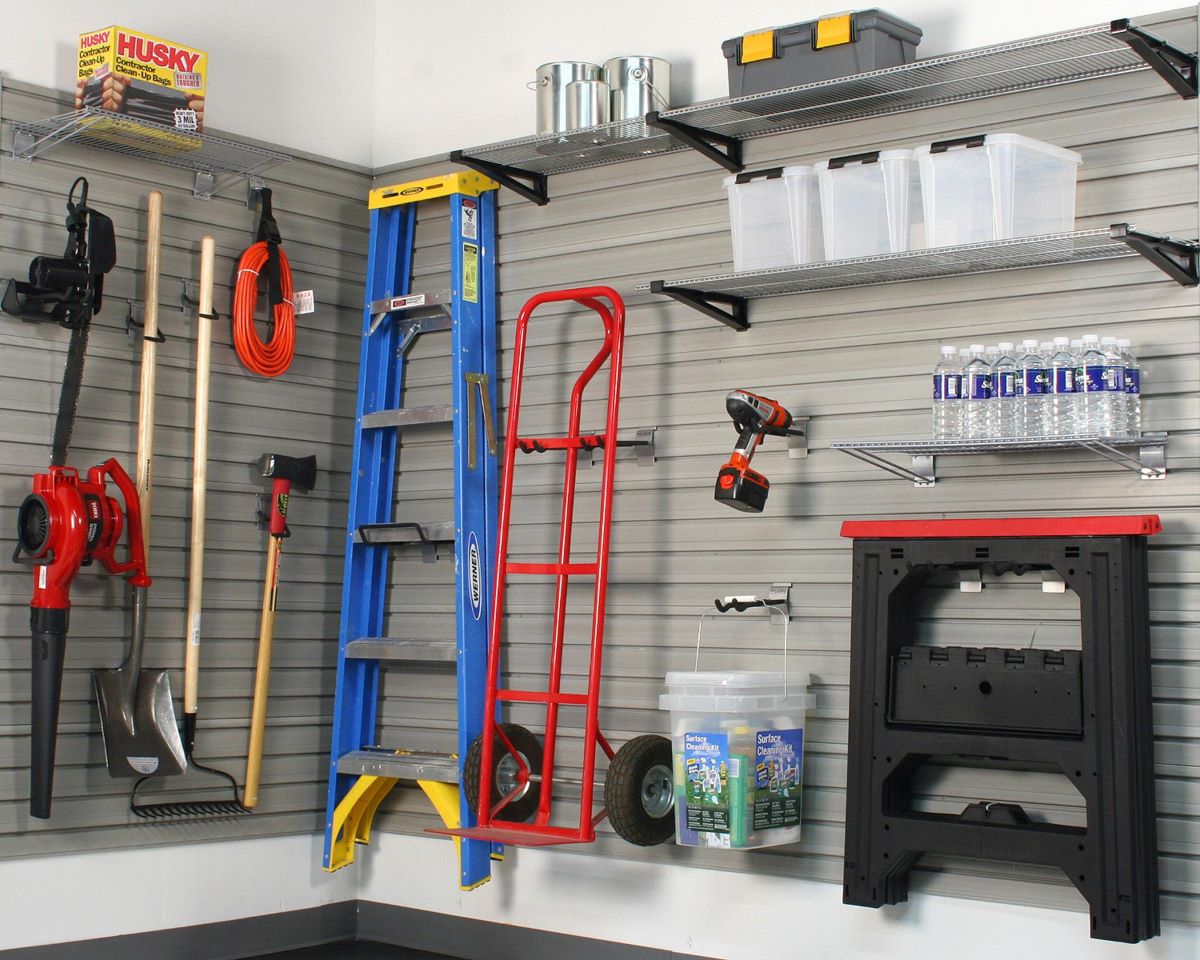
Utilizing wall-mounted racks and hooks
In addition to a pegboard, utilizing wall-mounted racks and hooks is an excellent way to store and organize your garden tools in your garage. Wall-mounted racks and hooks provide a space-saving solution for larger tools like shovels, rakes, and hoes. Follow these steps to effectively utilize wall-mounted racks and hooks:
- Select the right racks and hooks: Start by choosing the appropriate wall-mounted racks and hooks for your tools. Consider the size and weight of your tools to ensure that the racks and hooks can support them securely. Look for durable options made from sturdy materials such as steel or heavy-duty plastic.
- Plan the layout: Before installing the racks and hooks, plan the layout on your garage wall. Consider the height, accessibility, and frequency of use for each tool. Place frequently used tools within easy reach and ensure that longer tools can be hung vertically to maximize the available space.
- Prepare the wall: Ensure that the wall surface is clean and free of any obstructions. If necessary, use a stud finder to locate the wall studs for secure mounting. Mark the positions where you will install the racks and hooks, ensuring they are level and evenly spaced.
- Mount the racks and hooks: Use appropriate screws or wall anchors to mount the racks and hooks onto the wall. Make sure they are securely attached and can support the weight of your tools. Test the stability of the racks and hooks before placing any tools on them.
- Hang the tools: Once the racks and hooks are installed, hang your garden tools on them. Place larger tools like shovels, rakes, and hoes on the racks, ensuring they are positioned securely. Use hooks for smaller tools like hand trowels, pruning shears, and other handheld garden tools. Group similar tools together for easy identification and access.
- Optimize the space: To maximize the available wall space, consider using vertical hooks or brackets. These allow you to hang tools from top to bottom, making efficient use of the height of your garage. Use the top portion for longer tools and the lower portion for smaller tools.
- Label or outline: To make it even easier to find and return tools to their designated spots, consider labeling the racks and hooks. You can use adhesive labels or outline the shapes of each tool on the wall to remind you where each tool belongs. This helps maintain organization and reduces the chance of misplacing or losing tools.
By utilizing wall-mounted racks and hooks, you free up valuable floor space in your garage while keeping your garden tools easily accessible and organized. When properly installed and arranged, wall-mounted storage solutions provide a sleek and efficient way to display your tools. Take advantage of the vertical space and ensure that each tool has its designated place on the racks or hooks. With this system, you’ll have a tidy and functional garage, with your tools within reach whenever you need them.
Consider installing a pegboard or wall-mounted tool rack in your garage to keep garden tools organized and easily accessible. This will help prevent clutter and make it easier to find the tools you need when working in the garden.
Read more: How To Store Gas In Garage
Building or purchasing a garden tool storage shed
If you have a larger collection of garden tools or need more storage space, building or purchasing a garden tool storage shed is a great solution. A shed provides a dedicated space to store your tools, protecting them from the elements and keeping them secure. Follow these steps to build or purchase a garden tool storage shed:
- Determine the size and location: Start by determining the size of the shed you need. Assess the number and size of your garden tools, and consider any other items you plan to store in the shed. Find a suitable location in your yard or garden where the shed will fit comfortably without obstructing any pathways or views.
- Check local regulations: Before building a shed, check with your local authorities to ensure compliance with any building codes or regulations. You may need to obtain proper permits or follow specific guidelines for shed construction.
- Design and gather materials: If you decide to build your own shed, create a design that meets your requirements. Take into account the size of your tools, shelving needs, and any other features you desire. Gather the necessary materials for the construction, including lumber, nails, screws, roofing materials, and any other components based on your design.
- Prepare the site: Clear the area where you plan to install the shed. Ensure that the ground is level and stable. Remove any debris, vegetation, or obstacles that could interfere with the shed’s construction or stability.
- Construct the shed: If you’re building the shed yourself, follow your design and construction plan. Start by building the foundation, whether it’s a concrete slab, wooden frame, or other suitable option. Then, assemble the walls, roof, and other components according to your design. Take your time and follow proper construction techniques to ensure a sturdy and durable shed.
- Consider purchasing a shed: If DIY construction is not your preference, purchasing a pre-fabricated garden tool storage shed is an alternative option. There are a variety of sheds available on the market in different sizes, styles, and materials. Choose one that suits your needs and budget. Make sure to measure the available space in your yard or garden and select a shed that fits properly.
- Organize the interior: Once the shed is in place, organize the interior to optimize storage and accessibility. Install shelves, hooks, and racks to accommodate your gardening tools. Group similar tools together and arrange them in a logical order for easy retrieval.
- Maintain the shed: Regularly inspect and maintain your garden tool storage shed to ensure its longevity and functionality. Keep it clean, free from debris, and well-ventilated. Check for any signs of damage, such as leaks or wood rot, and address them promptly. Follow manufacturer instructions for any maintenance or repairs needed.
A garden tool storage shed provides a dedicated and secure space to store your tools, protecting them from the elements and freeing up space in your garage. Whether you choose to build your own shed or purchase a pre-fabricated one, it’s important to consider the size, location, and storage needs to ensure it meets your requirements. With a well-organized shed, you can keep your garden tools in top condition and have easy access to them whenever you need them.
Using storage bins and containers
When it comes to organizing and storing garden tools in your garage, storage bins and containers can be a practical and versatile solution. They help keep your tools protected, easily accessible, and neatly organized. Follow these steps to effectively use storage bins and containers:
- Select the right bins: Choose storage bins and containers that suit your needs and the size of your garden tools. Opt for durable bins made from materials such as plastic or metal that can withstand the garage environment. Consider clear bins with lids so you can easily see the contents.
- Group similar items: Categorize your garden tools and accessories into logical groups based on their use or function. For example, you can have separate bins for hand tools, pruning tools, gardening gloves, and fertilizers. This helps keep things organized and makes it easier to locate specific items when needed.
- Label the bins: Labeling the bins can make it even easier to find and retrieve your garden tools. Use adhesive labels or a label maker to identify the contents of each bin. Clear and descriptive labels save time and eliminate the need to search through multiple bins.
- Utilize vertical space: Make the most of vertical space by stacking the bins if possible. Stack the lighter bins on top of the heavier ones to create a stable and compact storage solution. Just make sure not to overload the bins to prevent them from becoming too heavy or unstable.
- Keep frequently used items accessible: Place the bins with frequently used items where they are easily accessible. Consider storing them near the entrance or within arm’s reach, so you can quickly grab what you need without having to sort through multiple bins.
- Use smaller containers within the bins: Consider using smaller containers or dividers within the bins to further organize your tools. This is especially useful for smaller accessories like screws, nails, or gardening gloves. It helps prevent items from getting jumbled together and keeps everything in its place.
- Maximize space with wall-mounted shelves: Install wall-mounted shelves above or near the bins to store additional tools or accessories. This increases your storage capacity while keeping items visible and within easy reach.
- Keep the bins clean and dry: Regularly clean and dry the storage bins to prevent the buildup of dirt, moisture, or mold. Wipe them down with a damp cloth if needed and ensure they are completely dry before placing your tools back inside.
By using storage bins and containers, you can create a well-organized and efficient storage system for your garden tools. Grouping similar items and labeling the bins make it easy to find and retrieve your tools when you need them. Utilize vertical space, consider smaller dividers, and maintain the cleanliness of the bins to ensure a clutter-free and functional storage solution in your garage.
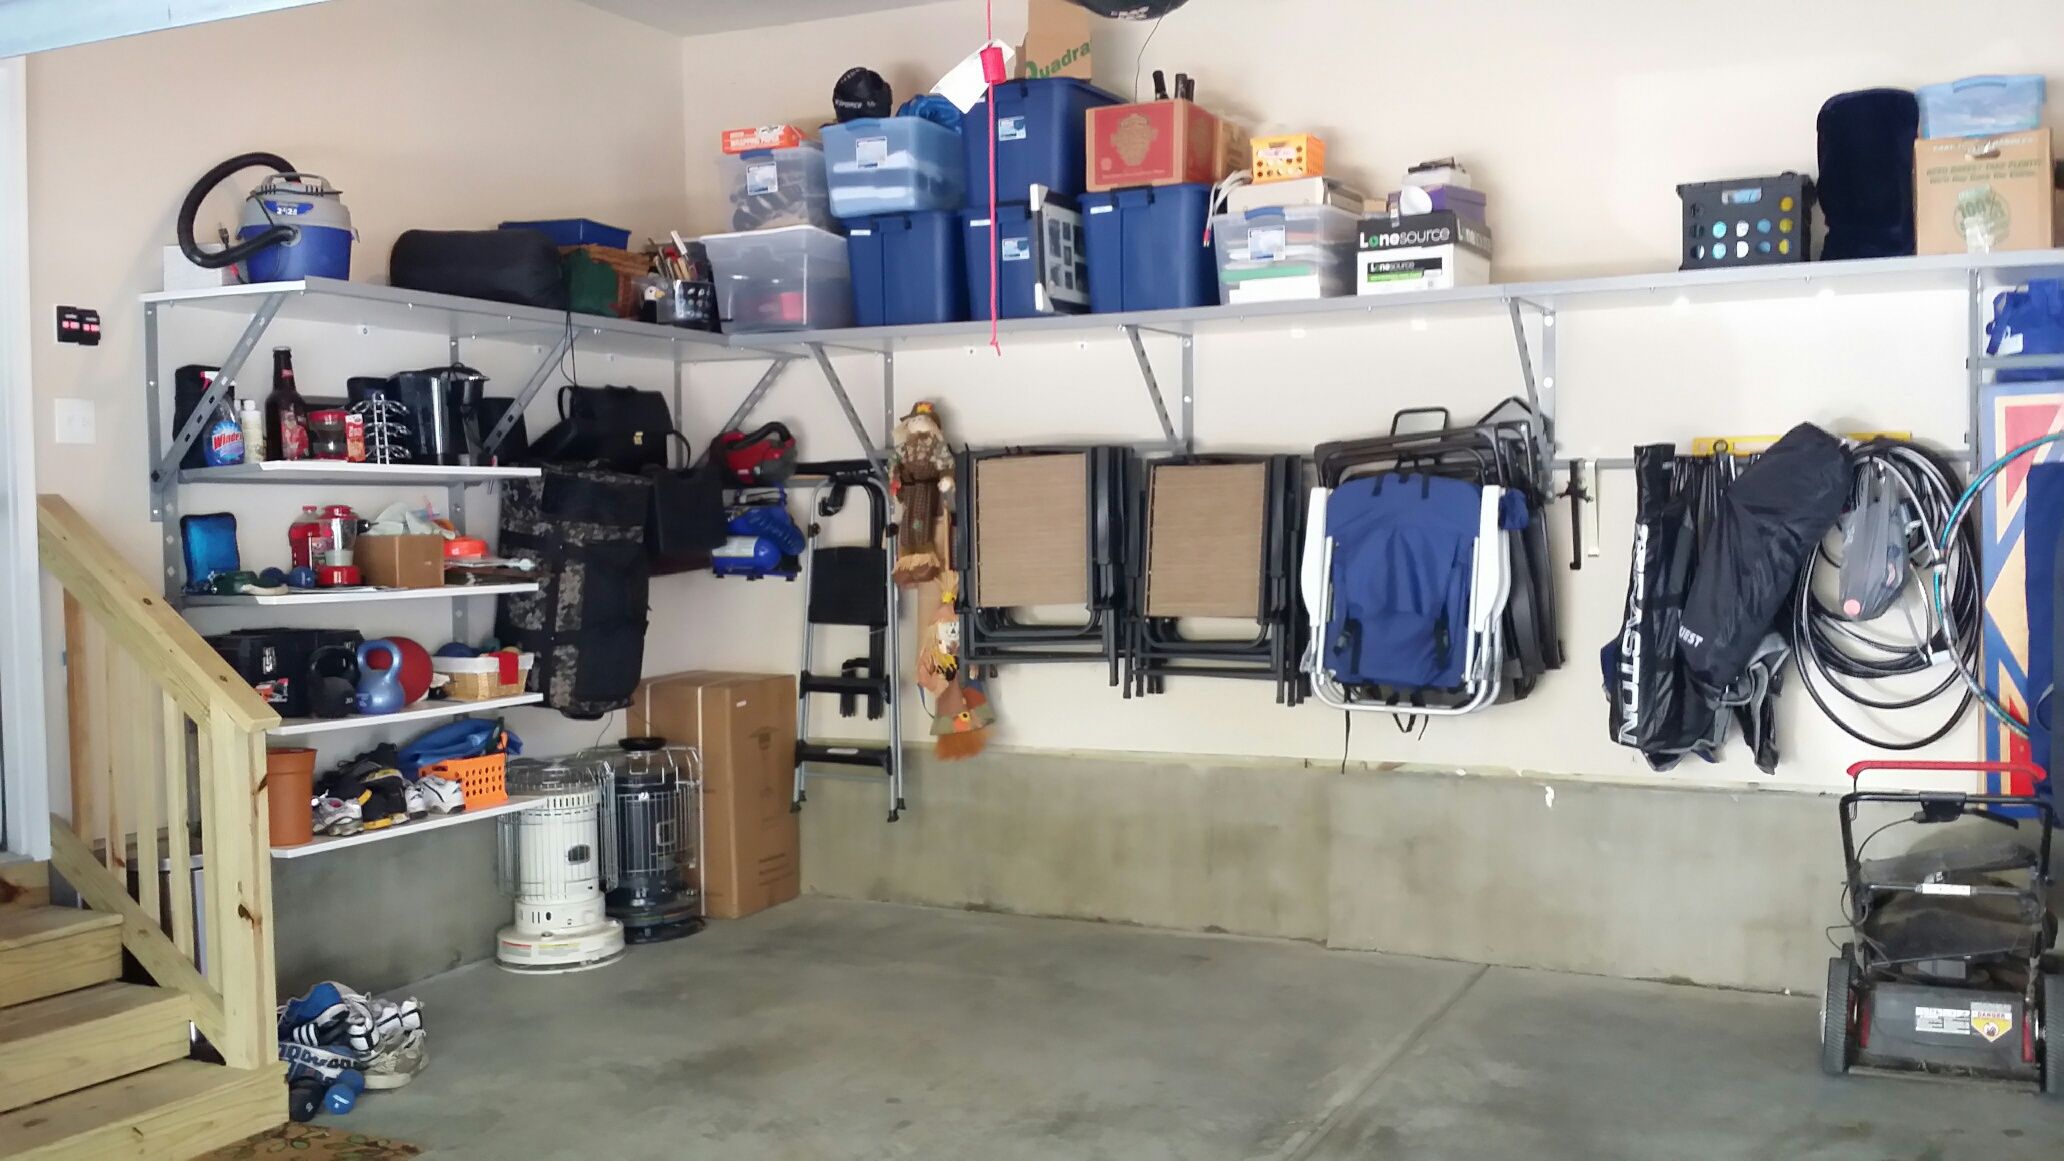
Creating a designated tool storage area
Creating a designated tool storage area in your garage is a practical and efficient way to keep your garden tools organized and easily accessible. Having a specific place to store and display your tools not only helps maintain order but also ensures that they are kept in good condition. Follow these steps to create a designated tool storage area:
- Select a specific area: Choose a dedicated area in your garage where you can store your garden tools. It can be a corner, a wall, or a workbench. Consider the available space and accessibility when determining the location for your designated storage area.
- Clear the space: Before setting up the tool storage area, clear out any clutter or items that are not related to gardening. This will free up space and create room for your tools. Donate or discard any items that you no longer use or need.
- Install storage units: Depending on your needs and available space, install storage units such as shelves, cabinets, or a workbench with tool drawers. These provide organized storage options for your garden tools. Measure the space carefully to ensure the storage units fit properly and meet your requirements.
- Arrange tools logically: Organize your tools logically within the designated storage area. Group similar tools together, such as hand tools, shovels, and rakes. Place the most frequently used tools within easy reach, while reserving lower shelves or drawers for less commonly used items.
- Label shelves and drawers: To enhance organization and quick identification, label shelves and drawers in your designated storage area. Use adhesive labels or a label maker to clearly mark each storage space. This makes it easy to locate and return tools to their designated spots, promoting a clutter-free environment.
- Create a hanging display: Install hooks or pegboards within the designated storage area to hang smaller tools or gardening accessories. This makes use of vertical space and keeps items within reach. Arrange the hooks or pegs strategically to maximize storage efficiency.
- Consider tool holders and organizers: Utilize tool holders and organizers to ensure that each tool has its designated spot. Attach tool holders or clips to walls or pegboards to securely hold smaller handheld tools such as pruning shears or trowels. This not only keeps things organized but also protects the tools from damage.
- Maintain cleanliness: Regularly clean your designated tool storage area to keep it tidy and free from dust or debris. Wipe down the storage units, shelves, and hooks to prevent dirt buildup. This not only enhances the visual appeal but also prolongs the lifespan of your tools.
By creating a designated tool storage area in your garage, you establish a functional and efficient space for your garden tools. With the right storage units, proper organization, and regular maintenance, you’ll have a clutter-free area that allows for easy access to your tools whenever you need them. Enjoy the benefits of a well-organized tool storage area, and make gardening tasks a breeze.
Maintaining and caring for your tools
Proper maintenance and care of your garden tools are essential to keep them in good condition and ensure they perform at their best. Regular maintenance not only extends the lifespan of your tools but also saves you time and effort in the long run. Follow these steps to maintain and care for your tools:
- Clean your tools after each use: After using your garden tools, take the time to clean them thoroughly. Remove any dirt, mud, or plant debris. Use a brush or hose to scrub away dirt and rinse off excess residue. Cleaning your tools helps prevent the buildup of dirt and rust, keeping them in optimal condition.
- Dry your tools properly: After cleaning, make sure to dry your tools thoroughly. Moisture can lead to rust and corrosion, which can damage your tools. Use a clean cloth or towel to wipe off any excess water, paying attention to hard-to-reach areas. Ensuring your tools are dry before storing them is crucial.
- Inspect for damage: Regularly inspect your tools for any signs of damage or wear. Check for cracks, bent blades, loose handles, or other issues. If you notice any damage, repair or replace the tool as necessary. Using damaged tools can lead to further problems and compromise their effectiveness.
- Sharpen blades and edges: Tools with blades or cutting edges, such as pruners or shovels, need to be sharpened regularly to ensure optimal performance. Dull blades make gardening tasks more difficult and inefficient. Use a sharpening stone, file, or appropriate tool sharpener to restore the sharpness of your tools.
- Lubricate moving parts: Tools with moving parts, such as pruners or loppers, benefit from lubrication. Apply a light coat of oil or lubricant to the pivot points or joints to prevent rust and keep the parts functioning smoothly. Follow the manufacturer’s instructions or consult a professional if you are unsure how to lubricate specific tools.
- Store your tools properly: Invest in proper storage solutions, such as racks, shelves, or toolboxes, to store your garden tools when not in use. Ensure they are stored in a clean, dry, and well-ventilated area. Avoid leaving them exposed to extreme weather conditions, as this can cause damage. Proper storage helps prevent rust, corrosion, and other forms of wear and tear.
- Handle with care: Treat your garden tools with care when using them. Avoid using them for unintended purposes or applying excessive force. Improper use or mishandling can lead to damage. Use each tool for its intended purpose and follow the manufacturer’s instructions for optimal usage.
- Regularly check and tighten handles: Handles, especially of tools like shovels or rakes, can loosen over time. Periodically check the handles and tighten them if necessary. Loose handles can compromise the effectiveness and safety of your tools.
- Store in a secure location: When storing your tools, make sure they are kept in a secure location. This helps prevent theft and keeps them out of reach of children or pets. Lock your storage area or use additional security measures if needed.
By maintaining and caring for your garden tools, you not only ensure their longevity but also enhance their performance and efficiency. Regular cleaning, drying, and inspecting of your tools prevent rust and damage, while sharpening blades and lubricating moving parts keep them in top condition. With proper maintenance and care, your garden tools will be ready for use whenever you need them, making your gardening experience more enjoyable and productive.
Read more: How To Store Tools In Garage
Conclusion
In conclusion, organizing and storing your garden tools in your garage doesn’t have to be a daunting task. With a systematic approach and some creative storage solutions, you can create a well-organized and efficient space for your tools. By following the steps outlined in this guide, you can effectively store your garden tools and keep them easily accessible.
Assessing your garage space and clearing out clutter are crucial first steps. This allows you to evaluate the available space and plan your storage solutions accordingly. Consider utilizing wall-mounted racks and hooks, pegboards, or storage bins and containers to optimize space and keep your tools organized.
Building or purchasing a garden tool storage shed provides a dedicated and secure space for your tools. It protects them from the elements and offers ample storage for larger collections of garden tools.
Regular maintenance and care of your tools are essential. Clean your tools after each use, dry them properly to prevent rust, and inspect for any damage. Sharpen blades, lubricate moving parts, and store your tools in a secure and well-organized manner.
Remember to create a designated tool storage area in your garage. This helps maintain order and ensures easy access to your tools. Utilize storage units, shelves, hooks, and dividers to keep your tools neatly arranged and readily accessible.
By implementing these storage and maintenance tips, you’ll have an organized and efficient system for storing your garden tools. You’ll save time and effort by being able to quickly locate and retrieve the tools you need. Furthermore, proper maintenance will extend the lifespan of your tools, allowing you to enjoy them for years to come.
So, take a proactive approach to organize and care for your garden tools. With a well-organized garage storage system, you’ll have a tidy and functional space that promotes efficiency and enhances your gardening experience. Happy gardening!
Frequently Asked Questions about How To Store Garden Tools In Garage
Was this page helpful?
At Storables.com, we guarantee accurate and reliable information. Our content, validated by Expert Board Contributors, is crafted following stringent Editorial Policies. We're committed to providing you with well-researched, expert-backed insights for all your informational needs.


0 thoughts on “How To Store Garden Tools In Garage”