Articles
How To Store Scrap Wood In Garage
Modified: May 6, 2024
Looking for ways to store scrap wood in your garage? Check out these helpful articles for tips on organizing and maximizing space.
(Many of the links in this article redirect to a specific reviewed product. Your purchase of these products through affiliate links helps to generate commission for Storables.com, at no extra cost. Learn more)
Introduction
As a DIY enthusiast or woodworking hobbyist, chances are you have accumulated a pile of scrap wood in your garage. Whether it’s leftover pieces from previous projects or salvaged wood you couldn’t bear to throw away, finding a suitable storage solution for your scrap wood can help you keep your garage organized and maximize the use of space.
In this article, we will explore various methods and strategies on how to store scrap wood in your garage. By implementing these ideas, you’ll be able to efficiently organize your wood scraps, protect them from damage, and easily locate the pieces you need for your future projects.
So, let’s dive in and discover the best ways to store your scrap wood collection!
Key Takeaways:
- Efficiently organize and protect your scrap wood collection by categorizing, labeling, and inventorying your materials. Regularly declutter and purge unwanted wood to maintain a streamlined and usable collection.
- Maximize space and accessibility in your garage by building customized shelves or racks for your scrap wood. Utilize wall space and keep wood off the floor to protect it from moisture and damage.
Read more: How To Store Wood Scraps
Assessing your scrap wood inventory
Before you begin organizing your scrap wood, it’s essential to assess and evaluate your inventory. This step will help you understand the quantity and types of wood you have, allowing you to plan your storage solution accordingly.
Start by gathering all your scrap wood in one area of your garage. Sort through the wood and separate it based on its size, type, and condition. This process will help you identify usable pieces, damaged wood that needs to be discarded, and any specialty materials you may have.
As you assess your inventory, it’s also a good idea to consider the potential projects you might undertake in the near future. Take note of specific wood types or sizes that you anticipate needing. This information will guide your organization and storage decisions, ensuring easy access to the materials you’ll frequently use.
Additionally, consider the storage requirements for any specialty woods or materials. For example, certain types of lumber may need to be stored in a climate-controlled environment to prevent warping or damage. Understanding these requirements will help you create a suitable storage solution.
The assessment process is also an excellent time to inspect the condition of your scrap wood. Discard any heavily damaged or rotted pieces that are beyond salvage. This will not only free up space but also prevent the spread of pests or mold to your other wood supplies.
By thoroughly assessing your scrap wood inventory, you will have a clear understanding of what you have and can make informed decisions about how to store and organize it effectively.
Sorting and organizing your scrap wood
Once you have assessed your scrap wood inventory, the next step is to sort and organize it. By categorizing your wood based on size, type, and condition, you can create a system that allows for easy access and efficient storage.
Start by grouping your wood scraps based on their size. You can have categories such as small, medium, and large pieces. This sorting method will make it easier to locate specific sizes when you need them for a project.
In addition to size, consider organizing your wood by type. If you have different types of wood, such as oak, pine, or plywood, keep them in separate groups. This way, you can easily find the appropriate wood for the specific look or structural requirements of your projects.
Furthermore, you can sort your scrap wood based on its condition. For example, you can have a category for pristine pieces that can be used for visible surfaces and another category for slightly damaged wood that can be used for hidden or supporting structures.
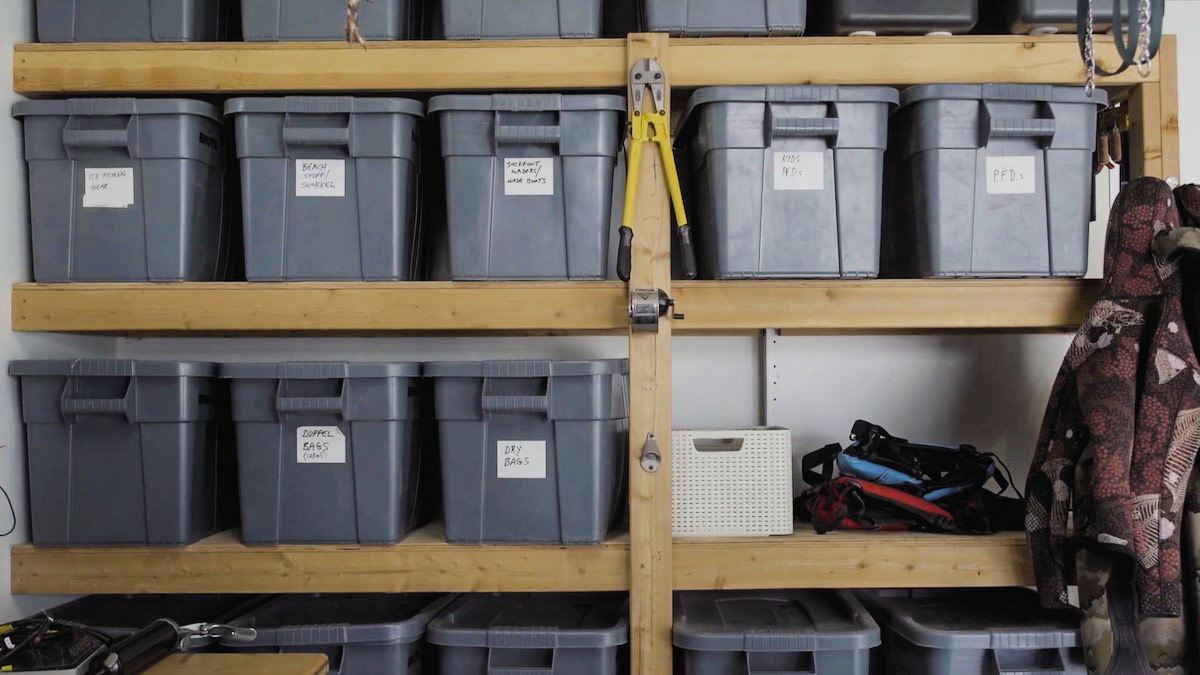
Once you have sorted your scrap wood, invest in storage containers or bins that can hold each category of wood. Clear plastic bins are a great option as they allow you to see the contents without opening them. Label each bin with the corresponding wood type or size to make identification effortless.
Alternatively, you could use shelving units with adjustable shelves. This setup allows you to customize the spacing between the shelves based on the sizes of your wood scraps. If possible, choose shelves with a weight capacity that can handle the weight of your heaviest pieces.
Remember to store your wood in a designated area away from high traffic areas in your garage. This will prevent accidents and keep your wood well-organized.
By sorting and organizing your scrap wood based on size, type, and condition, you’ll be able to quickly locate the materials you need for your projects and ensure that everything has its proper place.
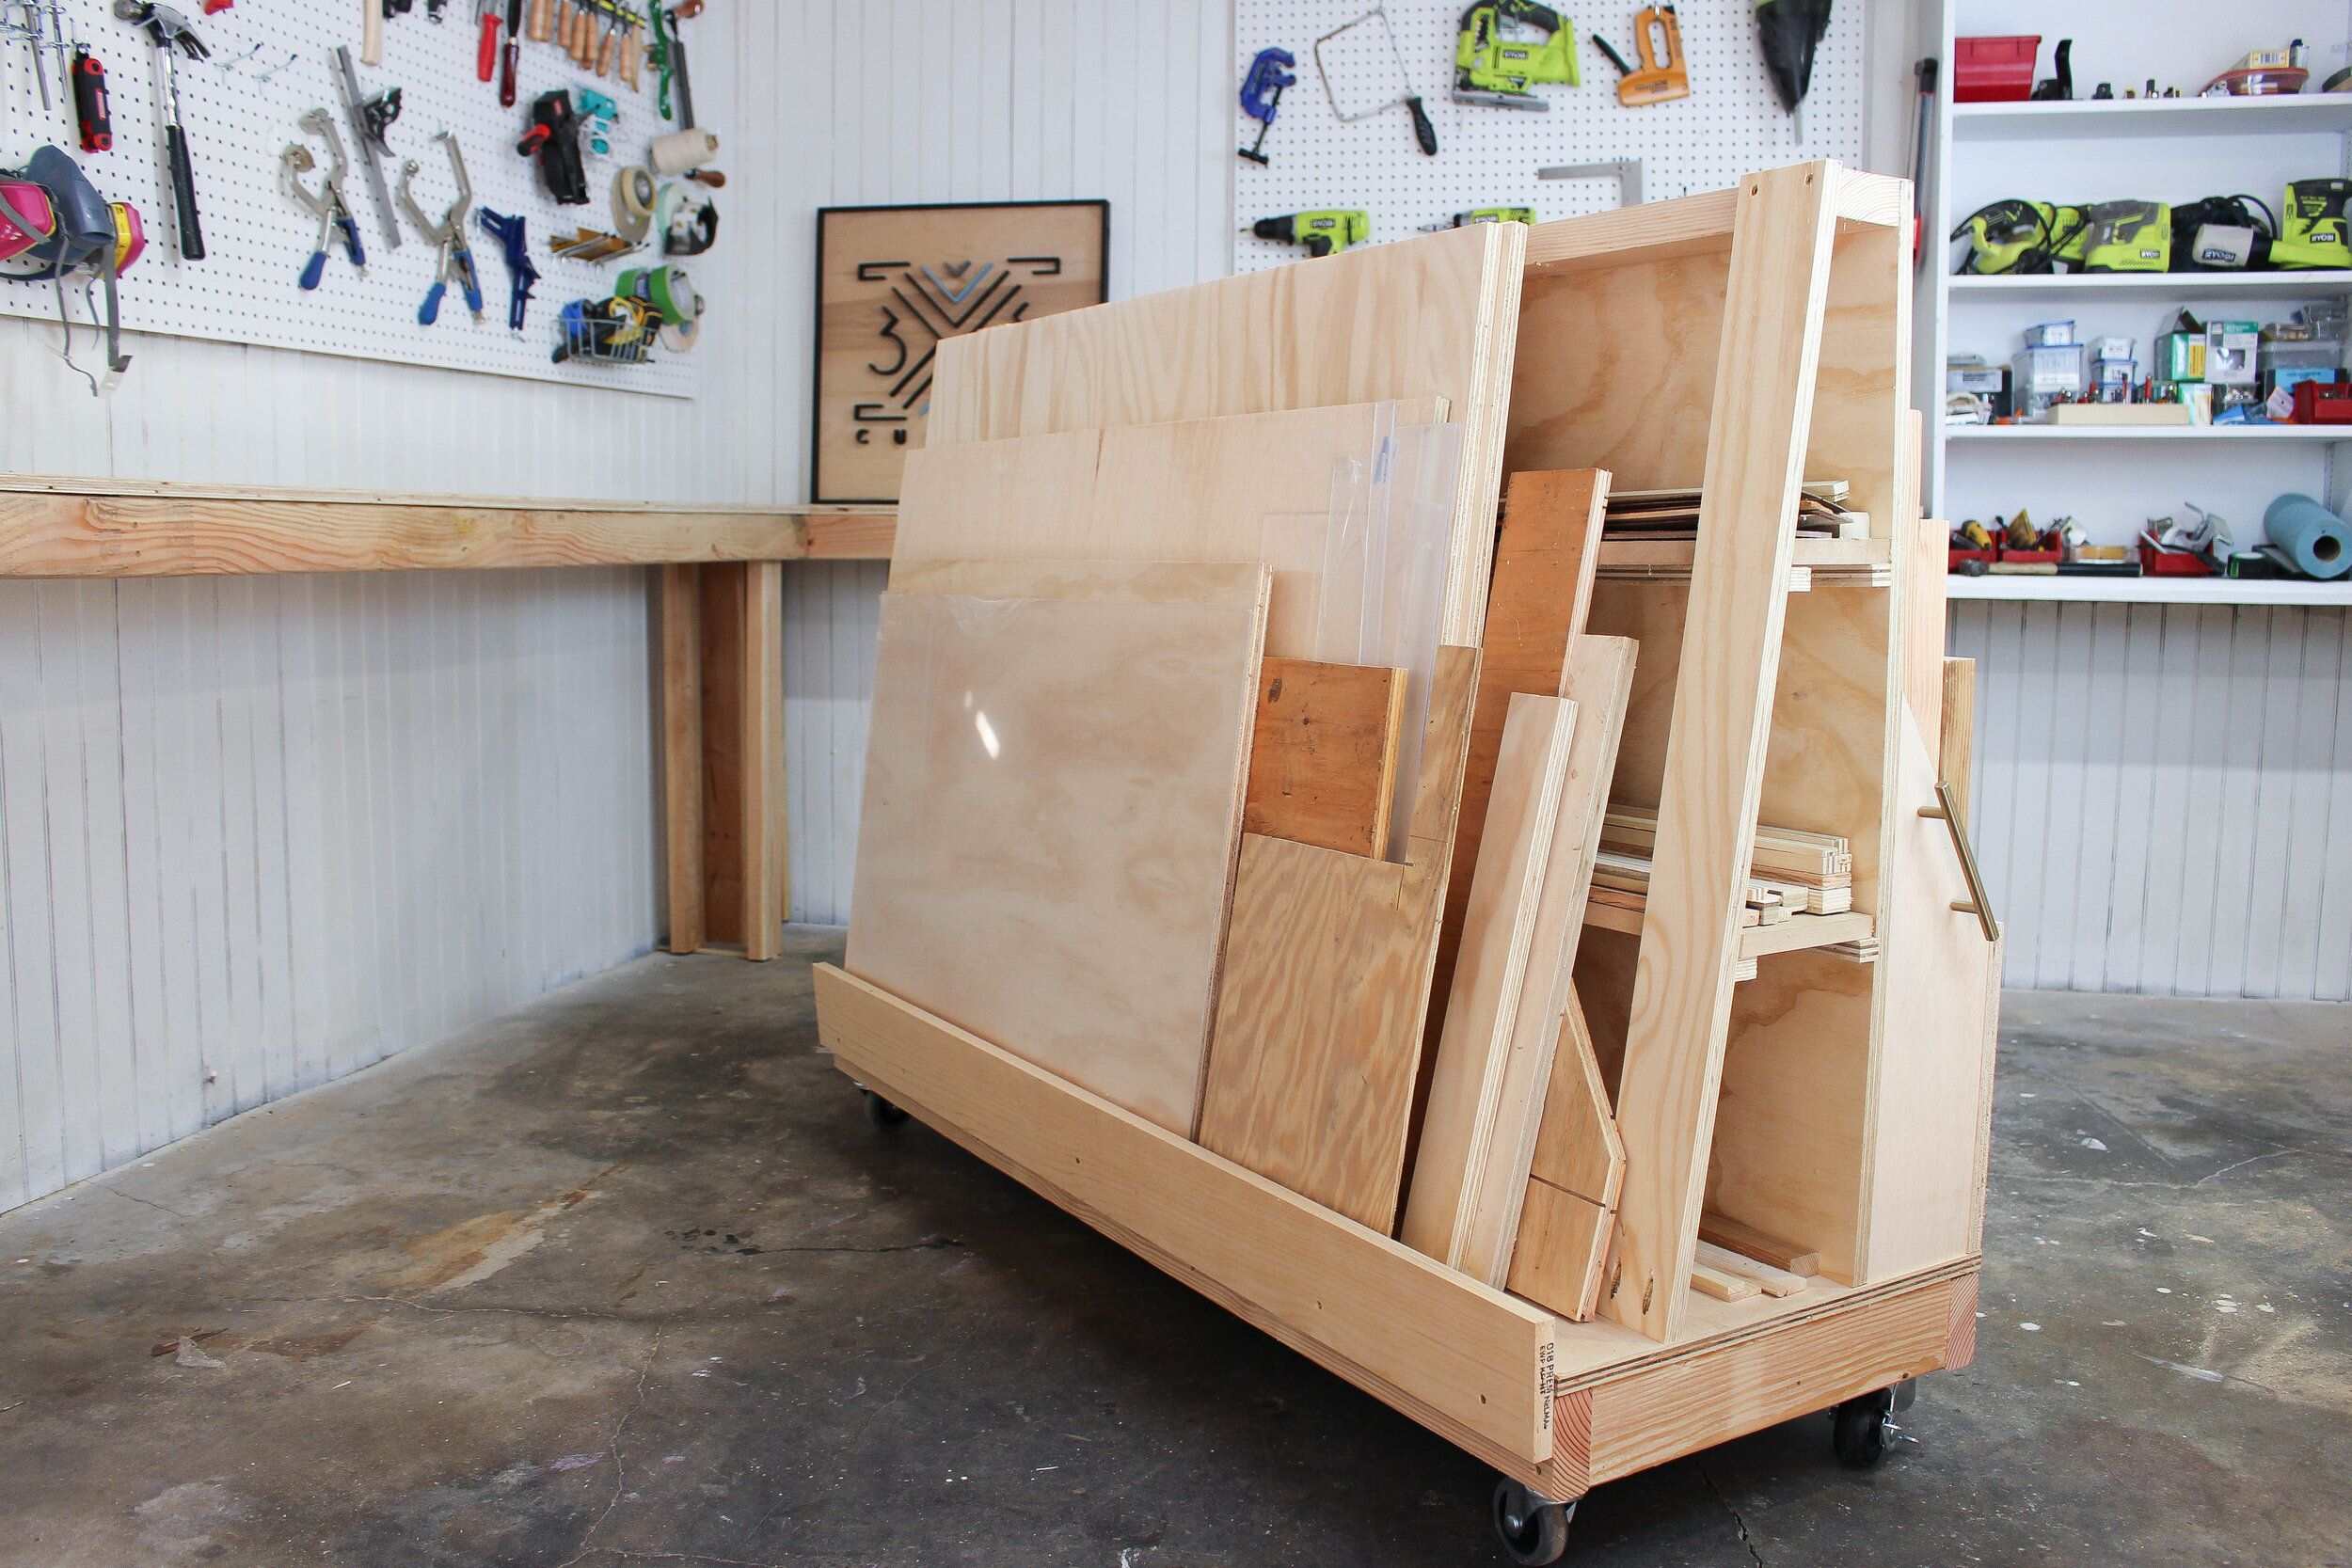
Building shelves or racks for storage
When it comes to storing your scrap wood in the garage, building shelves or racks specifically designed for this purpose can be a game-changer. Customized storage solutions not only maximize the use of space but also provide easy access to your wood collection.
Before you start building shelves or racks, consider the layout and available space in your garage. Measure the area where you plan to install the storage units to ensure a proper fit. Take into account any obstructions or obstacles that may hinder the installation process.
If you’re looking for a straightforward and budget-friendly option, basic wooden shelves can be an excellent choice. Constructing simple shelves using 2x4s and plywood is relatively easy and doesn’t require advanced carpentry skills.
Start by determining the dimensions of your shelves based on the size of your scrap wood. Cut the 2x4s into equal lengths to serve as the vertical supports for the shelves. Attach them to the wall or existing studs using screws or brackets.
Next, measure and cut the plywood to fit as the shelves. Attach them to the 2x4s using screws or nails. It’s advisable to secure the shelves with additional support brackets underneath to ensure stability and weight-bearing capacity.
If you have a larger collection of wood or require more heavy-duty storage, consider building a rack system. These racks typically consist of vertical supports with horizontal bars or slots where wood can be securely stored. You can customize the size and spacing between the bars based on the dimensions of your scrap wood.
Utilize the vertical space in your garage by installing wall-mounted brackets or brackets that hang from the ceiling. These brackets provide a sturdy base for shelves or racks and allow you to make the most of your available space.
Remember to reinforce the shelves or racks as necessary, especially if you’re storing heavier pieces of wood. Additionally, ensure that the shelves are level and secure to prevent accidents and damage to your wood collection.
By building shelves or racks specifically designed for storing scrap wood, you’ll have a dedicated and organized space to keep your materials easily accessible and protected.
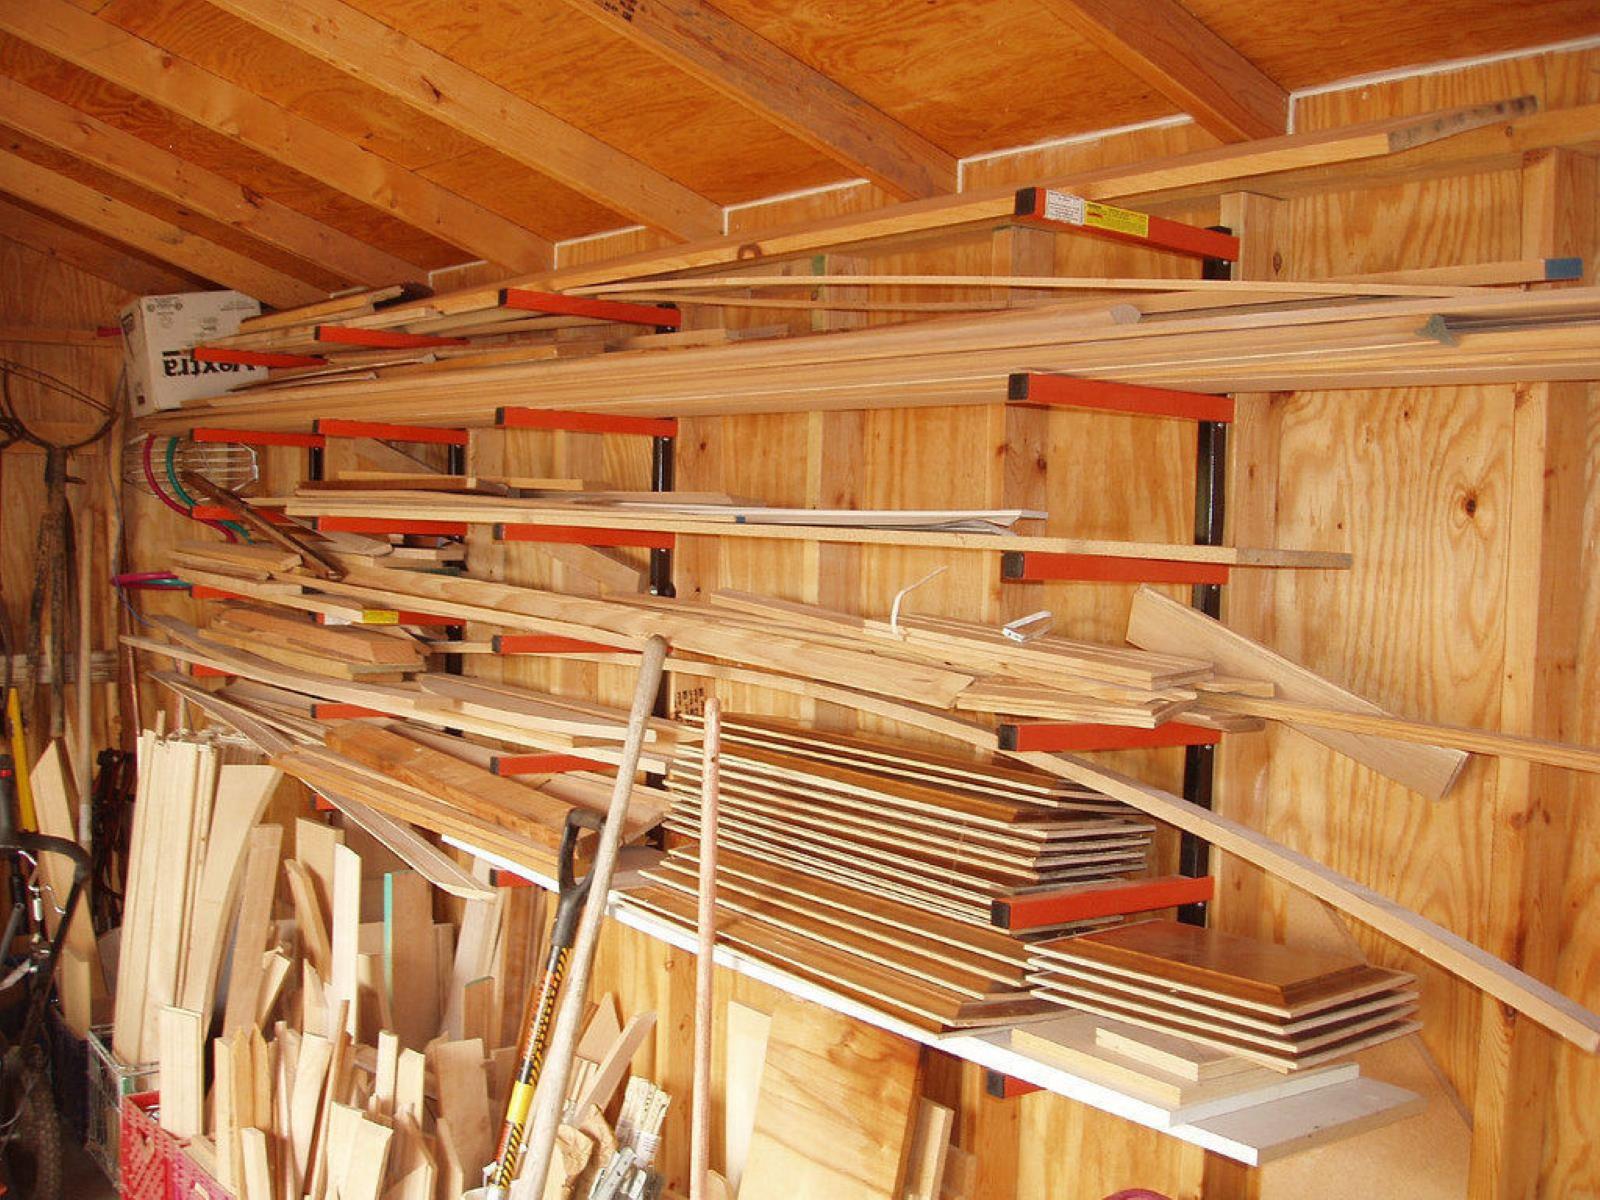
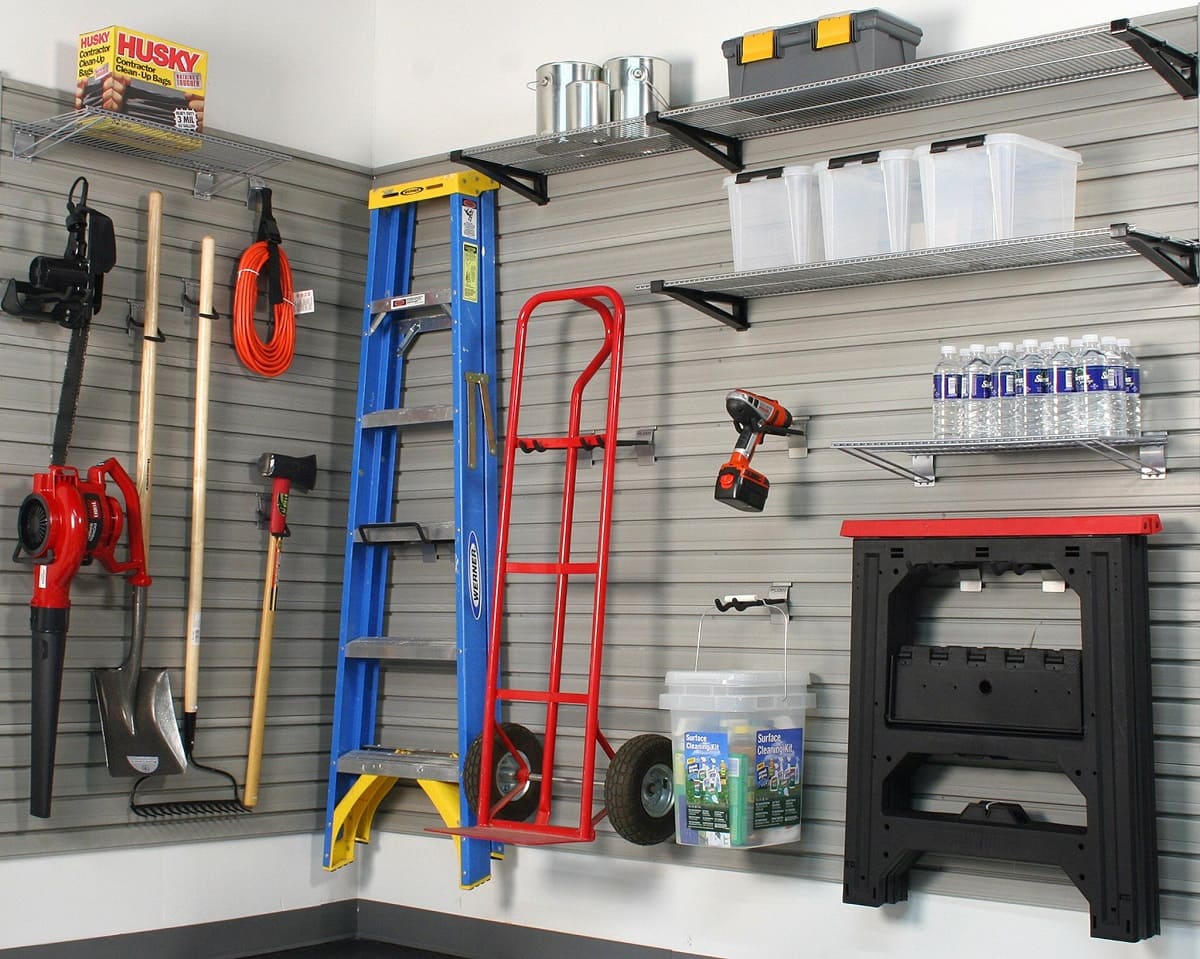
Utilizing wall space for storing scrap wood
When it comes to maximizing storage in your garage, don’t overlook the potential of your walls. Utilizing wall space can provide a practical and efficient solution for storing your scrap wood.
One of the simplest ways to utilize wall space is by installing wall-mounted brackets or hooks. These can be used to hang individual pieces of scrap wood or even long boards horizontally. Make sure to choose sturdy brackets or hooks that can support the weight of your wood.
If you have smaller pieces of wood or wood scraps, consider using a pegboard. Pegboards are versatile and allow you to create a customized storage solution. Install the pegboard on your garage wall and add pegboard hooks and accessories to hang your wood pieces. This setup makes it easy to rearrange and adapt as your wood collection grows or changes.
Another option is to install a lumber rack system. These racks are specifically designed to hold longer pieces of wood such as boards or trim. They typically consist of vertical supports with horizontal arms that extend to hold the wood. Lumber rack systems are a great way to store and display your longer pieces, keeping them organized and easily accessible.
If you have limited wall space or want to make the most of every inch, you can explore the option of ceiling-mounted storage solutions. Overhead racks or hanging shelves can be installed to keep your scrap wood elevated and out of the way. Just make sure to keep safety in mind and follow the manufacturer’s instructions for proper installation and weight capacity.
When utilizing wall space for storage, it’s important to consider the weight and size of your wood pieces. Ensure that the brackets, hooks, or racks you choose can support the weight of your wood safely to prevent damage or accidents.
By utilizing wall space for storing your scrap wood, you’ll free up valuable floor space in your garage while keeping your wood easily accessible and well-organized.
Consider using a wall-mounted rack or shelving system to store scrap wood in your garage. This will keep the wood off the floor, making it easier to access and reducing the risk of damage or tripping hazards.
Read more: How To Store Wood In Garage
Creating designated storage zones for different types of wood
Organizing your scrap wood becomes even more efficient when you create designated storage zones based on the different types of wood you have. By separating your wood by species or purpose, you can easily locate and access the specific materials you need for your projects.
Start by dividing your storage area into sections or zones. Each zone will represent a different type of wood or category of scrap pieces. For example, you can have separate zones for hardwoods, softwoods, plywood, or specialty materials.
Label each zone clearly to avoid confusion and make identification easier. You can use signs, colored tape, or even small chalkboard labels to clearly mark each area. This will help you quickly locate the desired wood and prevent mix-ups.
When storing your wood within each zone, ensure that pieces of the same type or size are grouped together. This organization method will make it easier to find specific materials and prevent unnecessary searching and rummaging.
If you have smaller pieces of scrap wood, consider using bins or containers within each zone. Label the containers accordingly and categorize the pieces based on size or purpose. This method keeps the small wood scraps contained and makes it easier to access them when needed.
For larger and irregularly shaped pieces, consider using upright storage solutions. Vertical racks or stands can be designed or repurposed to hold longer boards or odd-shaped pieces. This prevents them from taking up valuable space on the floor and keeps them organized and easily accessible.
Remember to take into account the specific storage requirements of different types of wood. Some woods may need to be stored in a dry and climate-controlled environment to prevent warping or moisture damage.
By creating designated storage zones for different types of wood, you’ll streamline your organization process and ensure that you can easily locate and access the specific materials needed for your various projects.
Keeping scrap wood off the floor and protected from moisture
One of the key factors in properly storing your scrap wood is ensuring that it is kept off the floor and protected from moisture. Moisture can cause wood to warp, rot, or attract pests, rendering it unusable for future projects. Here are some tips to keep your scrap wood safe and dry:
1. Use elevated storage options: Avoid placing your wood directly on the floor. Utilize shelves, racks, or pallets to elevate your wood off the ground. This not only keeps it away from potential dampness but also helps keep your garage floor clean and unobstructed.
2. Install a dehumidifier: If your garage tends to be prone to high humidity levels, installing a dehumidifier can help regulate the moisture in the air. Keeping the humidity at an optimal level will prevent your scrap wood from absorbing excess moisture and protect it from damage.
3. Provide proper ventilation: Good air circulation is crucial to prevent the buildup of moisture. Ensure that your storage area is well-ventilated, either through natural ventilation or with the use of fans. This will help keep the air moving and minimize the risk of excess moisture accumulating around your wood scraps.
4. Avoid areas with direct water exposure: When choosing the location for your scrap wood storage, avoid areas in your garage that are prone to water leaks or direct exposure to rain. This will help protect your wood from potential water damage.
5. Seal open ends: If your scrap wood has exposed or unfinished ends, consider sealing them with paint or a wood sealer. This helps prevent moisture from infiltrating the wood and causing damage. It also keeps the wood in better condition for future use.
6. Protect against condensation: Condensation can occur when warm air comes into contact with colder surfaces, such as your wood scraps. To prevent condensation buildup, insulate your garage and use vapor barriers if necessary. This will minimize the temperature changes and reduce the risk of moisture accumulation.
7. Consider climate-controlled storage: If you have valuable or delicate wood pieces, such as antique lumber or specialty materials, it may be worth investing in a climate-controlled storage area. These storage options allow you to regulate the temperature and humidity levels, ensuring optimal conditions for your scrap wood.
By keeping your scrap wood off the floor and protected from moisture, you’ll preserve its quality and usability, ensuring that it remains in good condition for future projects.
Labeling and inventorying your scrap wood collection
A crucial aspect of organizing your scrap wood collection is labeling and inventorying your materials. Proper labeling and inventory management will help you easily identify the wood pieces you have and locate them when needed. Here are some tips to effectively label and inventory your scrap wood:
1. Label each storage container: Whether you’re using bins, shelves, or racks to store your scrap wood, make sure to label each storage container clearly. Use adhesive labels, tags, or even masking tape to indicate the type, size, and any other relevant information about the wood pieces inside.
2. Categorize your wood inventory: Create an inventory spreadsheet or use inventory management software to categorize and track your scrap wood collection. Identify different wood types, sizes, and quantities. This will help you have a comprehensive overview of your inventory and make it easier to locate specific pieces for future projects.
3. Include key details: In your inventory, include key details about each wood piece, such as the dimensions, wood species, condition, and any specific features or characteristics. This information will assist you in selecting the appropriate wood for different projects and ensure that you can easily identify the right piece when needed.
4. Use a numbering system: Assign a unique number to each piece or category of wood in your inventory. This numbering system can be simple or more complex, depending on the size of your collection. Use these numbers when labeling your storage containers to create a clear and consistent reference system.
5. Update your inventory regularly: As you use or acquire new scrap wood, make sure to update your inventory accordingly. Remove any pieces that are no longer in your collection and add new ones as needed. This will help you maintain an accurate and up-to-date record of your wood materials.
6. Implement a tracking system: Consider adding a notes section to your inventory spreadsheet or software. Use this space to track information such as the project or date the wood was used, any special treatments applied, or the current location of the wood if you move it within your storage area.
7. Make the inventory accessible: Ensure that your inventory is easily accessible and can be viewed from various devices or locations. Cloud-based inventory management tools or spreadsheets stored in shared folders can be practical options. This accessibility will help you manage and update your inventory as needed.
By properly labeling and inventorying your scrap wood collection, you’ll have a clear record of the materials you have, making it easier to find specific pieces and manage your inventory efficiently.
Regularly decluttering and purging unwanted wood scraps
As your scrap wood collection grows and evolves, it’s important to regularly declutter and purge unwanted wood scraps. This habit will help you maintain an organized and efficient storage system while preventing your garage from becoming overrun with unnecessary materials. Here’s how you can effectively declutter and purge your wood scraps:
1. Assess your storage space: Start by evaluating the available storage space in your garage. Take note of any areas that are becoming crowded or cluttered with excess wood. This will help you identify where you need to focus your decluttering efforts.
2. Sort through your wood scraps: Dedicate some time to go through your scrap wood collection. Sort through each piece and determine whether it is still usable or if it has become damaged or warped beyond repair. Be honest with yourself and prioritize keeping only the pieces that are in good condition and have potential for future projects.
3. Dispose of damaged or unusable wood: Get rid of any pieces that are severely damaged or no longer suit your needs. You can discard these pieces responsibly by recycling them if possible or using them for firewood if appropriate. Removing these unusable pieces will free up space and make it easier to organize the remaining wood scraps.
4. Repurpose or donate excess wood: Consider repurposing or donating excess wood that is still in good condition but no longer needed for your projects. Look for opportunities to use the wood in creative ways, such as crafting small DIY projects or donating it to schools, community centers, or other woodworking enthusiasts who can make use of the materials.
5. Organize remaining wood: Once you have decluttered and purged your unwanted wood scraps, it’s time to reorganize the remaining pieces. Return them to their designated storage zones, ensuring that they are properly labeled and easily accessible.
6. Establish guidelines for future collection: To prevent your scrap wood collection from growing out of control, establish guidelines for what types and sizes of wood you will keep. Consider setting a limit on the amount of scrap wood you will store or establishing a “one-in, one-out” rule where you replace a piece of wood when you acquire a new one.
7. Schedule regular decluttering sessions: Make decluttering and purging unwanted wood scraps a regular part of your woodworking routine. Set a schedule to review and reassess your collection every few months or as needed. This proactive approach will help you maintain a well-organized and manageable scrap wood collection.
By regularly decluttering and purging unwanted wood scraps, you’ll keep your storage area organized, make room for new materials, and maintain a streamlined collection of usable pieces for your future projects.
Read more: How To Store Wood Furniture In Garage
Conclusion
Effectively storing and organizing your scrap wood in the garage is essential for keeping your DIY projects running smoothly and maintaining a clutter-free workspace. By implementing the strategies discussed in this article, you can create a well-structured system that maximizes space, protects your wood scraps, and simplifies the retrieval process.
First, assess your scrap wood inventory, categorizing it by size, type, and condition. This step will provide a clear understanding of your collection and guide your storage decisions. Sort and organize your wood into designated zones, ensuring easy access and streamlined retrieval.
Building shelves or racks tailored to your needs can be a game-changer. By utilizing wall space, you can create additional storage areas while keeping your wood off the floor and protected from moisture.
Labeling and inventorying your scrap wood collection is crucial for efficient organization. Create a system that includes proper labeling of storage containers and maintaining an inventory spreadsheet with key details about each piece.
Regularly decluttering and purging unwanted wood scraps is essential for maintaining an organized storage space. Assess your collection, dispose of damaged or unusable pieces, repurpose or donate excess wood, and establish guidelines for future acquisitions.
In conclusion, a well-organized and thoughtfully maintained scrap wood storage system in your garage lays the foundation for productive and efficient woodworking. By implementing these strategies, you can reclaim valuable space, protect your wood materials, and enjoy a clutter-free environment that fosters creativity and productivity in your DIY endeavors.
Now that you've mastered storing scrap wood in your garage, why not take your organizational skills further? Dive into our article on wood storage solutions that will transform how you manage all types of wood materials. Plus, don't miss out on our innovative garage organization strategies that will redefine your space entirely. Both guides offer practical tips to enhance every nook and cranny of your garage efficiently.
Frequently Asked Questions about How To Store Scrap Wood In Garage
Was this page helpful?
At Storables.com, we guarantee accurate and reliable information. Our content, validated by Expert Board Contributors, is crafted following stringent Editorial Policies. We're committed to providing you with well-researched, expert-backed insights for all your informational needs.


0 thoughts on “How To Store Scrap Wood In Garage”