Articles
How To Store Grapes In Fridge After Washing
Modified: August 30, 2024
Discover the best way to store grapes in the fridge after washing. Read our informative articles for helpful tips and tricks.
(Many of the links in this article redirect to a specific reviewed product. Your purchase of these products through affiliate links helps to generate commission for Storables.com, at no extra cost. Learn more)
Introduction
Grapes are a versatile and delicious fruit that can be enjoyed on their own or used in a variety of dishes and beverages. When you bring home a bunch of fresh grapes from the store, it’s important to properly store them to maintain their freshness and quality.
One crucial step in the process of storing grapes is washing them before placing them in the refrigerator. Washing grapes removes any dirt, debris, and potentially harmful bacteria that may be present on the surface of the fruit. By taking a few extra minutes to wash your grapes, you can ensure that you’re consuming clean and safe produce.
In this article, we will guide you through the steps of storing grapes in the fridge after washing them. You will learn the necessary supplies, techniques, and precautions to keep your grapes fresh and delicious for as long as possible.
Key Takeaways:
- Keep your grapes fresh and safe by washing them before storing in the fridge. Properly drying and inspecting for spoilage ensures optimal quality and longevity.
- Store your grapes in a clean container or bag in the fridge’s crisper drawer. Remember to wash them before consumption and enjoy within a week or two for the best flavor.
Read more: How To Store Grape Tomatoes In The Fridge
Why should you wash grapes before storing?
Washing grapes before storing them is an essential step in maintaining their integrity and quality. Here are a few reasons why it’s important to wash grapes before placing them in the fridge:
- Removes dirt and debris: Grapes are often handled during the harvesting and packaging process, which can leave them coated with dirt, dust, and other debris. By washing them, you can eliminate these contaminants and ensure that you’re consuming clean fruit.
- Reduces bacteria and pesticides: Grapes, like many other fruits, may be treated with pesticides to protect them against insects and diseases. Washing grapes helps to remove residue from these treatments, reducing your exposure to potentially harmful chemicals. Additionally, washing can eliminate any bacteria that may be present on the skin of the grapes, further enhancing their safety.
- Enhances shelf life: Washing grapes helps to remove bacteria and fungi that can cause the fruit to spoil more quickly. By eliminating these microorganisms, you can extend the shelf life of your grapes and enjoy them for a longer period of time.
- Improves taste and texture: Washing grapes can also enhance their taste and texture. By removing any dirt or residue, you can fully enjoy the natural sweetness and crispness of the fruit.
- Promotes food safety: Properly washing grapes is an important step in maintaining food safety. It helps to minimize the risk of foodborne illnesses caused by consuming contaminated produce.
Taking the time to wash your grapes before storing them may seem like a small step, but it can have a big impact on the overall quality and safety of the fruit. By incorporating this simple practice into your routine, you can ensure that you are enjoying the best possible grapes every time you reach for them.
Steps to store grapes in the fridge after washing
Now that you understand the importance of washing grapes before storing them, let’s dive into the steps you need to follow to properly store your grapes in the fridge:
- Gather necessary supplies: Before you begin, make sure you have the necessary supplies on hand. You will need a colander or strainer, a clean kitchen towel or paper towels, a container or plastic bag for storage, and a refrigerator.
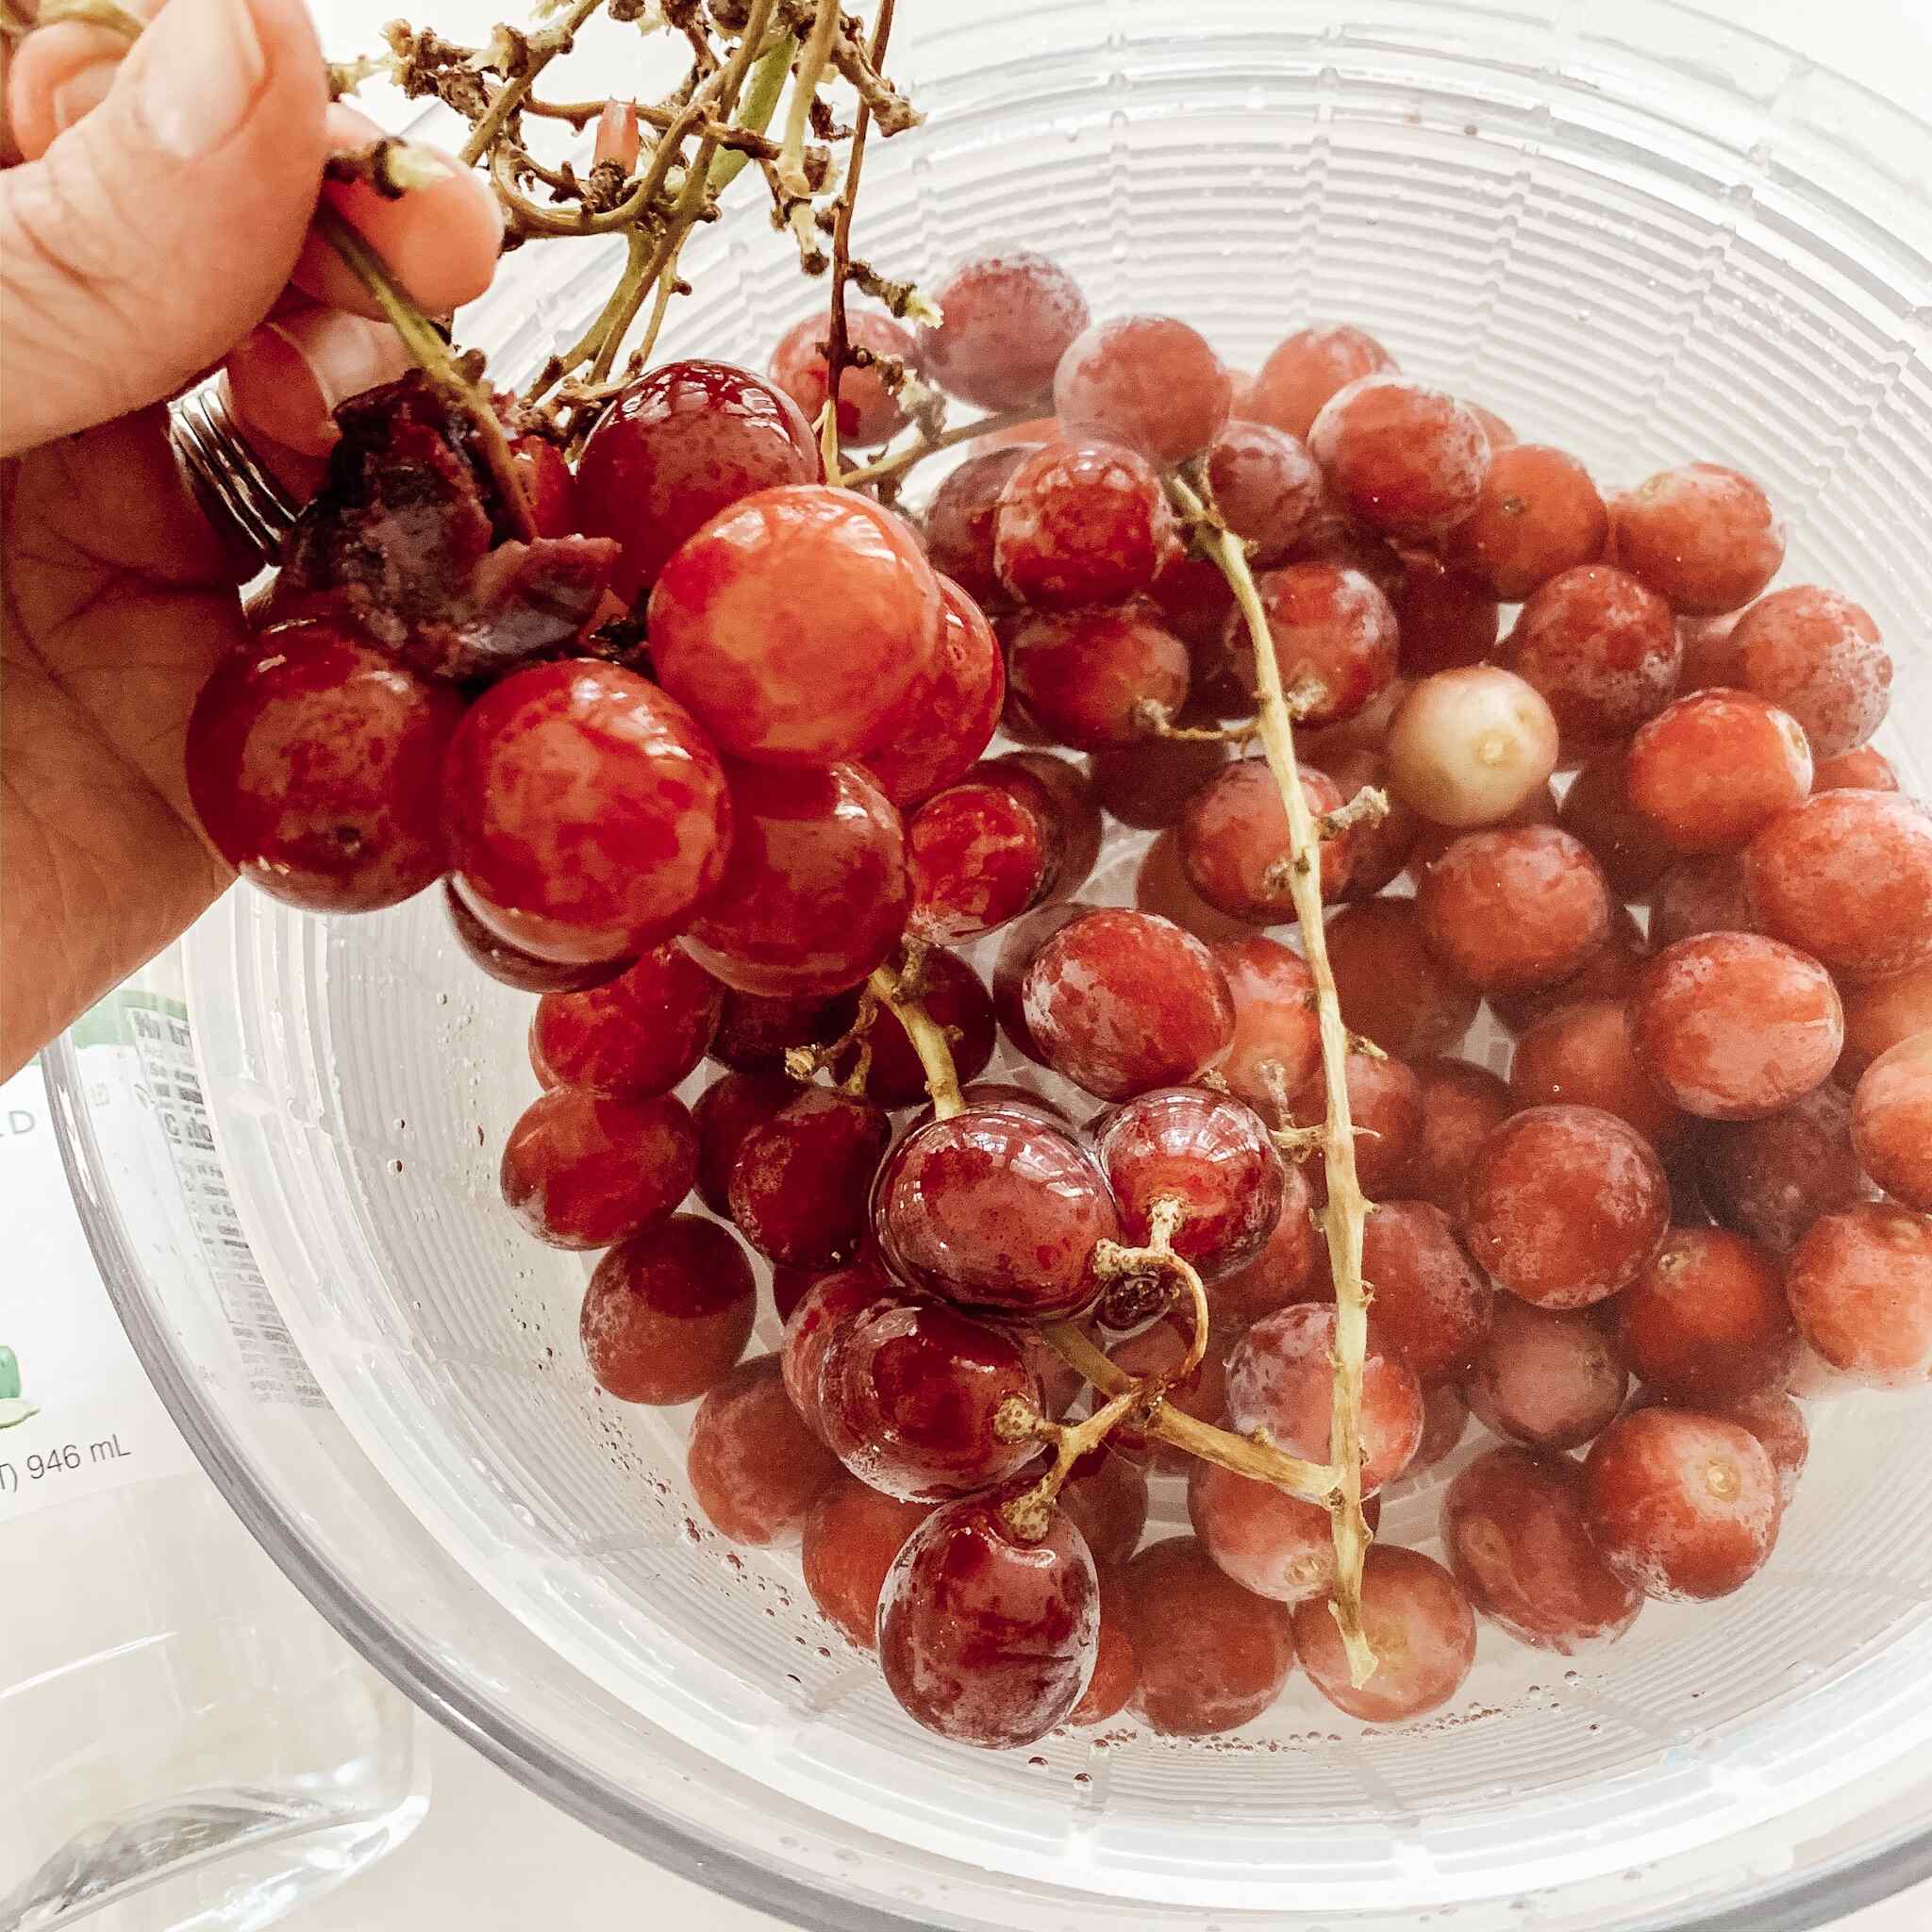
- Rinse the grapes: Start by placing the grapes in a colander or strainer. Rinse them under cool running water, gently rubbing them with your fingers to remove any dirt or debris. Avoid using soap or detergent, as these can leave a residue on the grapes.
- Dry the grapes: After rinsing, transfer the grapes to a clean kitchen towel or a few layers of paper towels. Gently pat them dry to remove excess moisture. It’s essential to dry the grapes thoroughly, as moisture can promote mold growth and reduce their shelf life.
- Remove any spoiled or damaged grapes: Sort through your grapes and discard any that are spoiled or damaged. These grapes can spoil the rest of the bunch more quickly, so it’s important to remove them before storage.
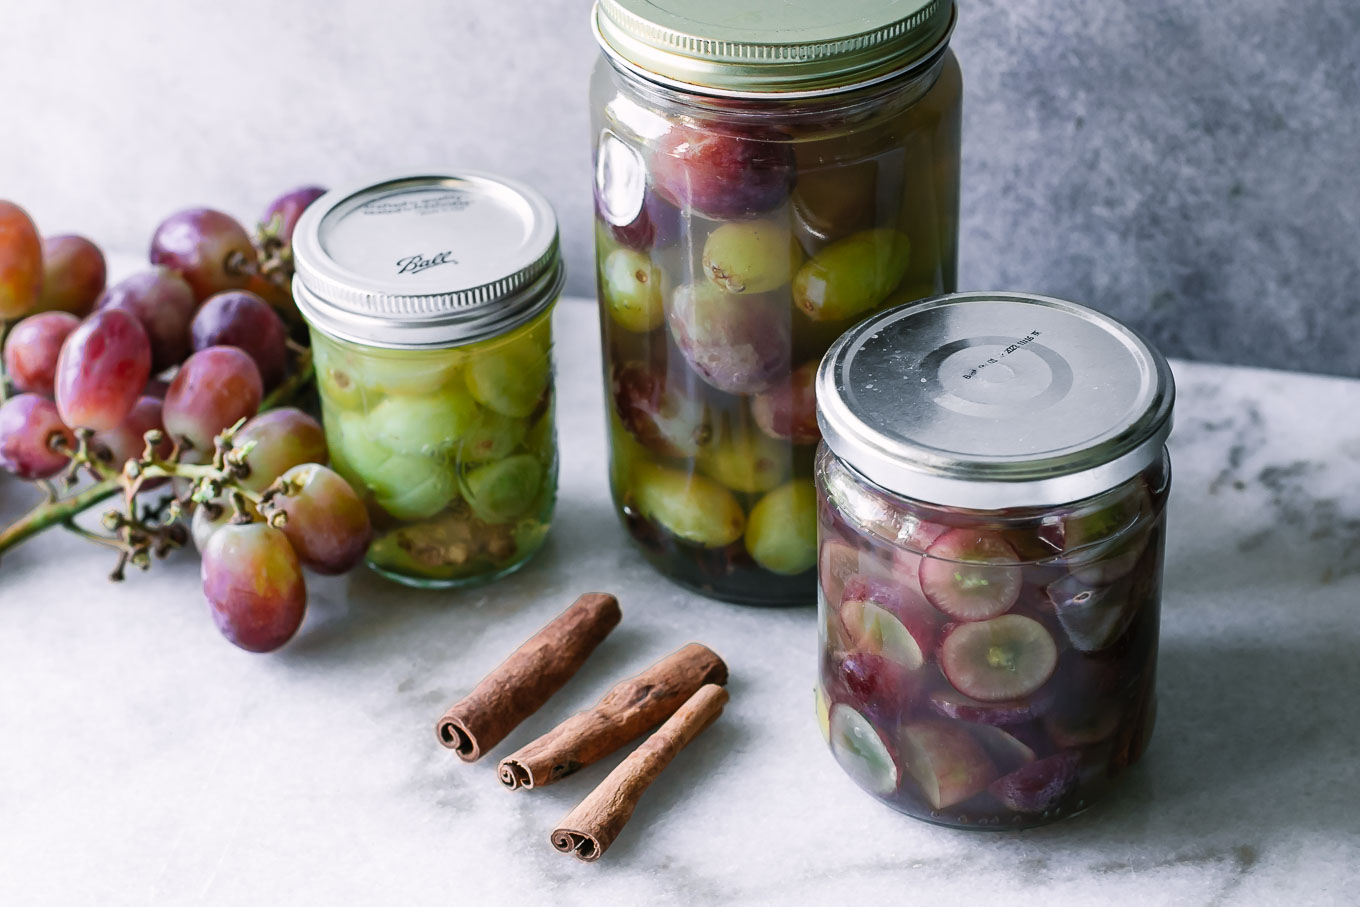
- Place the grapes in a container or bag: Choose a clean container or plastic bag that is large enough to accommodate the grapes without crushing them. You can use airtight containers, ziplock bags, or even airtight produce storage bags specifically designed for fruit storage.
- Store the grapes in the fridge: Place the container or bag of grapes in the refrigerator. It’s best to store them in the crisper drawer, as this will provide a more stable temperature and humidity level. Avoid storing grapes near foods with strong odors, as grapes can easily absorb odors.
- Properly handle and consume stored grapes: When you’re ready to enjoy your grapes, wash them again before eating. This will help remove any bacteria that may have accumulated in the fridge. It’s also important to consume the grapes within a week or two to ensure optimal freshness.
By following these steps, you can ensure that your grapes stay fresh, flavorful, and safe to eat throughout their storage in the fridge. Enjoy your delicious grapes whenever you’re in the mood for a sweet and healthy snack!
Step 1: Gather necessary supplies
Before you begin the process of storing grapes in the fridge after washing, it’s important to gather all the necessary supplies. Having these items ready will ensure that you can complete the task efficiently and effectively. Here’s what you’ll need:
- Colander or strainer: This will be used to rinse the grapes under running water. Choose a colander or strainer with small holes to prevent the grapes from falling through.
- Clean kitchen towel or paper towels: These will be used to dry the grapes after washing.
- Container or plastic bag: You will need a clean container or plastic bag to store the washed grapes in the fridge. Make sure the container or bag is large enough to hold the grapes without causing them to be squished or damaged.
- Refrigerator: Of course, you’ll need a refrigerator to store the grapes at the proper temperature.
Having these supplies ready before you begin the grape-storing process will save you time and ensure that you have everything you need within reach.
If you don’t have a specific container for storing grapes, you can use airtight containers, ziplock bags, or airtight produce storage bags that are designed to keep fruits and vegetables fresh. These options will protect the grapes from exposure to air, moisture, and other contaminants, helping them stay fresh for a longer period.
Make sure that all the supplies you gather are clean. It’s crucial to maintain a clean environment when handling fresh produce to prevent any potential contamination from bacteria or other microorganisms.
Now that you’ve gathered all the necessary supplies, you’re ready to move on to the next step: rinsing the grapes. Let’s ensure that your grapes are clean and ready to be stored in the fridge!
Step 2: Rinse the grapes
Now that you have all the necessary supplies ready, it’s time to move on to the next step: rinsing the grapes. Rinsing grapes is an important step to remove any dirt, debris, or potential pesticides that may be present on the fruit’s surface. Here’s how to do it:
- Prepare the colander or strainer: Place the colander or strainer in the sink or a clean bowl. Make sure it is clean and free of any residue or debris that may be left from previous use.
- Transfer the grapes to the colander or strainer: Carefully pour the grapes into the colander or strainer. If you have a large batch of grapes, you may need to do this in several smaller batches to ensure that the grapes can be rinsed thoroughly.
- Rinse the grapes under running water: Turn on the cold tap and let a gentle stream of water flow over the grapes. Use your fingers to gently rub the grapes as the water runs over them. This will help to dislodge any dirt or debris that may be clinging to the fruit’s skin.
- Inspect for any remaining debris: As you rinse the grapes, keep an eye out for any stubborn dirt or debris that may require extra attention. If you spot any, use a gentle brushing motion with your fingers to remove it.
- Continue rinsing until the water runs clear: Rinse the grapes under the running water until the water runs clear and there are no visible signs of dirt or debris on the grapes. This may take a minute or two, depending on the condition of the grapes and the amount of dirt present.
Remember to handle the grapes gently while rinsing to avoid bruising or damaging them. Use your fingertips to rub the grapes, being careful not to crush them. The gentle flow of water will help to remove any impurities from the grapes’ surface.
It’s important to note that you don’t need to use soap or detergent when rinsing grapes. Plain water is sufficient to wash away any unwanted substances, and using soap can leave a residue on the grapes.
Once you’ve rinsed the grapes thoroughly and are satisfied that they are clean, it’s time to move on to the next step: drying the grapes before storage. Let’s ensure your grapes are completely dry to prevent any moisture-related issues!
Read more: How To Store Cabbage In Fridge After Cutting
Step 3: Dry the grapes
After rinsing the grapes, it’s important to dry them thoroughly before storing them in the fridge. Drying the grapes helps to remove excess moisture, which can otherwise lead to spoilage. Here’s how to dry your grapes:
- Prepare a clean kitchen towel or paper towels: Lay out a clean kitchen towel or a few layers of paper towels on a flat surface. Ensure that the surface is clean and free from any contaminants that might transfer to the grapes.
- Transfer the rinsed grapes to the towel: Gently transfer the rinsed grapes onto the prepared kitchen towel or paper towels. Spread them out in a single layer, making sure they are not overlapping or crowded.
- Pat the grapes dry: Use another clean kitchen towel or paper towels to gently pat the grapes dry. Start at one end of the towel and work your way across the grapes, applying light pressure. Be careful not to squeeze or crush the grapes.
- Air dry the grapes: Leave the grapes on the towel or paper towels to air dry for a few minutes. This will allow any remaining moisture to evaporate naturally. Avoid drying them in direct sunlight or using a fan, as it may affect the quality of the grapes.
It’s important to ensure that the grapes are completely dry before proceeding to the next step. Excess moisture can promote the growth of mold or bacteria, which can spoil the grapes more quickly.
Take note that drying the grapes may not completely remove all traces of moisture, especially in the crevices and between grapes. However, the gentle patting and air drying will significantly reduce the excess water on the grapes and minimize the risk of spoilage.
Once the grapes are dry, you can proceed to the next step of removing any spoiled or damaged grapes before storing them in the fridge. Let’s ensure your grapes are in optimal condition!
After washing grapes, make sure to dry them thoroughly with paper towels before storing them in a breathable container or perforated plastic bag in the fridge. This will help prevent moisture buildup and extend their shelf life.
Step 4: Remove any spoiled or damaged grapes
Before storing the grapes in the fridge, it’s important to inspect them and remove any grapes that are spoiled or damaged. Doing so will prevent these grapes from affecting the others and help maintain the overall freshness of the bunch. Here’s how to remove any spoiled or damaged grapes:
- Examine each grape closely: Take the time to individually examine each grape in the bunch. Look for any signs of spoilage, such as mold, shriveled skin, or discoloration. Additionally, check for any grapes that have bruises, cuts, or are overly soft.
- Separate the spoiled or damaged grapes: As you identify grapes that are spoiled or damaged, set them aside in a separate container or discard them immediately. This will prevent them from contaminating the rest of the grapes and hastening their deterioration.
- Check nearby grapes: When you find a spoiled or damaged grape, check the grapes immediately surrounding it as well. Sometimes, the spoilage can spread to nearby grapes, so it’s essential to inspect them closely and remove any potentially affected ones.
- Continue until all grapes are inspected: Repeat the process of examining and removing spoiled or damaged grapes until you have gone through the entire bunch. This step ensures that only the freshest and highest-quality grapes remain for storage.
Removing any spoiled or damaged grapes is crucial to maintain the freshness and longevity of the remaining grapes. By eliminating the compromised fruits, you can prevent the spread of spoilage and maintain the overall quality of the bunch.
It’s important to handle the grapes gently while inspecting them to avoid causing unnecessary damage. Be mindful of any signs that indicate spoilage, such as an unpleasant odor or a significant change in texture or color.
Once you’ve completed this step and removed any spoiled or damaged grapes, you can proceed to the next step: placing the grapes in a container or bag for storage in the fridge. Let’s make sure your grapes are prepared for optimal storage!
Step 5: Place the grapes in a container or bag
Now that you have inspected and removed any spoiled or damaged grapes, it’s time to transfer the remaining grapes into a container or bag for storage in the fridge. Properly storing the grapes will help to maintain their freshness and prevent them from being crushed or damaged. Follow these steps to place the grapes in a suitable container or bag:
- Select a clean container or bag: Choose a clean container or plastic bag that is large enough to comfortably hold the grapes without overcrowding or squishing them. Ensure that the container or bag is food-safe and has a secure lid or closure to maintain freshness.
- Add the grapes to the container or bag: Gently transfer the inspected grapes into the container or bag. Be careful not to drop or spill any of the grapes during this process. Handle them gently to avoid bruising or damaging the fruit.
- Avoid overfilling: Ensure that you do not overfill the container or bag. Leave some room for air circulation to prevent the grapes from getting crushed or squished. If using a plastic bag, try to remove as much air as possible before sealing to minimize oxidation.
- Seal the container or bag: Close the container with a secure lid or seal the bag tightly to create an airtight environment. This will help to maintain the grapes’ freshness and protect them from external contaminants in the fridge.
- Label and date the container or bag (optional): If desired, label the container or bag with the date of storage. This step can help you keep track of the freshness and expiration date of the grapes.
Choosing the right container or bag is essential for grape storage. Options like airtight containers, ziplock bags, or airtight produce storage bags are ideal choices. These types of containers and bags will help to maintain the grapes’ quality by preventing excessive moisture loss and exposure to air.
Remember, proper storage is key to keeping your grapes fresh and flavorful. By following these steps, you can ensure that your grapes are stored in the best possible way, ready for consumption whenever you desire.
Now that your grapes are securely stored, let’s move on to the next step: storing the grapes in the fridge at the appropriate temperature. Your delicious grapes will be safely preserved and ready for enjoyment whenever you’re ready!
Step 6: Store the grapes in the fridge
Now that you have placed the grapes in a container or bag, it’s time to store them in the refrigerator. Proper storage in the fridge is essential to maintain the quality, freshness, and flavor of the grapes. Follow these steps to ensure optimal storage conditions:
- Select the optimal storage location: Choose the appropriate spot in your refrigerator to store the grapes. The crisper drawer is an ideal location as it provides a controlled environment with higher humidity, which helps to keep the grapes fresh.
- Prevent exposure to strong odors: Avoid storing the grapes near foods with strong odors, as grapes can easily absorb these odors. To prevent unwanted flavor transfer, keep the grapes away from pungent items like onions, garlic, or strong cheeses.
- Place the container or bag in the designated spot: Carefully place the container or bag of grapes in the chosen storage location within the fridge. Ensure that the container or bag is not squished or crowded, allowing air to circulate around the grapes.
- Close the refrigerator door gently: Close the refrigerator door gently to avoid jostling or disturbing the grapes. This will help maintain their quality and prevent any unnecessary damage.
- Keep the temperature consistent: Check the temperature settings of your refrigerator and ensure that it is set between 32°F (0°C) and 40°F (4°C). Maintaining a consistent temperature within this range is essential for preserving the quality and freshness of the grapes.
Proper storage in the refrigerator will prolong the shelf life of your grapes and help retain their crispness and juiciness. The controlled humidity level in the crisper drawer helps to prevent moisture loss, preserving the grapes’ texture and flavor.
It’s important to note that grapes are perishable and have a limited storage life. It is recommended to consume them within one to two weeks for optimal freshness. Frequent temperature fluctuations, such as opening and closing the refrigerator door frequently, can also affect the grapes’ quality and longevity.
Now that your grapes are safely stored in the refrigerator, you’re ready for the final step: properly handling and consuming the stored grapes. Let’s make sure you enjoy your grapes to the fullest!
Read more: How To Store Grapes In Freezer
Step 7: Properly handle and consume stored grapes
Now that your grapes are stored in the fridge, it’s essential to handle and consume them properly to maintain their quality and ensure a safe and enjoyable eating experience. Follow these guidelines for handling and consuming stored grapes:
- Wash the grapes before eating: Before consuming the stored grapes, it’s crucial to rinse them again under cool running water. Washing will help remove any bacteria that may have accumulated during storage, ensuring your grapes are clean and safe to eat.
- Remove grapes from the fridge just before consumption: Grapes are best enjoyed when they are slightly chilled. To experience their optimal flavor and texture, remove them from the fridge just before you’re ready to eat them.
- Separate the desired portion: Take out the desired portion of grapes that you plan to eat at a given time. Doing so prevents unnecessary handling and exposure of the remaining grapes, helping to maintain their freshness for a longer period.
- Consume within a week or two: Stored grapes have a limited shelf life. It’s best to consume them within a week or two to enjoy them at their peak quality. This timeframe ensures optimal freshness and flavor.
- Store leftovers properly: If you have any leftover grapes, store them back in the fridge promptly. Ensure they are in a sealed container or bag to maintain their freshness. However, note that their quality may not be as optimal as fresh grapes.
- Check for spoilage before eating: Always assess the grapes for any signs of spoilage, such as mold, unusual odor, or dramatic changes in texture or color. If you notice any of these signs, it’s best to discard the grapes to prevent any potential health risks.
Remember, proper handling and consumption practices are essential for enjoying your stored grapes while ensuring your health and safety. By following these steps, you can savor the deliciousness of your grapes for a longer period.
Now that you have successfully stored and learned how to handle and consume your grapes, you can enjoy them as a healthy snack, add them to salads, use them in smoothies, or even freeze them for a refreshing treat. Get creative and explore various ways to incorporate these flavorful fruits into your meals and snacks!
By following these steps and guidelines, you can make the most out of your stored grapes and indulge in their natural sweetness and juiciness. Enjoy your delicious grapes and happy snacking!
Conclusion
Properly storing grapes in the fridge after washing is essential for maintaining their freshness, quality, and flavor. By following the steps outlined in this article, you can ensure that your grapes are clean, safe to consume, and stored in the best possible conditions.
Washing grapes before storing removes dirt, debris, and potential pesticides, enhancing their safety and taste. Drying the grapes thoroughly helps prevent moisture-related issues and prolongs their shelf life. Removing any spoiled or damaged grapes ensures the overall quality and longevity of the bunch.
Placing the grapes in a suitable container or bag and storing them in the fridge at the proper temperature helps maintain their freshness and prevents them from being crushed or damaged. Properly handling and consuming the stored grapes, such as washing them again before eating and consuming them within a week or two, ensures a safe and enjoyable experience.
Remember to inspect the grapes for any signs of spoilage before eating and promptly discard any grapes that show such signs. Additionally, be mindful of the storage time frame and consume the grapes within the recommended period for optimal flavor and quality.
By following these steps and guidelines, you can enjoy the deliciousness of your stored grapes, whether as a refreshing snack or a versatile ingredient in various culinary creations. Embrace the natural sweetness, juiciness, and nutritional benefits of this versatile fruit.
So, the next time you bring home a bunch of fresh grapes, don’t forget to wash them before storing them in the fridge using the steps outlined in this article. Your efforts will be rewarded with the pleasure of savoring crisp, flavorful grapes whenever you desire.
Happy grape storing and enjoy the delightful taste of these wonderful fruits!
Frequently Asked Questions about How To Store Grapes In Fridge After Washing
Was this page helpful?
At Storables.com, we guarantee accurate and reliable information. Our content, validated by Expert Board Contributors, is crafted following stringent Editorial Policies. We're committed to providing you with well-researched, expert-backed insights for all your informational needs.


0 thoughts on “How To Store Grapes In Fridge After Washing”