Articles
How To Store Hydration Bladder
Modified: December 7, 2023
Learn how to store your hydration bladder properly with these helpful articles. Keep your gear clean and ready for your next adventure.
(Many of the links in this article redirect to a specific reviewed product. Your purchase of these products through affiliate links helps to generate commission for Storables.com, at no extra cost. Learn more)
Introduction
A hydration bladder is an essential piece of gear for outdoor enthusiasts, athletes, and adventurers who need a convenient and hands-free way to stay hydrated on the go. These bladder systems often come with a drinking tube and a reservoir that can be filled with water or other beverages.
Properly storing a hydration bladder after use is crucial to maintain its longevity and ensure that it remains clean and free from mold or mildew. In this article, we will guide you through the step-by-step process of storing your hydration bladder to keep it in optimal condition for future use.
By following these simple steps, you can extend the lifespan of your hydration bladder and avoid any unpleasant surprises the next time you reach for it on your next adventure. Let’s dive in and explore how you can store your hydration bladder effectively.
Key Takeaways:
- Properly cleaning, drying, and storing your hydration bladder is crucial for maintaining its cleanliness, longevity, and performance, ensuring it’s ready for your next adventure.
- Regular maintenance and storage of your hydration bladder not only prolong its lifespan but also contribute to your health and comfort during outdoor activities. Take the time to care for your hydration bladder, and it will serve you well on all your future ventures.
Read more: Coir Soil Mix: How Long To Hydrate
Step 1: Cleaning the Hydration Bladder
Before storing your hydration bladder, it’s important to give it a thorough cleaning to remove any residue or bacteria that may have accumulated during use. Follow these steps to ensure a proper clean:
- Start by emptying the bladder completely. Remove any remaining liquid and dispose of it appropriately.
- Dismantle the bladder by separating the drinking tube, the reservoir, and any other detachable parts.
- Rinse the reservoir with warm water, preferably using a mild soap or cleaning solution specifically designed for hydration bladders. Avoid using harsh chemicals or bleach, as they can damage the bladder.
- Use a cleaning brush or a soft cloth to scrub the interior of the reservoir, paying extra attention to any hard-to-reach areas or spots where residue may have built up.
- Rinse the reservoir thoroughly to remove any soap residue. Make sure there are no traces of soap left behind.
- For the drinking tube, you can use a cleaning brush specifically designed for hydration tubes to remove any dirt or bacteria. Run warm water through the tube to flush out any debris.
It’s worth noting that some hydration bladders are dishwasher safe. If your bladder’s manufacturer indicates that it is dishwasher safe, you can place the reservoir and detachable parts on the top rack of your dishwasher for a more thorough clean. However, be sure to check the manufacturer’s instructions before doing so.
Once you’ve cleaned all the components of your hydration bladder, move on to the next step to ensure proper drying before storage.
Step 2: Drying the Hydration Bladder
After cleaning your hydration bladder, it’s crucial to properly dry it before storing it. Leaving any moisture inside can lead to the growth of mold and mildew, compromising the hygiene of your bladder. Follow these steps to effectively dry your hydration bladder:
- Shake out any excess water from the reservoir and the drinking tube.
- Use a clean towel or paper towel to gently dab and absorb any remaining moisture. Pay attention to hard-to-reach areas, such as the connector points and the bottom of the bladder.
- Leave the bladder and all its components in a well-ventilated area to air dry completely. Make sure to place them on a clean surface to avoid any contamination.
- Avoid direct sunlight, as it can damage the bladder material. Instead, opt for a shaded area with good airflow.
- It’s recommended to fully extend the drinking tube and hang it horizontally while drying. This helps to ensure that any water trapped inside the tube can drain out completely.
- Periodically check on the bladder to ensure it is completely dry before moving on to the next step. This may take several hours, depending on the humidity and airflow in your environment.
By thoroughly drying your hydration bladder, you eliminate any moisture that may cause unpleasant odors or potential health risks. Once your bladder is completely dry, you can proceed to the next step, which involves disconnecting and emptying the drinking tube.
After each use, clean and dry the hydration bladder thoroughly before storing it. Store it in a cool, dry place away from direct sunlight to prevent mold and mildew growth.
Step 3: Emptying and Detaching the Drinking Tube
Before storing your hydration bladder, it’s important to empty and detach the drinking tube. This step ensures that the tube remains clean and free from any residual liquid. Follow these steps to properly empty and detach the drinking tube from your hydration bladder:
- Begin by emptying any remaining liquid from the drinking tube. Squeeze the tube gently to force out any water or beverage that may be inside.
- If your hydration bladder has a quick-release mechanism, detach the drinking tube from the bladder by pressing the release button or sliding the connector apart. If there is no quick-release mechanism, carefully disconnect the tube from the bladder, taking care not to damage the tube or the connector.
- Once detached, inspect the drinking tube for any signs of dirt, residue, or mold. If necessary, clean the tube using a specialized cleaning brush or by soaking it in warm, soapy water.
- Rinse the drinking tube thoroughly to remove any soap residue, and allow it to air dry completely.
- Inspect the drinking tube for any signs of wear and tear, such as cracks or leaks. Replace the tube if it is damaged to ensure the optimal performance and safety of your hydration bladder.
By emptying and detaching the drinking tube, you prevent any liquid remnants from becoming a breeding ground for bacteria or mold. This step also makes it easier to store the hydration bladder without any tangled or cumbersome parts. With the drinking tube safely removed, you can now proceed to the next step, which involves folding and storing the hydration bladder.
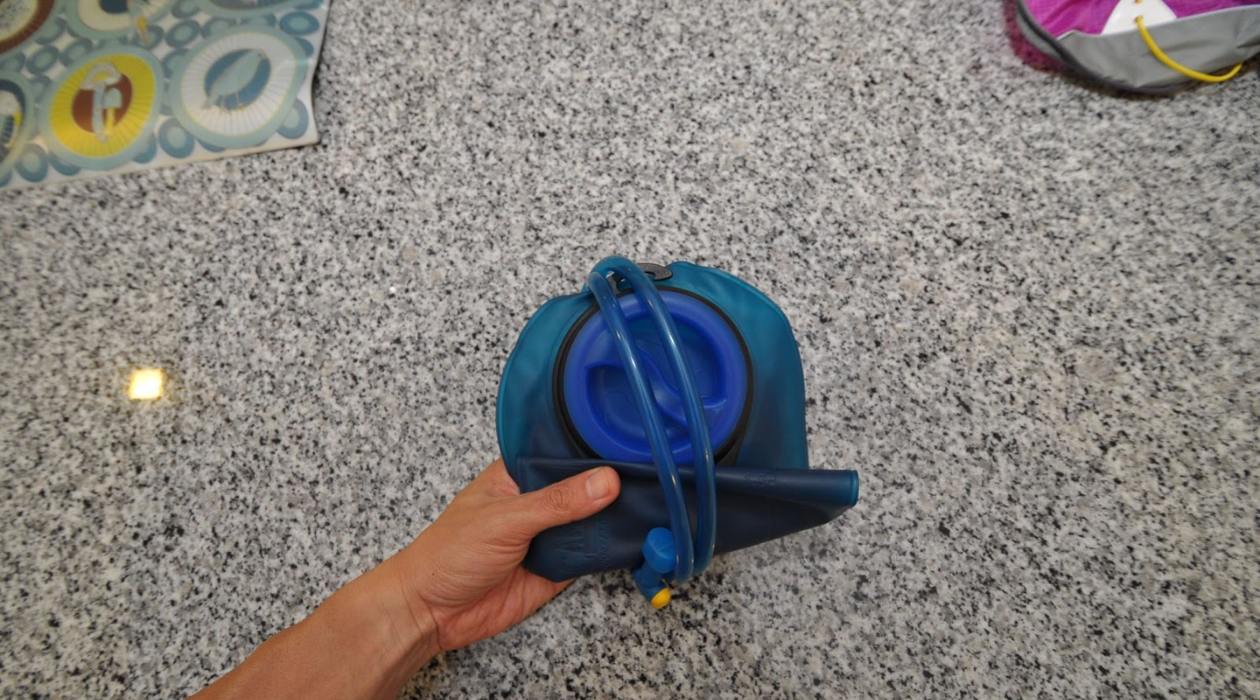
Step 4: Fold and Store the Hydration Bladder
Once you’ve completed the cleaning and drying process for your hydration bladder, it’s time to fold and store it properly. Follow these steps to ensure that your hydration bladder remains in optimal condition during storage:
- Start by folding the reservoir of your hydration bladder. Begin at the bottom of the bladder and fold it in a neat and compact manner. The exact folding method may vary depending on the design of your bladder, so refer to the manufacturer’s instructions if needed.
- Avoid folding the bladder too tightly, as it can cause creases and potentially compromise the integrity of the material.
- If your hydration bladder has multiple compartments, make sure to fold each compartment individually.
- Once you’ve folded the bladder, gently place it into a clean and dry storage bag or container. Avoid using plastic bags, as they can trap moisture and promote the growth of mold.
- If possible, store the bladder in an upright position to prevent any bending or unnecessary stress on the materials.
- Choose a location for storage that is cool, dry, and away from direct sunlight and extreme temperatures. This helps to preserve the quality and lifespan of the bladder.
- Label or mark the storage bag or container with the date of storage. This can help you keep track of when it’s time to inspect or replace the hydration bladder.
By properly folding and storing your hydration bladder, you can protect it from potential damage and ensure that it remains clean and ready for future adventures. Remember to check on the bladder periodically during storage to ensure that it is still in good condition.
Now that you’ve completed the final step, you can rest assured knowing that your hydration bladder is stored correctly and ready for your next outdoor excursion.
Conclusion
Properly storing your hydration bladder is essential for maintaining its cleanliness, longevity, and performance. By following the steps outlined in this article, you can ensure that your hydration bladder remains in optimal condition for your future adventures.
Firstly, cleaning the hydration bladder thoroughly helps to remove any residue or bacteria that may have accumulated during use. Remember to rinse all the components and use a specialized cleaning brush for the drinking tube if needed.
Secondly, drying the hydration bladder completely is vital to prevent the growth of mold or mildew. Take the time to shake out any excess water and allow the bladder to air dry in a well-ventilated area.
Thirdly, emptying and detaching the drinking tube helps maintain its cleanliness and allows for easier storage. Inspect the tube for any damage and replace it if necessary.
Finally, fold the hydration bladder neatly and store it in a clean and dry container or bag. Choose a cool and dry location for storage, and label the container with the date of storage for reference.
By following these steps, you can ensure that your hydration bladder remains hygienic, functional, and ready for your next adventure. Regularly check the bladder during storage to ensure its integrity and replace any damaged parts as needed.
Remember, proper maintenance and storage of your hydration bladder not only prolong its lifespan but also contribute to your health and comfort during outdoor activities. So, take the time to care for your hydration bladder, and it will serve you well on all your future ventures.
Frequently Asked Questions about How To Store Hydration Bladder
Was this page helpful?
At Storables.com, we guarantee accurate and reliable information. Our content, validated by Expert Board Contributors, is crafted following stringent Editorial Policies. We're committed to providing you with well-researched, expert-backed insights for all your informational needs.


0 thoughts on “How To Store Hydration Bladder”