Articles
How To Store Latkes
Modified: February 27, 2024
Learn how to store latkes for later enjoyment with these helpful articles. Find tips and tricks to keep your latkes fresh and tasty.
(Many of the links in this article redirect to a specific reviewed product. Your purchase of these products through affiliate links helps to generate commission for Storables.com, at no extra cost. Learn more)
Introduction
Latkes are a beloved traditional Jewish dish made from grated potatoes that are fried to golden perfection. They are crispy on the outside and soft on the inside, making them irresistibly delicious. Whether you make them for Hanukkah or any other occasion, it’s important to know the best way to store them to maintain their taste and texture.
In this article, we will guide you through the process of storing latkes so that you can enjoy them later without compromising their quality. We’ll cover key equipment and ingredients, step-by-step instructions for making the latke mixture, shaping the latkes, storing and freezing options, reheating techniques, and serving tips and suggestions. By the end of this article, you’ll be equipped with all the knowledge you need to keep your latkes fresh and tasty!
Key Takeaways:
- Preserve the Flavor: Properly store and freeze your homemade latkes to maintain their delicious taste and texture for later enjoyment, whether for a quick meal or a special occasion.
- Reheat with Care: Follow the right reheating techniques to ensure your stored or frozen latkes remain crispy and flavorful, ready to be served with traditional accompaniments or creative toppings.
Read more: How To Store Store-Bought Bread
Equipment and Ingredients
Before diving into the process of storing latkes, it’s essential to gather the necessary equipment and ingredients. Here’s what you’ll need:
Equipment:
- A large mixing bowl
- A grater or food processor for shredding the potatoes
- A sharp knife for chopping onions and other vegetables (optional)
- A frying pan or skillet
- A spatula or slotted spoon for flipping the latkes
- A baking sheet or cooling rack for draining excess oil
- Parchment paper or aluminum foil for layering and separating latkes
- An airtight container or resealable freezer bags for storage
Ingredients:
- 4 large potatoes, preferably Russet or Yukon Gold
- 1 small onion (optional)
- 2 large eggs, beaten
- 3 tablespoons all-purpose flour or matzo meal
- 1 teaspoon salt, or to taste
- 1/2 teaspoon black pepper, or to taste
- Oil for frying, such as vegetable or canola oil
Once you have all the necessary equipment and ingredients ready, you’ll be well-prepared to embark on the latke-making journey and ensure the best preservation methods for later enjoyment.
Step 1: Making the Latke Mixture
The first step in preparing latkes is creating the perfect mixture. Follow these steps:
- Start by peeling and grating the potatoes. You can use a grater or a food processor with a shredding attachment. Make sure to squeeze out any excess moisture from the grated potatoes using a clean kitchen towel or cheesecloth.
- If you prefer to add onions for added flavor, finely chop the small onion and mix it with the grated potatoes.
- In a large mixing bowl, combine the grated potatoes (and onions, if using) with the beaten eggs, flour or matzo meal, salt, and black pepper. Mix everything together until well-combined.
- Let the mixture rest for about 10 minutes. This will allow the flavors to meld together and the flour to absorb any extra moisture.
Once the latke mixture is prepared, you are ready to move on to the next step of shaping the latkes.
Read more: How To Store Basil From Grocery Store
Step 2: Shaping the Latkes
Shaping the latkes is an important step to ensure uniform cooking and crispy edges. Follow these steps:
- Heat a frying pan or skillet over medium-high heat and add enough oil to cover the bottom of the pan.
- Take about ¼ cup of the latke mixture and form it into a small patty using your hands. You can also use a spoon or an ice cream scoop for uniform-sized latkes.
- Gently place the latke patty into the hot oil and use a spatula to flatten it slightly. Repeat this process with more latke mixture, making sure not to overcrowd the pan.
- Cook the latkes for about 3-4 minutes on each side, or until they turn golden brown and crispy. Flip them carefully using a spatula to ensure even browning.
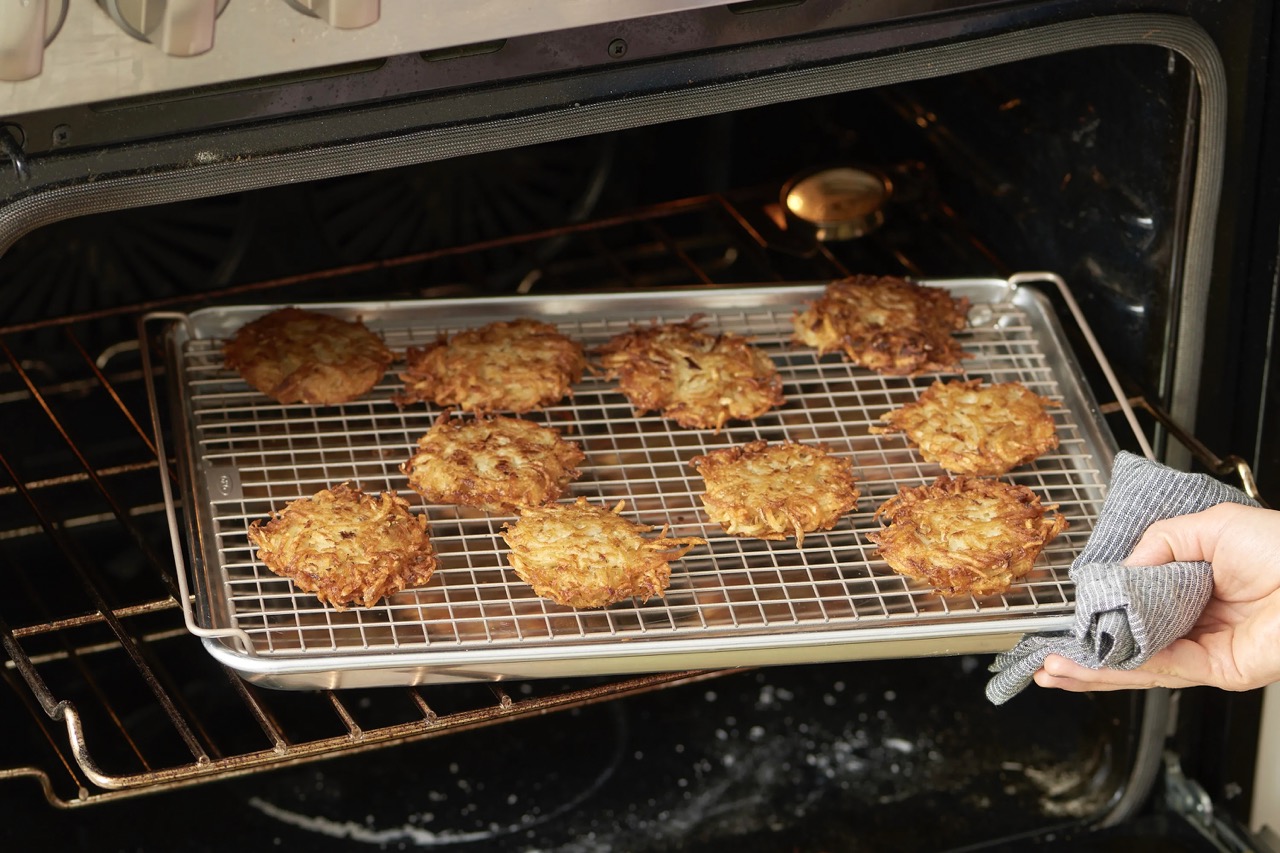
- Once the latkes are cooked, transfer them to a baking sheet or cooling rack lined with parchment paper or aluminum foil to drain excess oil.
Now that the latkes are perfectly shaped and cooked, it’s time to move on to the next step – storing and freezing the latkes for later use.
Step 3: Storing and Freezing Options
Storing and freezing latkes properly is crucial to maintain their flavor and texture. Here are a few options to choose from:
Short-Term Storage:
If you plan on enjoying the latkes within a day or two, you can store them in the refrigerator. Follow these steps:
- Allow the cooked latkes to cool completely at room temperature.
- Transfer the cooled latkes to an airtight container or zip-top bag, placing parchment paper or wax paper in between each layer to prevent sticking.
- Store the latkes in the refrigerator for up to 2 days.
Long-Term Freezing:
If you want to store the latkes for a longer period, freezing is the best option. Follow these steps:
- Cool the cooked latkes completely at room temperature.
- Place the latkes in a single layer on a baking sheet lined with parchment paper or wax paper.
- Flash freeze the latkes in the freezer for about an hour to prevent them from sticking together.
- Once frozen, transfer the latkes to an airtight container or freezer-safe bag. Be sure to remove as much air as possible before sealing.
- Label the container or bag with the date and contents.
- Store the latkes in the freezer for up to 3 months.
By following these storage and freezing methods, you can enjoy homemade latkes anytime, whether it’s for a quick meal or a special occasion.
Read more: How To Store Arrows
Step 4: Reheating the Latkes
When you’re ready to enjoy your stored or frozen latkes, it’s important to reheat them properly to ensure they remain crispy and flavorful. Here’s how:
From the Refrigerator:
- Preheat your oven to 375°F (190°C).
- Place the refrigerated latkes on a baking sheet lined with parchment paper.
- Heat the latkes in the preheated oven for about 10-12 minutes or until they are hot and crispy.
From the Freezer:
- Preheat your oven to 400°F (200°C).
- Arrange the frozen latkes on a baking sheet lined with parchment paper.
- Bake the latkes in the preheated oven for approximately 15-20 minutes, or until they are heated through and crispy.
Alternatively, you can use an air fryer or stovetop to reheat the latkes. For the air fryer, cook the refrigerated or frozen latkes at 375°F (190°C) for 5-7 minutes or until they are heated through and crispy. For stovetop reheating, simply heat a frying pan over medium heat and place the latkes in the pan, cooking for 2-3 minutes on each side until they are warm and crispy.
Once the latkes are reheated, you can serve them immediately or keep them warm in a low-temperature oven until ready to serve.
Step 5: Serving Tips and Suggestions
Now that your latkes are freshly reheated and ready to be enjoyed, here are some serving tips and suggestions to enhance your culinary experience:
Read more: How To Store Roux
Traditional Accompaniments:
Serve your latkes with the traditional accompaniments that complement their flavors. Some popular options include:
- Sour cream: A dollop of tangy sour cream adds a creamy touch.
- Applesauce: The sweet and tart flavor of applesauce balances the savory latkes perfectly.
- Chives or scallions: Sprinkle some fresh chives or thinly sliced scallions on top for added flavor and freshness.
Creative Variations:
Get creative with your latke toppings and explore different flavor combinations. Here are a few ideas:
- Smoked salmon and dill: Top your latkes with slices of smoked salmon and fresh dill for an elegant twist.
- Avocado and lime crema: Mash ripe avocados and mix with lime juice and sour cream for a creamy and refreshing topping.
- Greek-inspired: Garnish your latkes with crumbled feta cheese, tzatziki sauce, and a sprinkle of chopped Kalamata olives.
Serve as a Side Dish:
Latkes can be a versatile addition to any meal. Consider serving them as a side dish alongside roasted meats, grilled vegetables, or as a brunch item with eggs and bacon.
Presentation:
When serving latkes, presentation can make a difference. Arrange them on a platter or individual plates and garnish with fresh herbs or a sprinkle of paprika for a pop of color.
Enjoy your homemade latkes, and don’t be afraid to experiment with different toppings and variations to suit your taste preferences. Whether it’s a festive gathering or a cozy family dinner, latkes are sure to be a crowd-pleasing delight!
Read more: How To Store Cardstock
Conclusion
Storing and preserving the deliciousness of your homemade latkes is key to ensuring they taste just as good as the day they were made. By following the steps outlined in this article, you can store your latkes in the refrigerator or freezer, and enjoy them at a later time without compromising their flavor and texture.
Remember, when making the latke mixture, take the time to properly squeeze out the moisture from the grated potatoes for crispy latkes. Shaping the latkes into uniform patties will ensure even cooking and a delightful crunch. When it comes to storing, refrigerate for short-term storage or freeze for longer-term preservation.
Once it’s time to enjoy your stored or frozen latkes, reheating them properly is essential. Use the oven, air fryer, or stovetop to get them crispy and hot. And don’t forget to serve them with traditional accompaniments such as sour cream and applesauce, or get creative with unique toppings to elevate your latke experience.
Whether you’re celebrating Hanukkah, hosting a dinner party, or simply craving this comforting dish, knowing how to store and reheat your latkes will ensure they remain a crowd-pleasing favorite throughout the year.
So, gather your equipment and ingredients, follow the steps provided, and savor the joy of homemade latkes any time you desire. Happy cooking and storing!
Frequently Asked Questions about How To Store Latkes
Was this page helpful?
At Storables.com, we guarantee accurate and reliable information. Our content, validated by Expert Board Contributors, is crafted following stringent Editorial Policies. We're committed to providing you with well-researched, expert-backed insights for all your informational needs.


0 thoughts on “How To Store Latkes”