
Articles
How To Store Onigiri
Modified: February 29, 2024
Learn how to store onigiri in this helpful article. Discover the best methods to keep your delicious Japanese rice balls fresh and tasty.
(Many of the links in this article redirect to a specific reviewed product. Your purchase of these products through affiliate links helps to generate commission for Storables.com, at no extra cost. Learn more)
html
Introduction
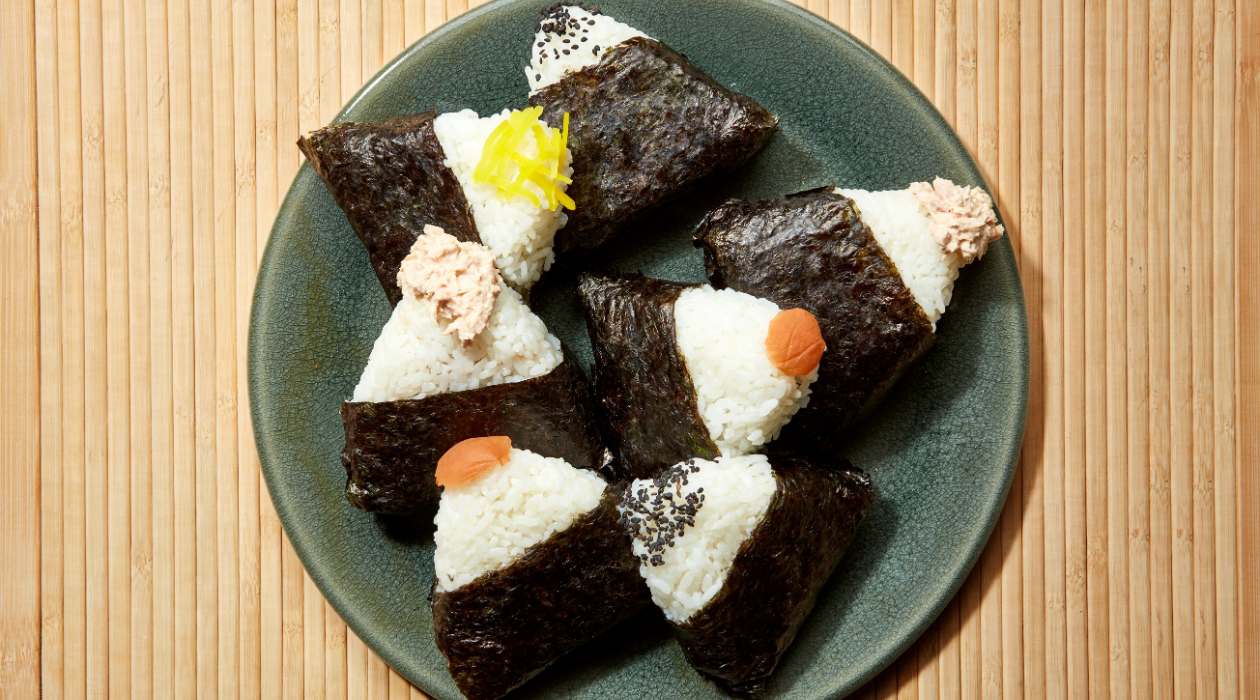
Onigiri, a traditional Japanese rice ball, is a versatile and delicious snack that can be enjoyed anytime, anywhere. Whether you’re a fan of traditional fillings like tuna and pickled plum or prefer modern twists with avocado or fried chicken, onigiri is a satisfying treat that can be easily stored and enjoyed later.
Storing onigiri properly is crucial to ensure its freshness and taste. In this article, we will take you through the step-by-step process of storing onigiri, from choosing the right filling to reheating the stored onigiri. So, let’s dive in!
html
Key Takeaways:
- Enjoy onigiri anytime by choosing the right filling, shaping with care, and wrapping securely. Store in the fridge for up to 24 hours or freeze for later, then reheat for a warm, satisfying snack.
- Storing onigiri is easy with fresh ingredients, proper shaping, and thoughtful wrapping. Keep them at room temperature for a few hours or store in the fridge or freezer for later enjoyment.
Read more: How To Store Store-Bought Bread
Step 1: Choosing the right onigiri filling
The first step in storing onigiri is to choose the right filling. Traditional fillings like tuna, salmon, pickled plum, or seaweed are popular choices and can be easily found in Japanese grocery stores. For a modern twist, you can experiment with fillings like avocado, teriyaki chicken, or even kimchi.
When choosing a filling, consider the flavors that complement each other and think about the taste and texture you want to achieve. It’s essential to use fresh ingredients to ensure the best taste and quality of your onigiri.
Once you have chosen your filling, prepare it by cooking the ingredients and seasoning them to your taste. Make sure the filling is not too wet or oily, as it can make the rice soggy and affect its texture.
Remember, the filling is the heart of your onigiri, so take your time to select a combination that suits your palate and preferences. With the right filling, your onigiri will be flavorful and satisfying.
html
Step 2: Preparing the onigiri rice
The key to delicious onigiri lies in perfectly cooked and seasoned rice. Start by rinsing the rice thoroughly to remove any excess starch. Place the rice in a pot with water and let it soak for about 30 minutes.
After soaking, drain the water and add fresh water to the pot. Cook the rice according to the instructions on the package or using a rice cooker. Once the rice is cooked, let it cool down slightly.
While the rice is still warm, season it with a mixture of rice vinegar, sugar, and salt. This step adds flavor to the rice and helps it stick together when shaping the onigiri. Gently mix the seasoning into the rice using a wooden spatula.
It’s important to pay attention to the rice’s texture and stickiness. The rice should be sticky enough to hold its shape when formed into a ball but not overly wet or mushy.
Remember, the quality of the rice plays a crucial role in the taste and texture of your onigiri. Opt for short-grain Japanese rice or sushi rice, as they have the perfect texture for onigiri.
html
Step 3: Shaping the onigiri
Once you have prepared the rice and chosen your filling, it’s time to shape your onigiri. Wet your hands with water or lightly sprinkle them with salt to prevent the rice from sticking.
Scoop a small handful of rice and place it in the palm of your hand. Make a small indentation in the center of the rice and add a spoonful of your chosen filling. Gently fold the rice over the filling, shaping it into a triangular, round, or cylindrical ball.
Press the rice firmly but not too hard to maintain the shape of the onigiri. If you’re using a mold, lightly oil it to prevent sticking and then fill it with rice and the desired filling. Press the mold firmly and remove the onigiri gently.
Take your time shaping the onigiri to ensure it holds together well. If you’re new to shaping onigiri, don’t worry if they don’t come out as perfect triangles or rounds at first. With practice, you’ll master the art of shaping them beautifully.
It’s worth noting that onigiri can be made in various shapes and sizes depending on personal preference. The most important thing is that the rice holds together and encases the filling securely.
html
After shaping the onigiri, wrap it tightly in plastic wrap to prevent it from drying out. Store it in an airtight container in the refrigerator to keep it fresh for up to 2 days.
Step 4: Wrapping the onigiri
Wrapping your onigiri is an important step to keep it fresh and portable. Traditionally, onigiri is wrapped in a thin strip of nori (seaweed) to provide a flavorful and slightly crunchy outer layer.
To wrap your onigiri with nori, cut a strip of nori that is slightly longer than the circumference of your onigiri. Place the strip of nori horizontally on a flat surface and position your onigiri in the center of the nori.
Gently fold the edges of the nori upwards, covering the sides of the onigiri. As you fold, slightly moisten the overlapping edges of the nori with a bit of water to help them stick together.
If you prefer not to use nori, you can also wrap your onigiri in plastic wrap. This method is particularly useful if you plan to store the onigiri for a longer period of time. Simply wrap the onigiri tightly with plastic wrap, making sure to remove any trapped air.
By wrapping your onigiri, you not only enhance its taste and texture but also create a protective layer that helps maintain its freshness.
html
Read more: How To Store Basil From Grocery Store
Step 5: Storing the onigiri
Proper storage is crucial to maintain the freshness and quality of your onigiri. If you plan to consume the onigiri within the next few hours, you can simply keep them at room temperature.
However, if you want to store the onigiri for a longer period of time, it’s best to keep them in the refrigerator. Place the wrapped onigiri in an airtight container or wrap them individually in plastic wrap to prevent drying out or absorbing unwanted odors.
When storing onigiri, it’s important to note that they are best consumed within 24 hours for optimal taste and texture. If you plan to store them for longer, you can freeze the onigiri. Wrap each onigiri tightly in plastic wrap and place them in a freezer-safe bag or container.
When you’re ready to enjoy the frozen onigiri, simply thaw them in the refrigerator overnight. Once thawed, you can either consume them cold or reheat them using a microwave or toaster oven.
It’s important to mention that onigiri tends to dry out over time. To prevent this, you can lightly moisten a paper towel or a clean cloth and place it in the container alongside the onigiri to help retain moisture.
By storing your onigiri properly, you can enjoy them at their best and have a convenient snack ready to go whenever you crave it.
html
Step 6: Reheating the stored onigiri
If you’ve stored your onigiri in the refrigerator or freezer and want to enjoy them warm, you can easily reheat them using a few different methods.
If you have stored the onigiri in the refrigerator, you can simply remove them from the fridge and let them sit at room temperature for a few minutes. This will allow them to gradually come to room temperature and regain their softness.
If you prefer to enjoy your onigiri warm, you can reheat them using a microwave or toaster oven. When using a microwave, wrap the onigiri individually in a damp paper towel to prevent them from drying out. Heat them on medium power for about 30 seconds to 1 minute until they are heated through.
If you’re using a toaster oven, preheat it to a low to medium heat setting. Place the wrapped onigiri directly on the oven rack or on a baking sheet and warm them for 5-7 minutes until they are heated thoroughly.
Remember to remove the nori or plastic wrap before reheating to avoid any unpleasant taste or texture. Once reheated, the onigiri should be soft, warm, and ready to be enjoyed.
html
Conclusion
Storing onigiri allows you to enjoy this beloved Japanese snack whenever you crave it, whether it’s for a quick lunch, a healthy snack, or as part of a bento box. By following these steps – choosing the right filling, preparing the rice, shaping the onigiri, wrapping them securely, and storing them properly – you can ensure that your onigiri stays fresh and delicious.
Remember to use fresh ingredients, take your time shaping the onigiri, and wrap them well to maintain their taste and texture. Whether you store them at room temperature, in the refrigerator, or in the freezer, make sure to consume them within the recommended time for the best eating experience.
So, next time you have leftover onigiri or want to prepare a batch in advance, follow these steps to store them properly. With a little effort and attention to detail, you can enjoy tasty and satisfying onigiri whenever you want!
Frequently Asked Questions about How To Store Onigiri
Was this page helpful?
At Storables.com, we guarantee accurate and reliable information. Our content, validated by Expert Board Contributors, is crafted following stringent Editorial Policies. We're committed to providing you with well-researched, expert-backed insights for all your informational needs.







0 thoughts on “How To Store Onigiri”