
Articles
How To Store Plumeria Cuttings
Modified: December 7, 2023
Learn how to properly store plumeria cuttings with our comprehensive articles. Get expert tips and advice to ensure the success of your plumeria propagation.
(Many of the links in this article redirect to a specific reviewed product. Your purchase of these products through affiliate links helps to generate commission for Storables.com, at no extra cost. Learn more)
Introduction
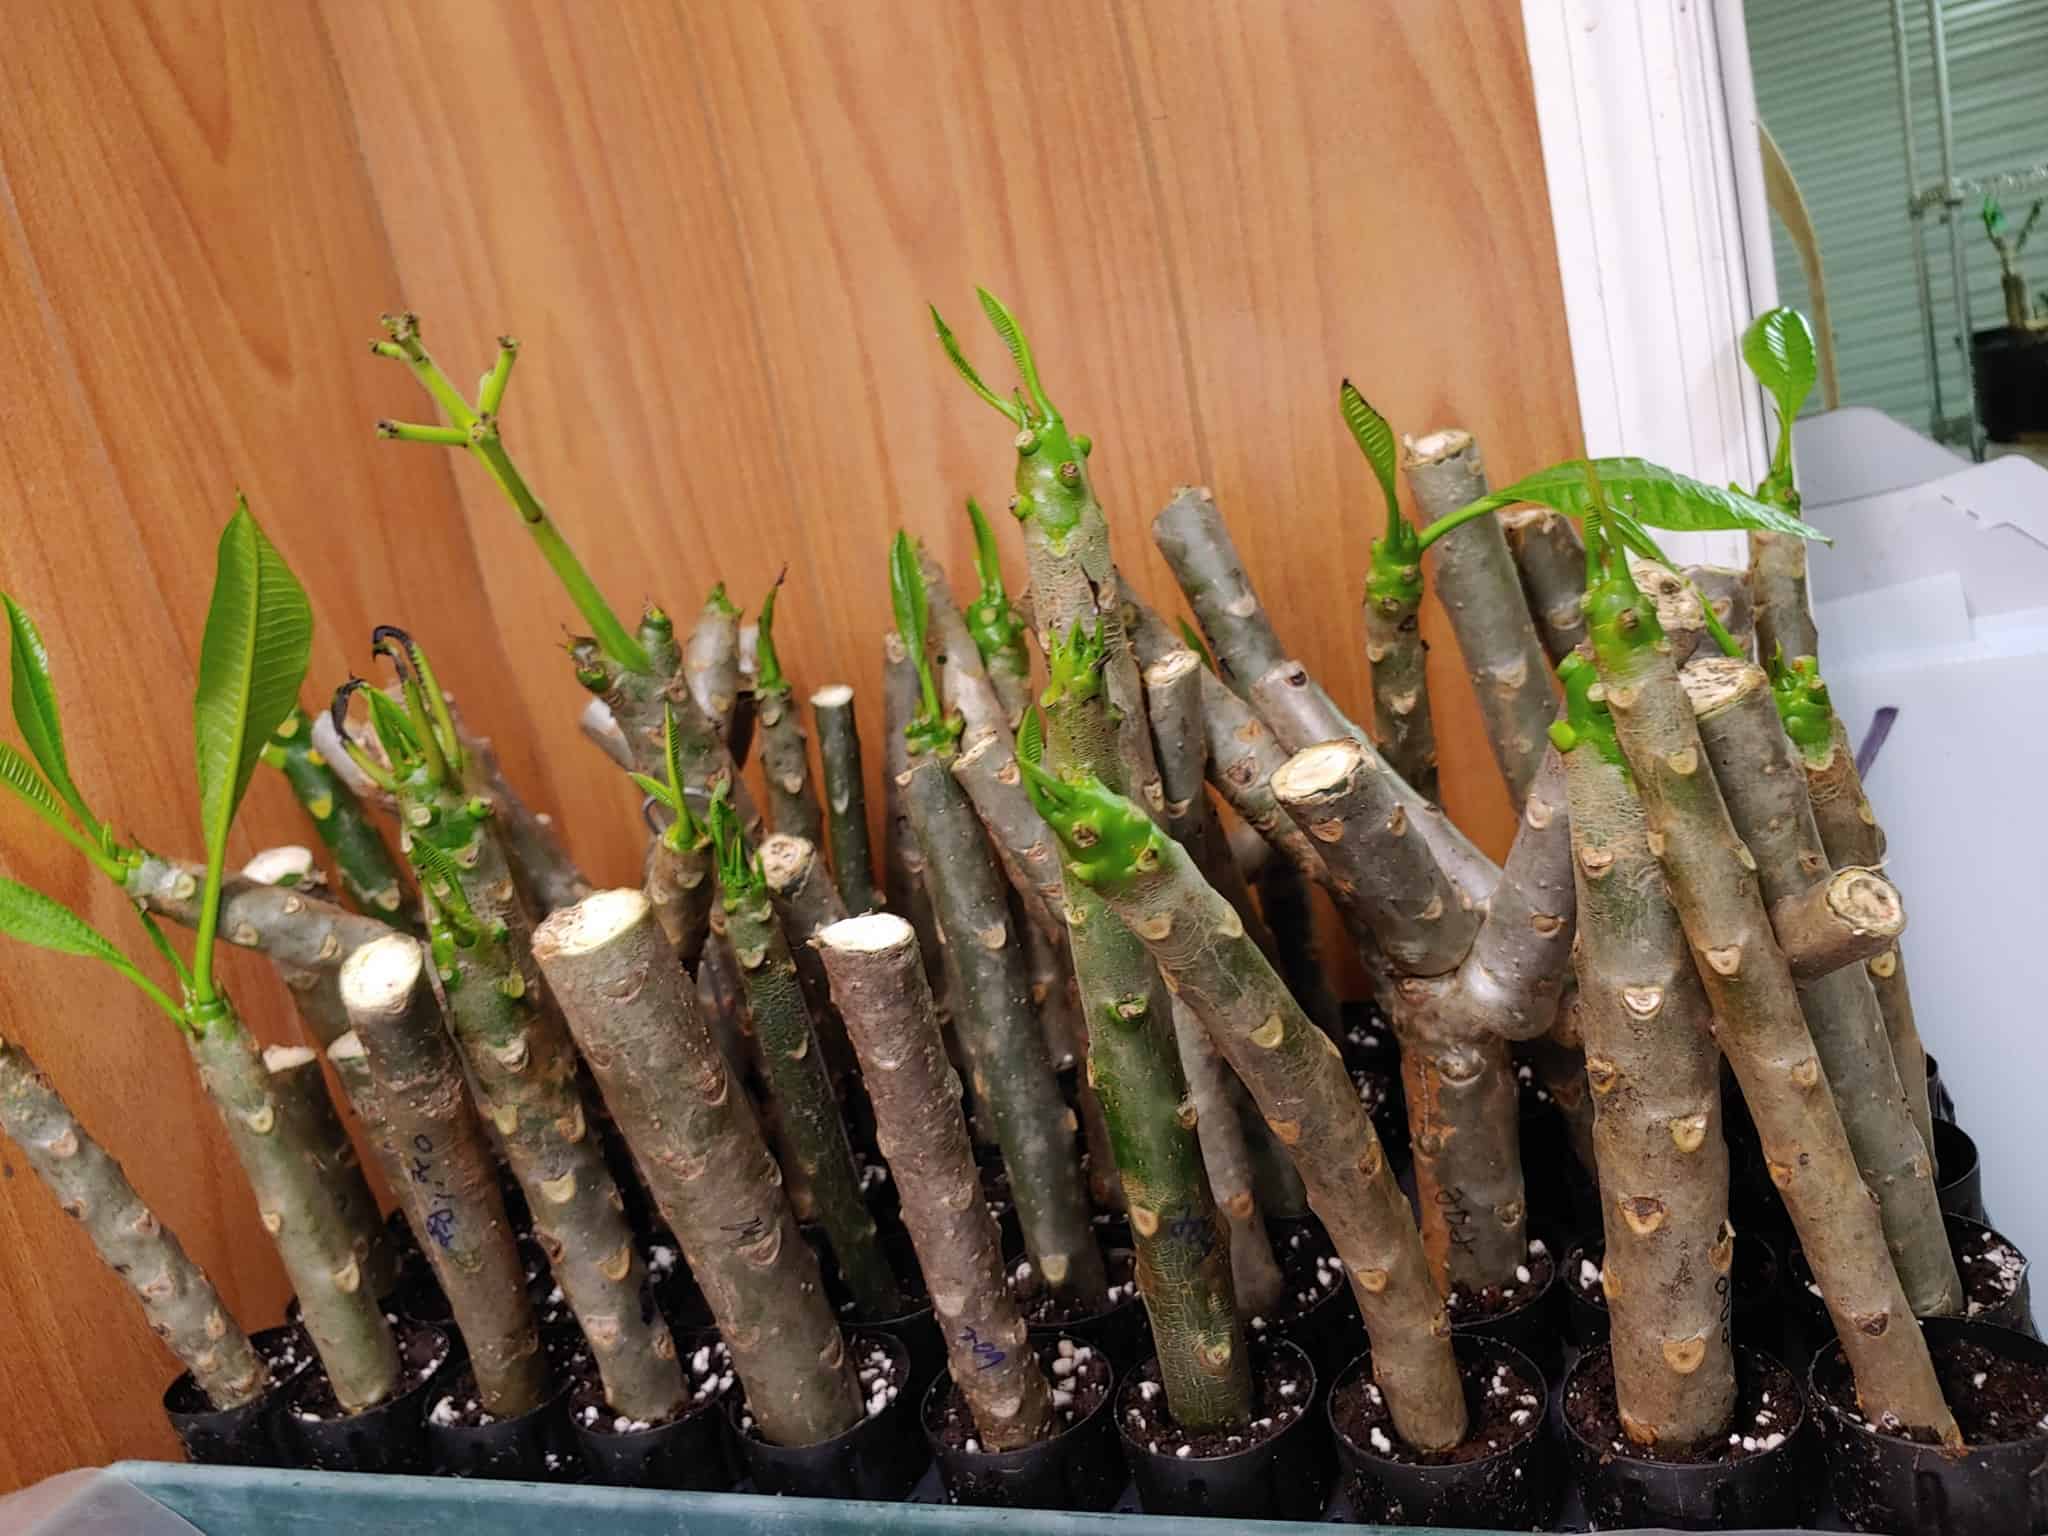
Plumeria, also known as frangipani, are tropical flowering plants with beautiful and fragrant blossoms. If you’re fortunate enough to have plumeria plants in your garden, you might have considered propagating them by storing plumeria cuttings. Storing plumeria cuttings is a great way to preserve the genetic material of your plants and propagate them in the future.
In this article, we will guide you through the process of storing plumeria cuttings effectively. Whether you’re a seasoned gardener or a beginner, storing plumeria cuttings can be a fun and rewarding experience. It allows you to expand your collection of plumeria plants or share them with friends and family.
By following the steps outlined in this article, you can ensure that your plumeria cuttings remain healthy and viable during storage. We will also discuss the tools and materials you’ll need, as well as the benefits of storing plumeria cuttings.
So, let’s delve into the world of plumeria and embark on a journey to successfully store plumeria cuttings!
Key Takeaways:
- Preserve the genetic material of your favorite plumeria plants by storing cuttings, ensuring the continuation of specific traits and the opportunity to propagate identical plants in the future.
- Storing plumeria cuttings offers convenience, flexibility, and the chance to share the joy of growing these stunning flowers with friends and family, making it a rewarding and beneficial practice for any plumeria enthusiast.
Benefits of Storing Plumeria Cuttings
Storing plumeria cuttings offers a range of benefits for gardeners and enthusiasts. Let’s explore some of the key advantages:
- Preserving Genetic Material: Storing plumeria cuttings allows you to preserve the genetic material of your favorite plumeria plants. This means that you can propagate and grow identical plants in the future, ensuring the continuation of specific traits, such as color, fragrance, and shape.
- Resilience Against Adverse Conditions: Plumeria cuttings can be sensitive to changes in climate or external conditions. By storing cuttings, especially during colder months or extreme weather events, you can protect them from potential damage or death.
- Convenience and Flexibility: Storing plumeria cuttings provides you with flexibility in terms of time and space. You can store cuttings until you’re ready to propagate them or share them with other gardening enthusiasts. This allows you to better manage your garden and plan your propagation activities.
- Propagation Opportunities: Having stored plumeria cuttings gives you a head start in propagating new plants. You can start growing the cuttings at any time, giving you a wider window to experiment with different propagation methods and techniques.
- Sharing and Gifting Plants: Storing plumeria cuttings also allows you to share the joy of growing plumeria with others. You can gift the stored cuttings to friends or family, allowing them to experience the beauty and fragrance of these tropical flowers.
- Preserving Rare or Unique Varieties: If you have rare or unique plumeria varieties in your collection, storing their cuttings becomes even more crucial. By preserving their genetic material, you ensure the conservation and availability of these special plants for future generations.
Overall, storing plumeria cuttings offers a range of benefits for both experienced gardeners and those starting their plumeria journey. It enables you to preserve, propagate, and share these stunning flowers, ensuring the continuation of their beauty and charm.
Tools and Materials Needed
Before you begin the process of storing plumeria cuttings, it’s important to gather the necessary tools and materials. Having everything prepared in advance will make your task easier and more organized. Here are the essential tools and materials you’ll need:
- Pruning Shears or Scissors: You’ll need a sharp pair of pruning shears or scissors to make clean cuts when selecting and preparing the plumeria cuttings.
- Storage Container: Choose a sturdy and well-ventilated container to store the plumeria cuttings. It should be large enough to accommodate the cuttings without crowding them. You can use plastic containers, pots, or even zipper bags.
- Rooting Hormone (optional): Rooting hormone promotes root development in the cuttings and can improve their chances of survival. While optional, using rooting hormone can increase the success rate of rooting the cuttings.
- Labels or Markers: It’s essential to label or mark the storage container with the names of the plumeria varieties or other identifying information. This will help you keep track of the cuttings and their specific attributes.
- Paper Towels or Newspaper: You’ll need paper towels or newspaper to wrap the cuttings during the drying process. This helps remove excess moisture and prevents damage or rotting.
- Rooting Medium (optional): If you plan on rooting the cuttings directly in the storage container, you may need a rooting medium. This can be a mix of perlite, vermiculite, or a well-draining potting mix.
- Sanitizing Solution: To ensure the cuttings remain free from diseases and pathogens, prepare a sanitizing solution. You can use a diluted bleach solution or a horticultural disinfectant according to the manufacturer’s instructions.
- Gloves: Wearing gloves during the process is recommended to protect your hands from any potential irritants, especially when handling the rooting hormone or sanitizing solution.
By having these tools and materials ready, you’ll be fully equipped to store plumeria cuttings effectively. Remember, it’s always a good idea to prepare a clean and organized workspace before you begin, ensuring that everything is within reach and readily available.
Step 1: Selecting Healthy Plumeria Cuttings
The first step in storing plumeria cuttings is to carefully select healthy and disease-free cuttings. Choosing the right cuttings is crucial for successful storage and future propagation. Follow these guidelines to ensure you select the best plumeria cuttings:
- Mature Cuttings: Select cuttings that are at least 12-18 inches long. Mature cuttings have a higher chance of successful storage and rooting compared to younger and thinner ones.
- Green and Firm Stems: Look for plumeria cuttings with green and firm stems. Avoid any cuttings with discoloration, visible rot, or soft spots, as these may indicate damage or disease.
- Air-Dried Cuttings: Ideally, choose cuttings that have been air-dried for at least a few days. Air drying helps reduce moisture content, making them more suitable for storage.
- Healthy Buds or Nodes: Check the cuttings for healthy buds or nodes. Buds or nodes are where new growth emerges, and they are important for rooting and future growth.
- Consider the Variety: Different plumeria varieties have different growth patterns and characteristics. If you have specific varieties you wish to propagate, select cuttings from the parent plants that exhibit the desired traits.
- Check for Pest Infestation: Inspect the cuttings carefully for any signs of pest infestation. Look for aphids, mealybugs, or any other common pest that could harm the cuttings or spread to other plants.
- Multiple Cuttings: To increase your chances of success, select multiple cuttings. This provides room for experimentation and safeguards against failure in case some cuttings do not root or survive during storage.
Remember to handle the cuttings with care, avoiding any unnecessary damage to the stems or nodes. It’s best to gather the cuttings in the morning when the plant is well hydrated and the temperatures are cooler. This helps minimize stress on the plants and increases the chances of successful storage.
By following these guidelines and selecting healthy plumeria cuttings, you are setting the foundation for a successful storing and propagation journey. Now that you have your cuttings ready, it’s time to move on to the next step: preparing the storage container.
Step 2: Preparing the Storage Container
Once you have selected healthy plumeria cuttings, the next step in storing plumeria cuttings is to prepare the storage container. Proper preparation will ensure an optimal environment for the cuttings during their storage period. Here’s how to prepare the storage container:
- Clean and Sterilize: Start by ensuring that the storage container is clean and free from any contaminants. Wash the container thoroughly with soap and water, and then sterilize it using a sanitizing solution. This helps eliminate any potential pathogens that could harm the cuttings.
- Add Drainage Holes: If the container does not already have drainage holes, it’s essential to add them. Good drainage is important to prevent waterlogging, which can lead to root rot. Use a drill or a heated metal rod to create a few drainage holes at the bottom of the container.
- Line the Container: Consider lining the storage container with a layer of newspaper or paper towels. This will help absorb excess moisture and prevent the cuttings from sitting in water, promoting better airflow and reducing the risk of fungal diseases.
- Label the Container: Label the storage container with the names of the plumeria varieties or any other relevant information. This will help you keep track of the cuttings and ensure you know which varieties you’re storing.
- Select the Right Size: Choose a storage container that comfortably accommodates the length of the plumeria cuttings. Avoid overcrowding the container, as this can lead to damage and hinder airflow around the cuttings.
- Consider Storage Location: Decide on a suitable location for storing the container. The area should be cool, dry, and well-ventilated. Avoid exposing the container to direct sunlight or extreme temperatures, as this can impact the viability of the cuttings.
By following these steps, you’ll create an ideal storage environment for the plumeria cuttings. This will promote their longevity and increase the chances of successful rooting when you’re ready to propagate them. With the container prepared, you are ready to move on to the next step: sanitizing the cuttings.
Step 3: Sanitizing the Cuttings
Sanitizing the plumeria cuttings is an important step in the process of storing them. This ensures that any potential disease-causing pathogens or pests are eliminated, reducing the risk of infections and ensuring the longevity of the cuttings. Follow these steps to sanitize the plumeria cuttings:
- Prepare the Sanitizing Solution: Prepare a sanitizing solution by diluting bleach or a horticultural disinfectant according to the manufacturer’s instructions. This will help kill any bacteria, viruses, or fungi present on the cuttings.
- Wear Gloves: To protect your hands from the sanitizing solution, wear gloves while handling the cuttings. This also helps prevent the transfer of any potential contaminants from your hands to the cuttings.
- Dip or Spray the Cuttings: Depending on the size of the container, you can either dip the cuttings into the sanitizing solution or use a spray bottle to thoroughly coat them. Ensure that all parts of the cuttings, including the stems and buds, come into contact with the solution.
- Air Dry: After sanitizing, allow the cuttings to air dry for a few minutes. This helps remove any excess sanitizing solution from the surface of the cuttings while ensuring that the solution has sufficient time to act against any potential pathogens.
- Avoid Contamination: During and after the sanitizing process, be cautious not to contaminate the sanitized cuttings. Avoid touching them with your bare hands or placing them on surfaces that may harbor contaminants.
- Dispose of the Sanitizing Solution: Properly dispose of the sanitizing solution according to local regulations. Do not pour it down the drain or use it for other purposes, as it may be harmful to the environment.
By taking the time to sanitize the plumeria cuttings, you are ensuring that they remain healthy and free from any potential diseases or pests. This step significantly increases the chances of successful storage and future propagation. With the cuttings sanitized, you are now ready to move on to the next step: drying the cuttings.
After cutting, allow plumeria cuttings to dry for 1-2 weeks in a warm, shaded area before storing. This helps prevent rot during storage.
Step 4: Drying the Cuttings
Once you have sanitized the plumeria cuttings, the next step in storing them is to dry them thoroughly. Drying the cuttings helps remove excess moisture, preventing rot and fungal infections during the storage period. Follow these steps to effectively dry the plumeria cuttings:
- Wrap the Cuttings: Take each plumeria cutting and wrap it loosely in paper towels or newspaper. The wrapping will absorb excess moisture from the cuttings and aid in the drying process.
- Avoid Overcrowding: Ensure that you do not overcrowd the wrapped cuttings. Allow enough space between each cutting to promote better airflow, which aids in the drying process.
- Select a Warm, Dry Location: Find a warm, dry location to place the wrapped cuttings. Ideally, the area should have good air circulation and indirect sunlight. Avoid direct sunlight, as it can cause the cuttings to dry out too quickly.
- Regularly Check for Moisture: Check the wrapped cuttings regularly to monitor their moisture level. If the paper towels or newspaper become saturated, replace them with fresh, dry ones. This prevents the cuttings from sitting in moisture, which can lead to rotting.
- Patience is Key: The drying process can take several days to a couple of weeks, depending on the humidity levels in your location. Be patient and allow the cuttings to dry thoroughly before moving on to the next step.
Properly drying the plumeria cuttings is essential for their successful storage. It ensures that the cuttings remain in optimal condition for future propagation. Once the cuttings are completely dry, you are ready to proceed to the next step: applying rooting hormone (optional).
Step 5: Applying Rooting Hormone (Optional)
In the process of storing plumeria cuttings, applying rooting hormone is an optional step. Rooting hormone helps stimulate root development in the cuttings, increasing their chances of successful rooting and subsequent growth. While it is not necessary, using rooting hormone can enhance the propagation process. Here’s how to apply rooting hormone to the plumeria cuttings:
- Choose a Suitable Rooting Hormone: There are different types of rooting hormone available, such as powder, gel, or liquid. Select the one that suits your preference and follow the manufacturer’s instructions for application.
- Prepare a Dipping Tray: Pour a small amount of rooting hormone into a clean, shallow tray or container. Make sure the tray is large enough to accommodate the base of the plumeria cuttings.
- Dip the Base of the Cuttings: Take each dried plumeria cutting and dip the base, or the cut end, into the rooting hormone. Ensure that the base is thoroughly coated with the hormone, as this is where the roots will develop.
- Tap off Excess Hormone: Gently tap the cutting against the side of the tray to remove any excess rooting hormone. This prevents the formation of clumps or concentrations that may harm the cutting.
- Allow the Cuttings to Dry: Once you’ve applied the rooting hormone, allow the cuttings to air dry for a few minutes. This helps the hormone adhere to the cutting and minimizes the risk of it rubbing off when you handle the cuttings.
Remember, using rooting hormone is optional, but it can significantly improve the success rate of rooting plumeria cuttings. If you decide not to use rooting hormone, the cuttings can still be stored and propagated successfully.
After applying the rooting hormone (if desired) and allowing the cuttings to dry, you’re ready to move on to the next step: storing the plumeria cuttings.
Step 6: Storing the Cuttings
Now that you have selected, prepared, sanitized, dried, and optionally applied rooting hormone to your plumeria cuttings, it’s time to store them. Proper storage is crucial for maintaining the viability of the cuttings until you’re ready to propagate them. Here’s how to store plumeria cuttings effectively:
- Place the Cuttings in the Prepared Container: Carefully place the plumeria cuttings into the prepared storage container. Make sure they are positioned upright, with the base (the end with the cutting or rooting hormone) facing down.
- Space the Cuttings: Ensure there is sufficient space between each cutting to prevent crowding. Overcrowding can increase the risk of rot and hinder airflow, which is essential for their storage.
- Check the Moisture Level: It’s important to strike the right balance of moisture during storage. You want to avoid excessive dryness or excessive moisture. Periodically check the newspaper or paper towels that the cuttings are wrapped in to ensure they remain slightly moist but not wet or overly dry.
- Monitor the Temperature and Light: Place the storage container in a cool, dry area away from direct sunlight. Plumeria cuttings prefer temperatures between 65-75°F (18-24°C). High temperatures can cause them to rot, while low temperatures can impede their potential growth.
- Check for Mold or Disease: Regularly inspect the stored cuttings for any signs of mold, disease, or pest infestation. If you notice any issues, remove and discard the affected cuttings to prevent further spread.
- Label the Container: Maintain order and organization by labeling the storage container with the names of the plumeria varieties or any other relevant information. This will help you identify the cuttings and keep track of their specific characteristics.
- Do Not Disturb: Avoid unnecessary disturbance or handling of the stored cuttings. Any unnecessary movement or handling can disrupt their root development and increase the risk of damage.
By following these storage guidelines, you’ll create a favorable environment for the plumeria cuttings, allowing them to remain healthy and viable until you’re ready to propagate them. Now that the cuttings are securely stored, it’s time for the final step in the process: monitoring and care.
Step 7: Monitoring and Care
Monitoring and providing the necessary care is crucial for the success of storing plumeria cuttings. By regularly checking on the cuttings and attending to their needs, you can ensure their health and readiness for future propagation. Here’s how to monitor and care for the stored plumeria cuttings:
- Check Moisture Levels: Regularly monitor the moisture levels in the storage container. Avoid excessive moisture or dryness. If the paper towels or newspaper start to dry out, lightly mist them with water to maintain the desired moisture level.
- Monitor Temperature and Humidity: Keep an eye on the temperature and humidity in the storage area. Aim for a temperature range of 65-75°F (18-24°C) with moderate humidity. Avoid extreme changes in temperature and high humidity, as these conditions can have a negative impact on the cuttings.
- Inspect for Growth: Periodically inspect the stored plumeria cuttings for signs of growth. Look for the emergence of new buds or root growth. This indicates that the cuttings are healthy and ready for propagation.
- Remove Dead or Diseased Cuttings: If you notice any cuttings that are not showing signs of growth or that appear to be diseased or rotting, remove them from the storage container. Prompt removal prevents the spread of diseases and ensures the well-being of the remaining cuttings.
- Provide Ventilation: Good airflow is essential for the stored cuttings. If using a container with a lid or cover, make sure to provide periodic ventilation to prevent excessive condensation and the risk of fungal diseases. Open the container briefly to allow fresh air circulation, but avoid prolonged exposure to outside elements.
- Maintain Labeling: Keep the storage container properly labeled to ensure you can identify the plumeria varieties and other relevant information. This will help you keep track of the stored cuttings and facilitate future propagation.
- Be Patient: Storing plumeria cuttings requires patience. It can take several weeks to several months for the cuttings to develop roots and be ready for propagation. Avoid the temptation to disturb or check on the cuttings too frequently, as this can disrupt their progress.
By diligently monitoring and providing care to the stored plumeria cuttings, you increase their chances of successful rooting and eventual growth. Continue to observe them until they exhibit healthy signs of new growth, at which point they will be ready to be transplanted or propagated. Congratulations on successfully storing your plumeria cuttings!
Remember, each step in the process of storing plumeria cuttings is essential for their well-being. By selecting healthy cuttings, preparing the storage container, sanitizing and drying the cuttings, applying rooting hormone (if desired), and properly storing and caring for them, you are setting the stage for future plumeria blooming and enjoyment.
Conclusion
Storing plumeria cuttings is a rewarding and beneficial practice for any plumeria enthusiast. By following the steps outlined in this guide, you can successfully store your plumeria cuttings and ensure their viability for future propagation. Here’s a recap of the steps involved:
- Select Healthy Plumeria Cuttings: Choose mature, green, and firm cuttings with healthy buds or nodes.
- Prepare the Storage Container: Clean and sterilize the container, add drainage holes, and line it with paper towels or newspaper.
- Sanitize the Cuttings: Use a sanitizing solution to eliminate potential pathogens and pests from the cuttings.
- Dry the Cuttings: Wrap the cuttings loosely in paper towels or newspaper and allow them to air dry in a well-ventilated area.
- Apply Rooting Hormone (Optional): Dip the base of the cuttings in rooting hormone to stimulate root development.
- Store the Cuttings: Place the cuttings in the prepared storage container, ensuring proper spacing and moisture levels.
- Monitor and Care: Regularly check the moisture levels, temperature, and humidity in the storage area, and remove any dead or diseased cuttings.
Properly stored plumeria cuttings will reward you with beautiful, fragrant blooms in the future, allowing you to expand your plumeria collection and share the joy with others. The benefits of storing plumeria cuttings, such as preserving genetic material, resilience against adverse conditions, convenience, and propagation opportunities, make it a worthwhile endeavor for any plumeria lover.
Remember to exercise patience throughout the process, as successful propagation requires time and careful attention. By following these steps and providing the necessary monitoring and care, you’ll be one step closer to maximizing the potential of your plumeria cuttings.
So, gather your tools, select healthy cuttings, and embark on your plumeria storing journey. With dedication and a little bit of green thumbs, you’ll soon have a collection of thriving plumeria plants to enjoy for years to come.
Frequently Asked Questions about How To Store Plumeria Cuttings
Was this page helpful?
At Storables.com, we guarantee accurate and reliable information. Our content, validated by Expert Board Contributors, is crafted following stringent Editorial Policies. We're committed to providing you with well-researched, expert-backed insights for all your informational needs.











0 thoughts on “How To Store Plumeria Cuttings”