Articles
How To Store Sopapilla Cheesecake
Modified: February 24, 2024
Learn how to store and keep your delicious sopapilla cheesecake fresh for longer with these helpful articles.
(Many of the links in this article redirect to a specific reviewed product. Your purchase of these products through affiliate links helps to generate commission for Storables.com, at no extra cost. Learn more)
Introduction
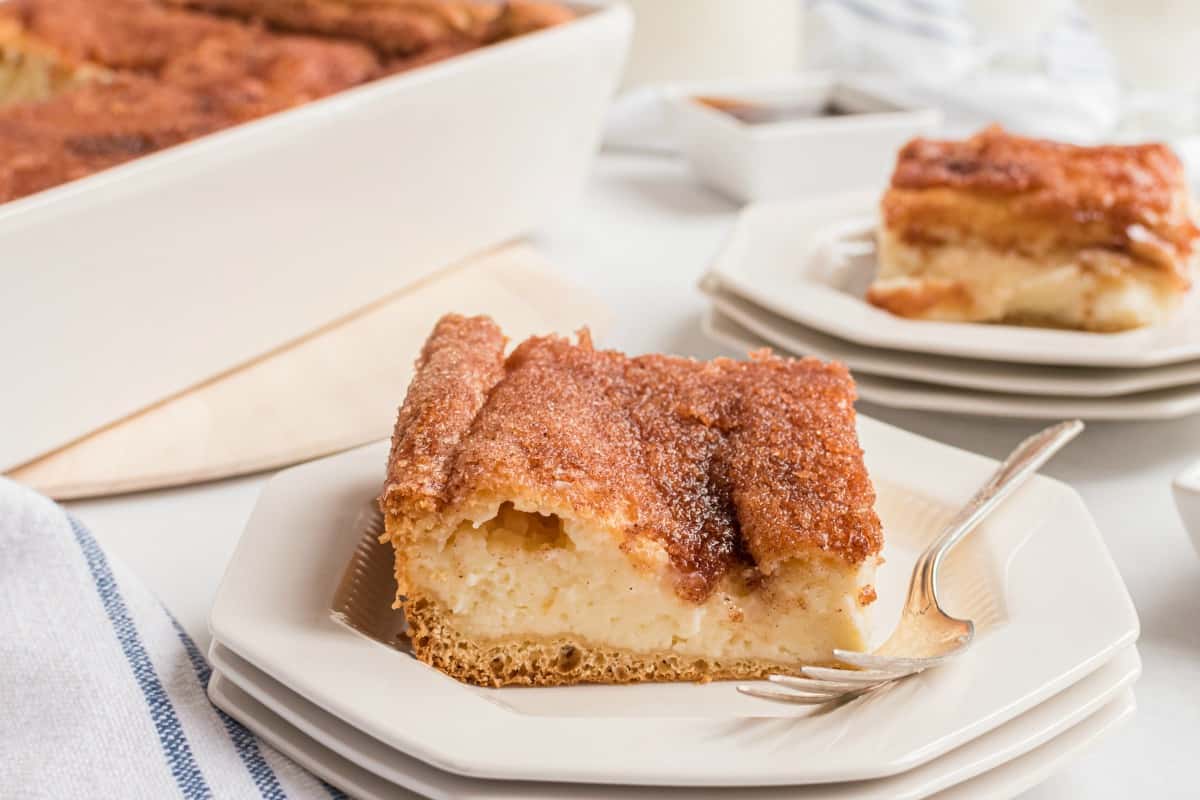
Welcome to the delicious world of sopapilla cheesecake! With its irresistible combination of creamy cheesecake and cinnamon-sugar coated dough, this dessert is sure to become a favorite. Whether you’re planning a special occasion or simply want to treat yourself, learning how to store sopapilla cheesecake properly is essential in order to preserve its flavor and texture.
Sopapilla cheesecake originated in the Southwestern region of the United States, where it quickly became a popular dessert among locals and visitors alike. It combines the flavors of traditional sopapillas, a type of fried dough pastry, with the rich and creamy goodness of cheesecake. The result is a heavenly dessert that is not only visually appealing but also incredibly delicious.
But what happens when you have leftovers or want to make a batch in advance? Properly storing sopapilla cheesecake will help maintain its freshness and prevent it from spoiling. In this article, we will guide you through the simple steps of storing sopapilla cheesecake so that you can enjoy its delectable taste even days after baking.
Before we dive into the storage process, let’s take a look at the key ingredients you’ll need to make this indulgent treat:
Key Takeaways:
- Indulge in the heavenly combination of sopapillas and cheesecake by following the simple steps to store and serve this delectable dessert. Enjoy the sweet rewards of your baking journey!
- Preserve the captivating flavors and textures of sopapilla cheesecake by properly storing it in the refrigerator for up to 5 days. With the right techniques, every mouthwatering bite will be as delightful as the first!
Read more: How To Store Sopapillas
Ingredients
To make sopapilla cheesecake, you will need the following ingredients:
- 2 packages of crescent roll dough
- 16 ounces of cream cheese, softened
- 1 cup of granulated sugar
- 1 teaspoon of vanilla extract
- ½ cup of unsalted butter, melted
- 1 tablespoon of ground cinnamon
- ¼ cup of honey
These simple ingredients can be easily found in most grocery stores. The crescent roll dough serves as the base for the sopapilla crust, while the cream cheese, sugar, and vanilla extract create the creamy and decadent cheesecake filling. The combination of melted butter, cinnamon, and honey adds a delightful sweetness and aromatic flavor to the dessert.
Now that you have gathered all the necessary ingredients, let’s move on to the step-by-step process of preparing and storing sopapilla cheesecake.
Step 1: Preparing the crust
The first step in making sopapilla cheesecake is preparing the crust. Here’s how to do it:
- Preheat your oven to the temperature indicated on the crescent roll dough package. This is typically around 350°F (175°C).
- Unroll one package of crescent roll dough and place it in the bottom of a greased 9×13 inch baking dish. Press the dough down firmly to create an even layer that covers the bottom of the dish.
- In a separate bowl, mix together the melted butter, ¼ cup of granulated sugar, and ½ tablespoon of ground cinnamon. Stir well until all the ingredients are combined.
- Using a pastry brush or spoon, spread half of the butter and sugar mixture evenly over the crescent roll dough in the baking dish. Make sure to cover the entire surface.
- Repeat the process with the second package of crescent roll dough, placing it on top of the butter and sugar mixture in the dish. Press it down gently to create another even layer.
- Spread the remaining half of the butter and sugar mixture over the second layer of dough, ensuring that it is evenly distributed.
The butter and sugar mixture adds a sweet and buttery flavor to the crust, making it irresistibly delicious. Now that the crust is ready, it’s time to move on to the next step: creating the creamy cheesecake filling.
Step 2: Making the cheesecake filling
Once you have prepared the sopapilla crust, it’s time to whip up the creamy and luscious cheesecake filling. Here’s what you need to do:
- In a mixing bowl, combine the softened cream cheese, ¾ cup of granulated sugar, and vanilla extract. Use an electric mixer on medium speed to beat the ingredients together until smooth and creamy. Make sure to scrape down the sides of the bowl to incorporate all the ingredients.
- Once the cream cheese mixture is well-blended, spread it evenly over the sopapilla crust in the baking dish. Use a spatula or the back of a spoon to smooth the filling and create an even layer.
- At this point, you can add an extra touch of flavor by sprinkling a teaspoon of ground cinnamon over the cheesecake filling. This will enhance the taste and complement the cinnamon in the crust.
- If you prefer a sweeter touch, drizzle ¼ cup of honey over the top of the cheesecake filling. The honey adds a subtle sweetness and a hint of floral flavor that perfectly complements the cream cheese.
As the cream cheese, sugar, and other ingredients come together, a decadently smooth and creamy filling emerges. The addition of cinnamon and honey adds depth and complexity to the overall flavor profile. Now that the filling is complete, it’s time to move on to assembling the sopapilla cheesecake.
Step 3: Assembling the sopapilla cheesecake
Now that you have prepared the crust and made the creamy cheesecake filling, it’s time to assemble the sopapilla cheesecake. Follow these steps:
- Take the remaining crescent roll dough and unroll it. Lay it gently on top of the cheesecake filling, covering the entire surface.
- Press down lightly to adhere the top layer of dough to the filling. This will help create a cohesive and uniform cheesecake.
- In a small bowl, combine the remaining ¼ cup of granulated sugar and ½ tablespoon of ground cinnamon. Mix well to create the cinnamon-sugar topping.
- Sprinkle the cinnamon-sugar mixture generously over the top layer of dough, ensuring it is evenly distributed.
- Optional: For an extra touch of sweetness and crunch, you can add a handful of chopped nuts, such as pecans or walnuts, on top of the cinnamon-sugar layer.
Assembling the sopapilla cheesecake is a straightforward process that brings together all the delicious layers. The top layer of dough, combined with the cinnamon-sugar topping, adds a crunchy and sweet element to the dessert. Now, it’s time to move on to the baking process to bring all the flavors and textures together.
Store sopapilla cheesecake in an airtight container in the refrigerator for up to 3-4 days. If you need to store it longer, wrap it tightly in plastic wrap and aluminum foil, then freeze for up to 2-3 months.
Read more: How To Store Cheesecake Factory Cheesecake
Step 4: Baking the cheesecake
Once you’ve assembled the sopapilla cheesecake, it’s time to bake it to perfection. Follow these steps:
- Preheat your oven to 350°F (175°C) if it isn’t already heated.
- Place the baking dish with the assembled cheesecake in the preheated oven.
- Bake for approximately 30-35 minutes, or until the crust turns golden brown and the cheesecake filling has set. You can test the doneness by gently jiggling the dish. The center should be firm and slightly springy.
- Keep an eye on the cheesecake during the baking process to prevent it from burning or overcooking. You want the crust to be beautifully golden, not overly browned.
- Once the cheesecake is baked to perfection, remove it from the oven and let it cool on a wire rack for at least 20 minutes. This will allow it to set and firm up.
The baking process is crucial to achieving the perfect texture and taste. It transforms the layers of dough and cream cheese into a melt-in-your-mouth dessert. Now, it’s time to move on to the final step: storing the sopapilla cheesecake.
Step 5: Cooling and refrigerating the cheesecake
After baking the sopapilla cheesecake, it’s important to let it cool properly and then refrigerate it to maintain its freshness and flavor. Follow these steps:
- Allow the baked cheesecake to cool completely on a wire rack. This will take approximately 1-2 hours. Cooling the cheesecake is essential to let it set and firm up.
- Once the cheesecake has cooled, cover the baking dish with plastic wrap or aluminum foil. Make sure the covering is airtight to prevent any moisture or odors from affecting the cheesecake.
- Place the covered baking dish in the refrigerator and let the cheesecake chill for at least 4 hours, or preferably overnight. Chilling allows the flavors to meld together and creates a firmer texture.
- If you plan to store the cheesecake for a longer period, you can transfer slices of the chilled cheesecake to an airtight container or wrap them individually with plastic wrap. This will help maintain their quality and prevent them from drying out.
- The sopapilla cheesecake can be stored in the refrigerator for up to 5 days. Beyond that, the quality and taste may begin to deteriorate.
Cooling and refrigerating are crucial steps to preserve the texture and taste of the sopapilla cheesecake. The chilling process allows the flavors to meld and intensify, making it even more delicious when served. Now, it’s time to unveil the final step: serving the sopapilla cheesecake!
Step 6: Serving the sopapilla cheesecake
Finally, it’s time to indulge in the deliciousness of the sopapilla cheesecake that you have patiently prepared and stored. Follow these steps to serve this delectable dessert:
- Remove the chilled sopapilla cheesecake from the refrigerator and uncover it. Take a moment to admire its golden crust and creamy filling.
- If you stored the cheesecake as a whole, carefully slice it into individual servings using a sharp knife. Wipe the knife clean between each slice to ensure clean and neat cuts.
- Gently transfer the individual slices or the whole cheesecake onto serving plates or dessert dishes. You can get creative with garnishes like a sprinkle of powdered sugar, a dollop of whipped cream, or a drizzle of caramel sauce.
- Serve the sopapilla cheesecake chilled or at room temperature, depending on your preference. It is traditionally enjoyed chilled, but some may prefer a slightly softer texture.
- Enjoy your sopapilla cheesecake with a cup of hot coffee or a scoop of vanilla ice cream. The creamy and sweet flavors will be a delightful treat for your taste buds.
Serving the sopapilla cheesecake is the final step in this delicious journey. Whether you’re enjoying it as a dessert after a special meal or as an indulgent treat for yourself, this creamy and cinnamon-sugar coated delight will surely satisfy your cravings.
Now that you know how to store sopapilla cheesecake and bring it to the table with finesse, go ahead and savor every mouthwatering bite!
Conclusion
Congratulations! You have successfully learned how to make, store, and serve sopapilla cheesecake. This delectable dessert combines the classic flavors of sopapillas and creamy cheesecake to create a truly indulgent treat. By following the steps outlined in this article, you can ensure that your sopapilla cheesecake remains fresh, flavorful, and ready to be enjoyed for days to come.
Properly storing sopapilla cheesecake is essential to maintain its taste and texture. From properly preparing the crust to making the creamy cheesecake filling and assembling the layers, every step is crucial in creating a captivating dessert. Baking the cheesecake to perfection and allowing it to cool and set are essential before refrigerating it for optimal taste.
Whether you’re making sopapilla cheesecake for a special occasion or just for your own indulgence, the result is sure to leave you and your loved ones delighted. The sweet aroma of cinnamon, the creamy cheesecake filling, and the crisp crust all come together for a dessert that is both comforting and irresistible.
So, the next time you have leftover sopapilla cheesecake or want to make a batch in advance, you now have the knowledge to store it properly. Remember to cover it tightly, refrigerate it, and enjoy it within five days for the best flavor and quality.
Now, it’s time to gather your ingredients, roll up your sleeves, and embark on the wonderful journey of making sopapilla cheesecake. With the right techniques and a touch of creativity, you’ll have a show-stopping dessert that will impress your guests and leave everyone wanting more.
So go ahead, indulge in the heavenly combination of sopapillas and cheesecake, and savor each delightful bite. Happy baking and enjoy the sweet rewards!
Frequently Asked Questions about How To Store Sopapilla Cheesecake
Was this page helpful?
At Storables.com, we guarantee accurate and reliable information. Our content, validated by Expert Board Contributors, is crafted following stringent Editorial Policies. We're committed to providing you with well-researched, expert-backed insights for all your informational needs.


0 thoughts on “How To Store Sopapilla Cheesecake”