Articles
How To Use A Garden Hoe
Modified: October 19, 2024
Learn how to effectively use a garden hoe for all your gardening needs. Discover the best techniques and tips for maximizing your gardening skills.
(Many of the links in this article redirect to a specific reviewed product. Your purchase of these products through affiliate links helps to generate commission for Storables.com, at no extra cost. Learn more)
Introduction
Welcome to the world of gardening! Whether you’re a seasoned gardener or a beginner looking to cultivate your green thumb, using a garden hoe is an essential tool for maintaining a healthy and thriving garden. The garden hoe is a versatile instrument that can be used for various tasks, from preparing the soil to clearing away weeds. It’s a tool that every gardener should have in their arsenal.
In this article, we will guide you through the steps of using a garden hoe effectively. With the right technique and knowledge, you’ll be able to make the most out of your garden hoe and ensure that your garden flourishes.
Before we dive into the specifics, let’s take a moment to understand the importance of using the correct garden hoe for the task at hand. There are different types of garden hoes available, each designed for a specific purpose. Choosing the right garden hoe will make your gardening experience smoother and more efficient.
Now that we have set the stage, let’s move on to the first step: choosing the right garden hoe.
Key Takeaways:
- Choose the right garden hoe for specific tasks to ensure efficient gardening. Consider types like standard, Dutch, Warren, and broadfork hoes for different purposes.
- Properly maintain and clean your garden hoe to ensure longevity and optimal performance. Regular inspection, sharpening, cleaning, rust prevention, and storage are essential for a well-cared-for tool.
Step 1: Choose the Right Garden Hoe
When it comes to using a garden hoe, selecting the right tool for the job is crucial. There are several types of garden hoes to choose from, each with its own unique features and purposes. Here are a few common types of garden hoes you may encounter:
- Standard Garden Hoe: This type of hoe, often called a “digging hoe” or “grub hoe,” has a flat blade attached to a long handle. It is suitable for general tasks like breaking up compacted soil, removing weeds, and cultivating the ground.
- Dutch Hoe: Also known as a “push hoe” or “scuffle hoe,” the Dutch hoe has a flat, paddle-shaped blade that cuts through weeds when pushed or pulled. It is particularly effective for removing weeds just below the soil surface.
- Warren Hoe: The Warren hoe, sometimes called a “stirrup hoe,” features a sharp, looped blade that cuts through weeds easily. This type of hoe is ideal for weeding in tight spaces or around delicate plants.
- Broadfork Hoe: This heavy-duty hoe has sturdy tines or forks that are designed to loosen compacted soil without disturbing the natural layers or structure. It is useful for aerating the soil and preparing it for planting.
Consider the specific tasks you will be performing in your garden and choose a garden hoe that aligns with those needs. Remember that having multiple types of hoes on hand can be beneficial, as it allows you to tackle different tasks efficiently.
Once you have chosen the right garden hoe, it’s time to move on to the next step: preparing the soil.
Step 2: Prepare the Soil
Preparing the soil is an essential step in gardening, as it creates an optimal environment for plants to grow and thrive. Here are some steps to follow when preparing the soil using a garden hoe:
- Clear the area: Before you begin preparing the soil, remove any rocks, debris, or large weeds from the area. This will make it easier to work with the hoe and ensure a clean starting point.
- Loosen the topsoil: Use the garden hoe to break up the topsoil, loosening it to a depth of about 6-8 inches. This helps to improve drainage, allows roots to penetrate deeper, and creates a favorable environment for plant growth.
- Remove any weeds: As you loosen the soil, keep an eye out for any weeds or unwanted plants. Use the hoe to gently remove them, ensuring that you get rid of both the roots and the foliage. This will prevent them from competing with your desired plants for nutrients and space.
- Amend the soil: Depending on the specific needs of your plants, you may need to amend the soil with organic matter such as compost, manure, or peat moss. Use the hoe to incorporate these amendments into the soil, ensuring an even distribution.
Remember to work in sections, tackling one area at a time with the garden hoe. Take breaks when needed to avoid strain and fatigue.
Once you have prepared the soil, you’re ready to move on to the next step: properly gripping the garden hoe.
Step 3: Properly Grip the Garden Hoe
Properly gripping the garden hoe is essential for maintaining control and maximizing efficiency during use. Here are some tips on how to grip the garden hoe effectively:
- Hold the handle: Position yourself behind the garden hoe, with your dominant hand gripping the handle near its end. This provides better leverage and control over the tool.
- Maintain a firm grip: Wrap your fingers firmly around the handle, ensuring a secure hold. Avoid gripping it too tightly, as this can lead to discomfort and muscle fatigue.
- Balance the weight: Pay attention to the weight distribution of the garden hoe. The blade should be parallel to the ground, providing stability and balance to the tool. This allows for smoother movements and better control while working.
- Use your body: Engage your core muscles and use your body weight to apply pressure and guide the garden hoe. This reduces strain on your arms and allows for more efficient and effective movements.
- Adjust grip for different tasks: Depending on the task you are performing, you may need to adjust your grip on the garden hoe. For instance, when breaking up soil, use a wider grip for more leverage. When clearing weeds, a narrower grip can provide better precision.
Practice gripping the garden hoe and find a position that feels comfortable and natural for you. Remember to maintain proper posture and take breaks when needed to prevent fatigue or strain.
Now that you have a good grip on the garden hoe, it’s time to move on to the next step: using the hoe to break up the soil.
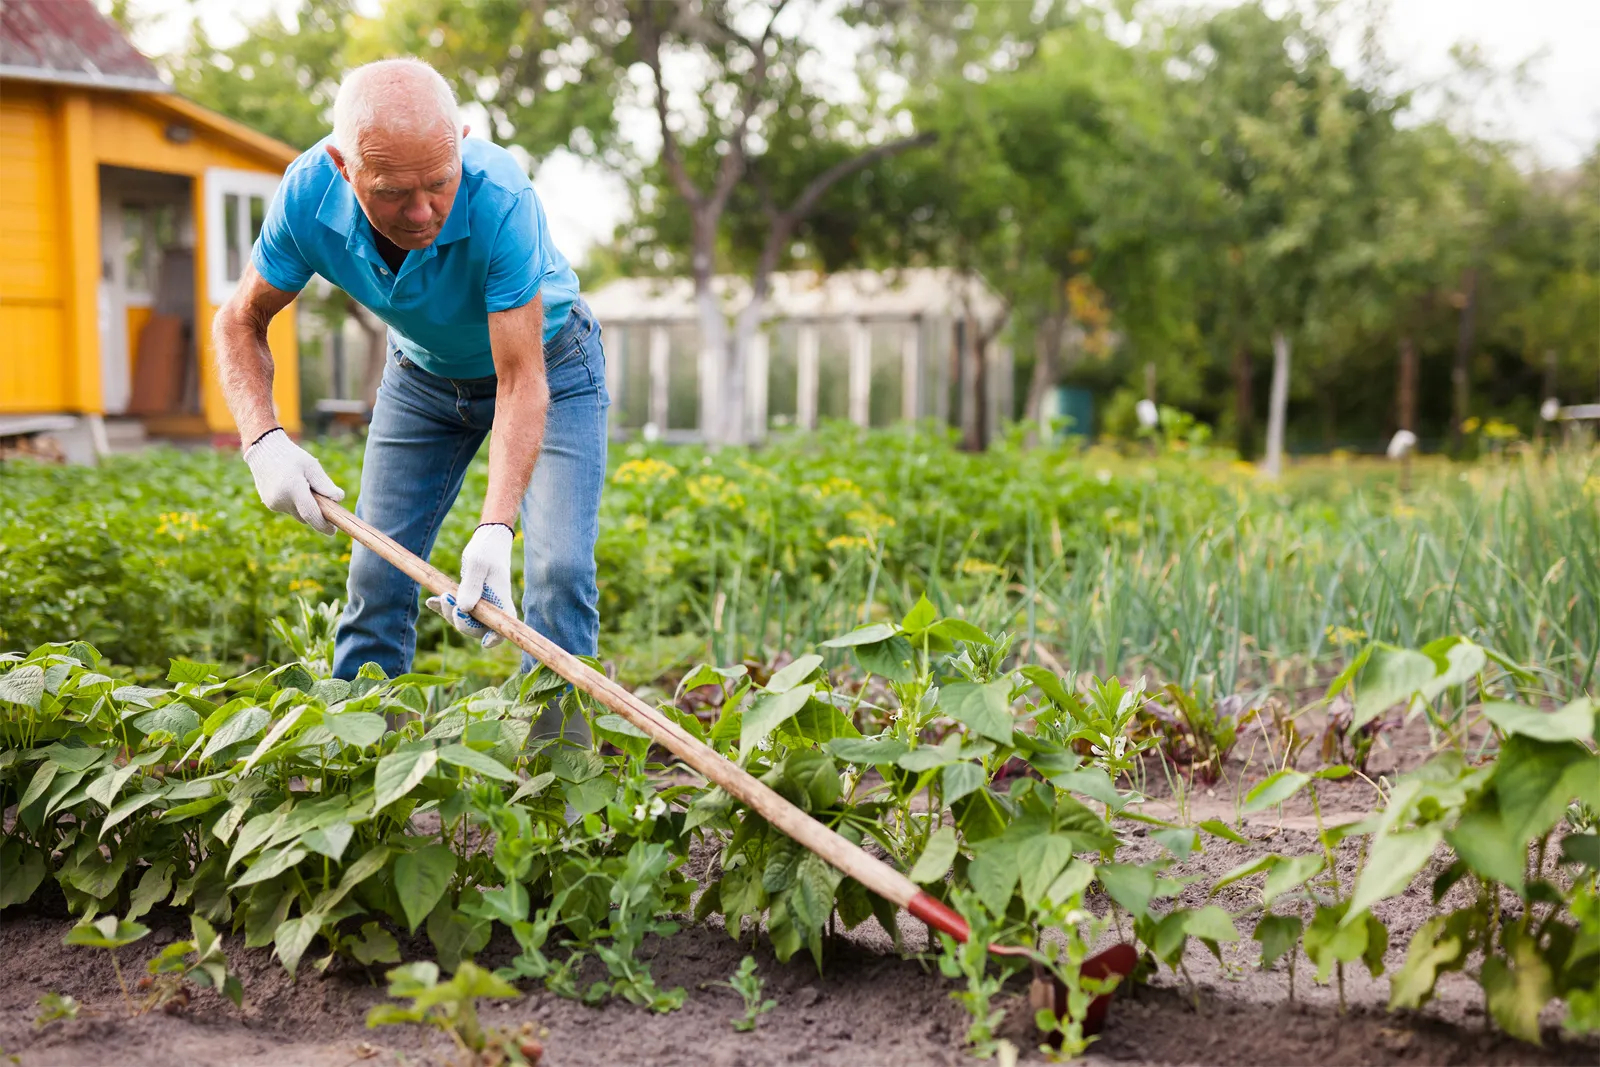
When using a garden hoe, make sure to keep a firm grip on the handle and use a smooth, sweeping motion to cut through weeds and loosen soil. This will help prevent strain on your arms and back.
Step 4: Use the Hoe to Break Up Soil
Using the garden hoe to break up soil is one of its primary purposes. This step is important for improving soil structure, allowing for better oxygen and water circulation, and creating a favorable environment for plants’ root growth. Here’s how to effectively use the garden hoe to break up soil:
- Position yourself: Stand with your feet shoulder-width apart, ensuring a stable and balanced stance. Hold the garden hoe with both hands, with your dominant hand at the end of the handle and your other hand placed closer to the blade for added control.
- Start at the edge: Begin at the edge of the soil area you’re working on. Angle the garden hoe slightly downwards and push it into the soil with a forward and downward motion. Apply moderate pressure to ensure the blade penetrates the soil.
- Work in rows or sections: Proceed to work your way across the soil, either in rows or sections, depending on the size of the area. With each stroke, pull the garden hoe towards you while simultaneously slightly lifting the blade. This motion helps to break up the soil and bring it to the surface.
- Overlap each stroke: To ensure that no area is missed, overlap each stroke slightly with the previous one. This helps to cover the entire soil surface and ensures consistent soil breakage.
- Break larger clumps: As you work, you may encounter larger clumps of soil that are more difficult to break up. Use the garden hoe’s edge or tip to break these clumps into smaller pieces for easier incorporation into the soil.
Continue this process until you have thoroughly broken up the soil in your desired area. Remember to take breaks when needed and adjust your grip or stance to prevent fatigue.
Now that you’ve effectively broken up the soil, it’s time to move on to the next step: clearing weeds and unwanted plants.
Step 5: Clear Weeds and Unwanted Plants
Clearing weeds and unwanted plants is an essential step in maintaining a healthy and productive garden. Weeds disrupt the growth of desired plants by competing for nutrients, water, and sunlight. Using a garden hoe to clear weeds is an efficient and effective method. Here’s how:
- Identify the weeds: Take a close look at your garden bed and identify the weeds and unwanted plants you want to remove. Weeds can be recognized by their different growth habits, leaf shapes, and colors.
- Position yourself: Stand in a comfortable position with your feet shoulder-width apart. Hold the garden hoe with both hands, adjusting your grip according to the type of weed you’re targeting.
- Approach the weeds: Position the garden hoe next to the base of the weed, using the angle of the blade to your advantage. Aim to cut the weed just below the soil surface to remove the entire plant, including its roots.
- Use a push-pull motion: Apply pressure to the garden hoe and push it forward to cut through the weed’s roots. Then, pull it towards you while lifting the blade slightly to lift the weed out of the ground. Repeat this process for each weed.
- Clear the area: As you remove the weeds, clear them from the garden bed to prevent reseeding or regrowth. Dispose of the weeds in a compost pile or discard them properly.
- Inspect and repeat: Take the time to inspect the area for any remaining weeds or unwanted plants. Use the garden hoe to quickly remove any stragglers and ensure that the garden bed is free from unwanted growth.
Regularly clearing weeds using a garden hoe helps prevent them from spreading and taking over your garden. It allows your desired plants to thrive without competition for space and resources.
Now that you’ve cleared the weeds and unwanted plants, let’s move on to the next step: maintaining and cleaning your garden hoe.
Step 6: Maintain and Clean Your Garden Hoe
Proper maintenance and cleaning of your garden hoe are essential to ensure its longevity and optimal performance. By taking care of your garden hoe, you can enjoy using it for years to come. Here’s how to maintain and clean your garden hoe:
- Inspect the hoe: Regularly inspect your garden hoe for any signs of damage, such as a loose handle or a worn blade. Address these issues promptly to prevent further damage and ensure safe and effective use.
- Sharpen the blade: Over time, the blade of your garden hoe may become dull. Use a file or sharpening stone to sharpen the blade, following the manufacturer’s instructions. A sharp blade will make your work easier and more efficient.
- Remove dirt and debris: After each use, it’s important to remove any dirt, mud, or debris that may have accumulated on the garden hoe. Use a stiff brush or a damp cloth to clean the blade and handle thoroughly.
- Prevent rust: If your garden hoe is made of metal, it’s susceptible to rust. To prevent rust formation, apply a thin layer of oil or rust-resistant coating to the blade and metal parts. This will protect the hoe from moisture and extend its lifespan.
- Store properly: When not in use, store your garden hoe in a dry and secure place, such as a shed or garage. Hanging it on a wall or using a tool rack helps keep it organized and prevents accidental damage.
- Check for wear and tear: Periodically check the handle and connection points for any signs of wear and tear. Replace the handle if it becomes loose or damaged, as a sturdy handle is crucial for safe and effective use of the garden hoe.
By following these maintenance tips, you can ensure that your garden hoe remains in excellent condition and ready to be used whenever needed. A well-maintained garden hoe will make gardening tasks more enjoyable and efficient.
With Step 6 completed, you’ve learned how to maintain and clean your garden hoe. Now, go ahead and put your newfound knowledge into practice, and enjoy the benefits of using a well-cared-for tool in your gardening endeavors.
Happy gardening!
Conclusion
Congratulations, you’ve reached the end of our comprehensive guide on how to use a garden hoe! We hope that this article has provided you with valuable insights and practical tips to make the most out of your gardening experience.
By choosing the right garden hoe for the job, preparing the soil effectively, and using proper techniques, you can create an ideal environment for your plants to flourish. The precise grip, along with the right motion, allows you to break up the soil, clear weeds, and maintain your garden with ease.
Remember to maintain and clean your garden hoe regularly to keep it in excellent condition. By doing so, you’ll ensure its longevity and maximize its performance, saving you time and effort in the long run.
Gardening is a continuous journey of learning and experimentation. As you become more comfortable with your garden hoe, don’t be afraid to explore different techniques and adapt them to suit your specific gardening needs. Enjoy the process and embrace the rewards of a beautiful and thriving garden.
We hope that this guide has inspired and empowered you to make the most of your garden hoe. Happy gardening!
Frequently Asked Questions about How To Use A Garden Hoe
Was this page helpful?
At Storables.com, we guarantee accurate and reliable information. Our content, validated by Expert Board Contributors, is crafted following stringent Editorial Policies. We're committed to providing you with well-researched, expert-backed insights for all your informational needs.


0 thoughts on “How To Use A Garden Hoe”