Home>diy>Planning & Engineering>How To Make A Round Room In Realtime Landscape Architect
Planning & Engineering
How To Make A Round Room In Realtime Landscape Architect
Modified: December 7, 2023
Learn how to create a round room in Realtime Landscape Architect with our planning and engineering guide. Enhance your architectural designs today!
(Many of the links in this article redirect to a specific reviewed product. Your purchase of these products through affiliate links helps to generate commission for Storables.com, at no extra cost. Learn more)
Introduction
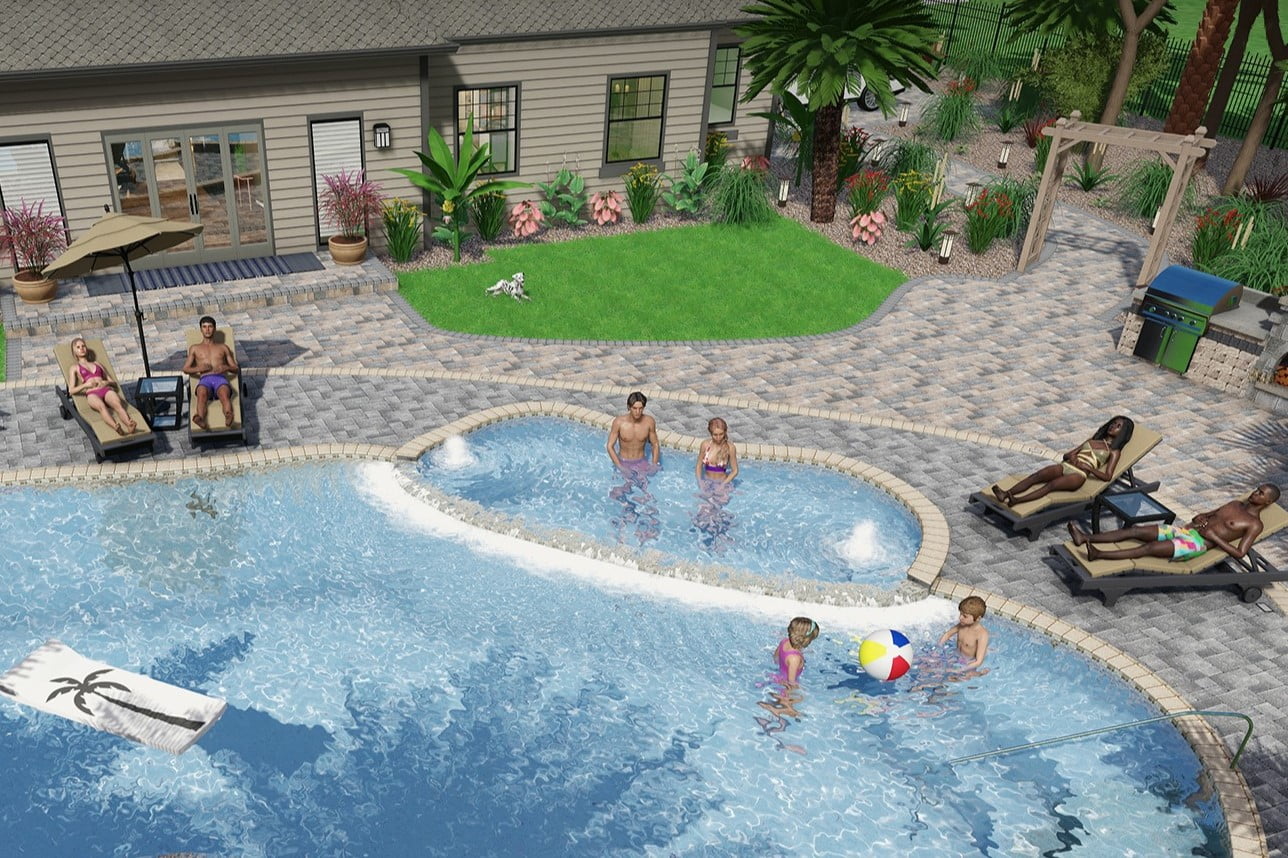
Welcome to this comprehensive guide on how to make a round room in Realtime Landscape Architect. If you’re looking to create a unique and visually stunning space in your landscape design, a round room can be a fantastic option. Whether you want to incorporate a circular gazebo, a circular patio, or even a round outdoor living area, this guide will provide you with step-by-step instructions on how to bring your vision to life.
Realtime Landscape Architect is a powerful software program that allows you to design and visualize landscapes in real-time. With its user-friendly interface and extensive library of landscaping elements, it’s the perfect tool for creating stunning outdoor spaces. In this guide, we’ll walk you through the process of creating a round room using this software, from setting up the project to adding the finishing touches.
Let’s dive in and get started!
Key Takeaways:
- Create visually stunning round rooms in Realtime Landscape Architect with step-by-step guidance, from setting up the software to adding furniture, decor, and lighting effects for a captivating outdoor space.
- Utilize Realtime Landscape Architect’s extensive library of landscaping elements to design unique and functional round rooms, incorporating doors, windows, materials, and lighting for a delightful outdoor experience.
Step 1: Setting up the software
The first step in creating a round room in Realtime Landscape Architect is to make sure you have the software installed and ready to use. If you don’t already have the program, you can download it from the official website and follow the installation instructions. Once the installation is complete, you can launch the software and begin setting up your project.
When you open Realtime Landscape Architect, you’ll be greeted with a welcome screen. From here, you can choose to start a new project or open an existing one. For our purposes, we’ll be starting a new project to create our round room.
To start a new project, click on the “New Project” button on the welcome screen. This will take you to the project setup window, where you can input the necessary information for your round room design. You’ll need to provide a project name, a location (if applicable), and set the project scale. The scale determines the size of the objects in your design, so make sure to choose an appropriate scale for your round room.
Once you’ve entered the project details, click on the “Create” button to create your new project. Realtime Landscape Architect will then generate your project workspace, where you can start designing your round room.
Before moving on to the next step, it’s a good idea to familiarize yourself with the software interface. Take some time to explore the various menus, toolbars, and panels so that you can navigate the software efficiently. Understanding how to access different features and tools will make the process of creating your round room much smoother.
Now that you have the software set up, you’re ready to move on to the next step: creating a new project.
Step 2: Creating a new project
Now that you have the software set up, it’s time to create a new project in Realtime Landscape Architect for your round room design. Creating a new project will give you a blank canvas to work on and allow you to customize the settings specific to your round room.
To create a new project, follow these simple steps:
- Click on the “File” menu in the top left corner of the software interface.
- Select “New” from the drop-down menu.
- A dialog box will appear, asking you to choose the project template. Since we are creating a round room, select the “Blank Template” option.
- Click on “OK” to create the new project.
Once you’ve created the new project, you’ll be taken to the project workspace. This is where you’ll design your round room and add all the necessary elements to bring it to life. At this point, your workspace will be empty, so let’s move on to the next step to start creating our round room shape.
Before you continue, it’s important to save your project. Click on the “File” menu and select “Save As” to save your project to the desired location on your computer. It’s always a good practice to save your work regularly to avoid any loss of progress.
Now that your new project is set up, let’s move on to the next step: selecting the round room shape.
Step 3: Selecting the round room shape
Now that you have your new project set up in Realtime Landscape Architect, it’s time to select the round room shape for your design. The round room shape is the foundation of your round room and determines the overall layout and structure.
To select the round room shape, follow these steps:
- In the software toolbar, click on the “Shapes” icon.
- A drop-down menu will appear with various shape options. Scroll down and select the “Circle” shape.
- With the “Circle” shape selected, click and drag your mouse on the project workspace to draw a circle. Adjust the size of the circle to your desired dimensions by dragging the edges or corners.
By selecting the round room shape, you have defined the general layout and structure of your round room. This will serve as the template for the rest of your design. Make sure to choose a size and dimensions that will fit well within your overall landscape design.
Once you have the round room shape in place, you can move on to the next step: adjusting the room size and dimensions.
Step 4: Adjusting the room size and dimensions
Now that you have selected the round room shape for your design, it’s time to adjust the size and dimensions to fit your desired specifications. Realtime Landscape Architect allows you to easily resize and modify the shape of your round room to create the perfect space in your landscape design.
To adjust the room size and dimensions, follow these steps:
- Select the round room shape by clicking on it.
- A bounding box will appear around the shape, indicating that it is selected.
- Click and drag the edges or corners of the bounding box to resize the room. You can make it larger or smaller, depending on your preferences and the available space in your landscape design.
- As you resize the room, you can also hold the Shift key to maintain the original proportions of the shape.
While adjusting the size and dimensions of the room, keep in mind the functionality and aesthetics of the space. Consider factors such as the number of people it should accommodate, the furniture and decor you plan to add, and how it fits within the overall landscape layout.
Realtime Landscape Architect provides real-time visual feedback, allowing you to see your changes instantly as you adjust the room size and dimensions. This makes it easy to experiment and find the perfect balance for your round room design.
Once you are satisfied with the size and dimensions of your round room, you can move on to the next step: adding doors and windows.
Step 5: Adding doors and windows
Adding doors and windows to your round room in Realtime Landscape Architect will not only enhance its functionality but also add a touch of elegance and charm. Doors and windows provide access, natural light, and ventilation to your space, making it more inviting and comfortable.
To add doors and windows to your round room, follow these steps:
- In the software toolbar, click on the “Doors and Windows” icon.
- A drop-down menu will appear with a variety of door and window options. Browse through the selection and choose the type and style that suits your design.
- Click and drag the selected door or window onto the round room shape. Position it in a suitable location, considering the flow of movement and placement of furniture.
- To adjust the size and position of the door or window, click on it to activate the editing handles. Use these handles to resize and move the element as needed.
- Repeat the process to add as many doors and windows as desired.
When adding doors and windows, it’s important to consider the functionality and aesthetics of the room. Place doors in convenient locations to provide easy access, and strategically position windows to maximize views and natural light. Additionally, pay attention to the style and design of the doors and windows to ensure they complement the overall theme of your round room.
By adding doors and windows to your round room, you are creating a more functional and visually appealing space. These elements will enhance the overall design and make it more enjoyable for users.
Next, we’ll move on to step 6: choosing the materials for your round room.
When creating a round room in Realtime Landscape Architect, start by using the circle or curve tool to outline the shape of the room. Then, use the push/pull tool to extrude the walls and adjust the height as needed. Finally, add doors, windows, and interior details to complete the design.
Step 6: Choosing the room materials
The choice of materials for your round room plays a crucial role in defining its style, durability, and overall aesthetic appeal. Realtime Landscape Architect offers a wide range of materials that you can use to customize the look and feel of your round room, from flooring options to wall finishes.
To choose the room materials in Realtime Landscape Architect, follow these steps:
- In the software toolbar, click on the “Materials” icon.
- A material library will appear, showcasing various options for flooring, walls, and more.
- Browse through the materials and select the ones that best align with your design vision.
- Click and drag the selected material onto the corresponding surface of the round room shape.
- If needed, adjust the size and position of the material to fit the room dimensions.
- Repeat the process to apply different materials to different surfaces of the round room.
When choosing materials, consider both the functional and aesthetic aspects. Opt for flooring materials that are durable and suitable for outdoor use. For walls, choose options that complement the overall style of your round room and blend harmoniously with the surrounding landscape.
Realtime Landscape Architect provides a realistic visual representation of the materials, allowing you to visualize how they will look in your round room. Take advantage of this feature to experiment with different combinations and find the perfect mix of materials for your design.
With the room materials selected, your round room is beginning to take shape and reflect your personal style. Next, we’ll move on to step 7: adding furniture and decor to complete the space.
Step 7: Adding furniture and decor
Adding furniture and decor to your round room is where you can truly bring your design to life and create a functional and aesthetically pleasing space. Realtime Landscape Architect provides a vast selection of furniture and decor items that you can incorporate into your round room to enhance its comfort and visual appeal.
To add furniture and decor to your round room, follow these steps:
- In the software toolbar, click on the “Furniture” icon.
- A furniture library will appear, showcasing various options for seating, tables, accessories, and more.
- Browse through the furniture options and select the ones that align with your design concept and preferences.
- Click and drag the selected furniture item onto the round room shape, positioning it in the desired location.
- To adjust the size and rotation of the furniture item, click on it to activate the editing handles and use them to make the necessary adjustments.
- Repeat the process to add more furniture items and decor pieces to complete the space.
When selecting furniture and decor, consider the functionality, comfort, and style of each piece. Choose seating options that provide comfort and accommodate the desired number of people. Incorporate tables and accessories that complement the overall design and serve practical purposes, such as storage or lighting.
Realtime Landscape Architect allows you to experiment with different furniture arrangements and combinations, giving you the flexibility to create a personalized and inviting round room. Take the time to arrange the furniture in a way that promotes a comfortable flow and makes the most of the available space.
With furniture and decor added to your round room, you’ll have created a delightful and inviting space within your landscape design. Next, we’ll move on to step 8: adding lighting effects to enhance the ambiance.
Step 8: Adding lighting effects
Adding lighting effects to your round room in Realtime Landscape Architect can transform the space and create a captivating ambiance during both day and night. Lighting not only serves a functional purpose but also adds a touch of drama and beauty to your design. By strategically placing lights, you can highlight key features, create warm and inviting atmospheres, and extend the usability of your round room well into the evening hours.
To add lighting effects to your round room, follow these steps:
- In the software toolbar, click on the “Lights” icon.
- A selection of lighting options will appear, including spotlights, path lights, and ambient lighting.
- Browse through the lighting options and choose the ones that suit your design goals.
- Click and drag the selected light fixture onto the round room shape, placing it in the desired location.
- To adjust the position and orientation of the light, click on it to activate the editing handles and make the necessary adjustments.
- Repeat the process to add more lighting fixtures, keeping in mind the desired lighting effect and the importance of balanced illumination.
When adding lighting effects, consider the purpose of each light fixture and how it contributes to the overall ambiance. Use accent lights to highlight architectural features or focal points, such as artwork or a fountain. Path lights can guide visitors and create a safe and welcoming pathway. Ambient lighting can set the mood and provide a soft and inviting glow to the entire space.
Realtime Landscape Architect allows you to adjust the intensity and colors of the lights, giving you full control over the desired lighting effect. Take advantage of this feature to create a beautiful and harmonious lighting scheme that enhances the overall atmosphere of your round room.
With lighting effects added, your round room will come alive and exude a captivating ambiance. Next, we’ll move on to step 9: previewing and adjusting the room to ensure its perfection.
Step 9: Previewing and adjusting the room
Now that you have completed the design of your round room in Realtime Landscape Architect, it’s time to take a step back and preview the space as a whole. This final step allows you to evaluate the overall composition, make any necessary adjustments, and ensure that your round room meets your design objectives and vision.
To preview and adjust the room, follow these steps:
- Take a virtual walk-through of the round room by using the software’s navigation tools. This will give you a sense of the spatial arrangement and the room’s flow.
- Observe the different elements in the room, such as furniture, decor, lighting, and materials, and assess their harmony and visual appeal.
- Pay attention to the overall balance and proportion of the room. Ensure that the furniture placement allows for adequate circulation and that the room does not feel too cluttered or empty.
- If needed, make adjustments to the size, position, or rotation of furniture and decor items to achieve the desired aesthetic and functionality.
- Experiment with different camera angles and perspectives to get a comprehensive view of the room from various viewpoints.
- Take note of any additional elements or features that you may want to include in the room, such as plants, artwork, or outdoor appliances.
Previewing and adjusting the room allows you to fine-tune your design and make it truly exceptional. By taking the time to evaluate the space and consider different perspectives, you can ensure that your round room meets your expectations and creates a delightful experience for both yourself and your guests.
Once you are satisfied with the overall look and feel of the round room, you can proceed with finalizing your design, saving your project, and even sharing your creation with others by generating images or walkthrough videos.
Congratulations! You have successfully created a stunning round room in Realtime Landscape Architect. Enjoy and appreciate your hard work and the unique space you have brought to life.
As a final reminder, always remember to save your project regularly and explore further features and possibilities that Realtime Landscape Architect offers to enhance your landscape design.
Conclusion
Congratulations on completing the process of creating a round room in Realtime Landscape Architect! By following the step-by-step guide in this article, you have learned how to set up the software, create a new project, select the round room shape, adjust the size and dimensions, add doors and windows, choose room materials, incorporate furniture and decor, add lighting effects, and preview and adjust the final design.
Realtime Landscape Architect is a powerful tool that allows you to bring your landscaping visions to life in a realistic and visually stunning way. With its user-friendly interface and extensive library of landscaping elements, you have the flexibility to create unique and captivating outdoor spaces, including the round room you’ve just designed.
Creating a round room in your landscape design opens up a world of possibilities. It can serve as a focal point, a cozy outdoor living area, or even a serene retreat. The circular shape brings a sense of harmony and flow to your overall landscape, creating a visually appealing design that stands out.
Remember to consider both functionality and aesthetics as you make design decisions. Think about the placement of doors and windows for easy access and natural light. Choose materials that complement your overall design and withstand the elements. Select furniture and decor that align with your style and create a welcoming atmosphere. Add lighting effects to enhance the ambiance and extend the usability of your round room into the evening.
Throughout the design process, take the time to preview and adjust your round room to ensure it meets your design objectives. Realtime Landscape Architect allows you to visualize your design in real-time, giving you the flexibility to make any necessary tweaks to achieve your desired outcome.
Enjoy the process of creating and designing in Realtime Landscape Architect, and don’t be afraid to let your creativity flourish. With this software, you have the tools to bring your landscape design dreams to life, creating beautiful and functional outdoor spaces for years to come.
So go ahead, explore the features and possibilities, and continue to create stunning round rooms and landscapes that leave a lasting impression.
Frequently Asked Questions about How To Make A Round Room In Realtime Landscape Architect
Was this page helpful?
At Storables.com, we guarantee accurate and reliable information. Our content, validated by Expert Board Contributors, is crafted following stringent Editorial Policies. We're committed to providing you with well-researched, expert-backed insights for all your informational needs.


0 thoughts on “How To Make A Round Room In Realtime Landscape Architect”