Home>Furniture & Design>Bathroom Accessories>How To Install Non-Slip Rug Pad
Bathroom Accessories
How To Install Non-Slip Rug Pad
Modified: February 17, 2024
Learn how to install a non-slip rug pad for your bathroom accessories to keep your rugs in place and prevent slips and falls. Follow our step-by-step guide for a safer and more secure bathroom.
(Many of the links in this article redirect to a specific reviewed product. Your purchase of these products through affiliate links helps to generate commission for Storables.com, at no extra cost. Learn more)
Introduction
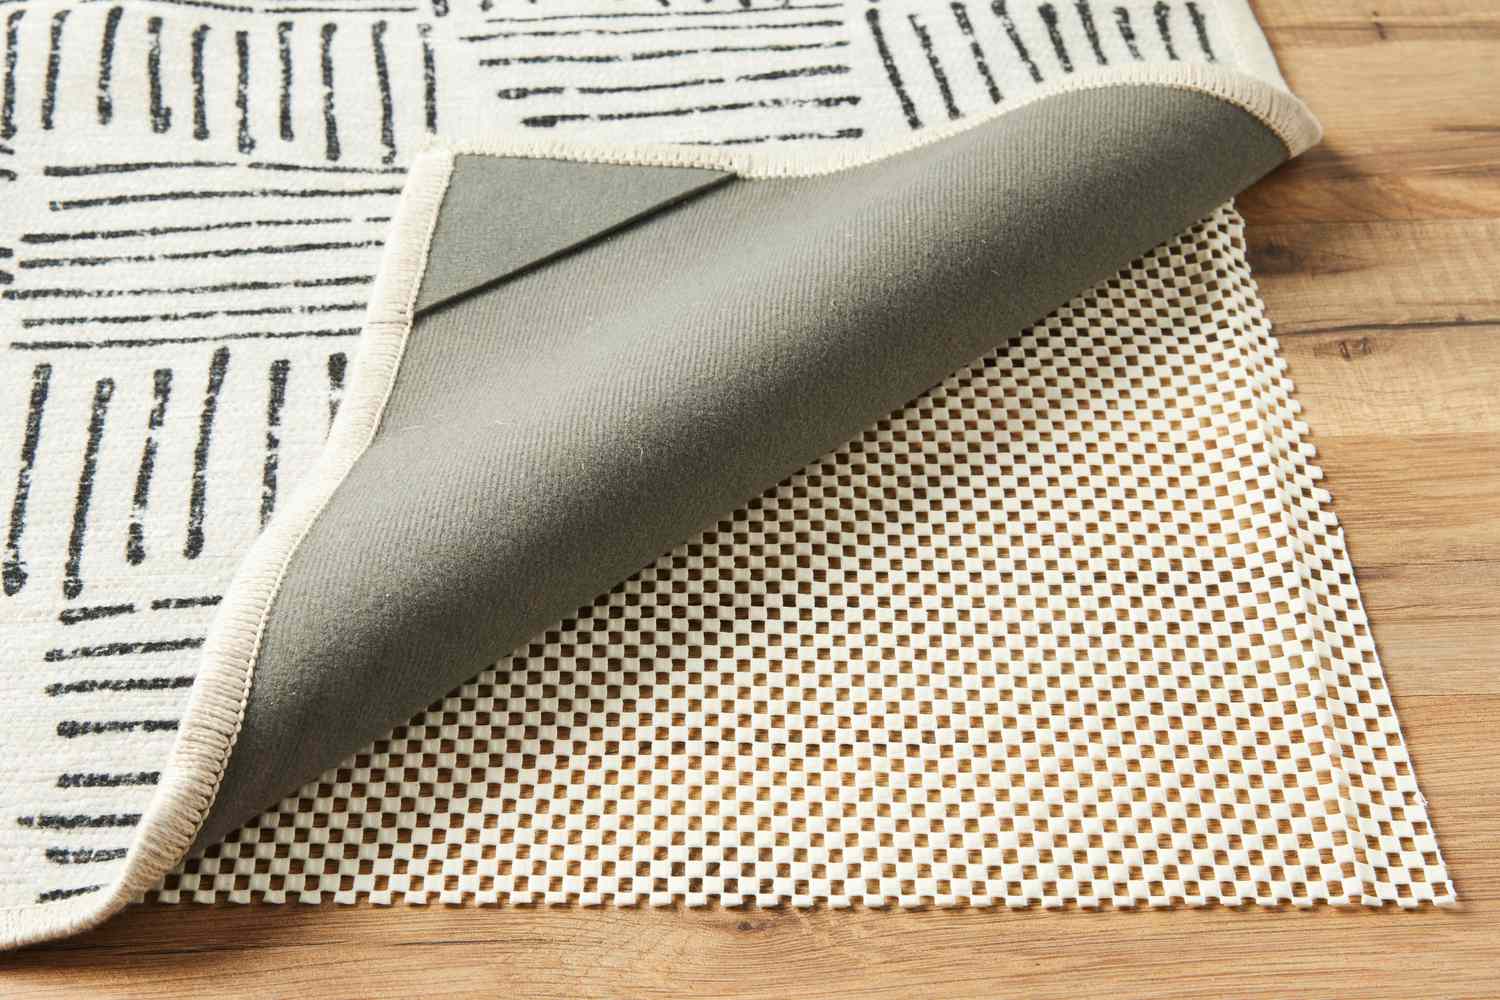
Installing a non-slip rug pad is a simple yet effective way to enhance the safety and functionality of your living space. Whether you have hardwood, tile, or laminate flooring, a non-slip rug pad provides an extra layer of security, preventing your rugs from sliding and bunching up. This not only reduces the risk of slips and falls but also helps to maintain the integrity of your rugs and the underlying flooring.
By following a few straightforward steps, you can ensure that your rug pad is properly installed, providing a stable foundation for your rugs and adding a touch of comfort and style to your home. In this guide, we will walk you through the process of installing a non-slip rug pad, from gathering the necessary materials to testing the grip. With these simple instructions, you can enjoy the peace of mind that comes with a securely anchored rug, creating a safer and more inviting environment for yourself, your family, and your guests.
Key Takeaways:
- Enhance Safety and Longevity
Installing a non-slip rug pad ensures a secure and stable foundation for your rugs, reducing the risk of slips and falls while preserving the integrity of both the rugs and the underlying flooring. - Simple Steps for a Secure Rug
Gather materials, prepare the area, cut the pad to size, place it under the rug, and test the grip for a safe and well-anchored rug that adds comfort and style to your home.
Read more: How To Wash Non-Slip Rug Pad
Step 1: Gather the Necessary Materials
Before you begin the process of installing a non-slip rug pad, it's essential to gather all the materials you'll need to ensure a smooth and efficient installation. Here's a comprehensive list of the necessary items:
-
Non-Slip Rug Pad: The key component of this project is, of course, the non-slip rug pad itself. Ensure that you select a high-quality pad that is suitable for the size and type of rug you plan to secure.
-
Measuring Tape: Accurate measurements are crucial for a precise fit. A reliable measuring tape will help you determine the exact dimensions needed for your rug pad.
-
Scissors or Utility Knife: You'll need a pair of sharp scissors or a utility knife to cut the rug pad to the appropriate size. Make sure the cutting tool is suitable for the thickness of the pad material.
-
Vacuum Cleaner: It's important to thoroughly clean the floor area where the rug pad will be placed. A vacuum cleaner will help remove any dust, debris, or small particles that could affect the pad's grip.
-
Marker or Chalk: Having a marker or chalk on hand will allow you to mark the cutting lines on the rug pad with precision, ensuring a clean and accurate cut.
-
Safety Gloves: While handling the rug pad and cutting tools, it's advisable to wear safety gloves to protect your hands from any sharp edges or potential abrasions.
-
Assistance (Optional): Depending on the size and weight of the rug, having an extra pair of hands to assist you in positioning and adjusting the rug pad can be beneficial.
By ensuring that you have all these materials ready and easily accessible, you can streamline the installation process and minimize any potential disruptions. With the necessary items at your disposal, you'll be well-prepared to move on to the next steps of preparing the area and cutting the rug pad to size.
Step 2: Prepare the Area
Before you proceed with installing the non-slip rug pad, it's crucial to prepare the designated area to ensure optimal adherence and functionality. Proper preparation sets the stage for a secure and long-lasting rug pad installation. Here's a detailed guide on how to prepare the area effectively:
Clear the Space:
Begin by removing any furniture or obstacles from the area where the rug will be placed. Clearing the space not only provides you with a clean and open area to work in but also allows for a seamless placement of the rug pad without any obstructions.
Clean the Floor:
Thoroughly clean the floor surface where the rug pad will be placed. Use a vacuum cleaner to remove any dust, dirt, or debris that may have accumulated. Pay close attention to corners and edges, ensuring that the entire area is free from any particles that could hinder the grip of the rug pad.
Read more: What Makes Non-Slip Shoes Non-Slip
Check for Moisture:
Inspect the floor for any signs of moisture or dampness, especially in areas with high humidity or potential water exposure. Moisture can compromise the effectiveness of the rug pad and lead to mold or mildew growth over time. If moisture is detected, address the underlying issue before proceeding with the installation.
Smooth Out Irregularities:
Feel the floor surface for any irregularities such as bumps, cracks, or uneven areas. If necessary, address these imperfections to create a smooth and level foundation for the rug pad. This may involve filling in gaps or using floor leveling compounds to ensure a uniform surface.
Allow for Air Circulation:
If the floor is made of a material that requires airflow, such as certain types of hardwood, ensure that the area is well-ventilated. Proper air circulation can help maintain the condition of the flooring and prevent moisture buildup, ultimately contributing to the longevity of both the rug pad and the floor.
By meticulously preparing the area where the non-slip rug pad will be installed, you can optimize the conditions for a secure and durable foundation. This proactive approach sets the stage for a successful installation, allowing you to proceed with confidence to the next step of cutting the rug pad to the appropriate size.
Step 3: Cut the Rug Pad to Size
With the area prepared and the necessary materials at hand, the next crucial step in installing a non-slip rug pad is cutting it to the appropriate size. This process ensures that the rug pad fits snugly under the rug, providing maximum coverage and grip. Here's a detailed guide on how to cut the rug pad to size effectively:
-
Measure the Rug: Begin by measuring the dimensions of the rug using a measuring tape. Take accurate measurements of the length and width, ensuring that you account for any fringe or decorative edges. It's essential to measure the rug precisely to determine the exact size of the rug pad needed for a secure fit.
-
Mark the Cutting Lines: Once you have the measurements, lay the rug pad on a flat surface with the appropriate side facing up. Use a marker or chalk to mark the cutting lines on the rug pad, following the measurements of the rug. Double-check the markings to ensure they align with the dimensions of the rug, allowing for a precise and clean cut.
-
Cutting the Rug Pad: Armed with a pair of sharp scissors or a utility knife, carefully cut along the marked lines to trim the rug pad to the required size. Exercise caution during the cutting process to maintain straight and even edges. If using a utility knife, ensure that the blade is sharp to facilitate smooth and controlled cutting.
-
Test the Fit: After cutting the rug pad to size, place it under the rug to test the fit. Ensure that the pad aligns with the edges of the rug, providing full coverage without extending beyond the rug's perimeter. The rug pad should fit seamlessly under the rug, with no visible protrusions or misalignment.
-
Adjustments, if Necessary: If the rug pad requires minor adjustments to achieve an optimal fit, carefully trim the edges as needed. It's important to prioritize precision to ensure that the rug pad complements the rug's dimensions perfectly.
By following these steps, you can tailor the rug pad to fit the specific dimensions of your rug, setting the stage for a secure and effective installation. Cutting the rug pad to size with precision ensures that it seamlessly integrates with the rug, delivering enhanced stability and safety. With the rug pad now customized to fit your rug, you're ready to proceed to the next step of placing the rug pad under the rug.
Step 4: Place the Rug Pad Under the Rug
With the non-slip rug pad cut to the appropriate size, the next step is to carefully position it under the rug, ensuring a secure and stable foundation. Proper placement of the rug pad not only enhances the safety and functionality of the rug but also contributes to the overall aesthetic appeal of the room. Here's a detailed guide on how to place the rug pad under the rug effectively:
-
Prepare the Rug: Before placing the rug pad, ensure that the rug itself is clean and free of any debris. If necessary, give the rug a quick shake or gentle vacuuming to remove any loose dirt or particles. This step helps to maintain the cleanliness of the rug and prevents any foreign objects from affecting the grip of the rug pad.
-
Position the Rug Pad: Lay the rug pad flat on the floor in the intended placement area. Carefully position the rug pad to align with the edges of the rug, ensuring that it sits evenly and securely. If the rug pad has a specific top or bottom side, make sure to orient it correctly to maximize its non-slip properties.
-
Place the Rug: Once the rug pad is in position, gently place the rug on top of it, ensuring that the edges of the rug align with the edges of the pad. Smooth out the rug to remove any wrinkles or folds, allowing it to rest evenly on the rug pad. Take your time to adjust the rug as needed, ensuring that it sits flush with the rug pad across its entire surface.
-
Check for Alignment: After placing the rug on the pad, inspect the alignment to ensure that the rug and pad are properly centered. The rug should sit securely on the pad without any overhanging edges or misalignment. Adjust the rug as necessary to achieve a symmetrical and balanced placement.
-
Test the Grip: Once the rug is in position, test the grip by applying gentle pressure to different areas of the rug. The rug pad should effectively anchor the rug in place, preventing any sliding or shifting. Walk across the rug to further test its stability, ensuring that it remains firmly in position without any noticeable movement.
By following these steps, you can effectively place the rug pad under the rug, creating a secure and slip-resistant foundation for your rug. This not only enhances the safety of the living space but also prolongs the life of the rug by minimizing wear and tear caused by movement and friction. With the rug pad successfully positioned, you can now enjoy the benefits of a stable and well-anchored rug, adding both comfort and style to your home.
Step 5: Test the Grip
After placing the rug pad under the rug, the final step in the installation process is to thoroughly test the grip to ensure that the rug remains securely anchored in its designated position. This critical step not only validates the effectiveness of the non-slip rug pad but also provides peace of mind, knowing that the rug will stay in place, even in high-traffic areas. Here's a detailed guide on how to test the grip of the rug pad:
-
Gentle Pressure Testing: Apply gentle pressure to various sections of the rug, particularly in areas where foot traffic is common. Press down on the rug and observe how the rug pad responds. A well-performing rug pad will effectively grip the rug, preventing it from sliding or shifting, even under pressure. Pay attention to any noticeable movement or slippage, as this may indicate areas that require additional attention.
-
Walking Test: Walk across the rug to simulate everyday use and movement. As you walk, observe the behavior of the rug and the rug pad. A reliable non-slip rug pad will keep the rug firmly in place, allowing for smooth and stable movement without any disruptive shifting. Test different paths and movements across the rug to assess its overall stability and grip.
-
Observe Over Time: After initial testing, observe the rug's position over a period of time, especially in areas with frequent activity. Regularly check for any signs of slippage or movement, particularly if the rug is located in a high-traffic area. A well-installed non-slip rug pad should maintain its grip consistently, providing reliable stability for the rug in the long run.
-
Repositioning Check: If the rug pad exhibits any signs of inadequate grip during testing, consider repositioning the rug and pad to address the issue. Carefully lift the rug and adjust the positioning of the pad as needed, ensuring that it fully supports the rug's weight and dimensions. Repeating the grip testing after repositioning can help confirm the effectiveness of the adjustments.
By thoroughly testing the grip of the rug pad, you can verify its ability to keep the rug in place, promoting a safer and more secure environment. A successful grip test provides the assurance that the rug pad is fulfilling its essential role, contributing to the overall functionality and longevity of the rug. With a stable and well-anchored rug, you can confidently enjoy the comfort and aesthetic appeal it brings to your living space.
When installing a non-slip rug pad, make sure to clean the floor underneath the rug to remove any dust or debris. Then, place the rug pad on the floor and smooth it out to ensure it lies flat before placing the rug on top.
Conclusion
In conclusion, the installation of a non-slip rug pad is a simple yet impactful endeavor that significantly enhances the safety, functionality, and longevity of your rugs and the underlying flooring. By following the step-by-step guide outlined in this article, you can ensure a seamless and effective installation process, ultimately creating a more secure and inviting living environment for yourself, your family, and your guests.
The initial step of gathering the necessary materials sets the stage for a smooth installation, ensuring that you have all the essential items at your disposal. From the non-slip rug pad itself to measuring tape, scissors, and safety gloves, having these materials ready streamlines the process and minimizes any potential disruptions.
Preparing the area is a crucial prelude to the installation, as it optimizes the conditions for the rug pad to adhere securely to the floor. Clearing the space, cleaning the floor, and addressing any irregularities or moisture issues create an ideal foundation for the rug pad, maximizing its effectiveness and longevity.
Cutting the rug pad to the appropriate size is a precision-oriented task that ensures a snug and tailored fit for your rug. By carefully measuring, marking, and cutting the rug pad, you can customize it to seamlessly integrate with the dimensions of your rug, setting the stage for a secure and effective installation.
Placing the rug pad under the rug is a pivotal step that not only enhances the safety and stability of the rug but also contributes to the overall aesthetic appeal of the room. Proper positioning and alignment of the rug pad create a secure foundation, preventing the rug from sliding or shifting, even in high-traffic areas.
Finally, testing the grip of the rug pad validates its effectiveness, providing the assurance that the rug will remain securely anchored in its designated position. Through gentle pressure testing, walking tests, and ongoing observation, you can confirm the reliability of the rug pad's grip, ensuring a stable and well-anchored rug in the long run.
By completing these steps with care and attention to detail, you can enjoy the peace of mind that comes with a securely anchored rug, creating a safer and more inviting environment for yourself, your family, and your guests. The installation of a non-slip rug pad not only enhances safety but also contributes to the preservation of your rugs and flooring, ultimately adding comfort and style to your home.
Frequently Asked Questions about How To Install Non-Slip Rug Pad
Was this page helpful?
At Storables.com, we guarantee accurate and reliable information. Our content, validated by Expert Board Contributors, is crafted following stringent Editorial Policies. We're committed to providing you with well-researched, expert-backed insights for all your informational needs.


0 thoughts on “How To Install Non-Slip Rug Pad”