Home>Garden Essentials>Garden Storage>How To Make A Stock Tank Pool For Budget-Friendly Backyard Fun
Garden Storage
How To Make A Stock Tank Pool For Budget-Friendly Backyard Fun
Modified: May 6, 2024
Learn how to repurpose a stock tank for a budget-friendly storage solution while creating a fun and stylish addition to your backyard.
(Many of the links in this article redirect to a specific reviewed product. Your purchase of these products through affiliate links helps to generate commission for Storables.com, at no extra cost. Learn more)
Introduction
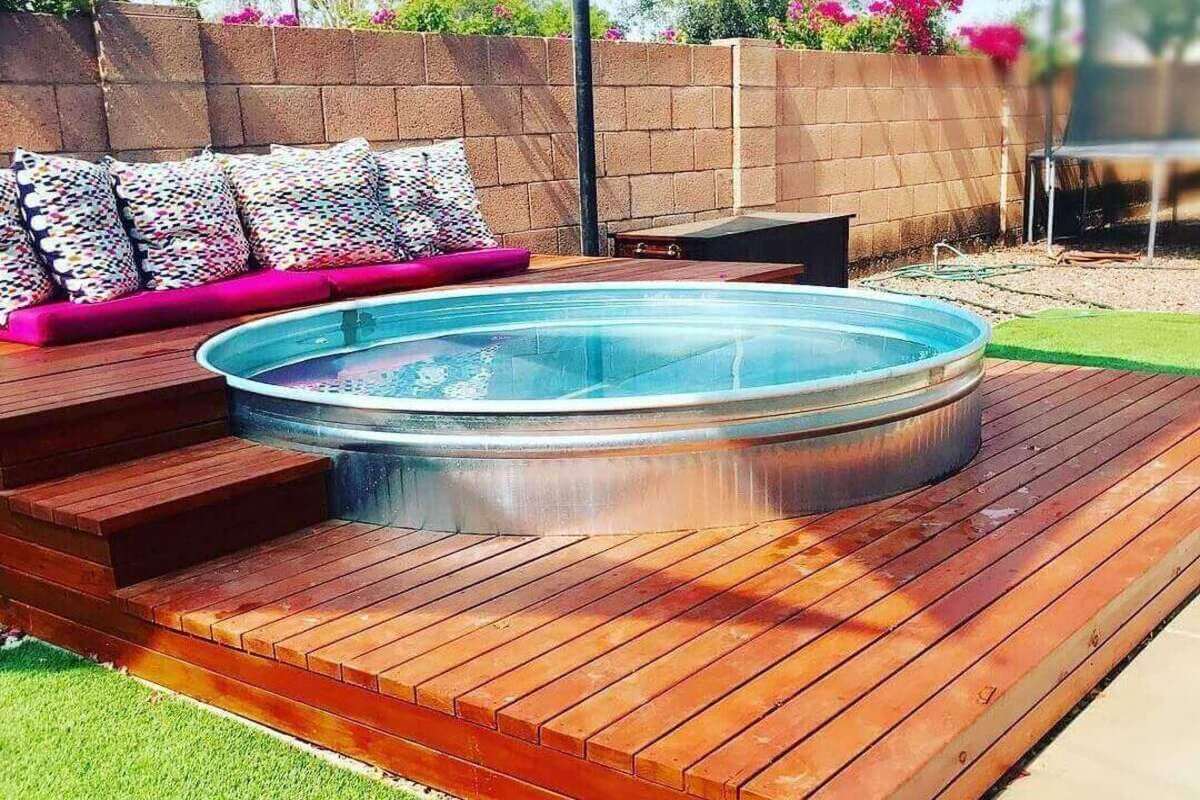
Have you ever dreamed of having your own swimming pool but thought it was too expensive? Well, we have a solution for you! With a little creativity and some DIY skills, you can create a budget-friendly backyard oasis with a stock tank pool.
Stock tank pools have become increasingly popular in recent years, offering an affordable and stylish alternative to traditional above-ground or in-ground pools. These large, galvanized metal tanks were originally designed for watering livestock, but they are now being repurposed to create unique and functional swimming pools.
In this article, we will guide you through the process of making your own stock tank pool. We will cover everything from choosing the right tank and location to adding accessories and maintaining your pool. So, let’s dive in and start creating your very own budget-friendly backyard fun!
Key Takeaways:
- Create a budget-friendly backyard oasis with a stock tank pool by carefully choosing the right tank, location, and accessories. Prioritize safety, maintain water chemistry, and enjoy a stylish and relaxing retreat.
- Transform your stock tank pool into a fun and inviting space with accessories, decorations, and regular maintenance. Prioritize safety, balance water chemistry, and create lasting memories with friends and family.
Read more: How To Make A Stock Tank Hot Tub
Choosing the Right Stock Tank
The first step in creating your stock tank pool is choosing the right tank. When selecting a stock tank for your pool, there are a few factors to consider.
1. Size: Stock tanks come in various sizes, ranging from small and cozy to large and spacious. The size you choose will depend on the available space in your backyard and the number of people you plan to accommodate in your pool. Keep in mind that a larger stock tank will require more water to fill and may increase maintenance costs.
2. Shape: Stock tanks are typically round or oval in shape. Round tanks are easier to install and maintain, while oval tanks offer a more elongated swimming area. Consider your personal preference and the available space when deciding on the shape of your stock tank.
3. Material: Most stock tanks are made of galvanized metal, which is durable and resistant to rust. However, some tanks are also available in plastic or fiberglass options. Consider the pros and cons of each material, such as durability, maintenance requirements, and cost, before making your choice.
4. Budget: Stock tanks come in a range of prices, so it’s important to set a budget before you start shopping. Consider not just the cost of the tank itself, but also any additional accessories or modifications you may need to install. Remember, the goal is to create a budget-friendly pool, so keep costs in mind.
5. Availability: Stock tanks can be found at farm supply stores, online retailers, or even through local listings. Research the availability of stock tanks in your area and compare prices and options to find the best fit for your needs.
Once you have considered these factors, you can make an informed decision and purchase the stock tank that suits your preferences and budget. In the next section, we will guide you through selecting the perfect location for your stock tank pool.
Selecting the Perfect Location
Now that you have chosen the right stock tank for your pool, it’s time to select the perfect location in your backyard. Here are some factors to consider when deciding where to place your stock tank pool:
1. Sunlight: Look for an area in your backyard that receives adequate sunlight throughout the day. Sunlight helps to naturally warm the water in your pool, making it more enjoyable to swim in. Avoid placing your pool in areas that are heavily shaded or prone to constant shade.
2. Level Ground: It’s essential to choose a level area for your stock tank pool. Uneven ground can cause stability issues and make it more challenging to maintain the water level. Take some time to level the ground if necessary or consider using a sand base to create a smooth surface for your pool.
3. Proximity to Utilities: Consider the access to water and electricity when selecting the location for your stock tank pool. You will need a water source to fill the pool initially and potentially for regular top-ups. Electricity is required if you plan to install a pump or filtration system for your pool.
4. Privacy: If privacy is important to you, choose a location that is not easily visible from neighboring properties or public areas. You can create a more secluded space by using fencing, plants, or other landscaping elements to block the view of your pool.
5. Accessibility: Think about how easily accessible your stock tank pool will be from your house and other outdoor areas. You’ll want to have a clear pathway to reach the pool and should consider factors like convenience and safety when planning the location.
6. Aesthetics: Consider the overall aesthetics and visual appeal of the location. You may want to place your pool in an area that complements the existing landscape or create a dedicated poolside space with seating, shade, and other amenities.
By taking these factors into account, you can select a location that meets your practical and aesthetic preferences. Once you have determined the perfect spot for your stock tank pool, it’s time to prepare the ground before installation.
Preparing the Ground
Before you can install your stock tank pool, it’s important to prepare the ground to ensure a stable and level base. Here are the steps to follow when preparing the ground for your pool:
1. Clear the Area: Start by clearing the area where you plan to install your stock tank pool. Remove any rocks, debris, or vegetation that may hinder the leveling process. It’s crucial to have a clean and smooth surface for the next steps.
2. Measure and Mark: Use a measuring tape to determine the dimensions of your stock tank pool. Mark the outline of the pool on the ground using stakes or spray paint. This will help you visualize the space and ensure accurate leveling.
3. Excavate the Area: If the ground is uneven or has slopes, you may need to excavate the area to create a level surface. Use a shovel or a small excavator to remove excess soil from higher areas and fill in depressions with soil or sand until the ground is level.
4. Compact the Soil: Once the ground is excavated and level, use a hand tamper or a plate compactor to compact the soil. This will help create a stable foundation for your stock tank pool.
5. Add a Layer of Gravel: To further enhance the stability of the ground, consider adding a layer of gravel or crushed stone. This will provide better drainage and prevent the ground from shifting or becoming muddy.
6. Smooth and Level: Use a rake or a leveling tool to smooth out the surface of the prepared ground. Ensure that the area within the marked outline is completely level and free from any bumps or dips.
By following these steps, you will have a solid and level base for your stock tank pool. Once the ground is prepared, you’re ready to move on to the next steps of installing a protective liner and filling the stock tank.
Leveling the Stock Tank
After preparing the ground, it’s time to focus on leveling the stock tank itself. This step is crucial to ensure the stability and proper functioning of your pool. Here’s how you can level your stock tank:
1. Place the Stock Tank: Carefully position the stock tank within the marked outline on the prepared ground. Ensure that it is centered and aligned properly.
2. Check for Levelness: With a spirit level, check the levelness of the stock tank by placing the level on top of the tank’s rim. Make sure it is balanced and not leaning in any direction.
3. Adjust the Ground: If the stock tank is not level, you will need to make adjustments. This can be done by adding or removing soil or gravel under the tank’s base. Use a shovel or rake to make the necessary adjustments, ensuring that the tank sits firmly and evenly.
4. Use Shims: In some cases, you may need to use shims to further level the stock tank. These can be small wooden blocks or plastic shims that are placed under the tank’s base in areas where it is slightly off level. They help stabilize the tank and prevent any rocking or shifting.
5. Check Levelness Again: After making adjustments and using shims, recheck the levelness of the stock tank. Continue to make any necessary tweaks until it is perfectly level in all directions.
6. Secure the Stock Tank: Once the stock tank is level, it’s important to secure it in place. You can do this by placing heavy bricks or landscape blocks around the outer perimeter of the tank. This will help prevent any movement or shifting.
By ensuring that your stock tank is properly leveled, you’ll have a stable and safe foundation for your pool. Remember to double-check the levelness at each stage of the installation process to make any necessary adjustments. With the stock tank leveled, you can now proceed to the next step of adding a protective liner to the pool.
Read more: What Size Stock Tank For Bathtub
Adding a Protective Liner
Once you have leveled your stock tank, the next step is to add a protective liner. A liner acts as a barrier between the metal of the tank and the water, preventing any damage or corrosion. Follow these steps to add a protective liner to your stock tank:
1. Choose a Liner: There are several options for liners, including pool-specific liners, pond liners, or even heavy-duty plastic sheets. Choose a liner that is durable, waterproof, and large enough to cover the entire interior of the stock tank.
2. Clean the Tank: Before placing the liner, ensure that the stock tank is clean and free from any debris. Give it a thorough rinse or wipe down to remove any dirt or dust that may be on the surface.
3. Position the Liner: Carefully place the liner inside the stock tank. Start by aligning one edge of the liner with the edge of the tank and gradually unfold it, ensuring that it covers the entire interior surface of the tank.
4. Smooth out Wrinkles: Once the liner is positioned, smooth out any wrinkles or creases. This can be done by pressing down on the liner and using your hands to gently pull and stretch the material until it lies flat and smooth.
5. Trim Excess Liner: If there is any excess liner protruding from the top of the stock tank, use a sharp knife or scissors to trim it down to size. Leave a slight overlap to ensure a secure and watertight seal.
6. Secure the Liner: To keep the liner in place, you can use clips, clamps, or adhesive products designed for pool liners. Attach them along the top edge of the stock tank, ensuring that the liner is snugly secured to the tank.
By adding a protective liner, you not only prevent potential damage to the stock tank but also create a smoother and more comfortable surface for swimmers. The liner provides an additional layer of protection and improves the overall aesthetics of your stock tank pool. Now that the liner is in place, it’s time to move on to the exciting step of filling the stock tank with water.
Filling the Stock Tank
Now that you have added the protective liner to your stock tank, it’s time to fill it with water. Follow these steps to ensure a successful and efficient filling process:
1. Check for Leaks: Before filling the stock tank, inspect the liner for any potential leaks or damage. Look for any visible holes or tears and patch them up using a pool liner repair kit if necessary. Ensuring the integrity of the liner is important to prevent water loss.
2. Water Source: Determine the source of water for filling your stock tank. This can be a garden hose connected to an outdoor faucet or a water delivery service, depending on your accessibility and preference.
3. Start Filling: Position the hose or water delivery mechanism inside the stock tank. Turn on the water and allow it to run gradually, filling the tank to the desired water level. Keep an eye on the water level and adjust the flow accordingly.
4. Monitor Water Chemistry: As the stock tank fills, it’s important to monitor the water chemistry to ensure a safe and comfortable swimming environment. Test the water regularly using a pool water testing kit to check the pH, chlorine levels, and other important parameters. Adjust the water chemistry as needed to maintain a balanced and healthy pool.
5. Slow and Steady: Filling the stock tank slowly and steadily is recommended to minimize turbulence and prevent the liner from shifting or wrinkling. Avoid rapid filling, which could put unnecessary stress on the pool structure.
6. Top Up if Necessary: After the initial fill, you may need to top up the water level periodically due to evaporation or splashing. Monitor the water level and add more water as needed to maintain the desired level.
Remember to take safety precautions while filling the stock tank. Do not leave the water unattended and ensure that children and pets are supervised during the process. Once the stock tank is filled with water, you can move on to the next steps of installing a filter and pump system to keep the water clean and clear.
When setting up a stock tank pool, make sure to place it on a level surface to prevent any uneven weight distribution and potential damage to the pool.
Installing a Filter and Pump System
Installing a filter and pump system is essential for maintaining clean and clear water in your stock tank pool. Here’s a step-by-step guide on how to install a filter and pump system:
1. Select the Right System: Choose a filter and pump system that is appropriate for the size of your stock tank pool. Consider factors such as flow rate, filtration capacity, and energy efficiency when making your selection. It’s also a good idea to opt for a system specifically designed for above-ground pools or stock tank pools.
2. Position the Equipment: Determine the ideal location for your filter and pump system near the stock tank. It should be within reach of a power source and close enough to connect the plumbing. Place the equipment on a stable surface, such as a level concrete pad or pavers.
3. Connect the Plumbing: Install the necessary plumbing connections to connect the filter and pump system to the stock tank. This typically involves attaching hoses or pipes to the inlet and outlet ports of the equipment. Ensure a secure and watertight connection, and use appropriate fittings for your specific setup.
4. Prime the Pump: If your pump requires priming, follow the manufacturer’s instructions to ensure proper operation. Priming helps remove any air from the system and promotes efficient water circulation.
5. Position the Filter: Place the filter in a convenient location near the pump, making sure it is easily accessible for maintenance and cleaning. Ensure proper alignment and connection of the filter to the plumbing system.
6. Connect and Test: Once the filter and pump system is in position, connect it to a power source and turn it on to test its functionality. Check for any leaks or irregularities in water flow, and make adjustments as needed.
7. Maintain and Clean: Regularly maintain and clean your filter and pump system according to the manufacturer’s instructions. This includes backwashing the filter, replacing or cleaning filter media, and ensuring the pump is free from debris.
Installing a filter and pump system will help keep the water in your stock tank pool clean and well-circulated. It removes debris, promotes proper filtration, and maintains water clarity. With the filter and pump system in place, it’s time to ensure the water chemistry is properly balanced for a safe and enjoyable swimming experience in your stock tank pool
Balancing the Water Chemistry
Properly balancing the water chemistry in your stock tank pool is crucial for maintaining a safe and comfortable swimming environment. Here’s how you can balance the water chemistry:
1. Measure pH Level: Use a pool water testing kit to measure the pH level of your stock tank pool. The ideal pH range for pool water is typically between 7.2 and 7.6. If the pH level is too high or too low, adjust it accordingly using pH increasers or decreasers.
2. Check Chlorine Levels: Chlorine is essential for sanitizing the pool water and preventing the growth of bacteria and algae. Test the chlorine levels regularly and aim to maintain a range of 1-3 parts per million (ppm). Add chlorine tablets or liquid chlorine as needed.
3. Monitor Alkalinity: Alkalinity helps buffer against pH fluctuations. Test the alkalinity level in your pool water and maintain it within the recommended range of 80-120 ppm. If the alkalinity is too high or low, adjust it using alkalinity increasers or decreasers.
4. Adjust Calcium Hardness: Calcium hardness refers to the amount of dissolved calcium in the water. Test the calcium hardness levels and aim for a range of 150-250 ppm. If the calcium hardness is too low, consider adding a calcium hardness increaser.
5. Consider Stabilizer: Stabilizer, also known as cyanuric acid, helps protect chlorine from degradation caused by sunlight. Test the stabilizer levels and maintain them within the recommended range of 30-50 ppm. If the stabilizer levels are too low, you can add a stabilizer product.
6. Shock the Pool: Regularly shock the pool to remove any organic contaminants and maintain water clarity. Shocking involves adding a larger dose of chlorine to the pool water. Follow the manufacturer’s instructions for the recommended shock treatment and frequency.
7. Regular Testing and Maintenance: It’s important to test the water chemistry regularly, at least once a week, to ensure it remains balanced. Follow a routine maintenance schedule that includes testing the pH, chlorine, and other levels, as well as cleaning the filter and skimming debris from the pool regularly.
Remember, maintaining proper water chemistry not only ensures a safe swimming environment but also prolongs the life of your stock tank and equipment. Regularly monitor the water chemistry and make adjustments as needed to keep your stock tank pool sparkling and inviting.
Read more: Tips For A Backyard Makeover On A Budget
Enhancing Safety Measures
When it comes to enjoying your stock tank pool, safety should always be a top priority. Here are some important safety measures to enhance the overall safety of your pool:
1. Secure the Pool Area: Install a sturdy fence or barrier around your stock tank pool to restrict access and prevent unsupervised entry. Make sure the fence is at least four feet high and has a self-closing, self-latching gate to keep children and pets away from the pool area.
2. Supervision: Never leave children unattended in or around the stock tank pool. Assign a responsible adult as a designated pool watcher at all times. Remember, drowning can occur quickly and silently, so maintaining constant supervision is essential.
3. Swimming Ability: Ensure that all individuals who will be using the stock tank pool have basic swimming skills. Encourage non-swimmers to wear approved flotation devices and provide appropriate supervision for inexperienced swimmers.
4. Clear the Pool Area: Remove any potential hazards or obstacles from the pool area, such as sharp objects, slippery surfaces, or tripping hazards. Keep the pool surroundings tidy to prevent accidents and injuries.
5. Emergency Equipment: Have essential safety equipment near the pool, including a life ring, reaching pole, and a first aid kit. Make sure you and your pool users know how to use these items in case of an emergency.
6. Educate Pool Users: Teach all individuals who use the stock tank pool about pool safety rules and guidelines. This includes reminders about not running around the pool, not diving into shallow water, and not using glass or sharp objects near the pool.
7. Learn CPR: Get certified in CPR (Cardiopulmonary Resuscitation) and familiarize yourself with basic rescue techniques. Knowing how to respond in case of an emergency can save lives.
8. Regular Maintenance: Keep up with regular maintenance of your pool, including cleaning the pool and filter, testing water chemistry, and ensuring that all equipment is in good working condition. Maintaining a clean and well-maintained pool reduces the risk of accidents.
By implementing these safety measures, you can create a safer environment for everyone enjoying your stock tank pool. Remember, safety is a shared responsibility, and it’s important to educate all pool users about the rules and guidelines to ensure a fun and secure swimming experience.
Adding Accessories and Decorations
Once you’ve installed your stock tank pool and ensured its safety, it’s time to add some accessories and decorations to enhance the overall aesthetic and enjoyment of your pool. Here are some ideas to consider:
1. Pool Lighting: Install pool lights around the stock tank to create a captivating ambiance during evening swims. LED lights or floating solar-powered lights are great options that provide both safety and decoration.
2. Seating: Add comfortable seating options around the pool area for relaxation and socializing. This can include outdoor chairs, loungers, or even inflatable pool floats and rafts.
3. Umbrellas and Shade: Set up umbrellas or shade structures near the pool to provide relief from the sun’s rays. This allows for extended swimming sessions and protects swimmers from excessive sun exposure.
4. Pool Toys and Games: Incorporate pool toys and games to add fun and entertainment to your stock tank pool. Consider options like inflatable balls, water noodles, or water volleyball nets to keep both kids and adults entertained.
5. Plants and Landscaping: Surround the pool area with plants and greenery to create a more natural and inviting atmosphere. Choose plants that can withstand pool water splashes and provide shade or privacy.
6. Poolside Storage: Install a storage unit or deck box to keep pool equipment, toys, and cleaning supplies neatly organized and easily accessible.
7. Outdoor Speaker System: Set up a weather-resistant outdoor speaker system to enjoy music while swimming or lounging by the pool. Create a playlist of your favorite tunes and set the mood for a relaxing poolside experience.
8. Poolside Bar or Refreshment Station: Create a designated area for refreshments near the pool, whether it’s a bar cart or a mini fridge stocked with cold drinks and snacks. This adds convenience and ensures everyone stays hydrated and nourished.
Remember to choose accessories and decorations that are appropriate for your space and align with your personal style. Be mindful of any safety concerns and ensure that all added items are designed for outdoor use and water-resistant. Adding these touches will transform your stock tank pool into a stylish and inviting oasis for summer fun and relaxation.
Maintenance Tips
Maintaining your stock tank pool is essential to ensure its longevity, water quality, and your overall enjoyment. Here are some maintenance tips to keep your pool in optimal condition:
1. Regular Cleaning: Remove debris, leaves, and insects from the water surface using a pool skimmer or net. Clean the pool walls and bottom with a pool brush to prevent algae buildup and maintain water clarity.
2. Monitor Water Chemistry: Test the water chemistry regularly using a pool water testing kit. Maintain proper pH, chlorine levels, and other parameters based on the recommended ranges. Adjust the water chemistry as needed to keep it balanced and safe for swimming.
3. Shock the Pool: Regularly shock the pool with chlorine to eliminate bacteria, viruses, and other organic matter. Follow the manufacturer’s instructions for the appropriate dosage and frequency based on the usage and environmental conditions.
4. Inspect and Maintain Equipment: Regularly check the filter, pump, and other equipment for proper functioning. Clean or replace the pool filter as recommended by the manufacturer. Inspect hoses, valves, and connections for any leaks or damage.
5. Backwash or Clean the Filter: If you have a sand or cartridge filter, backwash it or clean it regularly to remove trapped debris and maintain optimal filtration. Follow the manufacturer’s instructions for the recommended backwashing or cleaning procedure.
6. Top Up Water Level: Monitor the water level in your stock tank pool and top it up as needed. Evaporation and splashing can cause the water level to drop over time, so ensure it remains at an appropriate level for proper filtration and circulation.
7. Cover the Pool: Invest in a pool cover specially designed for your stock tank pool. Covering the pool when not in use helps reduce evaporation, keeps debris out, and prevents algae growth. Make sure the cover is secure and properly fitted.
8. Winterizing: If you live in an area with freezing temperatures, winterize your stock tank pool to protect it from potential damage. Drain the water, remove equipment, and follow the manufacturer’s recommendations for winterizing procedures.
9. Regular Inspections: Conduct routine inspections of the stock tank, liner, and fittings to ensure they are in good condition. Look for any signs of damage, rust, or wear and address any issues promptly to avoid further problems.
10. Safe Chemical Storage: Store pool chemicals in a cool, dry place away from sunlight and out of reach of children and pets. Follow the manufacturer’s instructions for proper storage and handling of chemicals.
By following these maintenance tips, you can keep your stock tank pool clean, safe, and inviting throughout the swimming season. Regular maintenance and care will help prolong the lifespan of your pool and ensure that you and your loved ones can enjoy it for years to come.
Conclusion
Congratulations, you are now equipped with the knowledge and guidance to create your own budget-friendly backyard oasis with a stock tank pool. With careful planning, proper installation, and regular maintenance, you can enjoy the refreshing and relaxing benefits of having a swimming pool right in your own backyard.
From choosing the right stock tank and selecting the perfect location to adding accessories, balancing the water chemistry, and implementing safety measures, each step of the process contributes to creating a beautiful and enjoyable swimming experience.
Remember to prioritize safety by implementing necessary precautions, including pool fencing, supervision, and regular equipment inspections. Proper maintenance, such as regular cleaning, water testing, and equipment care, will ensure that your pool remains in its best condition and provides a clean and inviting environment for swimming.
By adding your personal touch with accessories, decorations, and comfortable seating, you can transform your stock tank pool into a stylish and relaxing retreat where you can unwind and create lasting memories with friends and family.
Now it’s time to gather your tools, unleash your creativity, and start building your own stock tank pool. Get ready to dive into affordable backyard fun and make a splash all summer long!
Happy swimming!
Ready for more backyard transformations? Dive into our latest guide on decking out your space for supreme outdoor living. Discover smart, vibrant decor and easy enhancements that turn any deck into a cozy haven for relaxation and entertainment. From stylish furniture arrangements to atmospheric lighting, learn how to craft an inviting atmosphere where memories are made.
Frequently Asked Questions about How To Make A Stock Tank Pool For Budget-Friendly Backyard Fun
Was this page helpful?
At Storables.com, we guarantee accurate and reliable information. Our content, validated by Expert Board Contributors, is crafted following stringent Editorial Policies. We're committed to providing you with well-researched, expert-backed insights for all your informational needs.


0 thoughts on “How To Make A Stock Tank Pool For Budget-Friendly Backyard Fun”