Home>Garden Essentials>When Do Tulips Germinate
Garden Essentials
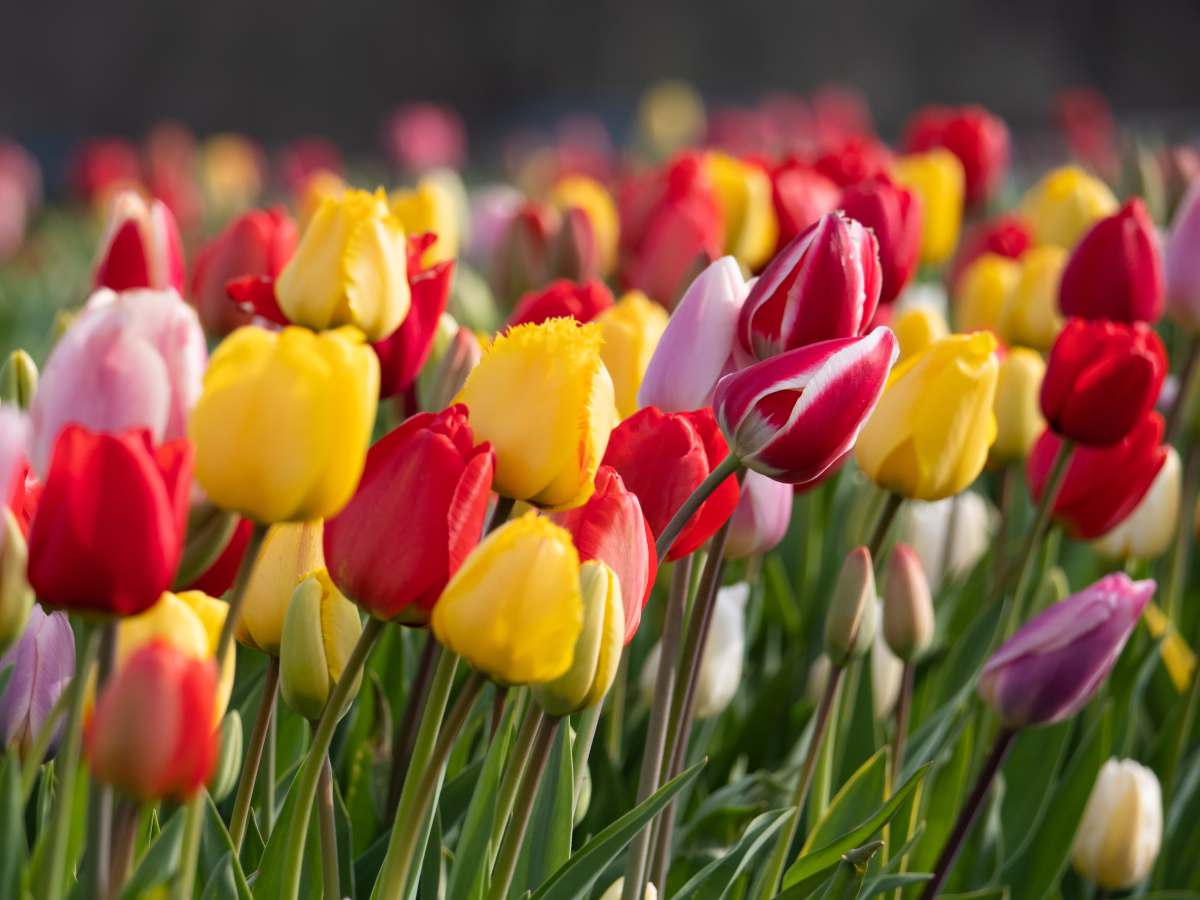
When Do Tulips Germinate
Modified: May 6, 2024
Learn when tulips germinate and how to grow them in your garden. Discover the best time to plant tulip bulbs and tips for successful germination.
(Many of the links in this article redirect to a specific reviewed product. Your purchase of these products through affiliate links helps to generate commission for Storables.com, at no extra cost. Learn more)
Introduction
Tulips are beautiful flowers that grace gardens and landscapes with their vibrant colors and elegant blooms. Whether you’re a seasoned gardener or a beginner, understanding the process of tulip germination is essential for successfully growing these majestic flowers. Germination is the stage in a plant’s life cycle when the seed begins to sprout and develop into a new plant. It is an exciting and crucial phase that lays the foundation for the growth and flowering of tulips.
In this article, we will delve into the fascinating world of tulip germination and explore the factors that influence its success. We will discuss the importance of temperature, light, soil conditions, and watering in the germination process. Furthermore, we will provide strategies to promote tulip germination, steps to prepare tulip bulbs for optimal growth, and guidelines for planting tulips to ensure successful germination. We will also outline the timeline for tulip germination and address common issues that may arise during this stage. By the end of this article, you will have a comprehensive understanding of when and how tulips germinate, equipping you with the knowledge to grow these stunning flowers in your own garden.
So, grab your gardening tools and let’s embark on a journey through the magical world of tulip germination!
Key Takeaways:
- Tulips need cool temperatures, light exposure, well-draining soil, and proper watering for successful germination. Understanding these factors and addressing common issues can help ensure healthy growth.
- Preparing tulip bulbs, providing vernalization, and troubleshooting issues like rot, pests, and sunlight exposure are crucial for successful tulip germination. Patience and care lead to vibrant blooms.
Read more: When Do Weeds Germinate
Understanding Tulip Germination
Tulip germination is a fascinating process that marks the beginning of a tulip’s life cycle. It involves the sprouting of the seed and the development of the young plant. Understanding the steps involved in tulip germination is crucial for providing the right conditions and care to ensure successful growth.
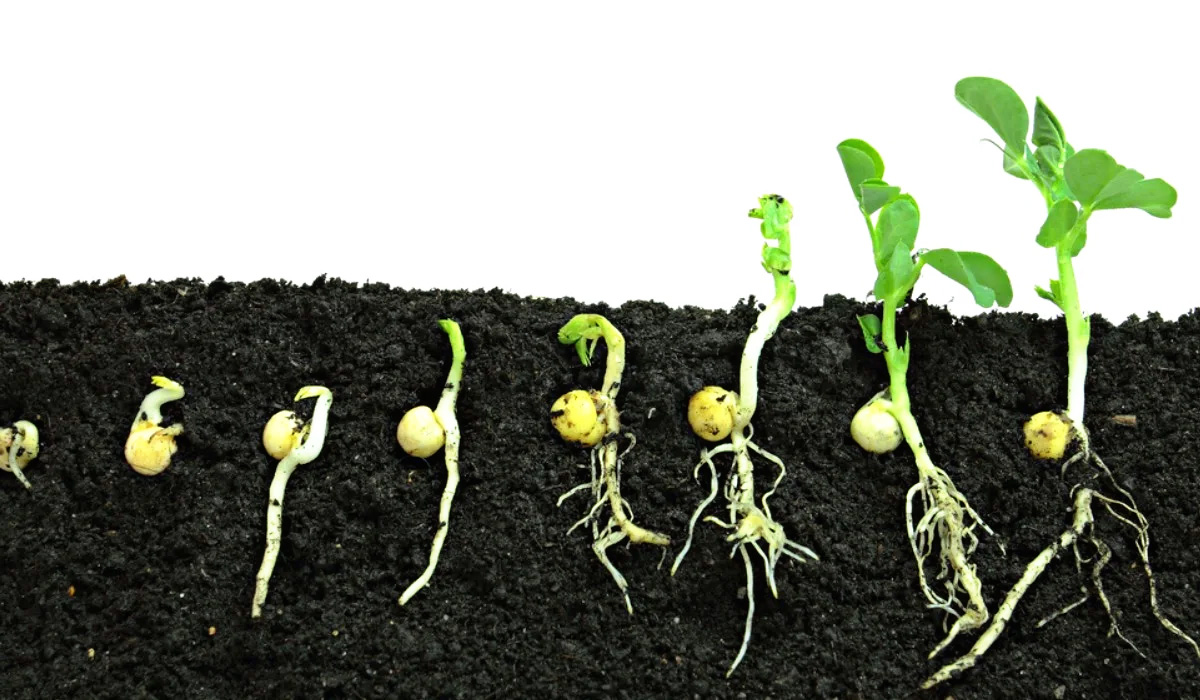
Firstly, it’s important to know that tulips are classified as geophytes, which means they have an underground storage organ called a bulb. This bulb acts as a nutrient reservoir and is responsible for supporting the initial stages of germination. Inside the bulb, there are small embryonic plants known as “bulblets.” These bulblets contain all the genetic material necessary for the growth and development of the tulip.
The germination process begins when the bulb is exposed to the right environmental conditions. The important factors influencing tulip germination include temperature, light, soil conditions, watering, and dormancy requirements.
During the germination process, the bulb absorbs moisture, which triggers physiological changes within the bulblet. The stored nutrients in the bulb provide the energy needed for the growth of the root and shoot systems. As the root develops, it anchors the plant into the soil, while the shoot emerges above the ground, eventually forming leaves and, later on, the iconic tulip flower.
It’s important to note that tulips have specific temperature requirements for germination. In general, tulips prefer cool temperatures between 41°F (5°C) and 50°F (10°C) for successful sprouting. High temperatures can hinder or delay germination, while extreme cold can damage the bulb or prevent germination altogether.
Light is another crucial factor in tulip germination. Tulip seeds are light-sensitive, meaning they require exposure to light in order to initiate the germination process. In nature, this usually occurs when the seeds are exposed to sunlight after the soil covering them erodes or when they are planted in shallow soil.
The soil conditions also play a vital role in tulip germination. Well-draining soil with a balanced nutrient composition is ideal for promoting healthy growth. Excessive moisture or waterlogging can lead to root rot and hinder germination, so it’s essential to ensure proper drainage.
Watering is essential during the germination period to provide the necessary moisture for the bulb to absorb and activate growth. However, overwatering can be detrimental, as it can lead to fungal diseases or bulb rot. It’s important to strike a balance and provide adequate, but not excessive, moisture.
Understanding tulip dormancy is another crucial aspect of germination. Tulips have a period of dormancy, during which they require a cold treatment. This simulates the natural winter conditions necessary to break their dormancy and trigger the germination process. This can be achieved through a process called “vernalization,” which involves chilling the tulip bulbs in a cool location for a specific period of time before planting.
In the next sections, we will explore each of these factors in more detail, providing you with insights and strategies to optimize tulip germination and ensure a successful growing experience.
Factors Affecting Tulip Germination
Tulip germination is influenced by several key factors that need to be carefully considered in order to ensure successful growth. These factors include temperature, light, soil conditions, watering, and dormancy requirements. Let’s take a closer look at each of these factors and their impact on tulip germination.
Temperature and Germination
Temperature plays a crucial role in tulip germination. Tulips generally prefer cool temperatures between 41°F (5°C) and 50°F (10°C) for successful sprouting. This temperature range provides the optimum conditions for the seeds to metabolize and initiate growth. High temperatures can hinder or delay germination, while extreme cold can damage the bulb or prevent germination altogether.
It’s important to note that temperature fluctuations can also impact tulip germination. Sudden temperature shifts, such as frost or heatwaves, can be detrimental to the germination process. To mitigate this, it is recommended to plant tulip bulbs during a time when consistent cool temperatures are expected, such as in the fall.
Light and Germination
Light is another crucial factor in tulip germination. Tulip seeds are light-sensitive, meaning they require exposure to light in order to initiate the germination process. In nature, this usually occurs when the seeds are exposed to sunlight after the soil covering them erodes or when they are planted in shallow soil.
When planting tulip bulbs, it’s important to place them at the appropriate depth to ensure they receive adequate light exposure. Planting them too deeply can result in insufficient light reaching the seeds, which may hinder or delay germination. On the other hand, planting them too shallowly can expose the bulbs to harsh weather conditions or risk damage from pests or animals.
Read more: When Do Cosmos Germinate
Soil Conditions and Germination
The soil conditions are crucial for the success of tulip germination. Well-draining soil with a balanced nutrient composition is ideal for promoting healthy growth. Heavy or compacted soils can prevent proper root development and impede germination.
Prior to planting tulip bulbs, it is advisable to prepare the soil by adding organic matter such as compost or well-rotted manure to improve its structure and drainage capabilities. This will create an environment that allows the roots to penetrate easily and access the necessary nutrients and water for germination.
Watering and Germination
Watering is essential during the germination period to provide the necessary moisture for the bulb to absorb and activate growth. Proper watering is crucial, as both under- and over-watering can adversely affect germination.
During the germination process, it’s important to keep the soil consistently moist, but not waterlogged. Overwatering can lead to fungal diseases, root rot, or bulb rot. On the other hand, inadequate watering can result in dry soil, preventing the bulb from absorbing the necessary moisture for germination.
Striking the right balance is key. Monitor the soil moisture regularly and water when the top inch of soil feels dry. Follow a watering schedule that ensures the soil remains moist but not saturated.
Dormancy Requirements
Tulips have a period of dormancy, during which they require a cold treatment. This simulates the natural winter conditions necessary to break their dormancy and trigger the germination process. This period of cold treatment is often referred to as “vernalization.”
Depending on the tulip variety, a specific duration and temperature range of vernalization are required. For most tulips, a period of 12 to 16 weeks at temperatures between 35°F (2°C) and 50°F (10°C) is recommended. This can be achieved by chilling the bulbs in a cool location, such as a refrigerator or a cold garage, before planting.
Ensuring the tulip bulbs receive the proper vernalization period is critical for successful germination. It allows the bulbs to break dormancy and develop the necessary internal changes for growth once planted in suitable conditions.
By understanding these factors and their influence on tulip germination, you can create the optimal environment for your tulip bulbs to sprout, grow, and thrive. The next sections will explore strategies and techniques for promoting successful tulip germination, providing you with practical tips to maximize your gardening efforts.
Temperature and Germination
Temperature is a critical factor in tulip germination. It plays a vital role in the growth and development of the bulbs, affecting their sprouting and overall success. Understanding the ideal temperature range for tulips will help ensure optimal germination and healthy plant growth.
Tulips are classified as cold-weather bulbs and generally prefer cool temperatures for successful sprouting. The ideal temperature range for tulip germination is between 41°F (5°C) and 50°F (10°C). Within this range, the seed metabolizes and initiates growth, allowing the young plant to emerge from the bulb.
It is important to note that excessively high temperatures can hinder or delay tulip germination. When exposed to high temperatures, the bulbs may enter a state of dormancy or remain dormant longer than expected. This delay can affect the overall development and flowering of the tulips.
On the other hand, extreme cold can harm the bulbs and prevent germination. Freezing temperatures can damage the internal structure of the bulbs, making it difficult for the plant to establish root systems and begin growth. It is important to protect the bulbs from freezing temperatures, especially during the early stages of germination.
When planning to plant tulips, it is crucial to consider the climate of your region and choose appropriate tulip varieties. Some tulip varieties are more tolerant of colder or warmer temperatures, so selecting the right ones for your climate will increase the likelihood of successful germination.
If you live in a region with mild winters, it may be necessary to provide a cool treatment for the tulip bulbs to simulate the natural winter conditions they require to break dormancy and initiate germination. This process, known as vernalization, involves chilling the bulbs in a cool location for a specific period of time before planting. This ensures that the bulbs have undergone the necessary exposure to cold temperatures, stimulating the germination process.
Monitoring the temperature during the germination period is crucial for successful growth. Using a soil thermometer to measure the temperature of the soil can provide valuable insights. It’s important to note that soil temperature can vary from air temperature, so placing the thermometer at the appropriate depth will give you a more accurate reading.
In summary, temperature plays a vital role in tulip germination. Tulips prefer cool temperatures between 41°F (5°C) and 50°F (10°C) for optimal growth. High temperatures can delay or hinder germination, while extreme cold can damage the bulbs. Adhering to the appropriate temperature range and providing any necessary vernalization will promote successful tulip germination and ensure healthy plant growth.
Read more: When Do Dandelions Germinate In Michigan
Light and Germination
Light is a vital factor in the germination process of tulips. Understanding the role of light and providing the appropriate conditions will help ensure successful germination and healthy growth of your tulip bulbs.
Tulip seeds are light-sensitive, meaning they require exposure to light in order to initiate the germination process. In their natural habitat, tulip seeds are exposed to sunlight when the soil covering them erodes naturally or when they are planted in shallow soil. This exposure to light signals to the seeds that it is time to begin germinating and growing.
When planting tulip bulbs, it is essential to consider the depth at which they are planted. If bulbs are planted too deeply, they may not receive sufficient light to trigger germination. On the other hand, planting them too shallowly can expose them to harsh weather conditions or risk damage from pests or animals.
The general rule of thumb is to plant tulip bulbs at a depth of two to three times their size. This ensures they have enough soil cover for insulation and protection, while still allowing light to reach the seeds. However, different tulip varieties may have specific planting depth requirements, so it is important to refer to the instructions provided by the bulb supplier or do some research on the specific tulip variety you are planting.
It is also important to consider the location where you plant your tulips. Tulips thrive in areas with full or partial sunlight. If you are planting them in a garden bed, choose a spot that receives at least six hours of direct sunlight per day. This will ensure that the tulip bulbs receive the necessary light to trigger germination and promote healthy growth.
If you are planting tulips in pots or containers, place them in an area where they can receive ample sunlight. Placing them near a window or on a porch that gets a good amount of sunshine will ensure they receive the light they need to germinate and grow successfully.
It’s important to note that once tulips have germinated and started to sprout, they will start actively seeking light. This is because they need light for photosynthesis, which is essential for their growth and development. If the tulips are growing in a location with inadequate light, they may become leggy and weak. To encourage healthy growth, ensure they are placed in a well-lit area.
In summary, light is a crucial factor in the germination process of tulips. Tulip seeds require exposure to light to trigger germination. Ensuring that bulbs are planted at the appropriate depth and in a location that receives sufficient sunlight will help promote successful germination and the healthy growth of your tulips.
Soil Conditions and Germination
Soil conditions play a crucial role in the germination process of tulips. Providing the right soil environment is essential for the successful growth and development of your tulip bulbs. Let’s explore the important factors to consider when it comes to soil and germination.
Well-draining soil is vital for tulip germination. Heavy or compacted soil can prevent proper root development and hinder the sprouting of tulip bulbs. When the soil does not drain well, excess moisture accumulates around the bulbs, leading to the risk of bulb rot or fungal diseases.
Prior to planting tulip bulbs, it is advisable to prepare the soil by improving its structure and drainage capabilities. Adding organic matter such as compost or well-rotted manure can greatly enhance the soil’s drainage and fertility. These organic amendments help break up compacted soil, improve its water-holding capacity, and provide essential nutrients for the bulbs.
When preparing the soil, ensure that it is loosened to a depth of 8 to 10 inches (20 to 25 cm). This will allow the tulip bulbs to develop their roots easily and access the necessary nutrients and moisture for germination. Loosening the soil also promotes good aeration, which is essential for healthy root growth.
It’s important to note that tulips prefer a slightly acidic to neutral soil pH level. The optimal pH range for tulip growth is between 6.0 and 7.0. Conducting a soil test before planting can help determine the pH level of your soil. If the pH is too low (acidic), you can add agricultural lime to raise it. Conversely, if the pH is too high (alkaline), sulfur or other soil amendments can be added to lower it.
In addition to soil structure and pH, it is important to ensure that the soil is rich in nutrients. Tulips require a balanced nutrient composition for healthy growth and development. Before planting, it is beneficial to incorporate a slow-release fertilizer into the soil to provide the essential nutrients that tulip bulbs need during germination.
When planting tulip bulbs, make sure they are placed at the appropriate depth. Planting them too shallowly can expose them to nutrient deficiencies or drying out, while planting them too deeply can inhibit root development and nutrient uptake. As a general guideline, plant tulip bulbs at a depth of two to three times their size. This will provide them with adequate soil coverage while allowing the roots to establish themselves.
It’s important to remember that proper watering is crucial for tulip germination and growth. Water the bulbs after planting to settle the soil around them, but avoid overwatering. Excess moisture can lead to root rot or bulb rot. Monitor the moisture levels in the soil and water only when the top inch of soil feels dry.
In summary, creating the right soil conditions is vital for tulip germination. Well-draining soil that is rich in organic matter, has a slightly acidic to neutral pH, and is properly fertilized will provide the optimal environment for your tulip bulbs to germinate and grow successfully.
Watering and Germination
Watering is a critical aspect of tulip germination. Proper watering ensures that the tulip bulbs receive the necessary moisture to activate growth and establish healthy roots. However, it is essential to strike the right balance when it comes to watering, as both under-watering and over-watering can have adverse effects on germination and the overall health of the tulips.
During the germination period, it’s important to keep the soil consistently moist, but not waterlogged. Adequate moisture is crucial for the tulip bulbs to absorb and activate growth. Dry soil can prevent the bulbs from absorbing the necessary moisture, leading to failed germination or delayed growth.
However, overwatering can be detrimental to tulip germination. Excessive moisture can lead to fungal diseases, root rot, or bulb rot. When the soil is constantly waterlogged, the bulbs may suffocate or develop rot, which can hinder their growth or cause them to rot away entirely.
So, how do you find the right balance? Here are some watering guidelines for promoting successful tulip germination:
- Water the bulbs immediately after planting. This helps settle the soil and ensures that the bulbs are in contact with moist soil, which promotes the activation of growth.
- Monitor the moisture levels in the soil regularly. Check the top inch of soil and water when it feels dry. This is an indication that the bulbs may need moisture.
- Avoid overwatering. Deep, infrequent watering is preferable over frequent, shallow watering. This allows the water to penetrate deeper into the soil and encourages the roots to grow deeper as well. Watering deeply also helps prevent water wastage and excessive run-off.
- Consider the weather conditions. Adjust your watering schedule accordingly, taking into account the rainfall in your area. If there has been significant rainfall, you may need to reduce or skip watering. On the other hand, during periods of drought or dry weather, you may need to water more frequently to ensure the soil remains moist.
- Apply mulch. Using a layer of mulch around the planted area helps retain moisture in the soil and reduces evaporation. This can help maintain a more consistent level of soil moisture, especially during hot or dry periods.
- Be mindful of the drainage capabilities of your soil. Ensure that the soil is well-draining, as excessive moisture can lead to waterlogging. If you have heavy or compacted soil that doesn’t drain well, consider amending the soil with organic matter to improve its drainage capabilities.
By following these watering guidelines and being mindful of the moisture levels in the soil, you can provide the optimal watering conditions for tulip germination. Remember, consistency is key – water enough to keep the soil consistently moist, but avoid overwatering and waterlogging the bulbs.
Proper watering practices will ensure that the tulip bulbs are supplied with the necessary moisture for germination, helping them establish healthy roots and set the stage for successful growth and beautiful blooms.
Strategies for Promoting Tulip Germination
To maximize the chances of successful tulip germination, there are several strategies you can employ. These strategies focus on creating the ideal conditions and providing the necessary care for the tulip bulbs. By following these tips, you can boost the germination process and ensure healthy growth for your tulips.
Read more: When Do Most Plants Germinate
1. Choose the Right Tulip Varieties:
When selecting tulip bulbs, choose varieties that are well-suited to your climate. Consider the temperature and sunlight requirements of the tulips, and select varieties that are known to perform well in your region. This will increase the likelihood of successful germination and healthy growth.
2. Optimize Soil Conditions:
Prepare the soil before planting by adding organic matter, such as compost or well-rotted manure. This improves soil structure and drainage, ensuring that the tulip bulbs have access to adequate air and water. Bulbs planted in well-prepared soil have a higher chance of germination and successful establishment.
3. Provide Proper Drainage:
Ensure that the planting area has good drainage to prevent waterlogging, which can lead to bulb rot. If your soil has poor drainage, consider planting tulips in raised beds or containers. You can also amend the soil with sand or grit to improve drainage.
4. Monitor Temperature:
Pay attention to the temperature requirements of the tulips you are planting. Tulips generally prefer cool temperatures for germination, so aim to plant them during a time when the temperatures are within their preferred range. If necessary, provide a vernalization treatment to simulate the cold winter conditions required to break dormancy and trigger germination.
Read more: When Do Black Walnuts Germinate
5. Proper Planting Depth:
Plant tulip bulbs at the appropriate depth. As a general guideline, plant bulbs at a depth of two to three times their size. Planting too shallowly may expose the bulbs to harsh weather or risk damage from pests, while planting too deeply can inhibit root development. Follow the specific planting instructions for the tulip variety you are planting.
6. Adequate Sunlight:
Tulips thrive in areas with full or partial sunlight. Ensure that the planting location receives at least six hours of direct sunlight per day. If planting in containers, place them in a well-lit spot or consider moving them to a sunny area as the bulbs start to sprout.
7. Regular Monitoring:
Regularly check the soil moisture levels and monitor the progress of your tulip bulbs. This allows you to make any necessary adjustments to watering or care practices. Stay vigilant for signs of pests or diseases and take prompt action to address any issues that may arise.
8. Provide Protection:
If you live in an area with extreme weather conditions, such as heavy frost or strong winds, consider providing protection to your tulip bulbs. Use mulch or row covers to insulate the bulbs and shield them from potential damage.
By implementing these strategies, you can create a favorable environment for tulip germination and ensure the best possible conditions for healthy growth. Remember to keep an eye on the bulbs and provide the necessary care throughout the germination period. With patience and proper care, you’ll soon be rewarded with vibrant tulips blooming in your garden.
Preparing Tulip Bulbs for Germination
Properly preparing tulip bulbs before planting is essential for promoting successful germination and ensuring the healthy growth of your tulips. Taking the time to prepare the bulbs will set the stage for optimal growth and vibrant blooms. Here are some steps to follow when preparing tulip bulbs for germination.
1. Select Healthy Bulbs:
Choose high-quality tulip bulbs that are firm, plump, and free from signs of damage or disease. Bulbs that are too small or shriveled may not have the necessary nutrients or vitality for successful germination. Select bulbs that have a healthy appearance and show no signs of rot or mold.
2. Inspect and Clean the Bulbs:
Before planting, inspect the bulbs carefully and remove any loose or damaged outer scales. Gently clean the bulbs by removing any excess soil or debris. This will help prevent the spread of diseases and ensure that the bulbs are ready for the germination process.
3. Perform a Vernalization Treatment:
Tulips, like many other bulb plants, often require a period of vernalization to break their dormancy and stimulate germination. Vernalization mimics the cold winter conditions necessary for the bulbs to grow. Depending on the variety, vernalization may be required for successful tulip germination.
To vernalize tulip bulbs, place them in a cool, dark location with temperatures between 35°F (2°C) and 50°F (10°C) for a specific period of time. This can be done indoors in a refrigerator or an unheated garage. The recommended vernalization period varies depending on the tulip variety, so refer to the instructions provided by the bulb supplier or do some research on the specific tulip variety you are planting.
4. Maintain Proper Storage Conditions:
While awaiting planting, it is important to store the prepared bulbs correctly. Place the bulbs in a well-ventilated container or paper bag, ensuring that they are kept in a cool and dry location. Avoid storing them near fruits or vegetables as the ethylene gas produced by ripening fruits can negatively affect the bulbs.
5. Timing the Planting:
Choose an appropriate time to plant the prepared tulip bulbs. The timing will depend on your climate and the specific tulip variety. Generally, bulbs are planted in the fall, around 6 to 8 weeks before the ground freezes. This allows sufficient time for the roots to develop and the bulbs to establish themselves before the onset of winter.
6. Follow the Planting Guidelines:
When planting the bulbs, follow the recommended planting depth and spacing guidelines. As a general rule, plant tulip bulbs at a depth of two to three times their size, with the pointed end facing up. Space the bulbs according to the instructions provided for each specific variety.
By taking these steps to prepare tulip bulbs for germination, you’ll give your tulips the best possible start. Healthy, well-prepared bulbs will have the necessary nutrients, vitality, and vernalization treatment to ensure successful germination and strong growth. With care and attention to detail, you’ll soon be rewarded with a stunning display of tulips in your garden.
Planting Tulips for Successful Germination
Planting tulips properly is crucial for ensuring successful germination and establishing healthy plants. By following the right planting techniques, you can create the ideal environment for tulip bulbs to grow and thrive. Here are some essential steps to consider when planting tulips.
Read more: When Crabgrass Germinate
1. Choose the Right Location:
Select a location that receives ample sunlight. Most tulips thrive in full to partial sunlight, so choose a spot that gets at least six hours of direct sunlight per day. Good air circulation is also important, as it helps prevent diseases and ensures the bulbs dry properly after rain or watering. Avoid planting tulips in areas that are prone to waterlogging, as excessive moisture can cause bulbs to rot.
2. Prepare the Soil:
Prepare the soil by loosening it to a depth of 8 to 10 inches (20 to 25 cm) using a garden fork or spade. Remove any weeds or debris from the planting area. Incorporate organic matter, such as compost or well-rotted manure, to improve soil fertility and drainage. This will create an optimal growing environment for the tulip bulbs.
3. Plant at the Right Depth:
Plant the tulip bulbs at the appropriate depth. As a general guideline, plant bulbs at a depth of two to three times their size. This ensures that they are adequately covered with soil while allowing the roots to establish themselves. Planting too shallowly may expose the bulbs to potential damage, while planting too deeply can inhibit root development and hamper germination.
4. Planting Technique:
Plant the tulip bulbs with the pointed end facing upwards. This is where the growing point is located, and it helps guide the plant in the right direction as it emerges from the soil. Space the bulbs according to the recommended distance for the specific tulip variety you are planting. This allows each bulb to have sufficient room to grow and prevents overcrowding.
Read more: When Will Big Bluestem Germinate
5. Watering after Planting:
After planting, water the tulip bulbs thoroughly to settle the soil around them. This ensures good soil-to-bulb contact and eliminates any air pockets. Proper watering encourages the roots to establish and allows the bulbs to absorb moisture for germination.
6. Mulch for Protection:
Consider applying a layer of organic mulch, such as straw or wood chips, around the planted area. Mulch helps retain moisture in the soil, suppresses weed growth, and insulates the bulbs from extreme temperature fluctuations. Apply a layer of mulch about 2 to 3 inches (5 to 7 cm) thick, being careful not to bury the bulbs too deeply.
7. Mark the Planting Area:
Mark the planting area with garden stakes or markers. This will help you locate the planted bulbs and avoid accidental damage when performing other gardening tasks. It also allows you to monitor the growth and progress of the tulips.
8. Maintenance and Care:
Once planted, monitor the soil moisture regularly and water as needed to keep the soil consistently moist, but not waterlogged. Avoid overwatering, as excessive moisture can lead to bulb rot. Remove any weeds that may compete with the tulips for nutrients and resources. As the tulips grow, provide support with stakes if necessary to prevent the stems from bending or breaking.
By following these steps and providing the proper care, you can ensure successful germination and establish healthy tulips in your garden. With time and patience, you’ll be rewarded with a beautiful display of colorful blooms that will brighten up your outdoor space. Happy planting!
Read more: When To Plant Germinated Seeds
Germination Timeline of Tulips
The germination timeline of tulips can vary depending on several factors, including the tulip variety, environmental conditions, and planting techniques. While individual timelines may differ, understanding the general germination process can help you anticipate the growth stages of your tulips. Here’s a rough outline of the germination timeline for tulips:
1. Planting:
Tulip bulbs are typically planted in the fall, 6 to 8 weeks before the ground freezes. This allows sufficient time for the bulbs to establish roots before the arrival of winter.
2. Dormancy:
After planting, tulip bulbs enter a period of dormancy. This phase is characterized by minimal growth activity as the bulbs settle in the soil and acclimate to their surroundings. During dormancy, the bulbs are preparing for the upcoming spring growth.
3. Vernalization:
For many tulip varieties, the vernalization period is necessary to break their dormancy and stimulate growth. Vernalization involves exposing the bulbs to a period of cold temperatures (35°F to 50°F or 2°C to 10°C) for a specific duration. This can be achieved by refrigerating the bulbs or using other cold storage methods.
Read more: When Does Switchgrass Germinate
4. Root Development:
Once the vernalization period is complete, the tulip bulbs begin to activate root growth. Root development is essential for the bulbs to absorb water and nutrients from the soil. The roots also anchor the plant in the ground, providing stability as it grows.
5. Shoot Emergence:
As the roots establish, the tulip shoots begin to emerge from the soil. The shoots initially appear as small green tips breaking through the surface. As they grow, they elongate and develop the rudimentary leaves.
6. Leaf Growth:
The tulip leaves continue to expand and develop as the plant gains energy through photosynthesis. The leaves play a crucial role in capturing sunlight and converting it into energy to fuel the growth and development of the plant.
7. Flower Bud Formation:
As the leaves mature, the tulip plant begins to allocate resources towards the production of flower buds. These buds develop within the plant and gradually grow in size and shape, readying themselves for their eventual burst of color.
Read more: When To Germinate Outdoor Grow
8. Flowering:
The timing of tulip flowering varies depending on the tulip variety and environmental conditions. Generally, tulips bloom in spring, bringing vibrant colors and stunning beauty to gardens and landscapes. The duration of the flowering period can range from a few days to several weeks, depending on the specific variety and weather conditions.
9. Seed Formation:
After the flowers fade, the tulip plant undergoes the process of seed formation. Once the flowers have completely withered, seeds develop within the spent flower heads. These seeds can be collected and used for propagating new tulip plants, although it’s important to note that this method takes longer and typically requires additional care and patience.
Keep in mind that the germination timeline may vary based on the tulip variety, location, and other environmental factors. Additionally, individual bulbs within a planting may germinate and progress at slightly different rates. By understanding the general sequence of growth stages, you can better appreciate and care for your tulips as they progress through their unique germination timeline.
Common Issues and Troubleshooting of Tulip Germination
While tulips are generally hardy and resilient plants, they can occasionally encounter issues during the germination process. Understanding common problems and troubleshooting them promptly can help ensure successful tulip germination. Here are some common issues that may arise and tips for troubleshooting:
1. Poor or No Germination:
If your tulip bulbs fail to germinate or show minimal signs of growth, several factors could be at play. One common reason is planting bulbs too deeply. Ensure that you are planting the bulbs at the appropriate depth, usually two to three times their size. Planting too shallowly or too deeply can inhibit growth. Verifying that the bulbs are healthy and viable before planting is also crucial.
Read more: When Does Chickweed Germinate
2. Rot or Mold:
Bulb rot or mold can occur due to excessive moisture and poor drainage. If you notice signs of rot, such as soft, decaying bulbs or white mold growth, it’s important to take action immediately. Carefully remove affected bulbs and inspect the surrounding soil for signs of excessive moisture. Improve soil drainage by amending with organic matter and adjusting watering practices to avoid over-watering.
3. Pests and Animal Damage:
Tulip bulbs can be susceptible to pests, such as squirrels, voles, or deer, who may dig them up or consume them. Consider protective measures, such as installing barriers or using repellents, to deter pests from reaching the bulbs. Creating a physical barrier with wire mesh or planting bulbs in containers can be effective in preventing animal damage.
4. Insufficient or Excessive Sunlight:
The amount of sunlight your tulip bulbs receive can impact their germination and growth. If your tulips are not receiving enough sunlight, they may grow weak and fail to produce flowers. Ensure that the planting location receives at least six hours of direct sunlight per day. On the other hand, excessive sunlight and heat can cause stress and damage the bulbs. Providing partial shade or shading the bulbs during excessively hot periods can help protect them.
5. Herbicide Contamination:
If you are planting tulips in an area that has been recently treated with herbicides, it may affect germination and growth. Some herbicides can remain in the soil and affect plant development. To avoid this issue, choose a planting location that has not been treated with herbicides or use clean, herbicide-free soil or potting mix for container planting.
6. Lack of Proper Vernalization:
Some tulip varieties require a period of vernalization (cold treatment) to break dormancy and stimulate germination. If you didn’t vernalize your tulip bulbs but it’s necessary for the particular variety, it can lead to incomplete or delayed germination. Ensure that you check the vernalization requirements for your specific tulip variety and provide the necessary cold treatment before planting.
By troubleshooting these common issues promptly and providing the appropriate care and conditions for your tulip bulbs, you can increase the likelihood of successful germination and healthy growth. Remember to monitor your tulips regularly, address any problems promptly, and make adjustments to optimize their growing environment. With proper care, you will be rewarded with beautiful tulips gracing your garden.
Conclusion
Tulip germination is a fascinating process that marks the beginning of a tulip’s life cycle. By understanding the factors that influence germination, such as temperature, light, soil conditions, and watering, you can create the ideal environment to ensure successful growth and vibrant blooms.
Temperature plays a crucial role in tulip germination, as tulips prefer cool temperatures between 41°F (5°C) and 50°F (10°C) for optimal sprouting. Light is another important factor, as tulip seeds require exposure to light to initiate germination. It is essential to plant tulip bulbs at the appropriate depth to allow for proper light exposure and establish healthy roots.
Soil conditions, including good drainage and balanced nutrient composition, are vital for successful germination. Providing adequate moisture through proper watering is essential, but overwatering should be avoided to prevent bulb rot or fungal diseases. Understanding tulip dormancy requirements and providing the necessary vernalization treatment can also promote successful germination.
To ensure successful tulip germination, it is important to choose healthy bulbs, perform proper vernalization, and provide the appropriate care during the germination process. Be mindful of common issues such as poor germination, rot or mold, pests and animal damage, sunlight exposure, herbicide contamination, and lack of vernalization. Addressing these issues promptly will increase the chances of successful tulip germination and healthy growth.
Remember, tulip germination is a journey filled with patience, care, and attention to detail. By following the guidelines outlined in this article and being responsive to the specific needs of your tulip bulbs, you can create an environment that encourages their growth and rewards you with a breathtaking display of vibrant tulips in your garden come springtime. So, roll up your sleeves and embrace the joy of planting and nurturing tulips, for they are sure to bring beauty and delight to your outdoor space. Happy gardening!
Now that you've mastered tulip germination, why not spruce up your garden even further? Dive into our guide on "Spring Flowers For A Fresh & Lively Feel" to fill your outdoor space with vibrant colors and inviting scents. Packed with handy tips on choosing and caring for the best blooms, this next read ensures your garden stays lively and appealing, providing a perfect backdrop for relaxation or entertaining guests.
Frequently Asked Questions about When Do Tulips Germinate
Was this page helpful?
At Storables.com, we guarantee accurate and reliable information. Our content, validated by Expert Board Contributors, is crafted following stringent Editorial Policies. We're committed to providing you with well-researched, expert-backed insights for all your informational needs.
0 thoughts on “When Do Tulips Germinate”