Home>Garden Essentials>When To Plant Germinated Seeds

Garden Essentials
When To Plant Germinated Seeds
Modified: October 20, 2024
Discover when to plant your germinated garden seeds for optimal growth and success. Learn the best timing and tips for a thriving garden.
(Many of the links in this article redirect to a specific reviewed product. Your purchase of these products through affiliate links helps to generate commission for Storables.com, at no extra cost. Learn more)
Introduction
Welcome to the wonderful world of gardening! If you’re a gardening enthusiast or just starting out, you’ve come to the right place. The journey of growing plants from seeds is incredibly rewarding and can bring so much joy to your life. One technique that can give your plants a head start is germinating the seeds before planting them. In this article, we will explore the art of planting germinated seeds, its benefits, and when is the best time to do it.
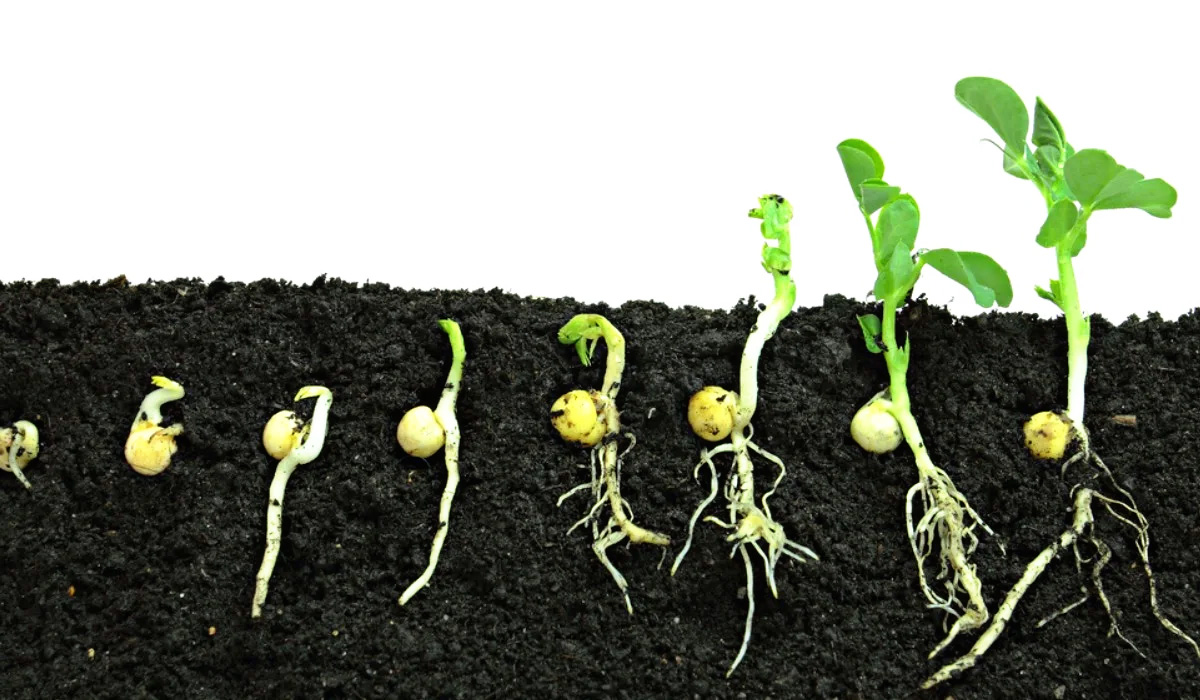
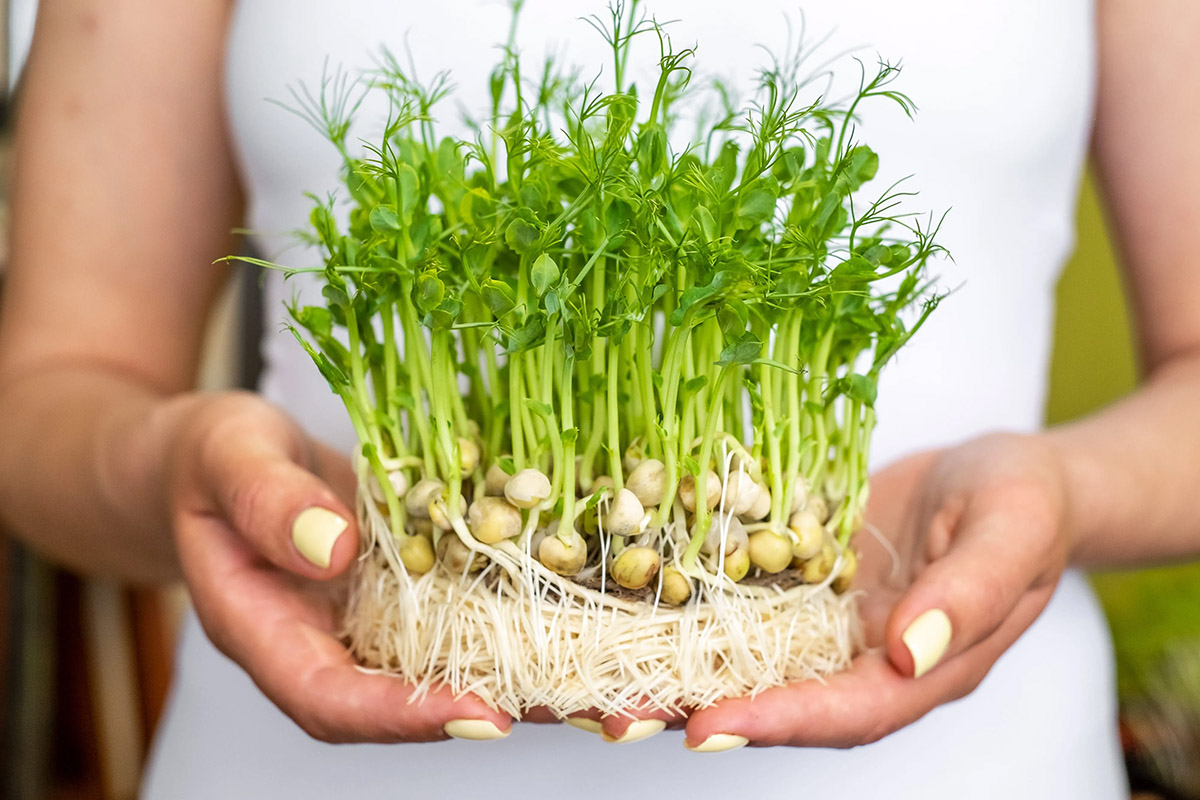
Germinating seeds is the process of pre-sprouting them before placing them in the soil. By doing so, you can ensure a higher success rate for your plants and faster growth. It’s like giving your little seeds a head start in their journey to becoming beautiful, mature plants.
Planting germinated seeds offers a wide range of benefits. Firstly, it allows you to control the environment in which your seeds start their growth. By germinating indoors, you can provide optimal conditions such as temperature, moisture, and light, which can significantly increase the chances of successful germination.
Secondly, germinating seeds can help you save time. Instead of waiting for the seeds to sprout in the soil, germinating them beforehand allows you to skip this waiting period and get your plants off to a quicker start. This is especially beneficial for plants with longer growing seasons or for gardeners in colder climates where the growing season is shorter.
Another advantage of germinating seeds is that it allows you to select the strongest and healthiest seedlings. During the germination process, you can easily identify which seeds have sprouted and discard any that haven’t. This ensures that only the strongest and most viable plants make it into your garden.
Before you embark on the journey of planting germinated seeds, there are a few factors you should consider. Firstly, make sure you have the necessary space and equipment for indoor germination. This can include seed trays, potting soil, grow lights, and a warm and humid environment.
Additionally, you need to consider the specific requirements of the plant species you are growing. Some plants prefer to be directly sown in the soil, while others benefit from pre-sprouting. Research the germination preferences of your chosen plants to ensure success.
In the following sections, we will discuss when is the right time to plant germinated seeds, how to prepare for planting, a step-by-step guide for the process, common mistakes to avoid, and best practices for caring for your germinated seedlings. So let’s dive in and discover the secrets of successfully growing plants from germinated seeds!
Key Takeaways:
- Give your seeds a head start by germinating them before planting. This can lead to healthier, faster-growing plants and a more successful growing season.
- Before planting germinated seeds, consider factors like planting location, seasonal timing, soil condition, and pest management to provide an optimal environment for your seedlings.
Read more: When Do Most Plants Germinate
Benefits of Planting Germinated Seeds
Planting germinated seeds offers numerous benefits that can significantly improve the success rate and growth of your plants. Let’s explore some of the key advantages:
- Increased germination rate: Germinating seeds before planting them ensures a higher germination rate compared to direct sowing. Germination can be a delicate process, and by providing seeds with optimal growing conditions during the pre-sprouting stage, you can enhance their chances of successfully germinating.
- Quicker growth: Pre-sprouted seeds have a head start in their growth journey. By germinating seeds indoors, you can control the temperature, moisture, and light, creating ideal conditions for faster growth. This can be especially beneficial for plants with longer growing seasons or for gardeners in colder climates where the growing season is shorter.
- Selective seedlings: Pre-sprouting seeds allows you to select the strongest and healthiest seedlings for your garden. During the germination process, you can easily identify which seeds have sprouted and discard any that haven’t. This ensures that only the most viable plants make it into your garden, leading to healthier plants and better yields.
- Optimal use of garden space: By starting with germinated seeds, you can save valuable space in your garden. Since not all seeds will successfully germinate, pre-sprouting allows you to determine which ones are viable beforehand. This means you can focus on planting only the seeds that have already sprouted, maximizing the use of your garden space.
- Protection from external factors: Germinating seeds indoors provides protection from external factors such as pests, diseases, and inclement weather. By starting the germination process indoors, you can create a controlled environment, shielded from unpredictable elements, allowing your plants to establish and grow without interference.
- Better plant establishment: Germinated seeds are more likely to establish themselves successfully in the soil. By allowing the seeds to sprout before planting, their root systems have already started developing. This gives them a head start in acquiring nutrients and establishing a strong foundation, leading to healthier and more robust plants.
Overall, planting germinated seeds can give you a head start in your gardening journey and significantly improve the success and growth of your plants. Whether you’re growing flowers, vegetables, or herbs, pre-sprouting seeds offers numerous benefits that can help you create a thriving garden. So, the next time you prepare to plant seeds, consider germinating them first and enjoy the rewards of healthier, faster-growing plants!
Factors to Consider Before Planting Germinated Seeds
Before you begin planting germinated seeds, it’s important to consider certain factors to ensure the success of your gardening endeavors. These factors include:
- Planting Location: Determine where you plan to plant your germinated seeds. Whether you’re growing them indoors or outdoors, ensure that the chosen location provides the appropriate temperature, sunlight, and moisture conditions required for the specific plant species.
- Seedling Development: Consider the stage of development of your germinated seedlings. Make sure they have developed roots and sturdy stems before transplanting them into the soil. This will ensure their ability to withstand the transition and establish themselves properly in their new environment.
- Seasonal Timing: Different plant species have specific seasonal preferences. It’s essential to research and understand when to plant your germinated seeds based on the natural growing season of each plant. Some plants thrive in cooler seasons, while others prefer warmer temperatures. Aligning the timing of planting with the appropriate season will promote healthy growth and maximize yields.
- Soil Condition: Assess the quality and condition of the soil in your planting area. Ensure that the soil is well-draining, nutrient-rich, and suitable for the specific plant species you’re growing. Consider conducting a soil test to determine if any amendments or adjustments are necessary to optimize plant growth.
- Watering and Irrigation: Understand the water requirements of the plants you’re growing. Some plants prefer moist soil, while others may require drier conditions. Develop a watering and irrigation plan that meets the specific needs of your germinated seedlings to avoid overwatering or underwatering, both of which can adversely affect plant health.
- Pest and Disease Management: Take preventative measures to protect your germinated seedlings from common pests and diseases. Research the potential threats in your area and develop a pest and disease management strategy, which may include physical barriers, organic pest control methods, or natural predators.
- Companion Planting: Consider companion planting when selecting the location for your germinated seeds. Some plants have beneficial relationships with others, such as repelling pests or enhancing nutrient absorption. Take advantage of companion planting to create a symbiotic environment for your plants.
- Hardening Off: If you’re transitioning your germinated seedlings from indoor environments to the outdoors, it’s crucial to gradually expose them to outdoor conditions through a process called “hardening off.” This helps the plants adjust to the change in temperature, sunlight intensity, and wind, reducing the risk of shock and ensuring successful acclimatization.
By considering these factors before planting your germinated seeds, you can provide the optimum conditions and care needed for your plants to thrive. Taking the time to plan and prepare will set the stage for healthy growth, increased yields, and a bountiful garden.
When is the Right Time to Plant Germinated Seeds
The timing of when to plant your germinated seeds plays a crucial role in the success of your gardening efforts. The right time to transplant seedlings into the soil depends on various factors, including the type of plant, local climate, and growing season. Here are some guidelines to help you determine the optimal time to plant germinated seeds:
- Last Frost Date: The last frost date is an essential consideration for outdoor gardening. Frost can damage young seedlings, so it’s important to wait until after the last expected frost in your region before transplanting germinated seeds. Consult the USDA Plant Hardiness Zone Map or local gardening resources to find the average last frost date in your area.
- Planting Chart: Many gardeners rely on planting charts or calendars specific to their region and plant types. These resources provide information on when to start seeds indoors, when to transplant outdoors, and the estimated time for maturity. Planting charts can be found online or in gardening books and offer valuable insights into the timing of germinated seed planting.
- Seed Package Instructions: When purchasing seeds, check the package for any specific instructions or recommendations regarding planting times. Some seed packets will provide information on the optimal time to transplant seedlings into the garden based on regional climate and growing conditions. Follow these instructions for the best results.
- Planting Seeds Directly: Some plant species prefer to be sown directly into the ground instead of being germinated and transplanted. Examples include root vegetables like carrots and radishes. Research the specific requirements of your chosen plants to determine if direct sowing is recommended.
- Indoor vs. Outdoor: If you’re germinating seeds indoors, you have more flexibility in terms of planting time. Start the germination process a few weeks before the expected transplant date outdoors. This allows the seedlings to develop strong roots and leaves before being exposed to the elements. However, ensure that indoor-grown seedlings are hardened off before being transplanted outside.
- Climate and Growing Season: Consider the local climate and the length of the growing season. Cold-season crops like lettuce and broccoli can be planted early in the spring, while warm-season crops like tomatoes and peppers need to wait until after the last frost date and when the soil has warmed up. Take into account the anticipated temperatures and the length of time available for your plants to mature.
Ultimately, determining the right time to plant germinated seeds requires careful consideration of the factors mentioned above. By understanding your local climate, consulting planting charts, and following the guidelines specific to your plant species, you can ensure a successful transplant and give your seedlings the best possible start in the garden.
How to Prepare for Planting Germinated Seeds
Preparing for planting germinated seeds is essential to ensure a smooth and successful transition from indoor germination to outdoor or container planting. Proper preparation allows you to create an optimal environment for the seedlings and set them up for healthy growth. Here are some steps to follow when preparing for planting germinated seeds:
- Choose a Suitable Planting Location: Determine where you plan to plant your germinated seedlings. Consider factors such as sunlight exposure, soil quality, and drainage. Most plants require at least 6-8 hours of direct sunlight daily, so choose a location that provides the required amount of sunlight.
- Prepare the Soil: Prepare the soil in the planting area by removing any weeds, rocks, or debris. Loosen the soil with a garden fork or tiller to improve aeration and drainage. Incorporate organic matter, such as compost or well-rotted manure, to enrich the soil with nutrients.
- Provide Proper Drainage: Ensure that the chosen planting area or containers have proper drainage to prevent waterlogging, which can lead to root rot. If planting in containers, ensure they have drainage holes at the bottom.
- Transplanting Bed Preparation: If transplanting seedlings into a garden bed, create small planting holes that are slightly larger than the size of the seedlings’ root balls. Space the holes according to the recommended spacing for the specific plant species.
- Container Preparation: If planting in containers, choose containers with sufficient depth and width for the root system of the seedlings. Fill the containers with a well-draining potting mix, leaving enough space at the top for watering.
- Watering and Moistening the Soil: Before transplanting the germinated seedlings, water the soil in the planting area or containers thoroughly. This will help ensure adequate moisture for the seedlings and make it easier to gently remove them from their containers without damaging the roots.
- Caring for the Seedlings: Handle the germinated seedlings with care, holding them by their leaves rather than the delicate stems. Avoid touching the roots as much as possible. If the seedlings are tall and leggy, bury them slightly deeper in the planting holes to support their growth and prevent them from becoming top-heavy.
- Protect from Extreme Weather: If the weather conditions are unfavorable, such as strong winds or extreme heat, consider providing temporary protection for the newly transplanted seedlings. This can be in the form of plant covers or using shade cloth to shield them from intense sunlight until they acclimate to the new environment.
By following these steps and adequately preparing for planting germinated seeds, you can create an ideal environment for your seedlings to thrive. Proper preparation sets the stage for successful establishment and healthy growth, ensuring that your hard work and dedication pay off with a bountiful and beautiful garden.
Plant germinated seeds in the spring after the last frost date for your area. Make sure the soil is warm and the danger of frost has passed. This will give the seeds the best chance of thriving.
Read more: How To Germinate A Plant
Step-by-Step Guide to Planting Germinated Seeds
Now that you have your germinated seeds ready to be planted, it’s time to follow a step-by-step guide to ensure their successful transition into the soil. Here’s a simple guide to help you plant your germinated seeds:
- Prepare the Planting Area: Choose the planting area in your garden or prepare your containers. Ensure the soil is well-prepared, free of weeds, and has good drainage.
- Dig Planting Holes: Dig holes in the soil or create holes in the planting medium, depending on whether you’re planting in the ground or containers. Make the holes slightly larger and deeper than the size of the germinated seedling’s root ball.
- Remove Seedlings from Containers: Gently remove the germinated seedlings from their containers, being careful not to damage the roots. If the seedlings are in peat pots or biodegradable containers, you can plant them directly into the holes, as they will decompose in the soil.
- Place Seedlings in Planting Holes: Carefully place each germinated seedling into its respective planting hole, making sure the top of the root ball is level with or slightly above the soil surface. Space the seedlings according to the recommended spacing for the specific plant species.
- Backfill and Firm the Soil: Gently backfill the soil around the root ball, ensuring that there are no air pockets. Lightly firm the soil around the seedling to provide stability, but be careful not to compact it excessively.
- Water the Seedlings: Immediately after planting, thoroughly water the seedlings to help settle the soil and provide initial hydration. Water until the soil is moist but not waterlogged. Watering gently with a fine spray nozzle or a watering can with a rose attachment works best to avoid disturbing the newly planted seedlings.
- Provide Support if Needed: For taller plants or those with weaker stems, consider providing support such as stakes or trellises to help them grow upright.
- Monitor and Care for the Seedlings: Regularly monitor your seedlings and provide proper care, including watering, fertilizing, and protecting from pests and diseases. Follow the specific care instructions for each plant species.
Remember to consider the specific needs of your chosen plants, as they may have unique requirements for planting depth, light exposure, and watering. Following this step-by-step guide will help ensure a smooth and successful planting process for your germinated seeds.
Always pay attention to the weather conditions and adjust your planting schedule accordingly. If cold temperatures or excessive heat are expected, consider providing temporary protection for your germinated seedlings.
With proper planting and care, your germinated seeds will thrive in their new environment and reward you with beautiful, healthy plants.
Common Mistakes to Avoid when Planting Germinated Seeds
Planting germinated seeds can be an exciting and rewarding experience, but it’s important to be mindful of potential mistakes that can hinder the success of your seedlings. Here are some common mistakes to avoid when planting germinated seeds:
- Planting Too Early: One of the most common mistakes is planting germinated seeds outdoors before the weather conditions are suitable. Transplanting seedlings too early can expose them to cold temperatures or frost, which can damage or kill them. Make sure to wait until after the last expected frost before moving seedlings outside.
- Overwatering: Excessive watering can drown the delicate roots of germinated seedlings. It’s important to strike a balance and provide enough moisture without causing waterlogged conditions. Water the seedlings when the top inch of soil feels slightly dry, and ensure good drainage in the planting area or containers.
- Not Hardening Off Seedlings: Failure to acclimate germinated seedlings to outdoor conditions can lead to shock and stunted growth. Gradually expose seedlings to outdoor conditions over a week or two before transplanting them outside. This process, known as hardening off, helps seedlings adjust to changes in temperature, sunlight intensity, and wind.
- Planting Too Deep or Shallow: Improper planting depth can impact the growth and development of germinated seedlings. Planting too deep can restrict oxygen supply, while planting too shallow can expose delicate roots to drying out. Follow the recommended planting depth for each plant species to ensure optimal growth.
- Skipping Soil Preparation: Neglecting to prepare the soil can lead to poor plant growth and nutrient deficiencies. It’s essential to remove weeds, loosen the soil, and incorporate organic matter to enhance soil fertility and drainage. Take the time to prepare the planting area or use well-draining potting soil for container gardening.
- Planting Too Close Together: Overcrowding seedlings can impede air circulation, limit access to light, and increase competition for nutrients. Allow enough space between seedlings to accommodate their mature size and prevent overcrowding. Refer to the recommended spacing guidelines for each plant species.
- Not Providing Proper Support: Failure to provide support for taller or more fragile plants can result in bending, breaking, or toppling over. Consider using stakes, trellises, or cages to provide support as needed and ensure proper plant growth and stability.
- Ignoring Pest and Disease Management: Neglecting to implement proper pest and disease management practices can lead to infestations and plant damage. Monitor your seedlings regularly, take preventative measures, and address any pest or disease issues promptly.
- Underestimating Sunlight Requirements: Insufficient sunlight can lead to weak, leggy seedlings. Ensure that your planting area receives the recommended amount of sunlight for each plant species. If growing indoors, use grow lights to provide adequate light intensity and duration.
By avoiding these common mistakes, you can increase the chances of success when planting germinated seeds. Pay attention to proper timing, watering, soil preparation, support, and pest management to give your seedlings a strong start and set them up for healthy growth and productivity.
Best Practices for Caring for Germinated Seedlings
Caring for germinated seedlings is crucial to their development and long-term success. By implementing proper care practices, you can promote healthy growth, ensure robust plants, and increase your chances of a bountiful harvest. Here are some best practices to follow when caring for germinated seedlings:
- Watering: Maintain consistent moisture levels in the soil to keep seedlings hydrated. Water the seedlings when the top inch of soil feels dry, but avoid overwatering, as it can lead to root rot. Use a watering can or a spray bottle with a fine mist to gently water the soil without disturbing the delicate seedlings.
- Lighting: Provide adequate light for the seedlings to support healthy growth. If growing indoors, place them near a south-facing window or use grow lights to ensure they receive 12-16 hours of light per day. Adjust the distance between the light source and the seedlings as they grow to maintain an optimal light intensity.
- Fertilizing: Start fertilizing germinated seedlings once they have established a few sets of true leaves. Use a balanced liquid fertilizer diluted to half the recommended strength to avoid overfeeding. Fertilize the seedlings every two to three weeks or as directed on the fertilizer package, taking care not to apply fertilizer directly to the leaves or stems.
- Temperature: Maintain appropriate temperature conditions for your seedlings. Most seedlings prefer temperatures between 60°F and 75°F (15°C to 24°C). Avoid exposing them to extreme temperature fluctuations or drafts, as this can stress the plants and hinder their growth.
- Air Circulation: Provide adequate air circulation around the seedlings. Good airflow helps prevent fungal diseases and encourages stronger stems. Use a small fan on a low setting or gently brush your hand over the seedlings periodically to simulate a gentle breeze.
- Thinning: If you have multiple seedlings growing close together, thin them out to provide proper spacing. Remove the weaker seedlings, leaving the strongest ones to grow without competition for nutrients, water, and light.
- Pruning: As the seedlings grow, remove any yellowing or damaged leaves. This helps redirect the plant’s energy towards healthy growth and prevents the spread of disease. Be careful not to remove too many leaves at once, as it can stress the seedlings.
- Pest and Disease Management: Regularly inspect your seedlings for any signs of pests or diseases. Common pests include aphids, spider mites, and fungus gnats. If you notice any issues, take immediate action to identify and treat the problem using organic pest control methods or natural remedies.
- Hardening off: Gradually acclimate your seedlings to outdoor conditions before transplanting them into the garden. Begin by exposing them to a few hours of outdoor time in a sheltered area, gradually increasing the duration and exposure to sunlight and wind over a period of 7-10 days. This helps the seedlings adjust to the outdoor environment and reduces the risk of transplant shock.
By following these best practices for caring for germinated seedlings, you can provide the optimal conditions for their growth and development. Pay attention to their watering, lighting, temperature, and nutrient needs, and address any issues promptly to ensure their health and vigor. With proper care, your seedlings will thrive and become strong, productive plants in your garden.
Conclusion
Planting germinated seeds can be a game-changer in your gardening journey. By giving your seeds a head start through pre-sprouting, you set the stage for healthier, faster-growing plants and a more successful growing season. Through this article, we explored the various benefits of planting germinated seeds, from increased germination rates to quicker growth and selective seedling choices.
Before planting germinated seeds, it’s important to consider factors such as the planting location, seedling development, seasonal timing, soil condition, watering, and pest management. Taking these factors into account ensures that you provide an optimal environment for your seedlings.
We also discussed the right time to plant germinated seeds and emphasized the importance of considering the last frost date, planting charts, seed package instructions, and the specific requirements of your plant species. By aligning your planting with the natural growing season and environmental conditions, you increase the chances of success for your germinated seedlings.
Proper preparation is key when planting germinated seeds. From choosing a suitable planting location to preparing the soil, providing proper drainage, and moistening the soil, each step sets the foundation for a successful transplant and healthy growth of your seedlings.
We provided a step-by-step guide to help you navigate the process of planting germinated seeds, emphasizing the importance of handling the seedlings with care, providing proper support, and thoroughly watering them once planted. Following these steps ensures a smooth transition and minimizes transplant shock.
Additionally, we highlighted common mistakes to avoid, such as planting too early, overwatering, skipping soil preparation, overcrowding, and underestimating sunlight requirements. By being aware of these potential pitfalls, you can steer clear of them and give your germinated seedlings the best chances for success.
To care for your germinated seedlings, we emphasized the importance of proper watering, lighting, fertilizing, temperature control, air circulation, thinning, pruning, pest and disease management, and hardening off. Implementing these best practices ensures the health, vitality, and long-term success of your seedlings.
In conclusion, planting germinated seeds opens up a world of possibilities in your gardening endeavors. By investing a little extra time and effort in pre-sprouting your seeds and following the proper care practices, you can witness the transformation of tiny seeds into vibrant, flourishing plants. So, embrace the art of planting germinated seeds and enjoy the wonders of growing your own garden!
Frequently Asked Questions about When To Plant Germinated Seeds
Was this page helpful?
At Storables.com, we guarantee accurate and reliable information. Our content, validated by Expert Board Contributors, is crafted following stringent Editorial Policies. We're committed to providing you with well-researched, expert-backed insights for all your informational needs.


0 thoughts on “When To Plant Germinated Seeds”