Home>Gardening & Outdoor>Garden Tools & Equipment>How To Repair Wildflower Seed And Tool Telescopic Pruner
Garden Tools & Equipment
How To Repair Wildflower Seed And Tool Telescopic Pruner
Published: December 24, 2023
Learn how to repair your Wildflower Seed and Tool telescopic pruner with our expert guide. Get your garden tools and equipment in top shape for the season.
(Many of the links in this article redirect to a specific reviewed product. Your purchase of these products through affiliate links helps to generate commission for Storables.com, at no extra cost. Learn more)
Introduction
Welcome to the world of gardening, where the right tools can make all the difference in nurturing your green oasis. One indispensable tool for any avid gardener is the Wildflower Seed and Tool Telescopic Pruner. This versatile and efficient pruner is designed to help you effortlessly maintain your garden, ensuring that your plants and trees are always in top condition. However, like any tool, the telescopic pruner may encounter wear and tear over time, requiring some maintenance and repairs.
In this comprehensive guide, we will delve into the intricacies of repairing the Wildflower Seed and Tool Telescopic Pruner, providing you with step-by-step instructions to troubleshoot and fix any issues that may arise. Whether it’s a jammed mechanism, a dull blade, or a broken handle, we’ve got you covered. By following these instructions, you can extend the lifespan of your pruner and continue to enjoy its reliable performance for years to come.
So, grab your work gloves and let’s embark on this DIY repair journey to keep your Wildflower Seed and Tool Telescopic Pruner in prime condition!
Key Takeaways:
- Keep your Wildflower Seed and Tool Telescopic Pruner in top shape by following step-by-step repair instructions. Maintain its precision and efficiency for a flourishing garden.
- With the right tools and know-how, you can troubleshoot, repair, and test your telescopic pruner, ensuring it remains a reliable companion for your gardening endeavors.
Read more: When To Seed Wildflowers
Understanding the Wildflower Seed and Tool Telescopic Pruner
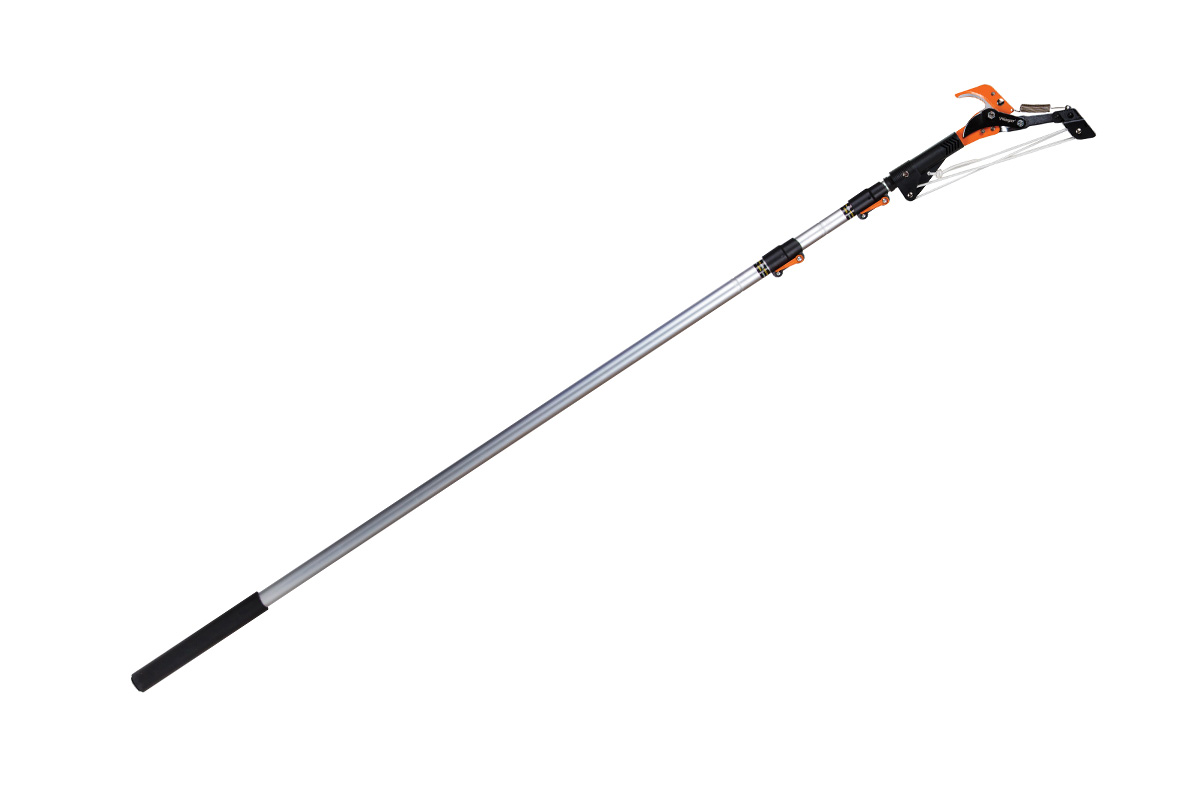
The Wildflower Seed and Tool Telescopic Pruner is a versatile and essential tool for gardeners, designed to provide precise and efficient pruning for trees, shrubs, and plants. This pruner features a telescopic handle that allows for extended reach, making it ideal for trimming branches at various heights without the need for a ladder. Its ergonomic design and sharp cutting blade ensure clean and accurate cuts, promoting the healthy growth of your garden foliage.
Equipped with a durable aluminum handle and a cutting head constructed from high-quality steel, the Wildflower Seed and Tool Telescopic Pruner offers both strength and lightweight maneuverability. The telescopic feature enables the user to adjust the length of the pruner to reach higher branches, providing unparalleled convenience and versatility during gardening tasks.
With its innovative design and reliable performance, the Wildflower Seed and Tool Telescopic Pruner has become a trusted companion for gardeners seeking precision and ease of use. However, like any tool subjected to regular use, it may experience issues such as blade dullness, jammed mechanisms, or general wear and tear over time. Understanding the components and functionality of this pruner is essential for diagnosing and addressing any potential problems that may arise.
By familiarizing yourself with the construction and operation of the Wildflower Seed and Tool Telescopic Pruner, you will be better equipped to identify, troubleshoot, and resolve maintenance issues, ensuring that your pruning tasks continue to be executed with efficiency and precision.
Tools and Materials Needed
Before embarking on the repair process for the Wildflower Seed and Tool Telescopic Pruner, it’s essential to gather the necessary tools and materials to facilitate a smooth and effective maintenance procedure. Here’s a list of items you’ll need:
- Screwdriver Set: A set of screwdrivers with various head types, including flathead and Phillips, to assist in disassembling and reassembling the pruner.
- Sharpening Stone or File: For sharpening the cutting blade if it has become dull from prolonged use.
- Lubricating Oil: A high-quality lubricant to oil the moving parts and ensure smooth operation of the pruner’s mechanisms.
- Clean Cloth: To wipe down the pruner and remove any dirt, debris, or old lubricant.
- Replacement Parts: Depending on the issue identified, you may need to acquire specific replacement parts such as springs, blades, or screws. Contact the manufacturer or a reputable garden tool supplier to obtain the correct components.
- Protective Gloves: A pair of durable work gloves to protect your hands during the repair process.
- Safety Glasses: To shield your eyes from any debris or particles that may dislodge during the disassembly and reassembly of the pruner.
- Clean, Flat Work Surface: A stable and clean area to lay out the pruner components during the repair process, preventing loss of small parts and ensuring organized work.
By ensuring that you have these tools and materials at your disposal, you’ll be well-prepared to address any maintenance issues that may arise with the Wildflower Seed and Tool Telescopic Pruner. With the right equipment on hand, you can proceed with confidence, knowing that you have everything needed to effectively troubleshoot and repair your pruner.
Step 1: Disassembling the Telescopic Pruner
Before diving into the repair process, it’s crucial to disassemble the Wildflower Seed and Tool Telescopic Pruner carefully. This step will provide access to the internal components, allowing for a thorough inspection and identification of any issues that may be affecting its functionality. Follow these steps to disassemble the pruner:
- Prepare Your Workspace: Find a clean and well-lit area to work on the disassembly process. Lay down a cloth or a soft mat to protect the pruner and its components from scratches or damage.
- Inspect the Pruner: Before disassembling, visually inspect the pruner for any visible damage, loose parts, or areas that require immediate attention. This initial assessment can provide valuable insights into the potential issues that need to be addressed.
- Identify the Fasteners: Locate the screws or fasteners that hold the pruner together. These are typically found near the pivot point and may require a screwdriver to remove.
- Remove the Fasteners: Using the appropriate screwdriver, carefully remove the screws or fasteners to detach the blade and cutting head from the handle. Place the fasteners in a small container or magnetic tray to prevent loss.
- Separate the Components: Once the fasteners are removed, gently separate the blade and cutting head from the handle, taking care not to force any components apart. Inspect the internal mechanisms for any signs of wear, damage, or debris accumulation.
- Document the Disassembly: If needed, take photos or make notes of the disassembly process to aid in reassembling the pruner later. This documentation can be particularly helpful if you encounter challenges during the repair.
By methodically disassembling the Wildflower Seed and Tool Telescopic Pruner, you’ll gain a deeper understanding of its internal workings and be better equipped to diagnose and address any maintenance issues. With the pruner disassembled, you’re ready to move on to the next step of identifying the specific problem that requires attention.
Step 2: Identifying the Issue
With the Wildflower Seed and Tool Telescopic Pruner disassembled, it’s time to focus on identifying the specific issue that is impacting its performance. By conducting a thorough inspection and assessment, you can pinpoint the root cause of the problem and determine the appropriate course of action for repair. Here’s how to effectively identify the issue:
- Inspect the Blade and Cutting Mechanism: Carefully examine the blade, cutting head, and the mechanisms responsible for the cutting action. Look for signs of blade dullness, chipping, or deformation that may be hindering the pruner’s cutting ability.
- Check the Telescopic Mechanism: If the telescopic feature is not functioning smoothly, inspect the telescopic extension mechanism for any obstructions, misalignments, or signs of wear that may be impeding its extension and retraction.
- Examine the Handle and Grip: Assess the handle and grip for any cracks, loose fittings, or damage that could affect the user’s comfort and control during operation. A secure and ergonomic handle is essential for safe and efficient pruning.
- Inspect Internal Springs and Components: Look for any broken or worn-out springs, screws, or internal components that may be causing the pruner to malfunction. Ensure that all parts are in their proper positions and functioning as intended.
- Test the Safety Features: Verify that any safety features, such as locking mechanisms or blade guards, are fully operational. Safety features play a crucial role in preventing accidents and should be thoroughly examined for functionality.
During the inspection process, take note of any specific areas or components that require attention. By systematically evaluating the pruner’s components and mechanisms, you’ll be able to narrow down the issue and prepare for the next steps in the repair process. Once the problem has been identified, you can proceed with the necessary repairs or replacements to restore the functionality of the telescopic pruner.
To repair a Wildflower Seed and Tool Telescopic Pruner, first identify the issue, then disassemble the pruner to access the damaged part. Replace the broken part with a new one and reassemble the pruner carefully.
Read more: How To Plant Wildflower Seed Paper
Step 3: Repairing or Replacing the Parts
After identifying the specific issue affecting the Wildflower Seed and Tool Telescopic Pruner, it’s time to initiate the repair or replacement process to address the underlying problems. Depending on the nature of the issue, you may need to perform repairs, sharpening, or procure replacement parts to restore the pruner to optimal working condition. Here’s a detailed guide on repairing or replacing the parts:
- Sharpening the Blade: If the blade is dull or showing signs of wear, use a sharpening stone or file to carefully sharpen the cutting edge. Maintain the original angle of the blade to ensure precise cutting performance.
- Replacing the Blade: In cases where the blade is irreparably damaged or excessively worn, consider replacing it with a new, compatible blade. Follow the manufacturer’s guidelines for safe blade replacement.
- Addressing Telescopic Mechanism Issues: If the telescopic extension is not functioning smoothly, inspect the extension mechanism for debris or misalignments. Clean and lubricate the telescopic components to improve their operation. In the case of severe damage, consider replacing the telescopic mechanism components as per the manufacturer’s recommendations.
- Repairing Handle and Grip: For damaged or cracked handles, consider using epoxy adhesives or specialized repair kits to mend the handle. Ensure that the repaired handle maintains its structural integrity and ergonomic design.
- Replacing Worn-out Springs and Components: If internal springs or components are worn or broken, acquire suitable replacement parts from the manufacturer or authorized suppliers. Carefully install the new components, ensuring they are securely in place and function as intended.
- Testing Safety Features: Verify that all safety features, such as locking mechanisms and blade guards, are fully operational after repairs or replacements. Safety should always be a top priority when restoring the functionality of the telescopic pruner.
By meticulously addressing the maintenance and repair needs of the Wildflower Seed and Tool Telescopic Pruner, you can ensure that it continues to deliver reliable performance and precision during gardening activities. Once the necessary repairs or replacements have been completed, you can proceed to reassemble the pruner and conduct thorough testing to validate its restored functionality.
Step 4: Reassembling the Telescopic Pruner
With the necessary repairs and replacements completed, it’s time to reassemble the components of the Wildflower Seed and Tool Telescopic Pruner. Proper reassembly is crucial to ensure that the pruner functions seamlessly and safely during gardening tasks. Follow these steps to effectively reassemble the telescopic pruner:
- Refer to Documentation: If you documented the disassembly process, refer to your notes or photos to guide you through the reassembly. This can help ensure that components are correctly positioned and aligned.
- Position the Blade and Cutting Head: Align the blade and cutting head with the handle, taking care to insert any fasteners or screws in their designated locations. Ensure that the components fit together snugly without any forced manipulation.
- Secure Fasteners: Using the appropriate screwdriver, reattach and tighten the fasteners that hold the blade and cutting head securely to the handle. Confirm that the fasteners are tightened to the manufacturer’s recommended torque specifications.
- Lubricate Moving Parts: Apply a small amount of lubricating oil to the moving parts and joints of the pruner to facilitate smooth operation. This will help reduce friction and wear on the internal mechanisms.
- Test Extension and Retraction: Verify that the telescopic extension mechanism functions smoothly and extends to the desired length without resistance. Retract the telescopic handle to its closed position to ensure that it operates seamlessly.
- Check Safety Features: Ensure that any safety features, such as locking mechanisms and blade guards, are fully operational and provide the necessary protection during use.
By methodically reassembling the Wildflower Seed and Tool Telescopic Pruner, you can be confident in the pruner’s structural integrity and operational efficiency. Once the pruner is reassembled, it’s crucial to conduct comprehensive testing to validate its restored functionality and performance.
Testing the Pruner
After completing the repair and reassembly process for the Wildflower Seed and Tool Telescopic Pruner, it’s essential to conduct thorough testing to ensure that the pruner functions optimally and meets the performance standards required for gardening tasks. Follow these steps to effectively test the pruner:
- Cutting Performance: Test the pruner’s cutting performance by trimming small branches or foliage. Verify that the blade delivers clean and precise cuts without excessive effort, indicating that it has been sharpened or replaced effectively.
- Telescopic Extension: Extend the telescopic handle to various lengths and confirm that it locks securely in position without slippage. Retract the handle to its closed position to ensure smooth and reliable retraction.
- Handle Comfort and Control: Evaluate the comfort and control provided by the pruner’s handle during use. Ensure that the repaired or replaced handle components offer a secure and ergonomic grip for enhanced maneuverability.
- Safety Feature Validation: Test all safety features, including locking mechanisms and blade guards, to verify that they function as intended, providing essential protection during operation.
- Overall Functionality: Perform a comprehensive assessment of the pruner’s overall functionality, including its ease of use, precision, and reliability. Confirm that all repaired and replaced components contribute to the pruner’s seamless operation.
By rigorously testing the Wildflower Seed and Tool Telescopic Pruner, you can ascertain that the repair and maintenance efforts have resulted in a fully functional and dependable tool for your gardening endeavors. Any issues identified during testing should be promptly addressed to ensure the pruner’s continued performance and longevity.
Conclusion
Congratulations on successfully navigating the repair process for the Wildflower Seed and Tool Telescopic Pruner! By following the comprehensive steps outlined in this guide, you’ve demonstrated a commitment to maintaining and optimizing your gardening tools for long-term reliability and performance. The diligent approach to troubleshooting, repairing, and testing the telescopic pruner has equipped you with the knowledge and skills to address maintenance issues effectively.
As you reflect on the repair journey, it’s important to acknowledge the value of regular maintenance in preserving the functionality of essential garden tools. The Wildflower Seed and Tool Telescopic Pruner, with its versatile design and precision cutting capabilities, plays a pivotal role in shaping and nurturing your garden landscape. By investing time and effort in its maintenance, you’ve ensured that it remains a dependable companion in your gardening endeavors.
Furthermore, the hands-on experience gained from repairing the telescopic pruner has deepened your understanding of its internal mechanisms and operational intricacies. This knowledge empowers you to proactively identify and address potential issues, fostering a proactive approach to tool maintenance and care.
Remember, the satisfaction of a well-maintained garden extends beyond the visual appeal of flourishing plants and trees. It encompasses the joy of utilizing reliable and efficient tools that enhance your gardening experience. The Wildflower Seed and Tool Telescopic Pruner, now restored to optimal functionality, stands as a testament to your dedication to preserving the tools that contribute to the beauty and vitality of your garden.
As you continue to tend to your garden and engage in the timeless art of nurturing nature, may the knowledge and skills acquired through this repair endeavor serve as a foundation for the ongoing care and maintenance of your gardening equipment. With a well-maintained arsenal of tools at your disposal, you’re poised to cultivate and cherish your garden sanctuary for years to come.
Frequently Asked Questions about How To Repair Wildflower Seed And Tool Telescopic Pruner
Was this page helpful?
At Storables.com, we guarantee accurate and reliable information. Our content, validated by Expert Board Contributors, is crafted following stringent Editorial Policies. We're committed to providing you with well-researched, expert-backed insights for all your informational needs.


0 thoughts on “How To Repair Wildflower Seed And Tool Telescopic Pruner”