Home>Gardening & Outdoor>Outdoor Recreation & Activities>How To Install A Swimming Pool Pump And Filter
Outdoor Recreation & Activities
How To Install A Swimming Pool Pump And Filter
Published: February 18, 2024
Learn how to properly install a swimming pool pump and filter for your outdoor recreation and activities. Follow our step-by-step guide for a successful setup.
(Many of the links in this article redirect to a specific reviewed product. Your purchase of these products through affiliate links helps to generate commission for Storables.com, at no extra cost. Learn more)
Introduction
Installing a swimming pool pump and filter is a crucial step in ensuring the cleanliness and proper circulation of water in your pool. A well-functioning pump and filter system not only keeps the water crystal clear but also helps maintain the overall health and hygiene of the pool. Whether you're setting up a new pool or replacing an old pump and filter, this comprehensive guide will walk you through the essential steps to successfully install these vital components.
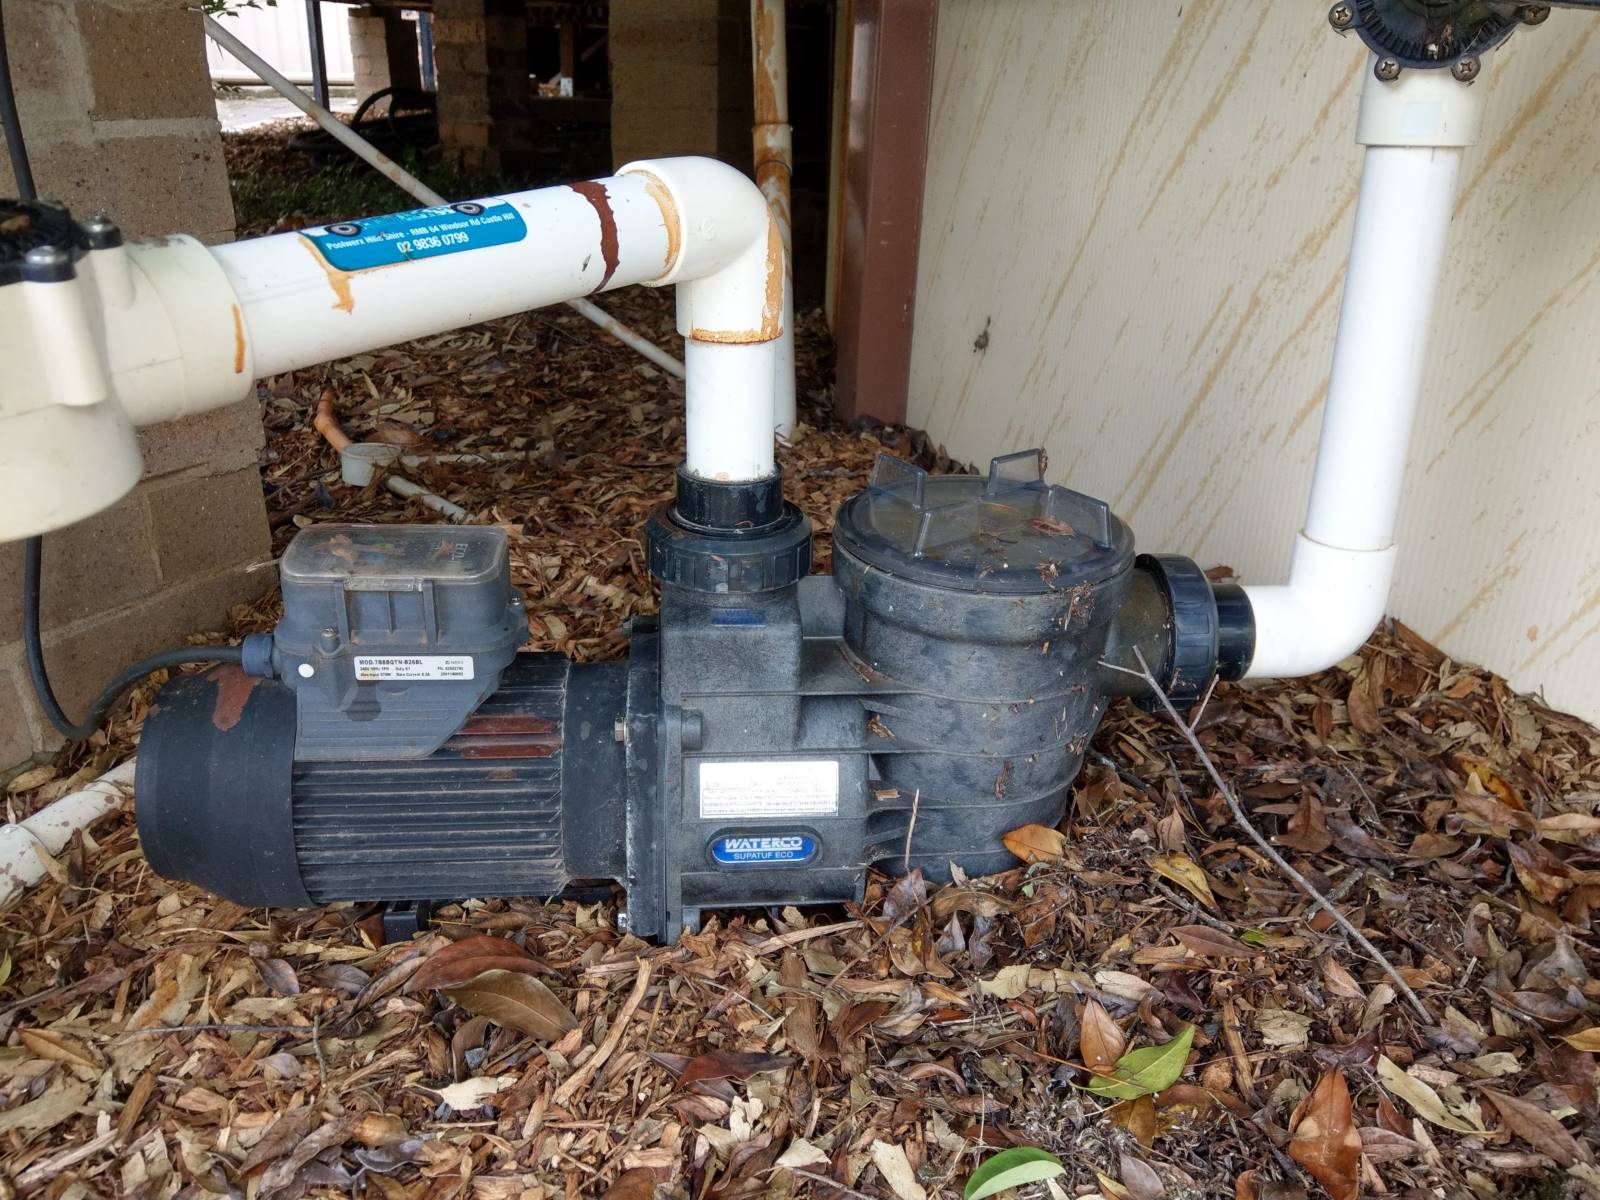
A swimming pool pump and filter work in tandem to remove debris, dirt, and other impurities from the water, ensuring that your pool remains a safe and inviting space for relaxation and recreation. The pump is responsible for circulating the water through the filtration system, while the filter traps and removes contaminants, preventing them from re-entering the pool. By understanding the installation process, you can ensure that your pool's pump and filter operate efficiently, contributing to a pristine and enjoyable swimming experience for you and your guests.
Proper installation of the pump and filter is not only essential for maintaining water quality but also for optimizing energy efficiency and minimizing maintenance requirements. By carefully selecting the location, assembling the components, and connecting the plumbing and electrical elements, you can set the stage for a reliable and effective pool filtration system. Additionally, learning how to prime the pump and test the entire system will enable you to troubleshoot any potential issues and ensure that everything is functioning as intended.
In the following sections, we will delve into the step-by-step process of installing a swimming pool pump and filter, providing detailed instructions and valuable insights to help you navigate each stage with confidence. From choosing the right location for the equipment to testing the system for optimal performance, this guide will equip you with the knowledge and skills needed to complete the installation successfully. Let's embark on this journey to enhance the functionality and cleanliness of your pool by installing a top-notch pump and filter system.
Key Takeaways:
- Choosing the right location for your pool pump and filter is crucial. Consider proximity to the pool, accessibility for maintenance, protection from the elements, stable ground, and noise considerations for a well-positioned and efficient system.
- Proper assembly, plumbing connection, electrical installation, priming, and thorough testing are essential for a reliable pump and filter system. Following these steps ensures a clean, inviting, and enjoyable swimming pool experience.
Read more: How To Clean A Swimming Pool Filter
Step 1: Choose the Right Location
Selecting the appropriate location for your swimming pool pump and filter is a critical first step in the installation process. The chosen spot should offer easy access for maintenance and repairs while ensuring optimal functionality of the equipment. Here's a detailed guide to help you make an informed decision:
Consider Proximity to the Pool
The pump and filter should be positioned as close to the pool as possible to minimize the distance the water needs to travel. This not only enhances the efficiency of the system but also reduces the workload on the pump, resulting in energy savings and prolonged equipment lifespan.
Accessibility for Maintenance
Choose a location that provides ample space for maintenance activities such as cleaning the filter, inspecting the pump, and accessing the electrical components. Easy access will streamline routine upkeep and troubleshooting, allowing you to address any issues promptly and keep the system in optimal condition.
Protection from the Elements
Shield the pump and filter from direct sunlight and inclement weather to prevent premature wear and damage. Consider installing a protective cover or positioning the equipment in a shaded area to safeguard it from the elements, thereby prolonging its longevity and preserving its performance.
Stable Ground and Proper Drainage
Ensure that the chosen location offers stable ground to support the weight of the pump and filter. Additionally, verify that the area has proper drainage to prevent water accumulation around the equipment, which could lead to corrosion and structural issues over time.
Noise Considerations
Take into account the noise generated by the pump during operation. Position the equipment away from areas where excessive noise may cause disturbances, such as outdoor seating areas or neighboring properties, to maintain a peaceful and enjoyable pool environment.
By carefully evaluating these factors and selecting a suitable location that addresses these considerations, you can lay the foundation for a successful installation of your swimming pool pump and filter. This thoughtful approach will contribute to the long-term efficiency, functionality, and durability of the equipment, ensuring that your pool remains a pristine and inviting oasis for years to come.
Step 2: Assemble the Pump and Filter
Assembling the swimming pool pump and filter is a pivotal phase in the installation process, laying the groundwork for efficient water circulation and effective filtration. Proper assembly ensures that the components work seamlessly together, contributing to the overall cleanliness and clarity of the pool water. Here's a detailed walkthrough of the essential steps involved in assembling the pump and filter:
Unpack and Inspect the Components
Carefully unpack the pump and filter components, ensuring that all parts are present and undamaged. Verify that the necessary hardware, such as screws, gaskets, and seals, are included and in good condition. Thoroughly inspect each item to identify any potential defects or discrepancies before proceeding with the assembly.
Read more: How Does A Swimming Pool Sand Filter Work
Read the Manufacturer's Instructions
Refer to the manufacturer's instructions and familiarize yourself with the specific assembly requirements for the pump and filter. Pay close attention to the recommended installation steps, proper alignment of components, and any special considerations outlined by the manufacturer. Adhering to the provided guidelines will help ensure a correct and efficient assembly process.
Assemble the Pump Housing and Motor
Begin by assembling the pump housing and motor according to the manufacturer's instructions. This typically involves securing the motor to the pump housing using the provided hardware and ensuring a tight and secure fit. Pay attention to any alignment marks or indicators to ensure proper positioning of the motor within the housing.
Install the Filter Tank and Cartridge/Filter Media
If your pool utilizes a cartridge filter or filter media, carefully install these components into the filter tank as per the manufacturer's guidelines. Ensure that the cartridge or filter media is properly seated and that any required seals or gaskets are in place to prevent leaks. For sand filters, follow the specific instructions for adding the filter sand and securing the tank components.
Connect the Pump and Filter
Once the individual components are assembled, proceed to connect the pump and filter according to the provided instructions. This typically involves securing the plumbing connections, such as inlet and outlet ports, and ensuring a watertight seal using appropriate fittings and sealing materials. Verify that all connections are secure and properly aligned to facilitate smooth water flow.
Read more: How To Cover A Swimming Pool
Test the Assembly
After completing the assembly, perform a preliminary test to ensure that the pump and filter components are functioning as intended. Check for any leaks, unusual noises, or operational issues that may indicate improper assembly. Address any issues promptly to ensure that the pump and filter are ready for the next phase of the installation process.
By meticulously following these assembly steps and adhering to the manufacturer's instructions, you can ensure that the swimming pool pump and filter are assembled correctly, setting the stage for the subsequent stages of the installation process. A well-assembled pump and filter system form the backbone of efficient pool maintenance, contributing to the overall health and enjoyment of your swimming pool.
Step 3: Connect the Plumbing
Connecting the plumbing is a crucial phase in the installation of a swimming pool pump and filter, as it establishes the pathways for water circulation and filtration. Properly configured plumbing ensures efficient water flow, minimizes resistance, and optimizes the performance of the pump and filter system. Here's a detailed exploration of the essential steps involved in connecting the plumbing for your pool's pump and filter:
Evaluate Plumbing Requirements
Before initiating the plumbing connections, carefully assess the specific requirements of your pool's pump and filter system. Take into account the recommended pipe sizes, flow rates, and any additional components, such as valves or unions, that may be necessary to facilitate the plumbing connections. Understanding these requirements will guide you in selecting the appropriate plumbing materials and components for the installation.
Select High-Quality Plumbing Materials
Choose high-quality PVC pipes, fittings, and connectors designed for use in swimming pool applications. Opt for corrosion-resistant materials that can withstand the chemical treatments and environmental factors commonly encountered in pool systems. Additionally, ensure that the selected materials comply with local building codes and industry standards to guarantee the safety and reliability of the plumbing connections.
Read more: How To Empty A Swimming Pool
Plan the Plumbing Layout
Map out the plumbing layout, considering the optimal positioning of the pump, filter, and other pool equipment. Determine the most direct and efficient route for the plumbing connections, minimizing unnecessary bends and turns that could impede water flow. Plan for adequate space around the plumbing components to facilitate future maintenance and repairs.
Establish Inlet and Outlet Connections
Connect the inlet and outlet ports of the pump and filter to the pool's plumbing system using appropriately sized pipes and fittings. Ensure a secure and watertight connection at each junction, utilizing PVC primer and solvent cement to bond the components effectively. Pay attention to the alignment and orientation of the connections to promote smooth water flow and minimize pressure loss.
Integrate Valves and Unions
Incorporate valves and unions into the plumbing layout to facilitate maintenance and serviceability. Install a gate valve on the discharge side of the pump to regulate flow and facilitate pump priming. Additionally, include unions at strategic points along the plumbing lines to enable easy disconnection of components for future maintenance or repairs.
Pressure Test the Plumbing
Upon completing the plumbing connections, perform a pressure test to verify the integrity of the system. Pressurize the plumbing lines and carefully inspect all connections for leaks or signs of instability. Address any identified issues promptly to ensure that the plumbing is secure and capable of withstanding the operational demands of the pump and filter system.
By meticulously executing these plumbing connections, you can establish a robust and efficient infrastructure for your swimming pool's pump and filter system. Well-designed and properly connected plumbing contributes to the overall performance and longevity of the equipment, ensuring that your pool remains a pristine and inviting retreat for relaxation and enjoyment.
Read more: How To Design A Swimming Pool
Step 4: Install the Electrical Components
Installing the electrical components for your swimming pool pump and filter is a critical phase that demands precision and adherence to safety standards. Proper installation of the electrical elements ensures reliable operation of the pump and filter system while safeguarding against potential hazards. Here's a comprehensive guide to navigating the installation of the electrical components with confidence and proficiency.
Adhere to Local Regulations and Codes
Before commencing the installation, familiarize yourself with the local electrical regulations and codes governing the setup of pool-related electrical components. Adhering to these standards is paramount for ensuring the safety and compliance of the installation. Verify the specific requirements for ground fault circuit interrupter (GFCI) protection, wiring methods, and equipment ratings to align with the established regulations.
Select Appropriate Wiring and Components
Choose high-quality, weather-resistant wiring and electrical components designed for outdoor and poolside applications. Opt for insulated copper conductors suitable for wet locations and UV-resistant conduit to protect the wiring from environmental exposure. Additionally, select a weatherproof electrical enclosure to house the necessary components, such as the pump motor's disconnect switch and any associated control devices.
Establish Proper Grounding and Bonding
Ensure proper grounding and bonding of the electrical components to mitigate the risk of electrical hazards and equipment damage. Establish a robust grounding system by connecting the pump and filter equipment to an appropriate grounding electrode, adhering to the prescribed guidelines for grounding and bonding in pool installations. Verify that all connections are secure and compliant with the recommended practices to maintain electrical safety.
Read more: How Long Is A Swimming Pool
Install GFCI Protection
Integrate ground fault circuit interrupter (GFCI) protection into the electrical circuit supplying power to the pool pump and filter. Install a GFCI breaker or receptacle in accordance with the manufacturer's specifications and local electrical codes to provide essential protection against electrical shocks and ground faults. Test the GFCI device to ensure its proper functionality before proceeding with the finalization of the electrical connections.
Connect the Electrical Components
Carefully connect the electrical components, including the pump motor, filter system controls, and any associated devices, following the manufacturer's wiring diagrams and instructions. Terminate the wiring in the designated electrical enclosure, observing proper wire routing and strain relief techniques to prevent damage and ensure a tidy and organized installation. Verify the integrity of all electrical connections and secure them within the enclosure to prevent exposure to moisture and physical damage.
Conduct a Preliminary Electrical Test
Upon completing the electrical connections, conduct a preliminary test of the system to verify proper operation and electrical safety. Power up the pump and filter components, ensuring that they function as intended and that the associated controls and safety devices operate effectively. Verify that the GFCI protection functions correctly by performing a test and reset sequence, confirming its responsiveness to ground fault conditions.
By meticulously executing the installation of the electrical components in accordance with the prescribed guidelines and best practices, you can establish a safe and reliable electrical infrastructure for your swimming pool pump and filter system. A well-installed electrical system not only ensures the efficient operation of the equipment but also prioritizes the safety of pool users and maintenance personnel, contributing to a secure and enjoyable pool environment.
Step 5: Prime the Pump
Priming the pump is a crucial step in the installation of a swimming pool pump and filter, as it ensures the proper initiation of water circulation and facilitates the optimal performance of the system. Priming involves removing air from the pump and plumbing lines, allowing water to fill the system and create the necessary hydraulic pressure for efficient operation. Here's a detailed exploration of the essential steps involved in priming the pump to prepare it for seamless functionality:
Read more: How To Paint A Swimming Pool
Understand the Priming Process
Before initiating the priming process, it's essential to understand the underlying principles and objectives. Priming serves to eliminate air pockets within the pump and plumbing system, which can impede water flow and compromise the pump's ability to generate sufficient pressure. By expelling air and establishing a continuous flow of water, the pump can operate at its full capacity, contributing to effective filtration and circulation within the pool.
Prepare the Pump and Plumbing System
Begin by ensuring that the pump and filter are properly assembled, and the plumbing connections are secure. Verify that all valves associated with the pump and filter are in the correct position to facilitate the priming process. Additionally, ensure that the pool's water level is sufficiently high to cover the skimmer intake and allow for the uninterrupted flow of water into the pump.
Open Air Release Valves
Identify and open any air release valves or vents located on the pump, filter, or plumbing lines. These valves are designed to expel trapped air from the system, allowing water to replace the displaced air and establish hydraulic continuity. By opening the air release valves, you create pathways for air to escape, enabling water to fill the system during the priming process.
Fill the Pump with Water
To initiate the priming process, fill the pump with water to submerge the intake port and cover the impeller. Depending on the pump's design, this may involve pouring water directly into the pump housing or utilizing a dedicated priming port or basket. By filling the pump with water, you create a liquid seal that prevents air from entering the pump during operation, promoting efficient water circulation.
Read more: How To Draw A Swimming Pool
Power Up the Pump and Monitor Progress
Once the pump is filled with water, power it up and observe the priming process. As the pump operates, air trapped within the system will be purged through the open air release valves, while water replaces the displaced air. Monitor the pump for signs of air expulsion and verify that water is flowing steadily through the pump and plumbing lines, indicating successful priming.
Close Air Release Valves and Verify Operation
As the priming process progresses, air release valves can be closed once water flows consistently from them, indicating the expulsion of air from the system. Verify that the pump is operating smoothly, with no unusual noises or signs of air cavitation. Additionally, check the filter for any air pockets and ensure that water is circulating effectively through the pool's filtration system.
By meticulously executing the priming process, you can ensure that the swimming pool pump is ready to deliver optimal performance, contributing to efficient water circulation and effective filtration. Proper priming sets the stage for the successful operation of the pump and filter system, laying the foundation for a clean, inviting, and enjoyable swimming pool experience.
Step 6: Test the System
Testing the swimming pool pump and filter system is a critical phase that validates the successful installation and functionality of the equipment. Thorough testing allows you to assess the performance of the pump and filter, identify any operational issues, and make necessary adjustments to ensure optimal efficiency. Here's a detailed exploration of the essential steps involved in testing the system to validate its functionality and readiness for operation.
Conduct a Flow Rate Test
Initiate the testing process by conducting a flow rate test to measure the volume of water circulated by the pump within a specified time frame. This test provides valuable insights into the pump's capacity to deliver the necessary flow rate for efficient filtration and circulation. Utilize a flow meter or other appropriate measuring devices to accurately assess the water flow and compare the results against the manufacturer's specifications.
Read more: How To Shock A Swimming Pool
Monitor Pressure and Vacuum Levels
Monitor the pressure and vacuum levels within the pump and filter system to gauge their operational characteristics. Verify that the pump generates adequate pressure to facilitate water circulation while maintaining optimal vacuum levels to support effective filtration. Anomalies in pressure or vacuum readings may indicate underlying issues that require attention, such as clogged filters or plumbing obstructions.
Evaluate Filtration Performance
Assess the filtration performance by observing the clarity and cleanliness of the pool water after it has circulated through the filter system. Verify that the filter effectively captures and retains debris, dirt, and other impurities, preventing their re-entry into the pool. Additionally, inspect the filter media or cartridges for any signs of premature clogging or reduced filtration efficiency, addressing any identified concerns promptly.
Test Automation and Control Functions
If the pump and filter system incorporates automation and control features, test their functionality to ensure seamless operation. Verify the responsiveness of timers, valves, and other control devices, confirming that they execute programmed functions accurately. Additionally, assess any automated backwashing or cleaning cycles to ascertain their effectiveness in maintaining the filter's performance.
Verify Energy Consumption and Efficiency
Measure the energy consumption of the pump and filter system to evaluate its efficiency and operational costs. Compare the actual energy usage against the manufacturer's specifications and industry benchmarks to assess the system's energy efficiency. Identify opportunities for optimizing energy consumption, such as adjusting pump run times or exploring energy-saving settings on variable-speed pumps.
Read more: How To Float In A Swimming Pool
Address Identified Issues and Fine-Tune Settings
Upon completing the testing process, address any identified issues or discrepancies in the system's performance. Fine-tune settings, adjust operational parameters, or make necessary repairs to rectify any observed deficiencies. By addressing these issues proactively, you can ensure that the pump and filter system operates at its full potential, delivering reliable performance and maintaining pristine pool conditions.
By meticulously executing these testing procedures, you can validate the successful installation and functionality of the swimming pool pump and filter system. Thorough testing not only ensures the system's readiness for operation but also provides valuable insights for optimizing its performance and efficiency. A well-tested and fine-tuned pump and filter system form the cornerstone of a clean, inviting, and enjoyable swimming pool environment.
Conclusion
In conclusion, the installation of a swimming pool pump and filter is a pivotal endeavor that significantly impacts the cleanliness, functionality, and overall appeal of a pool. By meticulously following the step-by-step process outlined in this comprehensive guide, pool owners and maintenance professionals can ensure the successful installation and optimal performance of these essential components.
The journey begins with selecting the right location for the pump and filter, considering factors such as proximity to the pool, accessibility for maintenance, protection from the elements, stable ground, proper drainage, and noise considerations. This thoughtful approach sets the stage for a well-positioned and functional pump and filter system, laying the groundwork for efficient water circulation and filtration.
Assembling the pump and filter components with precision and attention to detail is paramount to their seamless operation. Carefully unpacking and inspecting the components, following manufacturer's instructions, and conducting a preliminary test are crucial steps in this phase. A well-assembled pump and filter system form the backbone of efficient pool maintenance, contributing to the overall health and enjoyment of the swimming pool.
The subsequent phases of connecting the plumbing and installing the electrical components demand adherence to safety standards, local regulations, and best practices. Properly configured plumbing and a well-installed electrical infrastructure ensure efficient water flow, reliable operation, and the safety of pool users and maintenance personnel.
Priming the pump and conducting thorough testing of the entire system are critical steps that validate the successful installation and functionality of the equipment. Priming ensures the proper initiation of water circulation, while comprehensive testing allows for the assessment of the pump and filter's performance, identification of operational issues, and fine-tuning of settings for optimal efficiency.
By embracing these essential steps and best practices, pool owners and maintenance professionals can establish a robust and reliable pump and filter system, contributing to a clean, inviting, and enjoyable swimming pool environment. The successful installation and meticulous attention to each phase of the process lay the foundation for a pristine and well-maintained pool, enhancing the overall experience for swimmers and ensuring the longevity of the equipment.
In essence, the installation of a swimming pool pump and filter is not merely a technical task but a commitment to creating a safe, clean, and enjoyable aquatic retreat. It is a testament to the dedication to maintaining a welcoming and pristine pool environment, where relaxation, recreation, and rejuvenation converge seamlessly.
Frequently Asked Questions about How To Install A Swimming Pool Pump And Filter
Was this page helpful?
At Storables.com, we guarantee accurate and reliable information. Our content, validated by Expert Board Contributors, is crafted following stringent Editorial Policies. We're committed to providing you with well-researched, expert-backed insights for all your informational needs.
0 thoughts on “How To Install A Swimming Pool Pump And Filter”