Home>Gardening & Outdoor>Outdoor Recreation & Activities>How To Make A Sand Filter For A Swimming Pool
Outdoor Recreation & Activities
How To Make A Sand Filter For A Swimming Pool
Published: February 18, 2024
Learn how to make a sand filter for your swimming pool with our easy step-by-step guide. Enjoy outdoor recreation and activities with a clean and efficient pool filtration system.
(Many of the links in this article redirect to a specific reviewed product. Your purchase of these products through affiliate links helps to generate commission for Storables.com, at no extra cost. Learn more)
Introduction
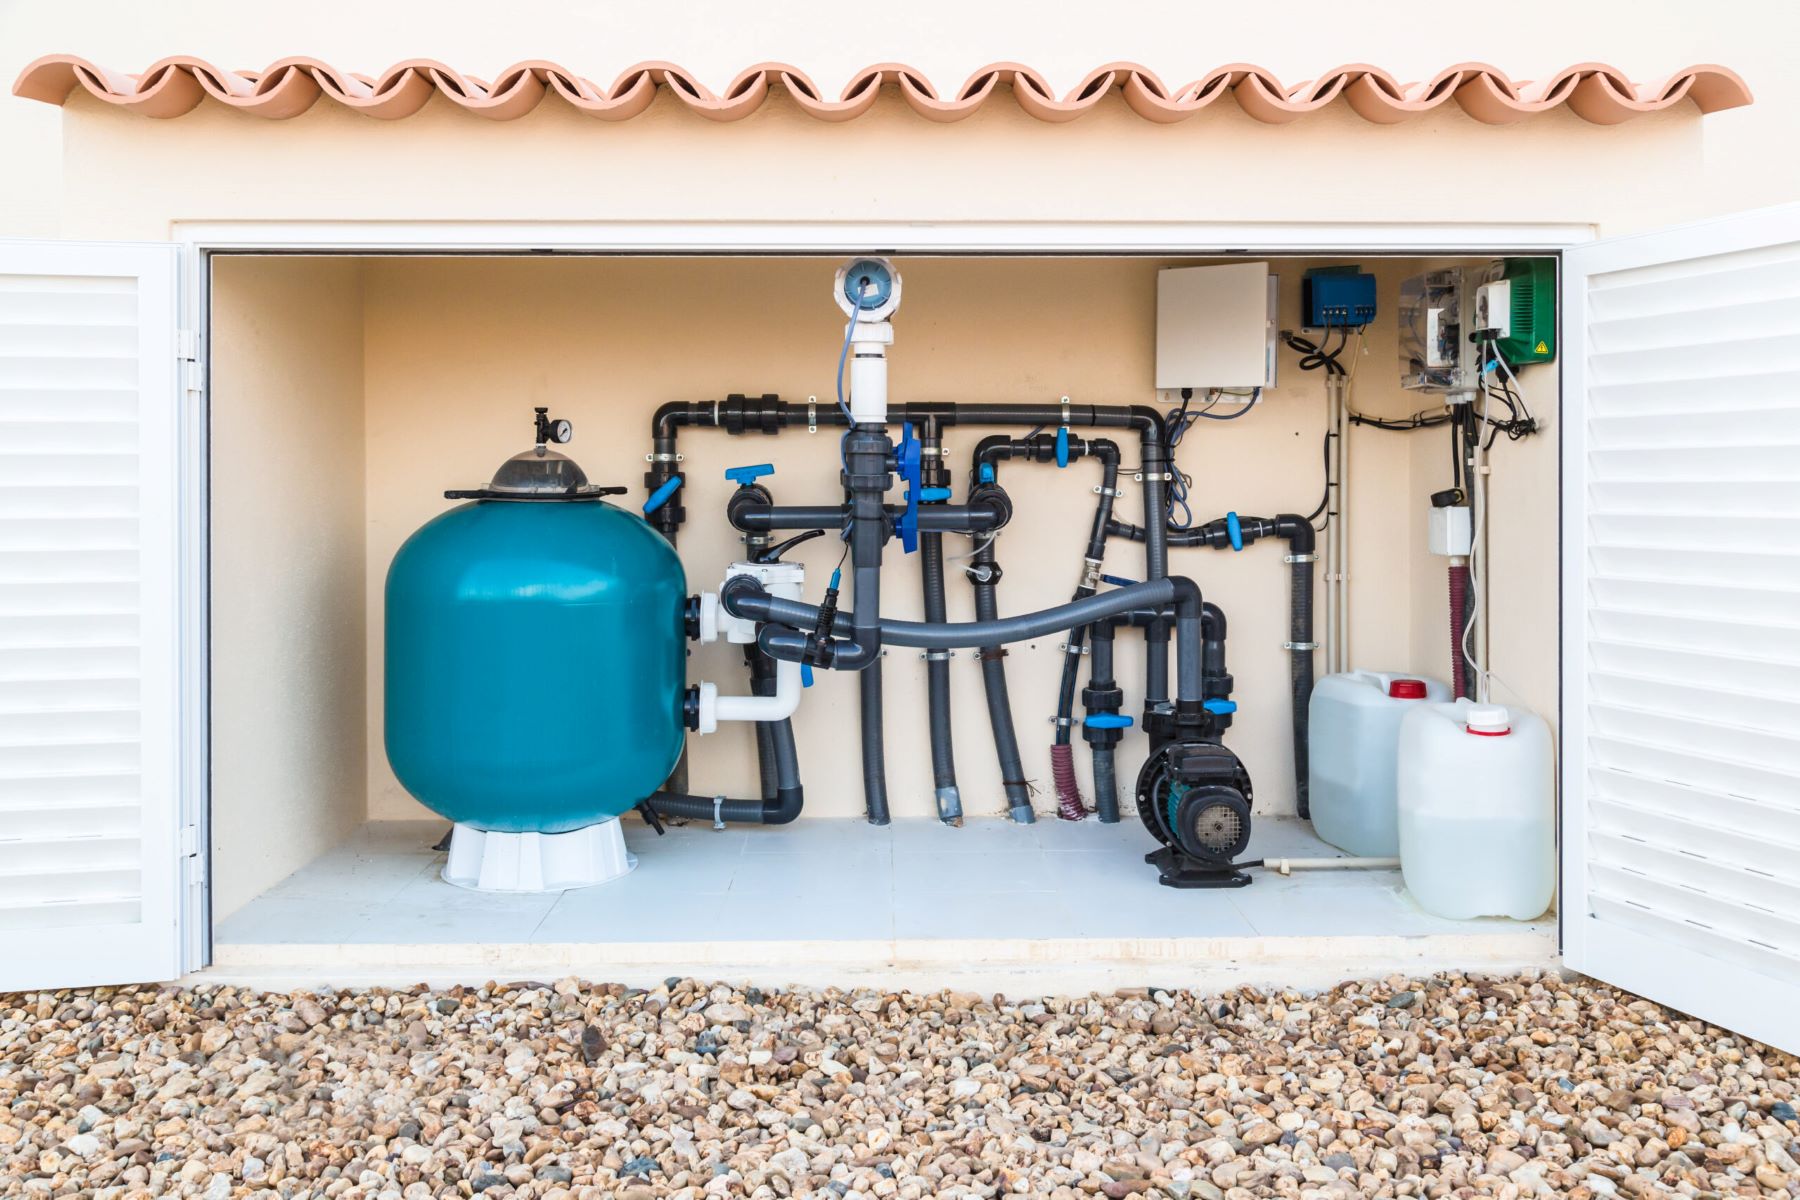
Creating a sand filter for your swimming pool is a cost-effective and efficient way to maintain crystal-clear water. This DIY project allows you to remove debris and impurities from the pool water without relying solely on chemical treatments. By harnessing the natural filtration properties of sand and gravel, you can enjoy a refreshing and pristine swimming experience while minimizing the environmental impact.
A sand filter works by trapping particles and contaminants as the water passes through the fine grains of sand. This process effectively removes dirt, leaves, insects, and other debris, resulting in cleaner and healthier pool water. Additionally, a well-maintained sand filter can reduce the need for excessive backwashing and chemical additives, making it a sustainable choice for pool maintenance.
In this guide, we will walk you through the step-by-step process of creating a sand filter for your swimming pool. By following these instructions and using readily available materials, you can enhance the quality of your pool water while embracing a DIY approach to pool maintenance. Whether you're a seasoned DIY enthusiast or a first-time pool owner, this project is designed to be accessible and rewarding, offering a practical solution for maintaining a sparkling clean swimming pool.
With a focus on simplicity and effectiveness, this DIY sand filter project empowers you to take control of your pool's maintenance routine. By harnessing the natural filtration capabilities of sand and gravel, you can achieve remarkable results without relying solely on chemical treatments. This not only promotes a more sustainable approach to pool maintenance but also provides a sense of satisfaction in knowing that you've created a functional and eco-friendly solution for keeping your pool water pristine.
Now, let's gather the necessary materials and dive into the step-by-step process of creating a sand filter for your swimming pool. Get ready to elevate your pool maintenance game and enjoy the benefits of clear, refreshing water, courtesy of your DIY sand filter.
Key Takeaways:
- Creating a DIY sand filter for your swimming pool is a fun and eco-friendly way to keep your pool water clean and clear without relying solely on chemicals. It’s like building your own natural cleaning system for a refreshing swim!
- By using simple materials like sand, gravel, and PVC pipes, you can make a DIY sand filter that reduces the need for excessive backwashing and chemical additives. It’s a sustainable and satisfying way to maintain a sparkling clean pool!
Read more: How Does A Swimming Pool Sand Filter Work
Materials Needed
To embark on this DIY sand filter project, you'll need a few essential materials that are readily available at hardware stores and garden centers. Here's a comprehensive list of the items required to create a functional sand filter for your swimming pool:
-
Container: Select a durable and watertight container to serve as the main housing for the sand filter. A large plastic barrel or a sturdy plastic storage bin with a lid can be suitable choices for this purpose. Ensure that the container has a capacity that aligns with the size of your pool and can accommodate the necessary layers of sand and gravel.
-
Drill and Hole Saw: A drill equipped with a hole saw attachment will be essential for creating the openings in the container for water inlet and outlet pipes. This tool will allow you to achieve precise and uniform holes to facilitate the flow of water through the filter.
-
PVC Pipes and Fittings: Acquire PVC pipes and fittings to construct the water inlet and outlet connections for the sand filter. These components will enable you to establish a reliable and efficient flow of water through the filter system.
-
Pool Pump: You'll need a pool pump to circulate the water through the sand filter. Ensure that the pump is compatible with the size of your pool and capable of providing adequate water flow for effective filtration.
-
Silicone Sealant: A high-quality silicone sealant will be necessary to secure the PVC pipes and fittings in place, preventing any potential leaks and ensuring a watertight seal for the filter system.
-
Sand and Gravel: The primary filtration media for the sand filter will be a layer of fine sand and coarse gravel. These materials will work in tandem to trap and remove impurities from the pool water as it passes through the filter.
-
Filter Screen or Fabric: Consider obtaining a filter screen or fabric to line the interior of the container, providing an additional barrier to prevent the sand and gravel from entering the outlet pipe and the pool pump.
-
Waterproof Tape: Waterproof tape can be useful for reinforcing the connections and ensuring that the PVC pipes and fittings are securely attached to the container.
By gathering these materials, you'll be well-equipped to commence the construction of your DIY sand filter, setting the stage for cleaner and clearer pool water through natural filtration. Now that you have the necessary materials at your disposal, let's proceed to the next steps of preparing the container and assembling the sand filter.
Step 1: Prepare the Container
The first crucial step in creating a sand filter for your swimming pool is to prepare the container that will house the filtration system. This container will serve as the central structure where the layers of sand and gravel, as well as the necessary inlet and outlet connections, will be housed. Here's a detailed guide on how to prepare the container for your DIY sand filter:
Select a Suitable Container
Choose a large plastic barrel or a sturdy plastic storage bin with a lid to serve as the container for the sand filter. Ensure that the container is watertight and has a capacity that aligns with the size of your pool. The container should be able to accommodate the necessary layers of sand and gravel while allowing ample space for the inlet and outlet connections.
Clean and Inspect the Container
Before proceeding with the preparation, thoroughly clean the interior of the container to remove any debris or residues that may compromise the filtration process. Inspect the container for any signs of damage or cracks, ensuring that it is structurally sound and capable of withstanding the water pressure and the weight of the filtration media.
Read more: How To Clean A Swimming Pool Filter
Position the Inlet and Outlet Locations
Determine the optimal positions for the water inlet and outlet on the container. Mark these locations to indicate where the holes will be drilled to accommodate the PVC pipes and fittings. The inlet will allow the pool water to enter the sand filter, while the outlet will facilitate the flow of filtered water back into the pool.
Secure the Container Lid
If the selected container comes with a lid, ensure that it provides a secure and watertight seal. This will prevent any external contaminants from entering the filter system and maintain the integrity of the filtration process. If necessary, use waterproof tape or silicone sealant to reinforce the seal between the container and the lid.
By meticulously preparing the container for the sand filter, you are laying the foundation for a reliable and efficient filtration system. This initial step sets the stage for the subsequent installation of the inlet and outlet connections, as well as the layers of sand and gravel that will form the core of the filtration process. With the container primed and ready, you are now poised to move on to the next phase of drilling holes and establishing the essential components of your DIY sand filter.
Step 2: Drill Holes in the Container
With the container prepared and the inlet and outlet locations marked, the next pivotal step in creating your DIY sand filter is to drill precise holes in the container to accommodate the water inlet and outlet connections. This process requires careful attention to detail and the use of the appropriate tools to ensure that the holes are accurately positioned and seamlessly integrated into the filtration system.
Gather the Necessary Tools
Before commencing the drilling process, gather the essential tools required for this task. You will need a drill equipped with a hole saw attachment that matches the diameter of the PVC pipes used for the water inlet and outlet. Additionally, ensure that you have a steady work surface to support the container during the drilling process, minimizing any potential movement or instability.
Read more: How To Make A Swimming Pool Slide
Mark the Hole Locations
Referencing the previously determined positions for the water inlet and outlet, carefully mark these locations on the exterior of the container. Use a measuring tape and a marker to ensure precision in marking the spots where the holes will be drilled. Double-check the markings to verify that they align with the intended placement of the PVC pipes and fittings.
Drill with Precision
With the container securely positioned on the work surface, use the drill and the appropriate hole saw attachment to begin creating the holes for the water inlet and outlet. Exercise caution and maintain a steady hand to achieve clean and uniform holes that correspond to the marked locations. Apply consistent pressure and allow the hole saw to work through the material, ensuring a smooth and controlled drilling process.
Test the Fit
Once the holes have been drilled, test the fit of the PVC pipes and fittings to ensure that they align seamlessly with the newly created openings. Verify that the connections sit flush against the container and that there are no gaps or irregularities that could compromise the integrity of the filtration system. This step is crucial in confirming that the drilled holes accurately accommodate the water inlet and outlet components.
By meticulously drilling holes in the container to accommodate the water inlet and outlet connections, you are advancing towards the realization of your DIY sand filter. This meticulous process sets the stage for the subsequent assembly of the filtration system, bringing you closer to the efficient and natural filtration of your pool water. With the holes drilled and the connections tested, you are now ready to proceed to the next phase of adding the layers of gravel and sand to complete your DIY sand filter.
Step 3: Add Layers of Gravel and Sand
With the container prepared and the inlet and outlet connections established, the next critical step in creating your DIY sand filter is to add the layers of gravel and sand that will serve as the primary filtration media. This process involves carefully layering the materials within the container to create a cohesive and effective filtration system that can efficiently remove impurities from the pool water.
Layering the Gravel
Begin by adding a layer of coarse gravel to the bottom of the container. This layer serves as the initial barrier for trapping larger debris and preventing the sand from entering the outlet pipe and the pool pump. Ensure that the gravel layer is spread evenly and covers the entire bottom surface of the container, creating a stable foundation for the subsequent layers.
Introducing the Filter Fabric
To further enhance the filtration process, consider placing a filter screen or fabric on top of the gravel layer. This additional barrier helps prevent the finer sand particles from mixing with the gravel and entering the outlet pipe. The filter fabric acts as a safeguard to maintain the integrity of the filtration system and optimize the effectiveness of the sand filter.
Adding the Sand Layer
Carefully pour a layer of fine sand on top of the filter fabric, ensuring even distribution and a uniform thickness across the container. The sand layer acts as the primary filtration medium, capturing smaller particles and impurities as the pool water passes through it. Aim to achieve a consistent and level sand layer to maximize the filtration efficiency of the DIY sand filter.
Establishing the Inlet and Outlet Connections
As you add the layers of gravel and sand, pay close attention to the positioning of the water inlet and outlet connections. Ensure that these components are securely integrated into the layers, allowing for seamless water flow through the filtration media. Verify that the connections are properly aligned and that the layers of gravel and sand support their stability within the container.
Read more: How To Make A Swimming Pool For Dolls
Securing the Layers
Once the layers of gravel and sand have been added, take the time to ensure that they are securely positioned within the container. Gently pat down the layers to minimize any potential shifting or displacement, promoting a stable and consistent filtration environment. This step is essential in optimizing the functionality of the sand filter and maintaining the integrity of the filtration media.
By meticulously adding the layers of gravel and sand to the container, you are advancing towards the completion of your DIY sand filter. This crucial step establishes the core filtration mechanism that will effectively remove impurities from the pool water, resulting in cleaner and healthier swimming conditions. With the layers of gravel and sand in place, you are now poised to proceed to the final steps of connecting the filter to the pool pump and testing the functionality of your DIY sand filter.
Step 4: Connect the Filter to the Pool Pump
Connecting the sand filter to the pool pump is a pivotal step that brings the filtration system to life, enabling the circulation of pool water through the filter for effective purification. This process involves establishing the necessary connections between the outlet of the sand filter and the inlet of the pool pump, ensuring a seamless flow of filtered water back into the pool. Here's a detailed guide on how to connect the filter to the pool pump, culminating in the activation of your DIY sand filter system.
Positioning the Pool Pump
Begin by positioning the pool pump in close proximity to the outlet of the sand filter. Ensure that the pump is stable and securely placed, with ample space for the connection of the PVC pipe from the filter outlet. Positioning the pump strategically facilitates a direct and efficient flow of filtered water back into the pool, optimizing the circulation process.
Connecting the Outlet Pipe
Using PVC pipes and fittings, establish a secure connection between the outlet of the sand filter and the inlet of the pool pump. Measure and cut the PVC pipe to the appropriate length, allowing for a direct and streamlined connection that minimizes bends and obstructions. Apply a high-quality silicone sealant to ensure a watertight and reliable connection, preventing any potential leaks and maintaining the integrity of the filtration system.
Read more: How To Make A Cheap Swimming Pool
Securing the Connections
Once the outlet pipe is connected to the pool pump, verify the stability and alignment of the fittings to guarantee a seamless flow of filtered water. Tighten the connections to eliminate any play or movement, ensuring that the PVC pipe is firmly attached to both the sand filter outlet and the pool pump inlet. This step is crucial in establishing a dependable and efficient link between the filter and the pump.
Testing the Flow
With the connections secured, activate the pool pump to initiate the flow of water through the sand filter. Observe the movement of water through the outlet pipe, confirming that the filtration system is effectively channeling filtered water back into the pool. Monitor the flow rate and ensure that there are no signs of leakage or irregularities in the connection. This testing phase validates the successful integration of the sand filter with the pool pump, marking the culmination of the connection process.
By meticulously connecting the filter to the pool pump, you have effectively integrated the DIY sand filter into your pool's circulation system, enabling the natural filtration of pool water. This seamless connection sets the stage for sustained clarity and purity in your pool, driven by the efficient filtration capabilities of your DIY sand filter. With the filter now connected to the pool pump, you are ready to proceed to the final step of testing the functionality of your DIY sand filter, bringing you closer to enjoying the benefits of pristine and refreshing pool water.
Step 5: Test the Filter
Testing the newly constructed sand filter is a crucial phase that validates its functionality and ensures that it effectively removes impurities from the pool water. This pivotal step allows you to observe the filtration process in action, confirming that the DIY sand filter is capable of delivering cleaner and healthier pool water. Here's a detailed guide on how to test the filter, providing insights into the performance and efficacy of your DIY filtration system.
Initiating the Filtration Process
To commence the testing phase, activate the pool pump to initiate the circulation of pool water through the sand filter. Observe the flow of water as it enters the filter, traverses through the layers of gravel and sand, and returns to the pool in a purified state. Pay close attention to the movement of water through the filter, ensuring that it follows a consistent and uninterrupted path, indicative of a well-functioning filtration system.
Monitoring Filtration Efficiency
As the pool water passes through the sand filter, monitor the clarity and cleanliness of the filtered water. Observe any visible changes in the water quality, such as the removal of debris, sediment, or other impurities. Assess the overall transparency and purity of the filtered water, noting any discernible improvements compared to the untreated pool water. This visual inspection provides valuable insights into the filtration efficiency of the DIY sand filter.
Assessing Flow Rate and Pressure
During the testing process, assess the flow rate and pressure of the filtered water as it returns to the pool. Verify that the pool pump maintains a consistent and adequate flow, indicative of unobstructed filtration. Monitor the pressure within the filter system, ensuring that it remains within the optimal range for efficient filtration. These assessments offer valuable indicators of the filtration system's performance and its ability to maintain a steady flow of purified water.
Verifying System Integrity
Throughout the testing phase, verify the integrity of the sand filter system, paying attention to potential leaks, irregularities, or malfunctions. Inspect the connections, including the inlet and outlet pipes, to ensure that they remain secure and watertight. Confirm that the layers of gravel and sand are effectively contained within the filter, preventing any bypass of unfiltered water. This comprehensive verification process ensures the reliability and functionality of the DIY sand filter.
By meticulously testing the filter, you gain valuable insights into its performance and effectiveness in purifying pool water. This critical phase allows you to validate the successful implementation of your DIY sand filter, affirming its capability to maintain pristine and refreshing pool water. With the filter successfully tested and proven to deliver exceptional filtration results, you can look forward to enjoying a cleaner and healthier swimming experience, courtesy of your DIY sand filter.
Conclusion
In conclusion, the journey of creating a DIY sand filter for your swimming pool culminates in a rewarding and sustainable solution for maintaining clean and refreshing pool water. By embarking on this project, you have embraced a practical and eco-friendly approach to pool maintenance, harnessing the natural filtration capabilities of sand and gravel to achieve remarkable results.
Through meticulous preparation of the container, precise drilling of holes, and the strategic layering of gravel and sand, you have constructed a functional and efficient sand filter that is poised to elevate the quality of your pool water. The seamless connection of the filter to the pool pump and the comprehensive testing of its functionality have validated its capability to purify pool water, setting the stage for a rejuvenating and enjoyable swimming experience.
The DIY sand filter represents more than just a filtration system; it embodies a commitment to sustainability and self-sufficiency in pool maintenance. By reducing reliance on chemical treatments and embracing a natural filtration approach, you have not only achieved cleaner pool water but also contributed to a more environmentally conscious pool maintenance routine.
As you witness the tangible results of your DIY sand filter in action – the removal of debris, the clarity of the filtered water, and the sustained purity of your pool – you can take pride in the ingenuity and effectiveness of your creation. This DIY project empowers you to take control of your pool maintenance, fostering a sense of accomplishment and connection to the natural processes that sustain a clean and inviting swimming environment.
Moving forward, the DIY sand filter stands as a testament to your dedication to sustainable and effective pool maintenance. By integrating this natural filtration system into your pool care routine, you are not only enhancing the quality of your swimming experience but also contributing to a more eco-conscious approach to pool ownership.
In the end, the DIY sand filter represents a harmonious blend of ingenuity, sustainability, and practicality, offering a compelling alternative to traditional pool maintenance methods. As you bask in the clarity and purity of your pool water, remember that your DIY sand filter is a testament to your commitment to a cleaner, healthier, and more sustainable swimming experience.
Frequently Asked Questions about How To Make A Sand Filter For A Swimming Pool
Was this page helpful?
At Storables.com, we guarantee accurate and reliable information. Our content, validated by Expert Board Contributors, is crafted following stringent Editorial Policies. We're committed to providing you with well-researched, expert-backed insights for all your informational needs.


0 thoughts on “How To Make A Sand Filter For A Swimming Pool”