Home>Ideas and Tips>DIY Guide To Installing A Kitchen Under-Sink Water Filtration System
Ideas and Tips
DIY Guide To Installing A Kitchen Under-Sink Water Filtration System
Modified: November 2, 2024
Learn how to install a kitchen under-sink water filtration system with our step-by-step DIY guide. Improve water quality and save space effortlessly.
(Many of the links in this article redirect to a specific reviewed product. Your purchase of these products through affiliate links helps to generate commission for Storables.com, at no extra cost. Learn more)
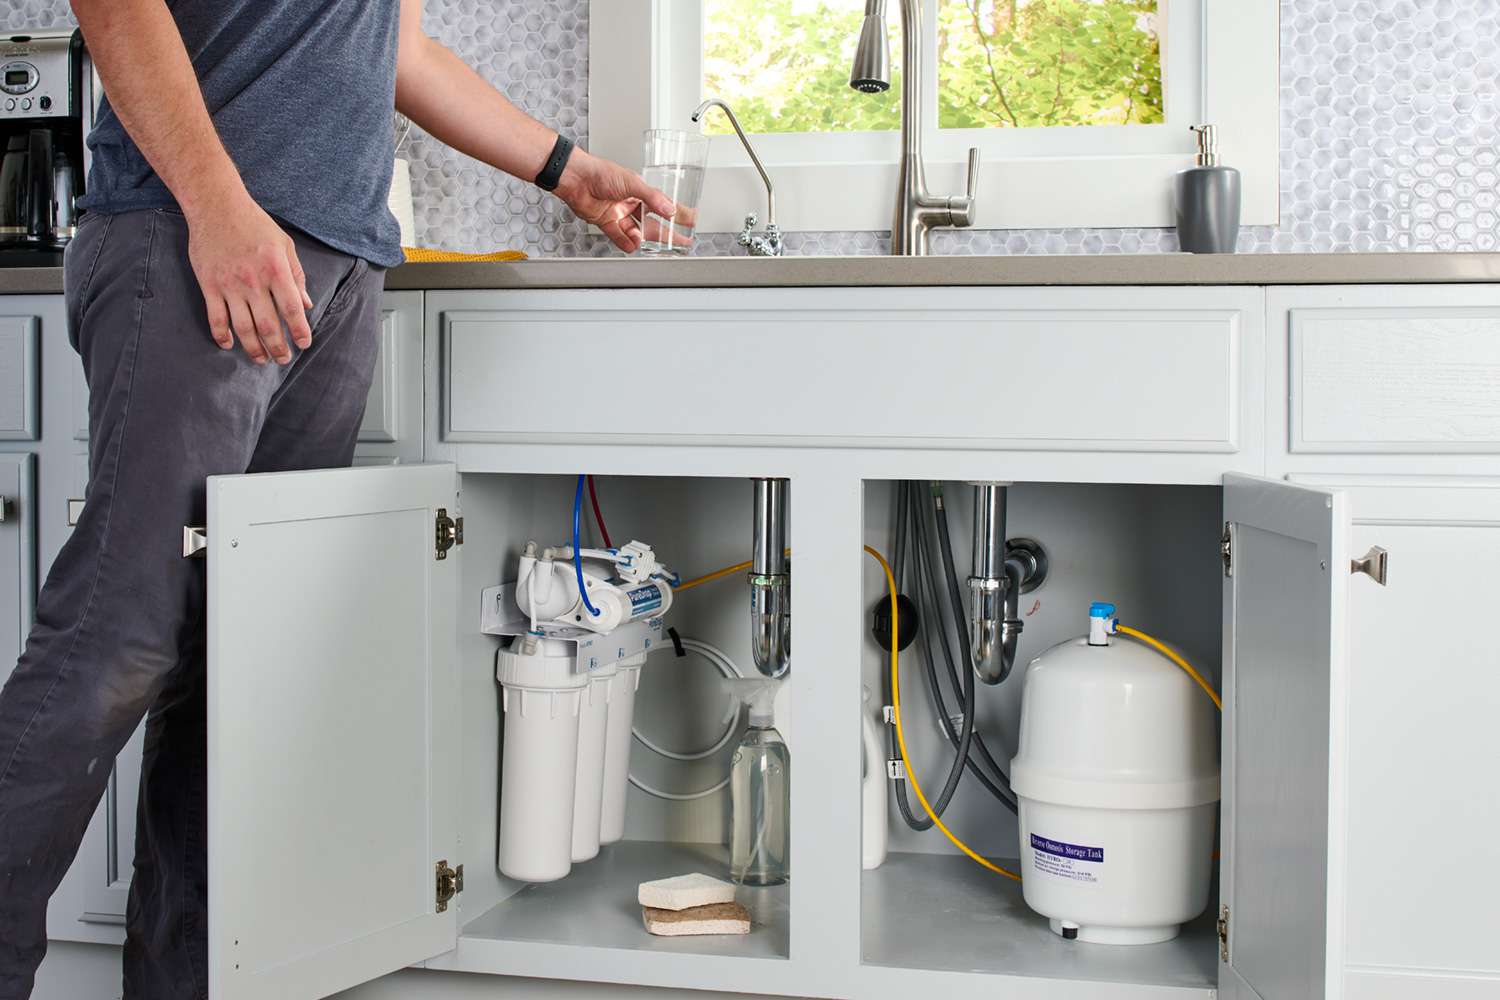
Installing an under-sink water filtration system in your kitchen is a straightforward DIY project that can significantly improve the quality of your drinking water. These systems are designed to remove a wide range of contaminants, including chlorine, lead, pesticides, and pharmaceuticals, ensuring that your water tastes better and is safer to drink. In this guide, we will walk you through the step-by-step process of installing an under-sink water filter, highlighting the tools and materials needed, the benefits of these systems, and providing detailed instructions for a successful installation.
Benefits of Under-Sink Water Filters
Under-sink water filters offer several advantages over other water filtration methods:
Convenience
These filters provide clean water on demand without the need for frequent refilling. Unlike pitcher filters, which require constant replenishment, under-sink filters offer continuous filtration without interruption.
Cost-Effective
While the initial investment in an under-sink filter may seem expensive, these systems last longer and require less frequent cartridge replacements compared to pitcher filters. This makes them a cost-effective option in the long run.
Improved Water Quality
Under-sink water filters are highly effective at removing a wide range of contaminants from your drinking water. They can remove chlorine, lead, pesticides, pharmaceuticals, and other impurities that might be present in your tap water.
Space-Saving Design
One of the most appealing aspects of under-sink water filters is their space-saving design. These systems are hidden from view, preserving your kitchen’s aesthetics and keeping your countertops clutter-free.
Choosing the Right Under-Sink Water Filter
Selecting the right under-sink water filter is crucial to ensure that it meets your specific needs and effectively removes the contaminants present in your water supply. Here are some key factors to consider when choosing an under-sink water filter:
Contaminant Removal
Make sure the filter you choose removes the specific contaminants that are in your water supply. Test your water to know for certain what’s in your system and select a filter that is designed to address those contaminants.
Filter Lifespan
Consider how frequently you’ll need to replace filters and what the associated costs will be. Filters that last longer may end up saving you money in the long run.
Filtration Technology
Choose a system that uses advanced filtration methods, such as activated carbon or reverse osmosis. These technologies are highly effective at removing a wide range of contaminants.
Flow Rate
Select a system that provides an adequate flow of filtered water. A low flow rate can be frustrating, especially during peak usage times.
Installation Requirements
Some systems may require professional installation, while others are suitable for do-it-yourself installation. Consider your level of comfort with DIY projects and choose a system accordingly.
Tools and Materials Needed
Before you begin the installation process, gather all the necessary tools and materials. Here’s a comprehensive list:
- Water Filter Kit: Ensure it includes the filter housing, cartridges, and tubing.
- Adjustable Wrench: Useful for loosening and tightening nuts.
- Teflon Tape: Ensures a tight seal on threaded connections.
- Drill: For making any necessary holes.
- Bucket: To catch any water that might spill during installation.
- Screwdriver: For securing brackets and other parts.
- Scissors or Cutters: To trim tubing as needed.
Step-by-Step Installation Guide
Read more: DIY Guide To Installing A Farmhouse Sink
1. Shut Off the Cold Water Supply
Locate the shutoff valve under the sink and turn it clockwise to stop the water flow. This prevents any leaks while you work.
2. Relieve Pressure
Open the cold water faucet to release any remaining pressure inside the line. This step is crucial to avoid any sudden water bursts during installation.
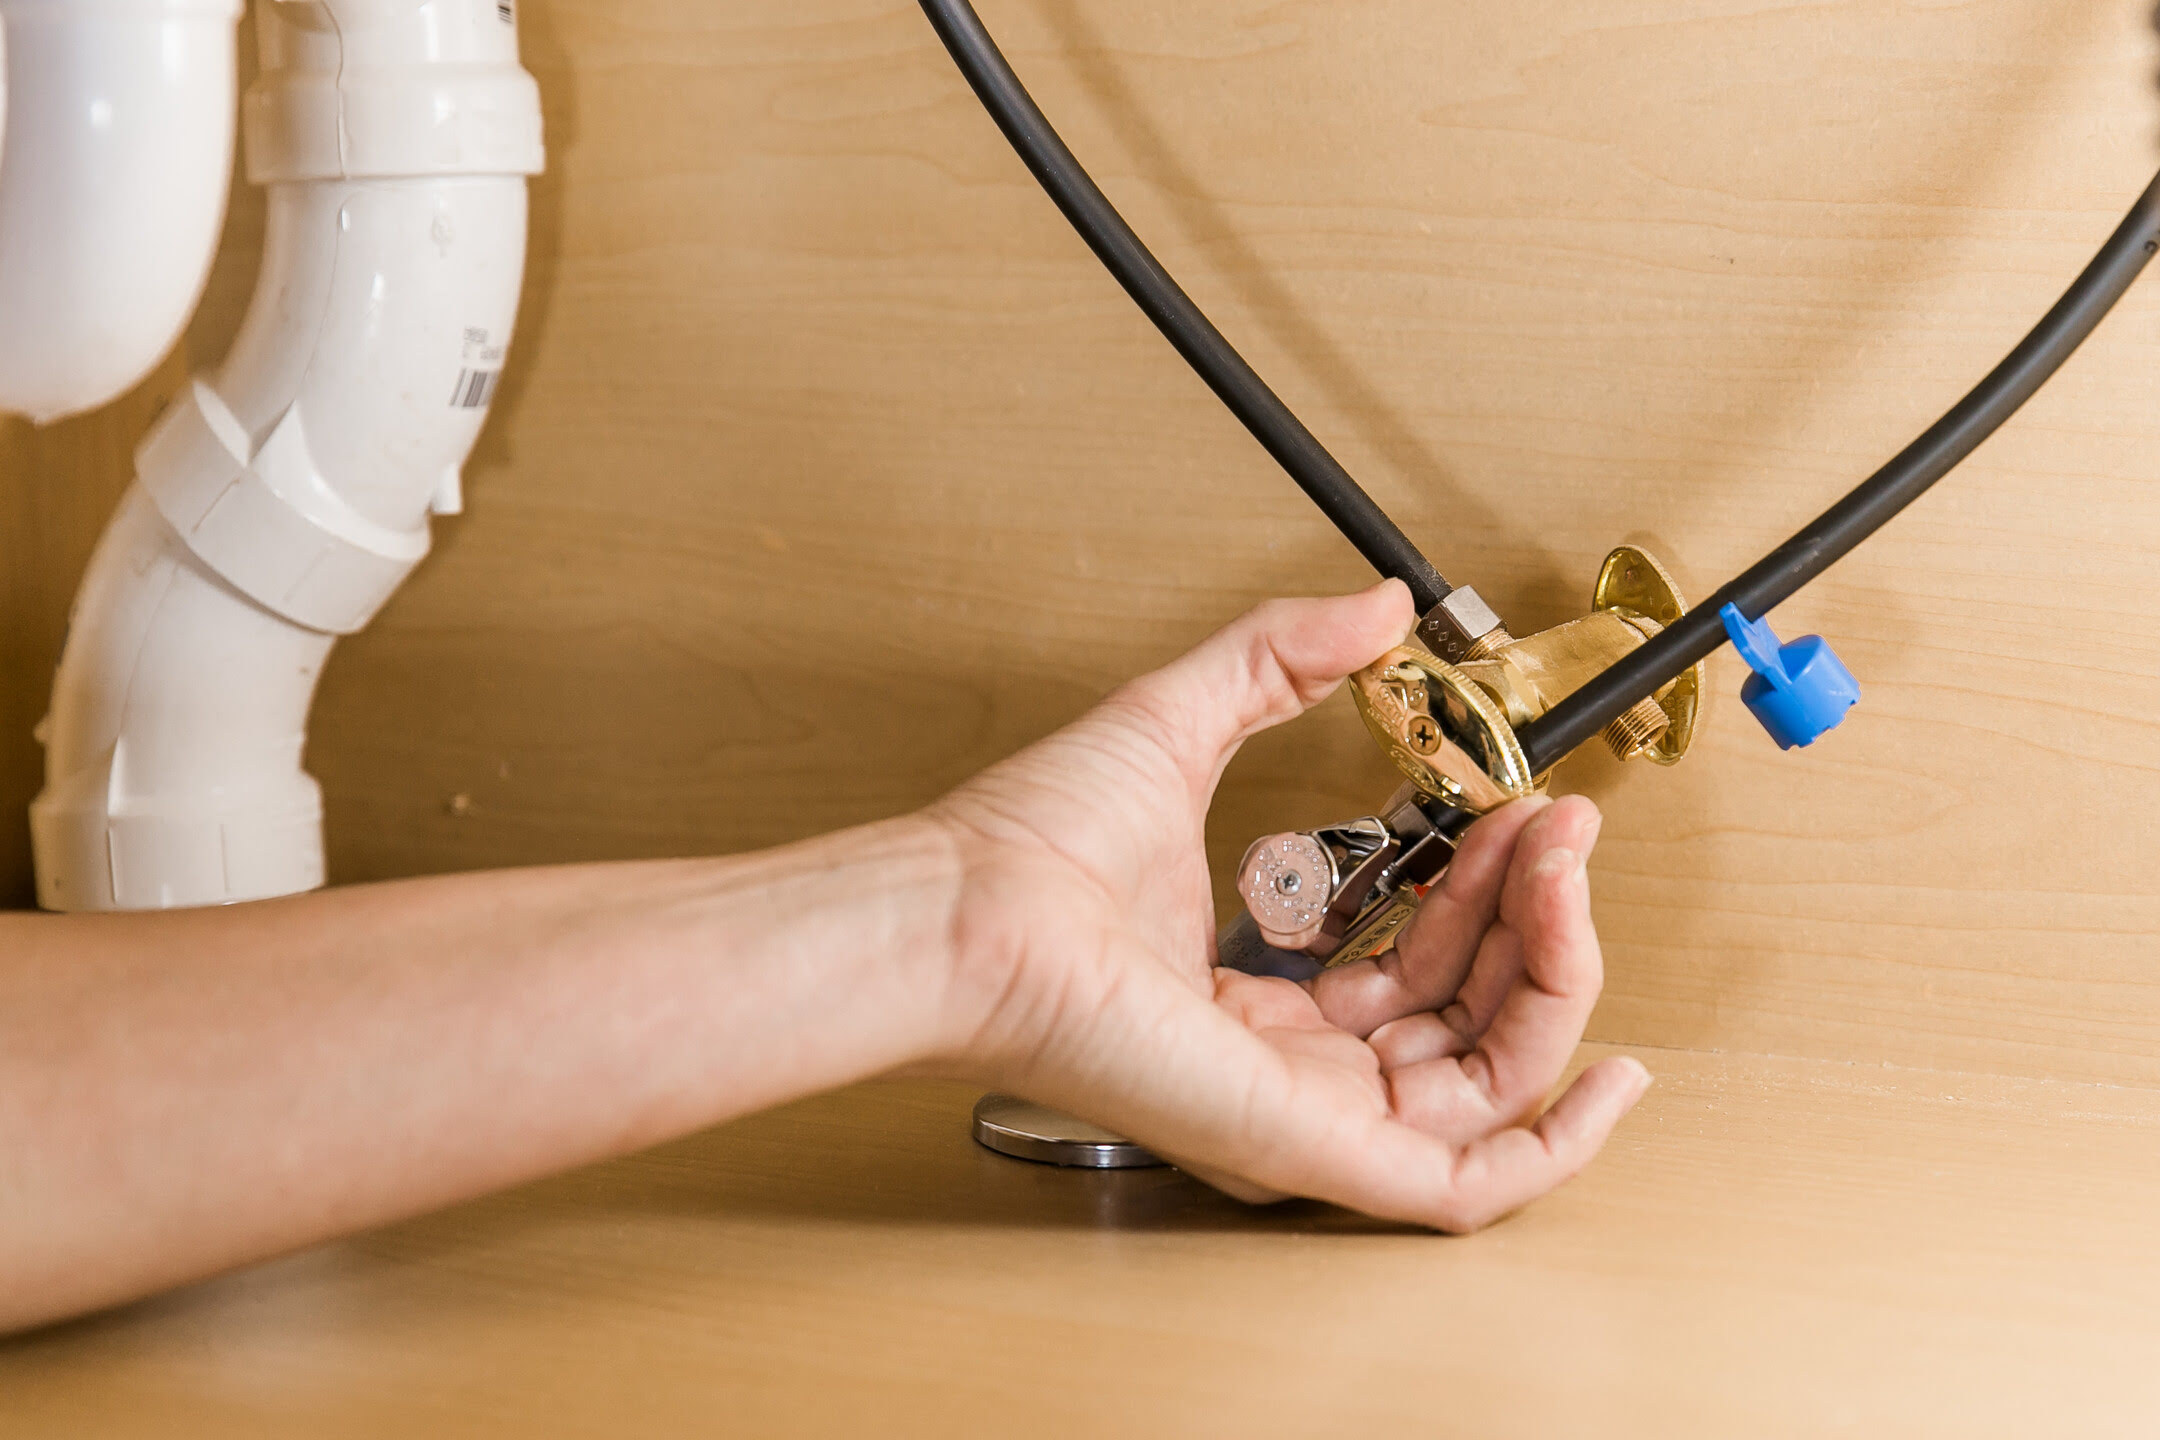
3. Disconnect the Cold Water Line
Use an adjustable wrench to loosen the nuts on the cold water tubing. Once loose, carefully remove the tubing from the shutoff valve. Have a bucket ready to catch any residual water.
4. Install the Filter Adapter
Wrap Teflon tape around the threads of the T-adapter. Screw the T-adapter onto the cold water line and tighten it with your wrench. Ensure it’s snug but don’t overtighten.
5. Connect the Filter Tubing
Attach the filter’s tubing to the T-adapter and the shut-off valve. Make sure the connections are tight but not overly tightened to ensure proper water flow.
6. Install the Faucet (if applicable)
If your filter comes with a separate faucet for filtered water, drill a hole in your countertop or use an existing hole. Secure the faucet in place with the provided hardware and connect the filter tubing to the faucet base.
7. Mount the Filter Unit
Mount the filter unit to the cabinet wall using the provided bracket and screws. Ensure it’s easily accessible for future filter changes and securely fastened.
8. Connect to Plumbing
Now, let’s connect the filter unit to your plumbing system:
- Identify the inflow and outflow ports on the filter.
- Attach the faucet’s tubing to the outflow port.
- Connect the cold water feed line to the inflow port.
Make sure all connections are secure to prevent leaks.
9. Turn On the Water Supply
Slowly turn the cold water valve back on to restore the water supply. Open the filter’s shut-off valve to let water flow into the unit. Check all connections for leaks and tighten if necessary.
10. Flush the Filter
Finally, flush the filter to remove any debris and activate the filter media. Run cold water through the filter for several minutes, collecting it in a bucket. This step is crucial to ensure your water is clean and safe to drink from the start.
Tips for a Smooth Installation
Read the Manual
Always start by reading the installation manual that comes with your filter. It provides specific instructions and tips tailored to your particular system.
Double-Check Connections
Ensure all connections are tight but not overtightened. A loose connection can lead to leaks and compromise the effectiveness of your filtration system.
Use Proper Tools
Using the right tools can make a significant difference in the ease of installation. An adjustable wrench and Teflon tape are essential for creating watertight seals.
Be Patient
Installing an under-sink water filter requires patience, especially when dealing with plumbing connections. Take your time to ensure everything is leak-free before turning on the water supply.
Maintenance and Filter Replacement
Regular maintenance and filter replacement are crucial to keep your under-sink water filtration system functioning optimally. Here are some tips:
Regular Maintenance
- Check the filter regularly for signs of wear or clogging.
- Clean the filter housing periodically to prevent buildup.
- Monitor the flow rate to ensure it remains consistent.
Filter Replacement
- Replace filters as recommended by the manufacturer.
- Test your water quality after replacing the filter to ensure it’s effective.
Common Issues and Troubleshooting
While installing an under-sink water filter is generally straightforward, you may encounter some common issues during or after installation. Here are some tips for troubleshooting:
Leaks
If you notice any leaks during or after installation, turn off the water supply immediately and tighten any loose connections. Use plumber’s tape if necessary to create a watertight seal.
Low Flow Rate
If the flow rate seems low, check if the filter is clogged or if there are any kinks in the tubing. Replace the filter if necessary and ensure all connections are secure.
Filter Not Activating
If the filter is not activating, check if the power source (if applicable) is turned on. Also, ensure that the filter housing is properly secured and that there are no blockages in the tubing.
Conclusion
Installing an under-sink water filtration system is a worthwhile DIY project that can significantly improve the quality of your drinking water. By following these steps and tips, you can ensure a smooth installation process and enjoy clean, safe drinking water from your tap. Remember to regularly maintain and replace filters to keep your system functioning optimally. With the right tools and a bit of patience, you can have fresh, filtered water flowing straight from your tap in no time.
By following this comprehensive guide, homeowners can confidently install an under-sink water filtration system in their kitchens, ensuring they have access to clean and safe drinking water at all times.
Was this page helpful?
At Storables.com, we guarantee accurate and reliable information. Our content, validated by Expert Board Contributors, is crafted following stringent Editorial Policies. We're committed to providing you with well-researched, expert-backed insights for all your informational needs.
0 thoughts on “DIY Guide To Installing A Kitchen Under-Sink Water Filtration System”