Home>Interior Design>How To Paint A Stairwell: Expert Advice For Painting Your Home’s Tallest Space
Interior Design
How To Paint A Stairwell: Expert Advice For Painting Your Home’s Tallest Space
Modified: August 28, 2024
Looking to give your stairwell a fresh new look? Get expert advice on interior design for painting your home's tallest space.
(Many of the links in this article redirect to a specific reviewed product. Your purchase of these products through affiliate links helps to generate commission for Storables.com, at no extra cost. Learn more)
Introduction
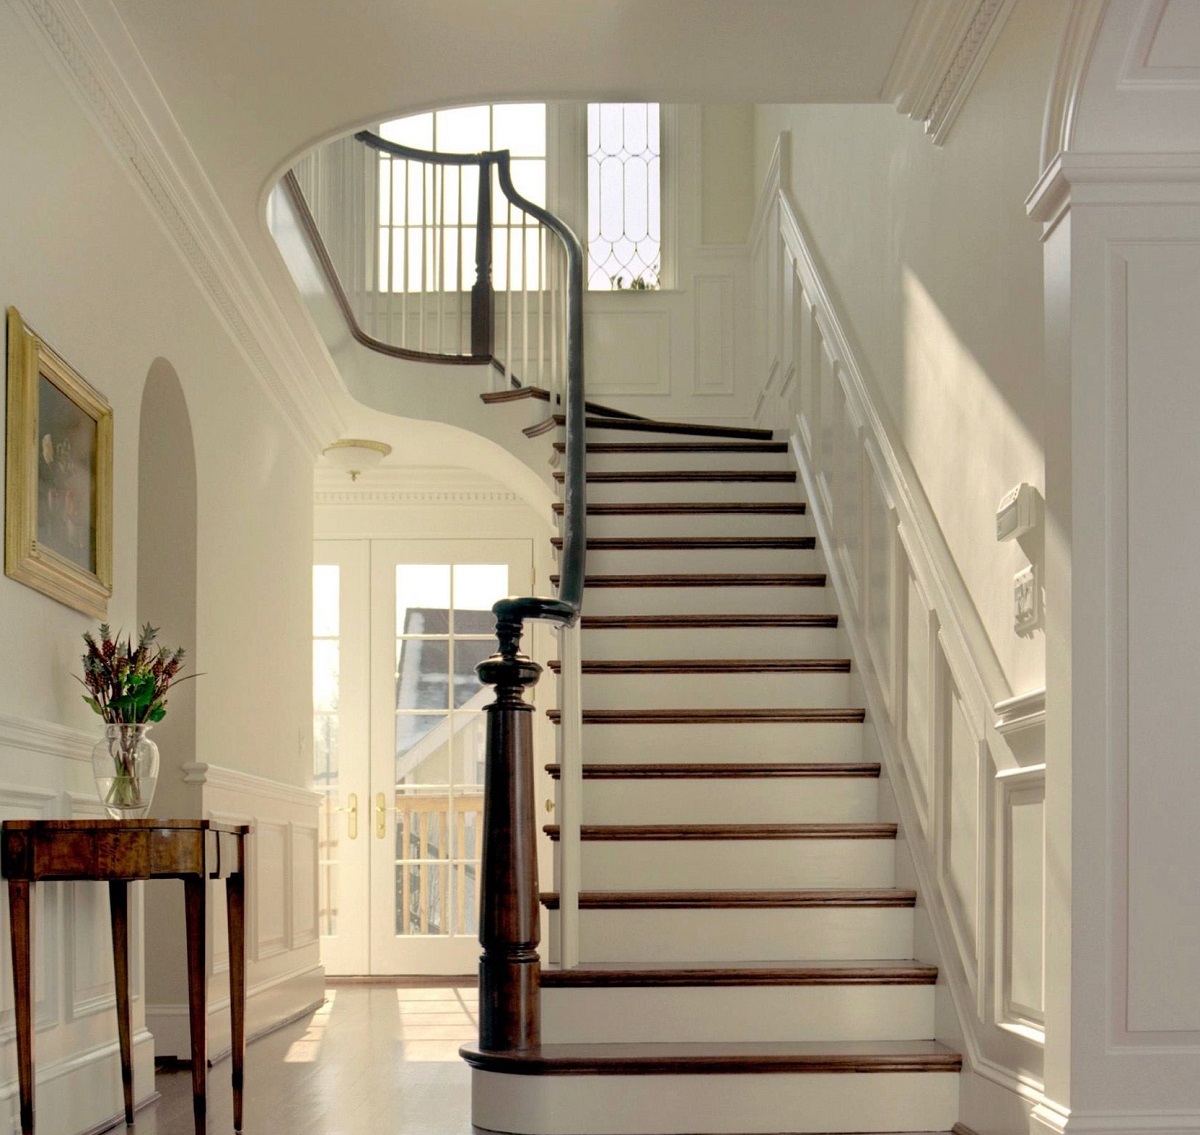
Welcome to our comprehensive guide on how to paint a stairwell. The stairwell in your home is not only a functional space but also an opportunity to showcase your personal style. Painting your stairwell can breathe new life into the area and make a significant impact on the overall aesthetic of your home. However, painting a stairwell can be a challenging task due to the height and confined space. With the right tools, materials, and techniques, you can transform your stairwell into a stunning feature.
In this article, we will provide you with expert advice on how to paint your home’s tallest space effectively. From selecting the right tools and materials to preparing the stairwell for painting, we will guide you through each step of the process. We will also share tips for painting high stairwells, applying the paint evenly, and achieving a professional-looking finish. So, let’s get started and turn your stairwell into a masterpiece!
Key Takeaways:
- Transform your stairwell into a stunning feature by following expert advice on selecting tools, preparing surfaces, and applying paint. Embrace the process and enjoy the creative journey!
- Achieve a professional-looking finish in your home’s tallest space with safety as a top priority. From priming to cleanup, take your time and revel in the beauty of your freshly painted stairwell.
Read more: How To Fix E2 Error In A Washing Machine
Selecting the Right Tools and Materials
Before you start painting your stairwell, it’s essential to gather the right tools and materials to ensure a smooth and efficient process. Here are some key items you will need:
- Paint: Choose a high-quality paint that is designed for walls and trim. Consider the color and finish that you desire for your stairwell. Opt for a durable and washable paint that will withstand frequent traffic.
- Primer: If you are painting over a dark or heavily stained surface, it is advisable to use a primer to create a smooth base for the topcoat. Primer also helps with adhesion and enhances the longevity of the paint.
- Brushes and Rollers: Select brushes and rollers appropriate for your chosen paint and the size of the area being painted. Use a brush with angled bristles for cutting in along edges and corners, and a roller with a long handle for reaching higher areas.
- Extension Pole: An extension pole will allow you to reach high areas of the stairwell without the need for a ladder. Look for one that is adjustable and compatible with your roller or paintbrush.
- Paint Tray and Liners: Pour your paint into a paint tray and use liners to make cleanup easier. This will also allow you to switch between different colors if desired.
- Drop Cloths and Plastic Sheets: Protect your floors and any furniture in the vicinity of the stairwell with drop cloths or plastic sheets. This will prevent paint splatters and spills from causing any damage.
- Sanding Supplies: If there are imperfections on the walls or woodwork, you may need sandpaper or a sanding block to smooth them out before painting.
- Cleaners and Repair Products: Ensure you have suitable cleaners to remove dirt, dust, and any existing paint peeling. Additionally, have wood fillers, caulking, and spackle to repair any cracks or holes in the surfaces.
- Protective Gear: Always wear protective gear such as goggles, gloves, and a dust mask when working with paint and chemicals.
By gathering these tools and materials, you will be well-equipped to proceed with the next steps of preparing and painting your stairwell. Now that you have everything you need let’s move on to the preparations required.
Preparing the Stairwell for Painting
Proper preparation is key to achieving a flawless paint job in your stairwell. Follow these steps to ensure your surfaces are ready for painting:
- Clear the Area: Remove any furniture, wall decor, and personal belongings from the stairwell. This will give you ample space to work and protect your items from paint splatters.
- Cover and Protect: Use drop cloths or plastic sheets to cover the floor and stairs. Secure them in place with tape to prevent any accidental paint drips or spills from damaging your surfaces.
- Clean the Surfaces: Thoroughly clean the walls, woodwork, and any other surfaces you plan to paint. Use a mild detergent and water solution to remove dirt, grease, and grime. For tougher stains, you may need to use a stronger cleaning agent.
- Repair Imperfections: Inspect the surfaces for any cracks, holes, or dents. Fill them with a suitable filler or spackle, and allow it to dry completely. Once dry, use sandpaper or a sanding block to smooth out the patched areas.
- Sand the Surfaces: If the existing paint is glossy or has a rough texture, sanding the surfaces will help create a more adhesive surface. Use a medium-grit sandpaper to lightly sand the walls and woodwork. Remember to wipe away any dust with a clean cloth before proceeding.
- Remove Hardware: If there are any light fixtures, switch plates, or outlet covers on the walls, remove them before painting. This will make it easier to paint around them and ensure a neat finish.
- Mask Off Edges and Trim: Use painter’s tape to mask off edges, trim, and any areas where you don’t want paint to get on. This will create clean lines and prevent paint bleeding onto adjacent surfaces.
By taking the time to properly prepare the stairwell, you are setting the foundation for a successful painting project. Once the surfaces are clean, repaired, and adequately protected, you are ready to prime the walls and woodwork.
Prime the Surfaces
Priming the surfaces before painting is an important step that helps improve paint adhesion, coverage, and durability. Here’s how to prime the walls and woodwork in your stairwell:
- Select the Right Primer: Choose a primer that is specifically formulated for the surface you are working on. For bare drywall or wood, a general-purpose primer will suffice. However, if you are covering stains or discolorations, consider using a stain-blocking primer.
- Prepare the Primer: Follow the manufacturer’s instructions on how to prepare the primer. Stir it well and pour it into a paint tray. If necessary, thin the primer with water or a suitable thinning agent.
- Cut In: Start by cutting in along the edges and corners of the walls and woodwork using a brush. This will create a clean transition between the primer and the existing surfaces.
- Roll the Surfaces: Use a roller with a suitable nap to apply the primer to the larger surfaces. Work in small sections, applying an even coat using vertical or horizontal strokes. Avoid excess roller pressure, which can cause streaks or drips.
- Allow the Primer to Dry: Follow the drying time specified on the primer label. Keep in mind that some primers may require multiple coats or longer drying times. Ensure the primer is completely dry before proceeding to the next step.
- Inspect and Touch Up: After the primer has dried, inspect the surfaces for any missed spots or uneven coverage. Use a brush or roller to touch up these areas with additional primer as needed.
Priming the surfaces not only improves paint adhesion and durability but also helps with color opacity. If you are painting over a dark or vibrant color, priming can help achieve better coverage and reduce the number of topcoat layers needed. Once the primer is dry and any touch-ups are complete, you are ready to tackle the actual painting of the stairwell.
When painting a stairwell, start at the top and work your way down to avoid stepping on wet paint. Use a sturdy ladder and take breaks to avoid fatigue.
Tips for Painting High Stairwells
Painting a high stairwell can be a challenging task due to the height and limited space. However, with some helpful tips and techniques, you can make the process easier and achieve professional results. Here are some tips to keep in mind:
- Safety First: Always prioritize safety when working at heights. Use a sturdy ladder or an adjustable extension pole with a secure grip. Ensure the ladder or pole is placed on a stable surface and never overreach while painting.
- Use an Extension Pole: An adjustable extension pole is a valuable tool when painting a high stairwell. It allows you to reach high areas without the need for a ladder. Attach your roller or brush to the extension pole for maximum reach and control.
- Work from Top to Bottom: Start painting from the top of the stairwell and work your way down. This will prevent any accidental drips or streaks from marring the already painted sections below.
- Use Controlled Movements: To avoid splattering and achieve an even coat, use controlled movements when painting. Roll or brush in smooth, overlapping strokes. Take your time and have patience to ensure proper coverage.
- Paint in Small Sections: Break down the stairwell into smaller, manageable sections. This will help you maintain control and achieve a consistent finish. Work on one section at a time, ensuring each section is fully painted before moving on.
- Proper Lighting: Adequate lighting is crucial when painting high stairwells. Use natural light or place additional lighting sources to ensure you can see the surfaces clearly. This will help you identify any missed spots or imperfections.
- Take Breaks and Rest: Painting a stairwell can be physically demanding, especially when working at heights. Take regular breaks to rest and recharge. This will help you maintain focus and prevent any potential accidents or mistakes caused by fatigue.
- Keep a Wet Edge: When using paint that dries quickly, it’s essential to keep a wet edge while painting. This means overlapping each stroke with the previous one while the paint is still wet to avoid visible lines or marks.
- Use Floor Protection: Place additional drop cloths or plastic sheets on the stairs underneath the area you are painting. This will catch any accidental paint drips and protect the steps from getting damaged.
By following these tips, you can navigate the challenges of painting a high stairwell with confidence and precision. Remember to work carefully and take your time to ensure a beautiful and professional-looking finish. Now, let’s move on to the next step: applying the paint.
Applying the Paint
Now that the surfaces are prepped and primed, it’s time to apply the paint to your stairwell. Follow these steps to ensure a smooth and even application:
- Stir the Paint: Before you begin, thoroughly stir your paint to ensure consistent color and texture. Use a paint stirrer or a wooden stick to mix the paint well.
- Cutting In: Start by cutting in along the edges and corners of the walls and woodwork using a brush. This will create clean lines and provide a neat transition between the painted surfaces and adjacent areas. Take your time and be precise in your brushwork.
- Rolling the Walls: Once you have cut in, use a roller to apply paint to the larger surfaces. Dip the roller into the paint tray, making sure to evenly distribute the paint on the roller. Roll the paint onto the walls using smooth, overlapping strokes. Work in small sections, being careful to blend the wet edges for a seamless finish.
- Blend the Sections: As you work your way down the stairwell, ensure that each section of paint is well-blended into the previous one. This will help create a uniform and professional look without any visible lines.
- Roll the Woodwork: If your stairwell has any woodwork, such as banisters or handrails, use a smaller brush or roller to apply paint to these areas. Take care to cover all surfaces evenly and be mindful of any intricate details or designs.
- Apply Multiple Coats: Depending on the color and coverage desired, you may need to apply multiple coats of paint. Follow the manufacturer’s instructions for drying times between coats. Be sure to allow each coat to dry thoroughly before applying the next layer.
- Inspect and Touch Up: Once you have completed the painting process, carefully inspect the stairwell for any missed spots, drips, or imperfections. Use a small brush or roller to touch up these areas as needed. Pay attention to corners, edges, and any intricate details where paint may not have reached.
Take your time with the painting process, ensuring each coat is applied evenly and allowed to dry properly. By following these steps, you can achieve a beautiful and flawless finish in your stairwell. Once the final coat is dry and any touch-ups are complete, it’s time to clean up and add those finishing touches.
Cleaning Up and Finishing Touches
As you near the completion of your stairwell painting project, it’s important to properly clean up and add the finishing touches. Follow these steps to ensure a seamless and polished finish:
- Clean Your Tools: After you have finished painting, immediately clean your brushes, rollers, and any other equipment you used. Follow the instructions on the paint can for the appropriate cleaning method. Properly cleaning your tools will help extend their lifespan and ensure they are ready for future use.
- Remove Painter’s Tape: Once the paint is dry, carefully remove the painter’s tape from the edges and trim. Slowly peel it away at a 45-degree angle to avoid any paint peeling. Check for any paint bleeding and use a small brush to touch up any areas if needed.
- Dispose of Paint Waste: If you have any leftover paint or empty cans, dispose of them properly according to your local regulations. You can consult your local waste management guidelines for the correct disposal methods.
- Inspect and Clean the Area: Take a moment to inspect the stairwell for any remaining paint splatters or marks. Use a damp cloth or sponge to gently wipe away any smudges or drips. Be careful not to scrub too hard and damage the freshly painted surfaces.
- Reinstall Hardware: Once the paint has dried completely, reattach any light fixtures, switch plates, or outlet covers that were removed during the painting process. Ensure they are securely in place and straightened.
- Replace Furniture and Decor: Once the stairwell is cleaned and dried, you can put back any furniture or wall decor that was removed. Take this opportunity to rearrange or add new elements to enhance the overall aesthetic of the space.
- Enjoy Your Painted Stairwell: Step back and admire your beautifully painted stairwell. Take pride in your hard work and enjoy the transformed space. A freshly painted stairwell can make a significant impact on the overall ambiance and style of your home.
By following these cleanup and finishing steps, you can ensure a professional and polished look for your newly painted stairwell. Take your time during this stage to address any remaining details and leave the space looking its best. Now, step back and revel in the beauty of your freshly painted stairwell!
Conclusion
Painting a stairwell may seem like a daunting task, but with the right tools, materials, and techniques, it can transform your home’s tallest space into a stunning feature. By following the expert advice provided in this comprehensive guide, you can achieve a professional-looking finish and breathe new life into your stairwell.
From selecting the right tools and materials to preparing the surfaces, priming, and applying the paint, each step plays a crucial role in ensuring a successful painting project. By investing time in proper preparation and using techniques tailored for high stairwells, you’ll be able to navigate the challenges and achieve impressive results.
Remember, safety should always be a top priority when working at heights. Make sure to use secure ladders or adjustable extension poles, and take breaks when necessary to prevent fatigue. Additionally, take the time to properly clean up and add those finishing touches to ensure a seamless and polished finish.
With a freshly painted stairwell, you can enhance the overall aesthetic of your home and add a touch of your personal style. Whether you choose a bold and vibrant color or a timeless and neutral tone, the renewed space will surely impress guests and make you proud of your accomplishment.
Now that you have the knowledge and guidance on how to paint a stairwell, it’s time to get started. Embrace your creativity, enjoy the process, and bring your vision to life. Happy painting!
Frequently Asked Questions about How To Paint A Stairwell: Expert Advice For Painting Your Home’s Tallest Space
Was this page helpful?
At Storables.com, we guarantee accurate and reliable information. Our content, validated by Expert Board Contributors, is crafted following stringent Editorial Policies. We're committed to providing you with well-researched, expert-backed insights for all your informational needs.


0 thoughts on “How To Paint A Stairwell: Expert Advice For Painting Your Home’s Tallest Space”