Home>Renovation & DIY>Tools & Equipment>How Do You Check An Alternator With A Screwdriver?
Tools & Equipment
How Do You Check An Alternator With A Screwdriver?
Published: December 20, 2023
Learn how to check an alternator with a screwdriver using the right tools and equipment. Ensure the effectiveness of your car's charging system easily and quickly.
(Many of the links in this article redirect to a specific reviewed product. Your purchase of these products through affiliate links helps to generate commission for Storables.com, at no extra cost. Learn more)
Introduction
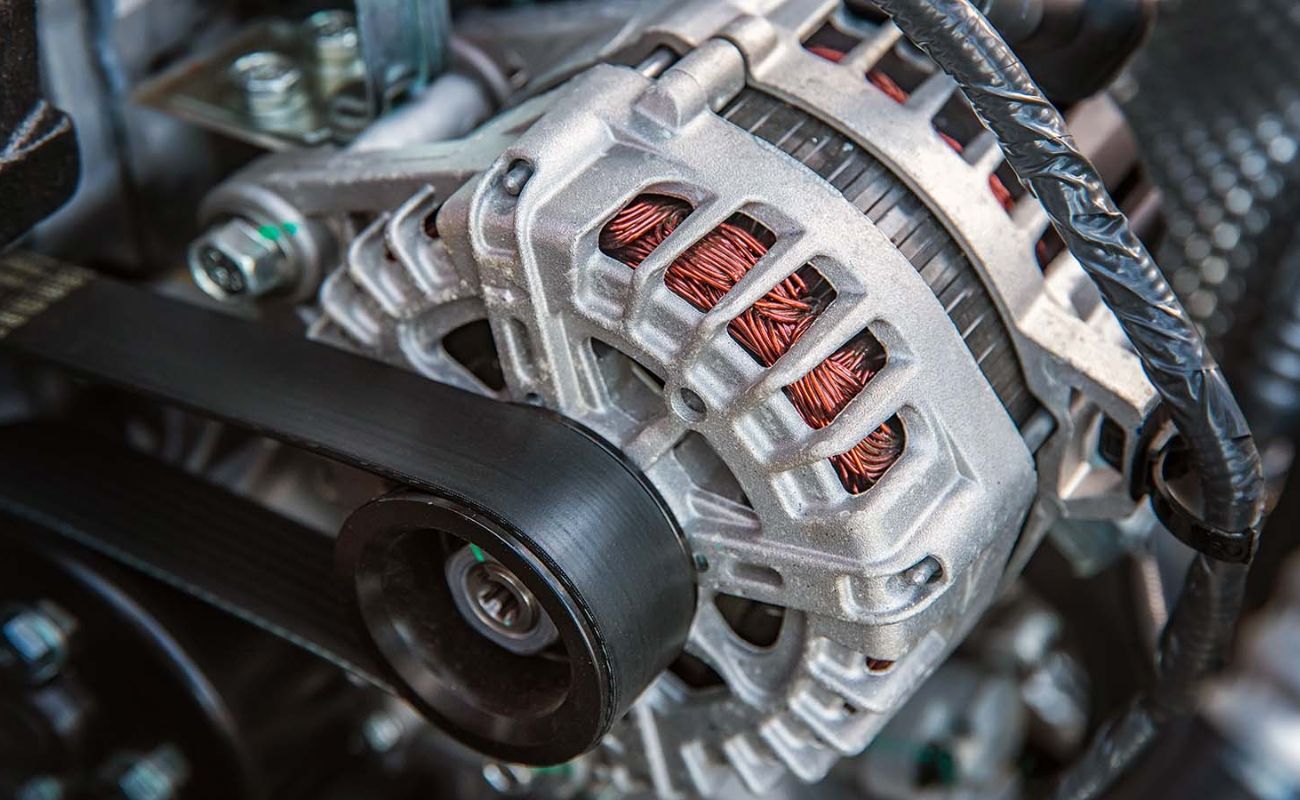
Welcome to our comprehensive guide on how to check an alternator with a screwdriver. The alternator is a critical component in your vehicle’s charging system, supplying power to the battery and electrical system while the engine is running. Over time, alternators can wear out, resulting in issues such as a dead battery or a malfunctioning electrical system.
While there are various methods to test an alternator, one popular technique is using a simple tool that you may already have on hand – a screwdriver. This method is quick, easy, and can provide valuable insights into the health of your alternator. However, it is important to note that this test is not foolproof and may not diagnose all alternator problems. If you suspect a major issue or if your vehicle is experiencing consistent charging problems, it is always recommended to consult with a professional mechanic.
In this guide, we will walk you through the step-by-step process of checking your alternator with a screwdriver. We will also cover the safety precautions you should take and explain how to interpret the results. So, let’s dive in and learn how to diagnose your alternator’s health with just a screwdriver.
Key Takeaways:
- Use a screwdriver to check your alternator’s health, but remember it’s not foolproof. Always prioritize safety and consider professional help for accurate diagnosis and repairs.
- The screwdriver test can indicate alternator functionality, but confirm with a voltmeter and load testing. Regular maintenance and early detection are crucial for a reliable alternator.
Read more: How To Check For Spark With A Screwdriver
Tools and Materials Required
Before getting started, it’s important to gather the necessary tools and materials for checking your alternator with a screwdriver. Here’s what you’ll need:
- Screwdriver: You will need a flathead screwdriver to perform the test. Make sure it is in good condition and the handle provides a comfortable grip.
- Protective Gear: It’s always a good idea to wear safety goggles and gloves to protect yourself from any potential hazards.
- Pen and Paper: Having a pen and paper on hand will allow you to jot down any observations or measurements during the test.
- Voltmeter (optional): While not necessary, having a voltmeter can provide more accurate readings and help validate the results obtained from the screwdriver test. If you have a voltmeter, be sure it is functioning properly and has a good battery.
By gathering these tools and materials before starting the test, you will be fully prepared and set up for success.
Safety Precautions
Before proceeding with any automotive task, including testing your alternator with a screwdriver, it is important to prioritize safety. Here are some crucial safety precautions to keep in mind:
- Disconnect the Battery: To avoid any potential electric shock or damage to the electrical system, always disconnect the negative terminal of the battery before working on your vehicle. This will cut off the power supply and minimize the risk of electrical accidents.
- Wear Protective Gear: Protect your eyes and hands by wearing safety goggles and gloves. These will shield you from any debris or sparks that may occur during the testing process.
- Work in a Well-Ventilated Area: If you are performing the test in an enclosed space, ensure proper ventilation to prevent inhaling harmful fumes or gases that may be emitted by the vehicle.
- Be Mindful of Moving Parts: When working under the hood of your vehicle, be cautious of moving parts such as belts, pulleys, and fans. Keep your hands and clothing clear of these components to avoid accidents or injury.
- Follow Proper Technique: Always handle the screwdriver and any other tools with care. Use them as intended and avoid using excessive force or applying pressure in the wrong places.
- Take Precautions with Electricity: While the screwdriver test is relatively safe, electricity can still be dangerous. If you are using a voltmeter, ensure that it is rated for automotive use and follow the manufacturer’s instructions for safe operation.
By following these safety precautions, you can minimize the risk of accidents, injuries, or damage to your vehicle. It’s always better to prioritize safety and take necessary precautions before proceeding with any automotive tasks.
Step 1: Preparation
Before performing the actual alternator test with a screwdriver, it’s important to make some necessary preparations. Follow these steps to ensure a smooth and efficient testing process:
- Turn off the Engine: Start by turning off your vehicle’s engine and removing the keys from the ignition. This will prevent any accidental starting or unexpected movements during the test.
- Open the Hood: Locate the hood release lever inside your vehicle and pull it to open the hood. Secure the hood in the raised position using the prop rod or hood latch mechanism.
- Locate the Battery: Identify the location of the battery in your vehicle’s engine compartment. It is typically found towards the front of the vehicle, secured by a bracket or tray.
- Disconnect the Negative Terminal: Using an appropriate wrench or socket, loosen the nut on the negative terminal of the battery. Carefully remove the negative cable from the terminal and set it aside away from any metal surfaces. This will ensure that there is no power supply while performing the test.
By completing these preparatory steps, you are now ready to move on to the next phase of the alternator test. It’s important to take your time and double-check that all necessary precautions have been taken to ensure a safe testing environment.
Step 2: Locating the Alternator
Once you have completed the necessary preparations, the next step is to locate the alternator in your vehicle’s engine compartment. The alternator is typically a small, metallic device with a pulley attached to it. Here’s how you can find it:
- Refer to the Owner’s Manual: If you’re unsure about the exact location of the alternator, consult your vehicle’s owner’s manual. It will provide detailed information and diagrams to help you find the alternator.
- Look for the Serpentine Belt: The alternator is usually driven by a serpentine belt, which is a long, rubber belt that connects various engine components. Follow the path of the serpentine belt to locate the alternator.
- Identify the Pulley: Once you have located the serpentine belt, look for a pulley attached to a metallic component. This pulley is typically connected to the alternator and provides mechanical power to it.
- Note the Position: Take a mental note of the position of the alternator in relation to other engine components. This will help you in the next steps of the testing process.
It’s important to exercise caution while locating the alternator, as it may be in close proximity to other moving parts or hot surfaces. Take your time and ensure that the engine is cool before proceeding. Once you have successfully located the alternator, you can move on to the next step of the testing process.
Read more: How Do You Magnetize A Screwdriver
Step 3: Identifying the Positive Terminal
In this step, we will identify the positive terminal of the alternator, which is essential for conducting the screwdriver test. The positive terminal is where the electrical charge from the alternator is distributed to the battery and the rest of the vehicle’s electrical system. Follow these steps to locate the positive terminal:
- Refer to the Owner’s Manual: If you’re unsure about the position of the alternator’s positive terminal, consult your vehicle’s owner’s manual. It will provide specific information and diagrams to help you find the terminal.
- Inspect the Alternator Housing: Look for any markings or labels on the alternator housing that indicate the positive terminal. These markings may be in the form of a (+) symbol or the word “positive”.
- Check for Wires: Examine the alternator for any wires that connect to it. The wire connected to the positive terminal is a clear indication of its location. Trace the wire back to the terminal to confirm.
- Use a Multimeter (optional): If you have access to a multimeter, you can use it to measure the voltage at various points on the alternator. The terminal with the highest voltage reading is likely the positive terminal.
It is important to correctly identify the positive terminal as the screwdriver test relies on making contact with this specific terminal. Take your time to locate the terminal accurately to ensure accurate test results.
You can use a screwdriver to check an alternator by placing the metal end of the screwdriver on the back of the alternator and listening for a strong magnetic pull. If there is no pull, the alternator may be faulty.
Step 4: The Screwdriver Test
Now that you have located the positive terminal of the alternator, you are ready to perform the screwdriver test. This test will help determine if the alternator is generating an electrical charge. Follow these steps to conduct the test:
- Ensure Safety: Before proceeding, make sure you are wearing safety goggles and gloves to protect yourself from any potential sparks or debris.
- Select a Safe Ground: Locate a safe and grounded metal surface in the engine compartment. This could be a bolt or bracket that is securely connected to the vehicle’s chassis.
- Hold the Screwdriver: Hold the insulated handle of the screwdriver firmly in your hand, making sure to avoid contact with the metal shaft.
- Touch the Positive Terminal: Carefully touch the metal shaft of the screwdriver to the positive terminal of the alternator. Ensure that the shaft makes good contact with the terminal.
- Observe for Sparks: As you make contact, observe the tip of the screwdriver for any sparks or electrical discharge. If you see sparks, it indicates that the alternator is producing power.
- Listen for Sounds: Pay attention to any unusual sounds coming from the alternator or electrical system while the screwdriver is in contact with the terminal. Strange noises may suggest a malfunctioning alternator.
- Ensure Safety: After conducting the test, remove the screwdriver from the positive terminal carefully and place it in a safe location away from any metal surfaces.
By following these steps, you can quickly perform the screwdriver test to determine if your alternator is generating an electrical charge. The presence of sparks and the absence of unusual sounds generally indicate that the alternator is functioning properly. However, it is important to interpret the results accurately by considering them in conjunction with the next steps of the testing process.
Step 5: Observing the Results
After performing the screwdriver test on your alternator, it’s time to observe and analyze the results. By paying close attention to specific indicators, you can gain valuable insights into the health of your alternator. Here’s what to look for:
- Sparks: If you observed sparks when the screwdriver made contact with the positive terminal, it indicates that the alternator is producing power. This is a positive sign and suggests that the alternator is functioning properly.
- No Sparks: If there were no sparks or minimal sparking, it could indicate that the alternator is not generating enough power or is experiencing a malfunction. In such cases, further testing or professional assessment is recommended.
- Unusual Sounds: While conducting the test, listen carefully for any unusual sounds coming from the alternator or electrical system. If you heard any grinding, squeaking, or clicking noises, it may indicate a problem with the alternator that requires further investigation.
It is important to note that the screwdriver test is a simple diagnostic method and may not provide a definitive diagnosis of alternator issues. It is always a good idea to complement this test with other diagnostic techniques and consult a professional mechanic if you suspect a significant problem. Additionally, keep in mind that the results of this test should be considered along with the next steps of the testing process to get a complete picture of your alternator’s health.
Step 6: Interpreting the Results
Once you have observed the results of the screwdriver test on your alternator, it’s time to interpret those results. Understanding what the results mean will help you assess the overall health and functionality of your alternator. Here’s how to interpret the results:
- Sparks and Normal Operation: If you observed sparks and heard no unusual sounds during the test, it signifies that the alternator is generating power and functioning correctly. This is a positive result, indicating that the alternator is likely in good working condition.
- No Sparks or Minimal Sparking: In the absence of sparks or with minimal sparking, it could indicate a potential problem with the alternator. It might not be producing enough power, leading to issues with the charging system. Further testing and evaluation are needed to determine the exact cause of the problem.
- Unusual Sounds: If you heard grinding, squeaking, or clicking noises during the test, it suggests that there might be a mechanical issue with the alternator. These sounds could be an indication of a failing bearing, faulty pulley, or other internal problems. In such cases, it is crucial to have the alternator inspected and repaired by a professional.
Remember, the screwdriver test is a basic diagnostic method, and its results should be considered alongside other tests and inspections to obtain a comprehensive understanding of your alternator’s condition. If you have any doubts about the results or if your vehicle continues to exhibit charging system issues, it is recommended to seek assistance from a qualified mechanic for a thorough diagnosis and repair.
Read more: How Do You Check For Bed Bugs
Step 7: Confirming the Alternator’s Health
After performing the screwdriver test and interpreting the results, the final step is to confirm the overall health of your alternator. While the screwdriver test can provide valuable insights, it is essential to complement it with additional diagnostic methods. Here are some ways to confirm the alternator’s health:
- Using a Voltmeter: If you have access to a voltmeter, you can measure the voltage output directly from the alternator. Connect the voltmeter’s positive lead to the alternator’s positive terminal and the negative lead to a grounded metal surface. Start the engine and observe the voltage reading on the voltmeter. A healthy alternator should produce around 13.5 to 14.5 volts.
- Load Testing: Perform a load test by turning on various electrical components in your vehicle, such as the headlights, air conditioning, and radio. Observe how the alternator handles the increased electrical load. A healthy alternator should be able to maintain a steady voltage output even with the additional load.
- Professional Evaluation: If you remain uncertain about the alternator’s health or if your vehicle shows consistent charging issues, it is advisable to seek the assistance of a professional mechanic. They have specialized tools and expertise to conduct thorough tests and provide an accurate assessment of the alternator’s condition.
By combining the results of the screwdriver test with these additional diagnostic methods, you can confidently determine the overall health and functionality of your alternator. If any issues are found, prompt repairs or replacement may be necessary to ensure optimal performance of your vehicle’s electrical system.
Always remember that proper maintenance and regular inspections are key to preventing alternator issues. Pay attention to any warning signs such as dimming lights, a dead battery, or unusual noises, as these may indicate problems with the alternator. Early detection and intervention can help avoid more significant issues and prolong the lifespan of your alternator.
Conclusion
Checking the health of your alternator using a screwdriver can be a valuable diagnostic method that provides insights into its functionality. While the screwdriver test is relatively simple and straightforward, it should be complemented with other diagnostic techniques and professional evaluation to ensure accurate results.
Throughout this guide, we have discussed the step-by-step process of checking an alternator with a screwdriver. We emphasized the importance of safety precautions, including disconnecting the battery and wearing protective gear. We also highlighted the significance of correctly locating the alternator’s positive terminal and interpreting the results of the screwdriver test.
Remember, the presence of sparks during the screwdriver test and the absence of unusual sounds generally indicate that the alternator is functioning properly. However, no sparks or minimal sparking, along with unusual sounds, may suggest potential issues that require further examination.
To confirm the alternator’s health, consider using a voltmeter to measure voltage output and performing a load test by simultaneously running various electrical components. It is always wise to seek the assistance of a professional mechanic for a comprehensive evaluation if you have any doubts or persistent charging system issues.
Regular maintenance, including keeping the alternator clean and inspecting for any signs of damage, is vital for its longevity and reliable performance. Timely identification and resolution of alternator problems will help ensure the smooth operation of your vehicle’s electrical system.
In conclusion, while the screwdriver test can provide initial insights into the health of your alternator, it should be complemented with other diagnostic methods and professional guidance for a comprehensive assessment. By staying proactive and attentive to your vehicle’s charging system, you can maintain a reliable alternator and enjoy uninterrupted electrical power in your vehicle.
Frequently Asked Questions about How Do You Check An Alternator With A Screwdriver?
Was this page helpful?
At Storables.com, we guarantee accurate and reliable information. Our content, validated by Expert Board Contributors, is crafted following stringent Editorial Policies. We're committed to providing you with well-researched, expert-backed insights for all your informational needs.


0 thoughts on “How Do You Check An Alternator With A Screwdriver?”