Home>Renovation & DIY>Tools & Equipment>How To Open Paint Can With A Screwdriver
Tools & Equipment
How To Open Paint Can With A Screwdriver
Modified: January 9, 2024
Learn how to open a paint can with a screwdriver and other tools and equipment. Follow these simple steps for easy paint can opening.
(Many of the links in this article redirect to a specific reviewed product. Your purchase of these products through affiliate links helps to generate commission for Storables.com, at no extra cost. Learn more)
Introduction
Welcome to the world of DIY home improvement! Opening a paint can with a screwdriver is a handy skill that can save you time and frustration. Whether you’re a seasoned DIY enthusiast or a novice looking to tackle your first painting project, knowing how to open a paint can with a screwdriver is a valuable technique to have in your toolbox.
While some paint cans come with built-in mechanisms for easy opening, others require a bit of manual finesse. In this guide, we’ll walk you through the step-by-step process of using a screwdriver to open a traditional paint can. With a few simple tools and a bit of know-how, you’ll be popping paint can lids like a pro in no time.
So, grab your trusty screwdriver and let’s dive into the world of paint can opening!
Key Takeaways:
- Opening a paint can with a screwdriver is a valuable DIY skill. Prepare the can, position the screwdriver securely, and leverage it carefully to safely access the paint inside.
- With a few simple tools and patience, you can confidently open traditional paint cans. Mastering this skill empowers you to tackle painting projects with ease and efficiency.
Materials Needed
Before you begin the process of opening a paint can with a screwdriver, it’s essential to gather the necessary materials. Here’s what you’ll need:
- A standard screwdriver with a flat head
- A sturdy cloth or rag
- A hammer (optional, for stubborn lids)
- Protective gloves (optional, to protect your hands)
These simple materials are readily available and can be found in most households or easily obtained from a local hardware store. Once you have everything on the list, you’ll be well-prepared to tackle the task of opening your paint can with ease.
Step 1: Preparing the Paint Can
Before you can begin the process of opening the paint can, it’s important to prepare the can for easy access. Here’s how to get started:
First, ensure that the paint can is placed on a stable and flat surface. This will prevent any accidental spills or tipping while you work to open it.
Next, use a clean cloth or rag to wipe any dust or debris from the top of the paint can. This step is crucial as it prevents any foreign particles from falling into the paint when you open the can.
If the paint can has been sealed with dried paint, gently tap the lid with a hammer to loosen the dried paint and make it easier to open. Be careful not to dent or damage the lid during this process.
Once the paint can is clean and any dried paint has been loosened, you’re ready to move on to the next step: positioning the screwdriver for opening the can.
Step 2: Positioning the Screwdriver
Positioning the screwdriver correctly is crucial for effectively opening the paint can. Follow these steps to ensure you’re ready to proceed:
Hold the paint can securely with one hand, ensuring that it remains stable and upright throughout the process. This will prevent any accidental spills or mishaps as you work to open the can.
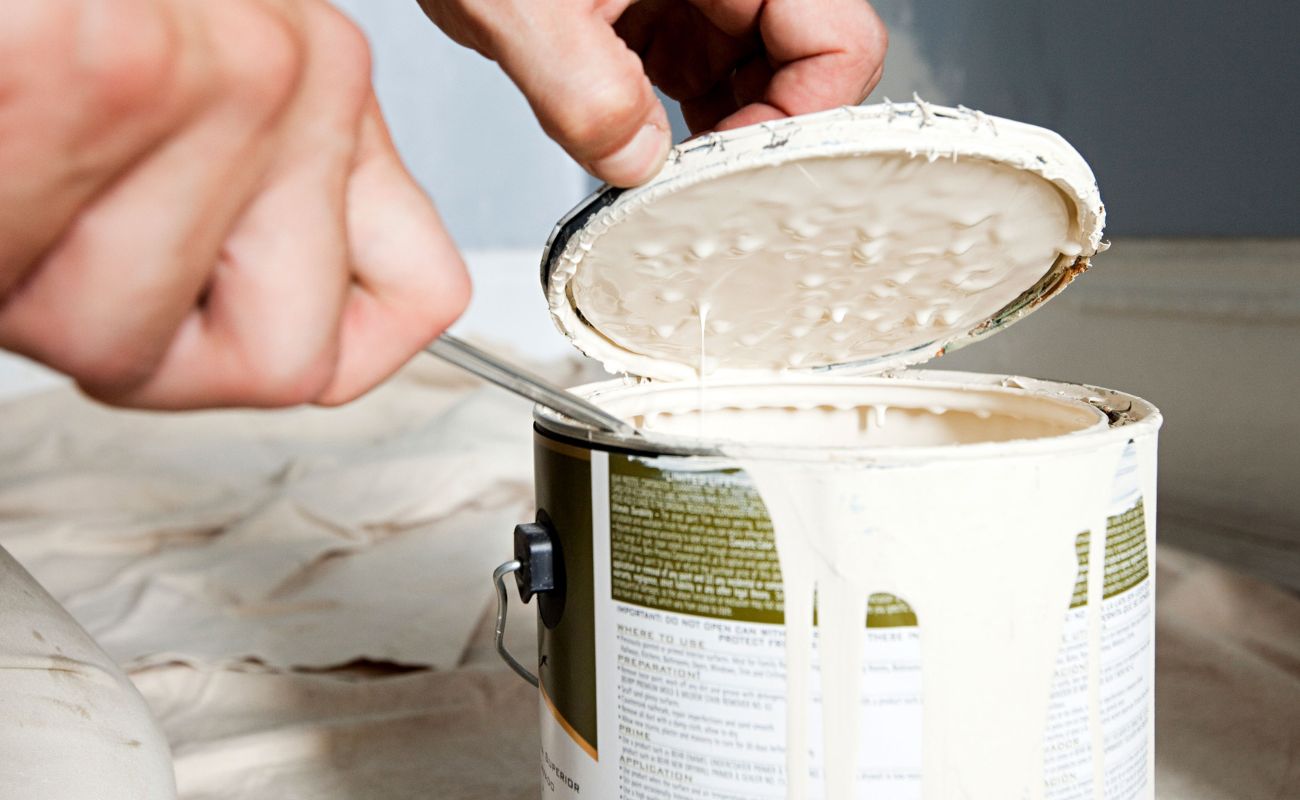
Take the flat-head screwdriver and place the tip of the screwdriver’s blade under the outer lip of the paint can’s lid. Position the screwdriver at a slight angle to create leverage when prying the lid open.
Ensure that the screwdriver is inserted firmly under the lip of the lid, but be cautious not to apply excessive force that could cause the lid to bend or warp. The goal is to create a small gap between the lid and the can, making it easier to leverage the lid open in the next step.
Once the screwdriver is positioned securely under the lid’s lip, you’re ready to move on to the next step: leveraging the screwdriver to open the paint can.
Use a flathead screwdriver to gently pry open the lid of the paint can. Place the screwdriver under the lid’s edge and carefully lift it up to avoid bending the lid.
Step 3: Leveraging the Screwdriver
With the screwdriver positioned under the lid’s lip, it’s time to leverage the screwdriver to begin opening the paint can. Follow these steps to proceed:
Using the hand that’s not holding the paint can, firmly grip the handle of the screwdriver. This will provide you with better control and leverage as you work to pry the lid open.
Apply gentle and steady pressure on the handle of the screwdriver, using it as a lever to lift the lid of the paint can. Be cautious not to use excessive force, as this could cause the lid to bend or the paint to spill.
As you apply pressure, you should begin to hear the faint sound of the lid starting to release from the can. Continue to apply gradual pressure, working your way around the lid to create an even gap between the lid and the can.
If you encounter resistance or the lid feels particularly stubborn, you can gently tap the end of the screwdriver’s handle with a hammer to help loosen the lid further. Be careful not to strike the lid directly, as this could cause damage.
Once you’ve created a small gap between the lid and the can, you’re ready to move on to the final step: removing the lid and gaining access to the paint inside.
Read more: How To Open A Paint Can
Step 4: Removing the Lid
With the lid of the paint can partially loosened, it’s time to complete the process by removing the lid entirely. Follow these steps to safely and effectively remove the lid:
Continue to apply gentle pressure on the handle of the screwdriver, using it as a lever to lift the lid further away from the can. As you do so, you should notice the gap between the lid and the can widening, making it easier to remove the lid.
Once you’ve created enough space between the lid and the can, carefully slide the screwdriver around the perimeter of the lid, leveraging it to fully release the lid from the can. Take your time and work methodically to ensure that the lid is fully detached.
With the lid fully released, carefully lift it away from the can, taking care to avoid any sharp edges. Set the lid aside in a safe place, ensuring that it’s clear of your work area to prevent any accidental spills or accidents.
You’ve now successfully opened the paint can using a screwdriver, and you’re ready to access the paint inside for your upcoming project. Remember to securely seal the paint can after use to preserve the remaining paint for future touch-ups or projects.
Congratulations on mastering the art of opening a paint can with a screwdriver. With this valuable skill in your DIY arsenal, you’re well-equipped to tackle painting projects with confidence and ease.
Conclusion
Mastering the technique of opening a paint can with a screwdriver is a valuable skill for any DIY enthusiast or homeowner. By following the simple steps outlined in this guide, you can confidently and safely open traditional paint cans using common household tools.
Remember to prepare the paint can by ensuring it’s clean and stable before attempting to open it. Positioning the screwdriver securely under the lid’s lip and leveraging it carefully are essential steps in the process. With patience and precision, you can successfully remove the lid and gain access to the paint inside.
Opening a paint can with a screwdriver is not only a practical skill but also a rewarding accomplishment. It empowers you to take on painting projects with ease and efficiency, ensuring that you can access your paint supplies whenever needed.
So, the next time you’re faced with a sealed paint can, reach for your trusty screwdriver and put your newfound knowledge to the test. With a bit of practice, you’ll become a pro at opening paint cans in no time.
Now that you’ve mastered this essential DIY skill, you’re well-prepared to tackle your next painting project with confidence. Happy painting!
Frequently Asked Questions about How To Open Paint Can With A Screwdriver
Was this page helpful?
At Storables.com, we guarantee accurate and reliable information. Our content, validated by Expert Board Contributors, is crafted following stringent Editorial Policies. We're committed to providing you with well-researched, expert-backed insights for all your informational needs.


0 thoughts on “How To Open Paint Can With A Screwdriver”