Home>Interior Design>How To Open A Paint Can
Interior Design
How To Open A Paint Can
Modified: December 7, 2023
Learn how to open a paint can effortlessly with these simple steps. Perfect for interior design enthusiasts seeking a DIY approach.
(Many of the links in this article redirect to a specific reviewed product. Your purchase of these products through affiliate links helps to generate commission for Storables.com, at no extra cost. Learn more)
Introduction
Welcome to our comprehensive guide on how to open a paint can. Whether you are starting a DIY project or tackling a professional painting job, knowing how to properly open a paint can is essential. While it may seem like a simple task, there are certain steps you should follow to ensure a smooth and easy opening process.
By properly opening a paint can, you can avoid spills, messes, and potential accidents. Additionally, a properly opened can will maintain the quality and consistency of the paint, allowing you to achieve the best results for your project.
In this guide, we will walk you through the step-by-step process of opening a paint can, from gathering the necessary materials to properly recapping the can after use. So, let’s get started!
Key Takeaways:
- Master the art of opening a paint can by gathering the right tools, inspecting the can, and choosing the best method. Proper sealing and storage ensure paint longevity and a mess-free painting experience.
- Opening a paint can is more than just prying the lid. It’s about preparation, cleanliness, and care. Follow the steps to ensure a smooth and successful painting project.
Step 1: Gather Necessary Materials
Before you begin opening a paint can, it is important to gather all the necessary materials. Having everything you need on hand will make the process more efficient and convenient. Here are the materials you will need:
- Paint can opener: This specialized tool is designed to open paint cans without damaging the lid or rim. It typically has a curved edge that fits under the lid, allowing you to pry it open easily.
- Screwdriver: If you don’t have a paint can opener, a flathead screwdriver can serve as a suitable alternative. Ensure that the screwdriver is clean and free from any rust or debris that could contaminate the paint.
- Protective gear: It’s important to protect yourself during the painting process. Wear gloves to protect your hands from any potential spills or splatters. Additionally, wearing safety goggles and a mask can help prevent any paint fumes or particles from coming into contact with your eyes or respiratory system.
- Rag or cloth: Keep a clean rag or cloth nearby to wipe off any excess paint that may have accumulated on the lid or rim.
- Drop cloth or newspaper: To protect your work area from any paint spills or drips, lay down a drop cloth or newspapers underneath the paint can.
By gathering these materials beforehand, you will be well-prepared to open the paint can and start your painting project without any interruptions.
Step 2: Inspect the Paint Can
Before proceeding with opening the paint can, it is essential to inspect it for any damage or defects. This step helps ensure the integrity of the can and prevents any unwanted surprises during the painting process. Here’s what you should do:
- Check for dents or leaks: Carefully examine the paint can for any dents or signs of leakage. Dents can indicate a compromised seal, which may affect the quality of the paint inside. If you notice any leaks or major dents, it is advisable to replace the can to avoid potential spills or contamination.
- Inspect the rim: Take a close look at the rim of the can. It should be free from any damage, rust, or hardened paint. A damaged rim may result in difficulties when resealing the can after use.
- Ensure proper labeling: Check that the paint can is properly labeled with the necessary information, such as the paint color, brand, and type. This will help you easily identify the paint can during your project and keep track of the paint’s specifications for future reference.
- Check the expiration date: Paints have a shelf life, so it’s important to check the expiration date on the can. Using expired paint can lead to poor paint quality and unsatisfactory results. If the paint is past its expiration date, it is best to dispose of it properly instead of attempting to use it.
By thoroughly inspecting the paint can, you can ensure that it is in good condition and ready to be opened. This step helps maintain the quality of the paint and prevents any potential issues that may arise during the painting process.
Step 3: Prepare the Work Area
Preparing your work area is an important step before opening a paint can. This ensures a clean and organized space, allowing for a smooth painting process. Here’s how you can prepare your work area:
- Cover surfaces: To protect your floors, furniture, or other nearby surfaces from accidental paint spills or drips, cover them with a drop cloth or newspapers. This will prevent any unwanted stains and make cleanup easier.
- Clear the area: Remove any obstacles or clutter from the immediate vicinity of the paint can. This includes tools, brushes, or any other items that may hinder your access to the can or impede your movement during the opening process.
- Ensure proper ventilation: Painting can release fumes that may be harmful if inhaled for prolonged periods. Open windows and doors in the area to promote proper air circulation. If necessary, use a fan or wear a mask to protect yourself from any strong odors or fumes.
- Organize your tools: Keep your paint can opener, screwdriver, cloth, and any other necessary tools nearby and easily accessible. This will save you time and effort when you’re ready to open the can and start painting.
- Consider lighting conditions: Adequate lighting is crucial for a successful painting project. Ensure that the area is well-lit, allowing you to see the paint can and its contents clearly. This will help you avoid any accidental spills or mistakes.
By taking the time to prepare your work area, you will create a conducive environment for opening the paint can and working on your project. A well-prepared space contributes to a smoother and more enjoyable painting experience.
Step 4: Locate the Paint Can Lid
Locating the paint can lid is the next step in opening a paint can. The lid securely seals the can to prevent the paint from drying out or spilling. Here are some tips for finding the paint can lid:
- Orientation: Paint can lids are typically located on the top of the can. The lid may be slightly raised or flush with the can’s rim. Look for a circular or rectangular shape that matches the size of the can.
- Check for any overhang: In some cases, the lid may be partially opened or have a small portion extending beyond the edge of the can. Gently press down on the lid to ensure it is secured and properly sealed.
- Inspect the label: The paint can label may provide instructions or visual cues on the location of the lid. Look for any arrows or indications that point to the lid’s position.
- Feel for resistance: If you’re having trouble locating the lid visually, run your finger along the rim of the can. You should be able to feel the edge of the lid, which will guide you to its exact position.
- Make sure it’s intact: Once you find the lid, inspect it for any damage, such as cracks or deformities. A damaged lid might not properly seal the can, leading to potential leaks or spills. If you notice any issues with the lid, it’s best to use a new one or transfer the paint to a different container.
By following these steps, you will successfully locate the paint can lid and be one step closer to opening the can and beginning your painting project.
Read more: How To Open A Can With A Wine Opener
Step 5: Remove Any Debris or Dirt from the Lid
Before opening the paint can, it is important to ensure that the lid is clean and free from any debris or dirt. This step helps maintain the integrity of the paint and prevents any contaminants from entering the can. Here’s how to remove any debris or dirt from the lid:
- Inspect the lid: Take a close look at the surface of the lid. Look for any dust, dirt, or other particles that may have accumulated. Use a clean cloth or rag to wipe away any visible debris.
- Use a brush: If there are stubborn particles or dried paint on the lid, you can use a small brush, such as a toothbrush, to gently scrub away the dirt. Be careful not to damage the lid or push any debris into the can.
- Check the rim: Pay attention to the area where the lid meets the rim of the paint can. Ensure that it is clean and free from any hardened paint or residue that could affect the seal of the lid.
- Wipe with a damp cloth: For a thorough cleaning, dampen a cloth with water and give the lid a gentle wipe. This will help remove any remaining dirt or residue, leaving it clean and ready for opening.
- Inspect the underside: Don’t forget to check the underside of the lid as well. Dust and dirt can settle there, and it’s important to remove any debris to prevent it from falling into the paint when you open the can.
By taking the time to clean the lid, you ensure that the paint inside remains free from contaminants. This step contributes to a clean and high-quality painting experience, resulting in a professional finish for your project.
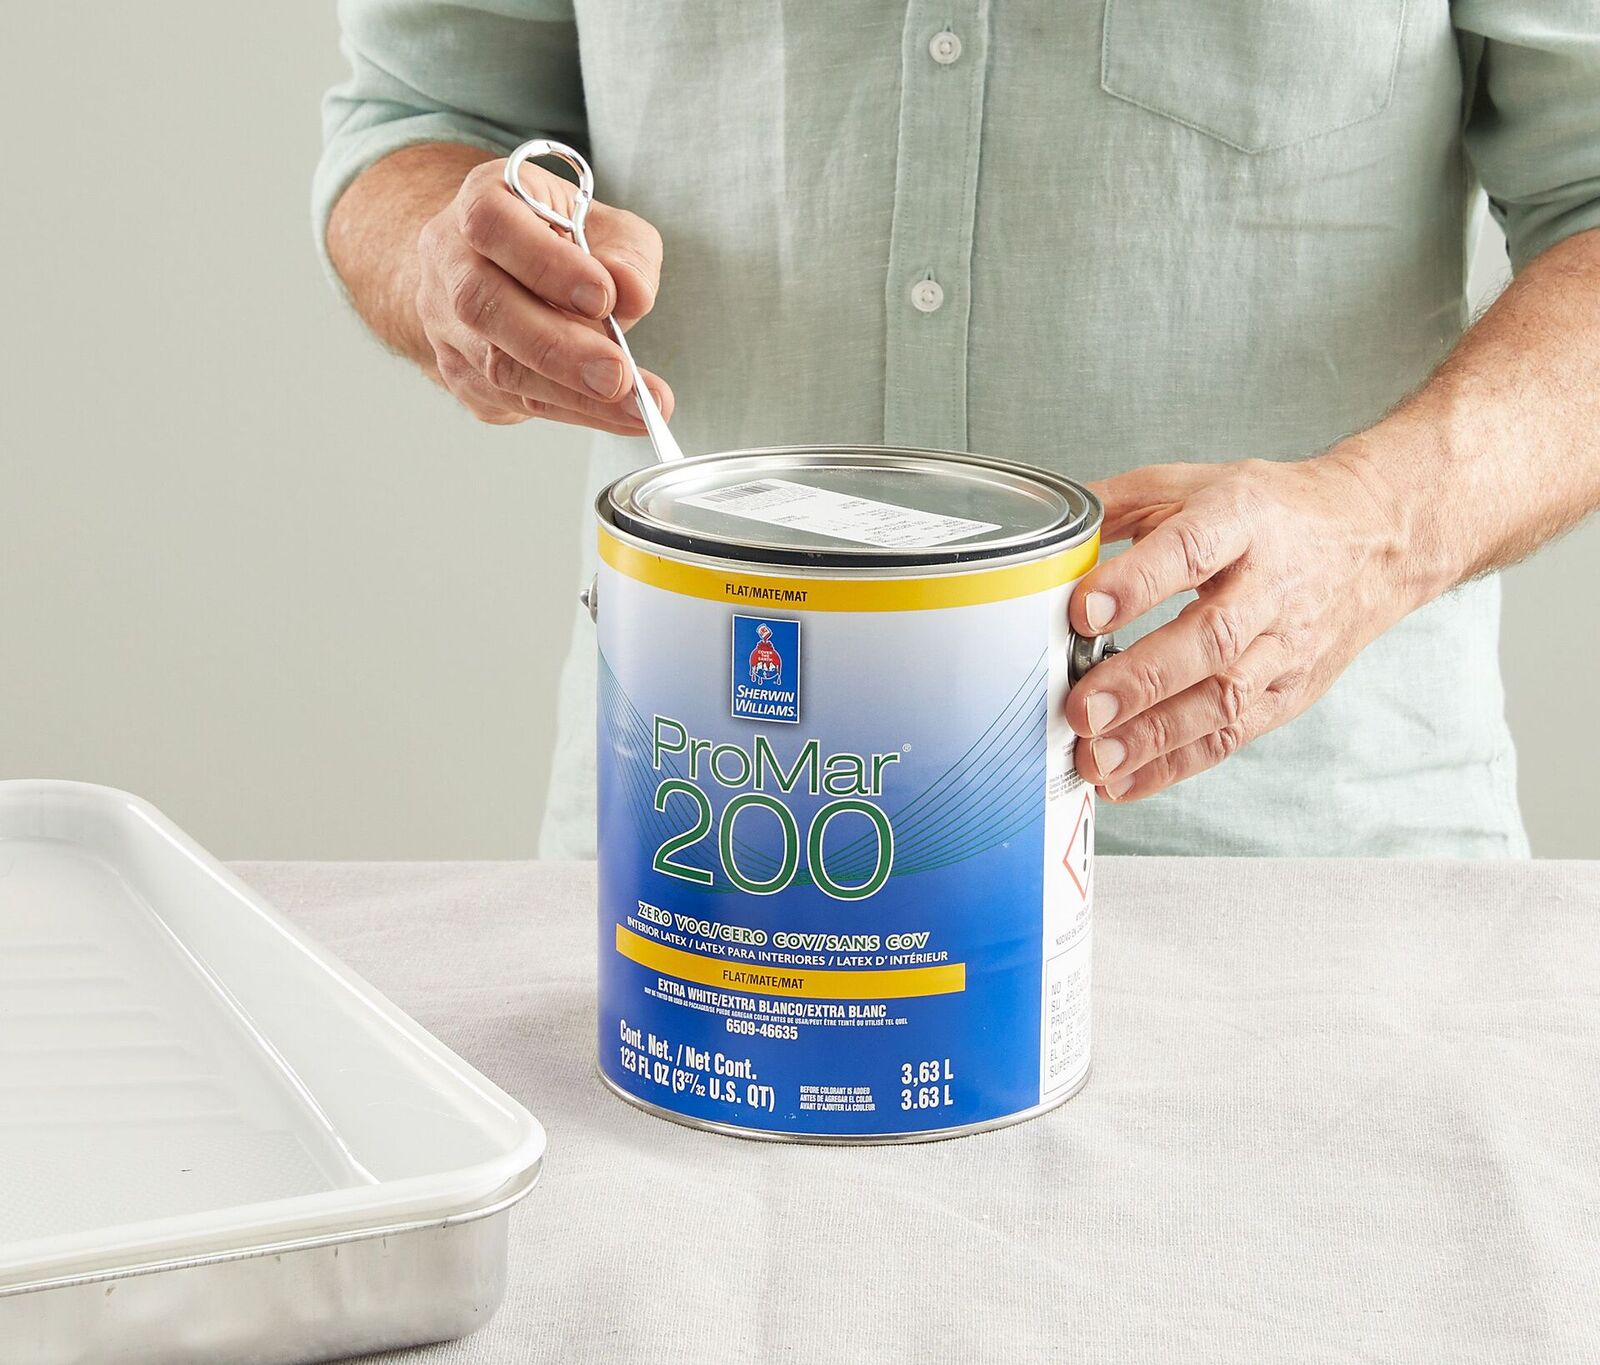
Use a flathead screwdriver to gently pry open the lid of the paint can. Place the screwdriver under the lid and apply pressure to lift it up. Be careful not to bend the lid.
Step 6: Open the Paint Can using a Screwdriver or Paint Can Opener
Now that you’ve prepared the paint can, it’s time to open it. There are two common methods to choose from: using a screwdriver or a paint can opener. Both options are effective in getting the job done. Here’s how to open the paint can using each method:
Using a Screwdriver:
- Select a flathead screwdriver: Choose a flathead screwdriver that is clean and free from any rust or debris.
- Position the screwdriver: Place the tip of the screwdriver between the lid and the rim of the paint can, near the edge. Make sure the screwdriver is secure and properly positioned.
- Apply pressure: Using your hand or a mallet, apply gentle pressure to the screwdriver, being careful not to puncture the lid or the can. Slowly rotate the screwdriver around the can in a circular motion to loosen the lid.
- Continue rotating: Gradually increase the pressure as you rotate the screwdriver around the can, loosening the lid further with each turn. Be patient and work your way around the entire circumference of the can.
- Remove the lid: Once the lid is sufficiently loosened, you can lift it off the can using the screwdriver. Be cautious of any paint that may have settled on the lid.
Using a Paint Can Opener:
- Select a paint can opener: Use a paint can opener, a specialized tool designed specifically for opening paint cans. It usually has a curved end and a one-sided blade.
- Position the opener: Slide the curved end of the opener under the lid, between the lid and the rim of the paint can. Ensure that the blade is securely in place.
- Apply pressure: Holding onto the handle of the opener, apply downward pressure to lift the lid. Gently rock the opener back and forth to loosen the lid from the can.
- Continue rocking: Maintain a steady rhythm of rocking the opener while exerting downward pressure. This will gradually release the lid from the can.
- Remove the lid: Once the lid is loose enough, simply lift it off the can using the paint can opener. Take care to avoid any paint on the lid.
Both methods are effective and it simply comes down to personal preference and the tools you have at hand. Choose the method that feels most comfortable and convenient for you.
Remember, regardless of the method you choose, always exercise caution to avoid any injuries or spills. Take your time and be mindful of the paint can’s contents as you open it.
Read more: How To Store Opened Beer Can
Step 7: Test the Lid to Ensure it is Properly Sealed
After opening the paint can, it is crucial to test the lid to ensure it is properly sealed. A secure seal helps maintain the paint’s quality, prevents drying out, and minimizes the risk of spills or leaks. Here’s how you can test the lid:
- Visually inspect the lid: Take a look at the lid to ensure it is intact and free from any visible damage or defects. Check for any cracks, dents, or improper alignment that could compromise the seal.
- Wipe the rim: Clean the rim of the paint can using a cloth or rag to remove any paint residue or debris. A clean rim ensures a proper seal with the lid.
- Press down on the lid: Using moderate pressure, press down firmly on the center of the lid to ensure it is securely in place. You should feel some resistance and hear a slight clicking sound as the lid engages with the can.
- Check for movement: Gently nudge the lid to see if it moves or wiggles. If it does, it may not be properly sealed. In this case, remove the lid and reposition it to create a tighter seal.
- Invert the can: Carefully turn the paint can upside down and hold it over a protected surface. This simulated test will help determine if the lid is securely sealed and if any paint leaks or drips occur.
- Observe for leaks: Inspect the bottom of the can for any signs of leaking paint. If there are no leaks, you can be confident that the lid is properly sealed.
By performing these tests, you can ensure that the paint can is securely sealed and ready for storage or future use. A properly sealed lid maintains the paint’s quality, extends its shelf life, and prevents any potential accidents or messes.
Step 8: Recap the Paint Can After Use
After you have finished using the paint, it is important to properly recap the paint can to preserve the remaining paint and prevent it from drying out. This step is essential for maintaining the paint’s quality and ensuring it can be used again in the future. Here’s how to recap the paint can:
- Remove excess paint: Before recapping the can, use a brush or the edge of the can to remove any excess paint from the rim and the lid. This will prevent any paint from accidentally sealing the lid shut.
- Align the lid: Place the lid back on top of the can, aligning it with the rim. Ensure that it is positioned correctly and ready to be sealed.
- Press down firmly: Apply pressure to the center of the lid and press down firmly to create a tight and secure seal. Use the palm of your hand or a mallet to ensure proper closure.
- Tap the lid: Lightly tap around the lid with a mallet or the handle of a screwdriver to further secure the seal. This helps ensure that the lid is tightly in place and minimizes the risk of any air or moisture entering the can.
- Wipe the rim: Use a clean cloth or rag to wipe any paint residue from the rim of the can. This will prevent the lid from sticking to the rim and make it easier to open in the future.
- Label the can: To easily identify the paint in the future, label the can with the color, brand, and any other relevant information. This will help you locate and use the paint efficiently for future projects.
- Store the can properly: Once the paint can is properly recapped, store it in a cool, dry place away from direct sunlight and extreme temperatures. These conditions help preserve the paint’s quality and extend its shelf life.
Recapping the paint can is a crucial final step in the painting process. It ensures that the remaining paint can be safely stored and used again in the future. By following these steps, you can maintain the paint’s integrity and get the most out of your investment.
Conclusion
Congratulations! You have successfully learned how to open a paint can with ease and confidence. By following the step-by-step process outlined in this guide, you can avoid spills, maintain the quality of the paint, and ensure a smooth painting experience.
Remember, gathering the necessary materials, inspecting the paint can, preparing the work area, locating the lid, removing debris, and choosing the appropriate method to open the can are all important steps in the process. Testing the lid to ensure it is properly sealed and recapping the can after use are vital for preserving the paint’s quality and longevity.
By incorporating these techniques into your painting routine, you can make your DIY projects or professional jobs more efficient and enjoyable. Properly opening and sealing a paint can is an essential skill that every painter should master.
So, the next time you embark on a painting project, remember to follow these steps to open your paint can like a pro. Enjoy the process and let your creativity flow!
Frequently Asked Questions about How To Open A Paint Can
Was this page helpful?
At Storables.com, we guarantee accurate and reliable information. Our content, validated by Expert Board Contributors, is crafted following stringent Editorial Policies. We're committed to providing you with well-researched, expert-backed insights for all your informational needs.


0 thoughts on “How To Open A Paint Can”