Articles
How Long Does It Take To Make A Quilt
Modified: August 28, 2024
Discover the process of creating a beautiful quilt from start to finish. Find informative articles on the time it takes to make a quilt and expert tips to speed up your quilting projects.
(Many of the links in this article redirect to a specific reviewed product. Your purchase of these products through affiliate links helps to generate commission for Storables.com, at no extra cost. Learn more)
Introduction
Quilting is a beloved craft that allows you to create beautiful and functional pieces of art. From cozy blankets to decorative wall hangings, quilts can add warmth and style to any space. However, one question that often arises for those new to quilting is, “How long does it take to make a quilt?” The answer to this question depends on various factors, including the complexity of the quilt pattern, your skill level, the amount of time you can dedicate to the project, and the size of the quilt.
In this article, we will walk you through the steps involved in making a quilt and provide some estimates of how long each step may take. While it’s important to remember that everyone works at their own pace, these estimates can serve as a rough guideline to help you plan your project and manage your time effectively.
So, if you’re ready to embark on a quilting adventure, let’s dive into the process and explore how long it may take to make a quilt!
Key Takeaways:
- Quilting is a labor of love that requires creativity, patience, and attention to detail. Each step, from gathering supplies to binding the quilt, contributes to the satisfaction of bringing your vision to life.
- Embrace the art of quilting and let your creativity soar. With each quilt you create, you’ll refine your skills and leave a lasting legacy of creativity and craftsmanship.
Step 1: Gathering Supplies
Before you begin your quilt-making journey, it’s essential to gather all the necessary supplies. Having everything at hand will save you time and ensure a seamless workflow. Here are the basic supplies you’ll need:
- Fabric: Choose fabrics that coordinate well with each other and suit the design you have in mind for your quilt. The amount of fabric you’ll need depends on the size of the quilt you plan to make.
- Thread: Use high-quality thread in colors that complement your fabric choices. Cotton or polyester thread is commonly used for quilting.
- Scissors or rotary cutter: Invest in a good pair of fabric scissors or a rotary cutter for cutting your fabric with precision.
- Cutting mat: If you opt for a rotary cutter, a self-healing cutting mat will protect your work surface and make cutting easier.
- Ruler: A quilting ruler with clear markings will help you achieve accurate measurements while cutting your fabric.
- Pins or clips: Use pins or clips to hold your fabric layers together as you sew.
- Sewing machine or needle and thread: If you have a sewing machine, it will make the stitching process faster and more efficient. However, you can also hand stitch your quilt if you prefer.
- Quilt batting: This is the material that goes between the quilt top and the backing. Choose a batting that suits your desired level of warmth and comfort.
- Backing fabric: The backing fabric is the fabric that forms the back of your quilt. It should be large enough to cover the entire quilt top with some extra for seam allowances.
- Quilt binding: The binding is a strip of fabric that finishes the edges of the quilt. You can choose a pre-made binding or make your own.
Take your time to gather these supplies before you begin. Being prepared will streamline the process and prevent interruptions as you progress through each step of quilt-making.
Step 2: Choosing a Quilt Pattern
Once you have gathered all your supplies, the next step in making a quilt is choosing a quilt pattern. Your chosen pattern will determine the overall design and layout of your quilt. There are countless quilt patterns to explore, ranging from simple and classic designs to intricate and modern creations.
When selecting a quilt pattern, consider your skill level and the time you are willing to invest in the project. Some patterns may require more advanced techniques or involve intricate piecing, which can be time-consuming. If you are a beginner, it’s wise to start with a simpler pattern that allows you to learn and practice the basic quilting techniques.
You can find quilt patterns through various sources, including quilting books, magazines, online resources, and even free patterns available on quilting websites. Take your time to browse through different patterns, consider your personal style preference, and envision how the finished quilt will look in your desired setting.
Once you’ve chosen a pattern, you may want to make it your own by selecting fabrics that align with your taste and desired color scheme. Consider the mood or theme you want to convey through your quilt and let that guide your fabric choices.
Remember, the quilt pattern you choose will influence both the aesthetic appeal and the time it takes to complete your quilt. Some patterns may require intricate piecing and precise alignment, which can add complexity and time to the project. Others may involve simpler block patterns that can be assembled quickly.
So take your time in selecting a quilt pattern that inspires you, matches your skill level, and aligns with the time frame you have in mind for completing your quilt. Remember, this is your opportunity to unleash your creativity and create a quilt that reflects your unique style and personality!
Step 3: Cutting the Fabric
Once you have your quilt pattern selected and your fabrics chosen, it’s time to start cutting the fabric. This step is crucial, as accurate and precise cutting will ensure that your quilt pieces fit together seamlessly. Here’s how to approach cutting the fabric:
- Prepare your fabric: Before cutting, ensure that your fabric is properly prepared by washing, drying, and ironing it. This will remove any wrinkles or sizing and prevent any unwanted surprises during the cutting process.
- Refer to your pattern: Look at your chosen quilt pattern and carefully read the instructions regarding the fabric cutting measurements and layouts. The pattern will guide you on the sizes and quantities of fabric pieces you need to cut for each component of the quilt.
- Use a cutting mat and ruler: Lay your fabric on a cutting mat to protect your work surface and use a quilting ruler to measure and mark the specific dimensions of the fabric pieces. Ensure that your ruler is securely pressed against the fabric to prevent any slippage during cutting.
- Use scissors or a rotary cutter: Depending on your preference and comfort level, use either fabric scissors or a rotary cutter to cut along the marked lines. Scissors work well for smaller pieces, while a rotary cutter provides smooth and precise cuts for longer strips or larger shapes. Exercise caution and use a cutting tool that you are confident and comfortable with.
- Organize your fabric pieces: As you cut each piece, group them together according to the pattern instructions. This will ensure that you have all the necessary fabric pieces ready for the next steps and help you stay organized throughout the quilting process.
Remember, accuracy is key when cutting the fabric for your quilt. It’s better to take your time and double-check your measurements than rush through this step and potentially end up with pieces that don’t fit together properly. A well-cut fabric will make the rest of the quilting process smoother and more enjoyable.
Once you have finished cutting your fabric pieces, you are ready to move on to the next step of assembling the quilt blocks. The satisfaction of seeing your carefully chosen fabrics come together in beautifully arranged blocks will make all the cutting effort worthwhile!
Step 4: Sewing the Quilt Blocks
With your fabric pieces cut and organized, it’s time to start sewing the quilt blocks together. The quilt blocks are the building blocks of your quilt’s design, and sewing them accurately is essential for an aesthetically pleasing finished product. Follow these steps to sew your quilt blocks:
- Refer to your pattern: Take a close look at your chosen quilt pattern and follow the instructions for sewing the quilt blocks. The pattern will guide you on the order in which to sew the fabric pieces together and any specific techniques or seam allowances to use.
- Organize your fabric pieces: Arrange your fabric pieces according to the pattern’s instructions, ensuring that they are within easy reach while you sew. Having your pieces organized will save you time and minimize confusion as you progress through each block.
- Match and pin fabric pieces: Align the edges of the fabric pieces that need to be sewn together, right sides facing each other. Pin them together to hold them in place during sewing. Take care to match any pattern elements or seam intersections accurately to maintain the desired design.
- Stitch the fabric pieces: Using a sewing machine or hand stitching, sew along the pinned edges with a seam allowance as specified in your pattern. Make sure to sew a straight and even seam for clean and professional-looking quilt blocks. Remove the pins as you sew and press the seams open or to the side, as directed in your pattern.
- Trim and square up the blocks: Once the blocks are sewn, trim any excess fabric and square up each block to ensure they are all the same size. This will help your quilt blocks fit together properly during assembly.
- Repeat for all blocks: Continue sewing and assembling the quilt blocks according to your pattern’s instructions. Take your time and enjoy the process of watching your quilt come together one block at a time.
Remember, accuracy is crucial when sewing the quilt blocks. Take care to sew straight and even seams, match pattern elements carefully, and trim and square up the blocks as needed. This attention to detail will ensure the blocks fit together seamlessly when assembling the quilt top.
Once you have completed sewing all the quilt blocks, you are ready to move on to the next step: assembling the quilt top. The satisfaction of seeing your carefully stitched blocks come together in a cohesive design will motivate you to keep going on your quilting journey!
When making a quilt, the time it takes can vary depending on the complexity of the design, your skill level, and the amount of time you can dedicate to the project. A simple quilt may take a few weeks, while a more intricate design could take several months to complete.
Step 5: Assembling the Quilt Top
Now that you have finished sewing all the quilt blocks, it’s time to assemble them into the quilt top. The quilt top is the main focal point of your quilt, showcasing the beautiful arrangement of colors and patterns you have chosen. Follow these steps to successfully assemble your quilt top:
- Plan the layout: Before you begin assembling the quilt top, take a moment to plan the layout of your blocks. Arrange them on a design wall or a flat surface and experiment with different combinations until you are satisfied with the overall look. Take pictures or make notes to help you remember the final layout.
- Join the blocks: Once you have settled on a layout, it’s time to join the blocks together. Align the edges of two adjacent blocks, right sides facing each other. Pin them together at the seams and sew a straight seam along the pinned edge, using the specified seam allowance from your pattern. Continue joining blocks until you have completed the entire quilt top.
- Press the seams: After sewing each seam, press it open or to the side, as directed in your pattern. Pressing helps to flatten the seams and create a neater appearance. Take care not to stretch or distort the quilt top while pressing.
- Check for accuracy: As you join the blocks, periodically check the accuracy of your seam allowances and block alignment. Ensure that your quilt top lays flat and the seams match up properly. Make any necessary adjustments to maintain the desired quilt top dimensions.
- Trim the edges: Once the quilt top is fully assembled, trim the edges to ensure they are straight and even. This will make it easier to attach the quilt batting and backing in the subsequent steps.
Assembling the quilt top requires attention to detail and precision. Take your time to join the blocks accurately and press the seams diligently. It’s important to maintain the integrity of the quilt design and ensure that all the blocks fit together seamlessly.
Once you have completed assembling the quilt top, take a moment to admire your hard work. The quilt top represents the culmination of your creativity and quilting skills. Now, it’s time to move on to the next step: adding the quilt batting.
Step 6: Adding the Quilt Batting
Adding the quilt batting is an important step in the quilt-making process as it provides the desired level of warmth and comfort to your finished quilt. The batting is the fluffy layer that goes between the quilt top and the backing fabric. Follow these steps to add the quilt batting:
- Select the right batting: Choose a batting that suits your preferences for warmth, loft, and ease of quilting. Batting materials can vary, including cotton, polyester, wool, or a blend of fibers. Consider the intended use of your quilt and select a batting that will provide the desired level of insulation.
- Prepare the quilt top: Ensure that your quilt top is free from loose threads and any excess fabric. Smooth out any wrinkles or folds and ensure that the top is flat and well-pressed.
- Lay out the backing fabric: Lay the backing fabric on a clean and flat surface with the wrong side facing up. Smooth out any wrinkles or creases and secure it in place with tape or weights.
- Place the batting: Carefully place the quilt batting on top of the backing fabric, ensuring that it is centered and accurately covers the entire quilt top. Smooth out any wrinkles or bubbles in the batting to ensure a flat and even surface.
- Layer the quilt top: Gently lay the quilt top on top of the batting, aligning the edges with the backing fabric. Smooth out any wrinkles or folds and ensure that the layers are well-aligned and evenly distributed.
- Secure the layers: Use safety pins or basting spray to temporarily secure the quilt layers together, ensuring that they stay in place during the quilting process. Start pinning or spraying in the center of the quilt and work your way towards the edges, making sure there are no tucks or puckers.
Adding the quilt batting is a crucial step that adds dimension, warmth, and comfort to your quilt. Take your time to ensure that the layers are flat and evenly distributed, and secure them properly to avoid shifting while quilting.
Once you have completed adding the quilt batting, you are now ready for the next step: quilting the layers together to create a cohesive and durable quilt.
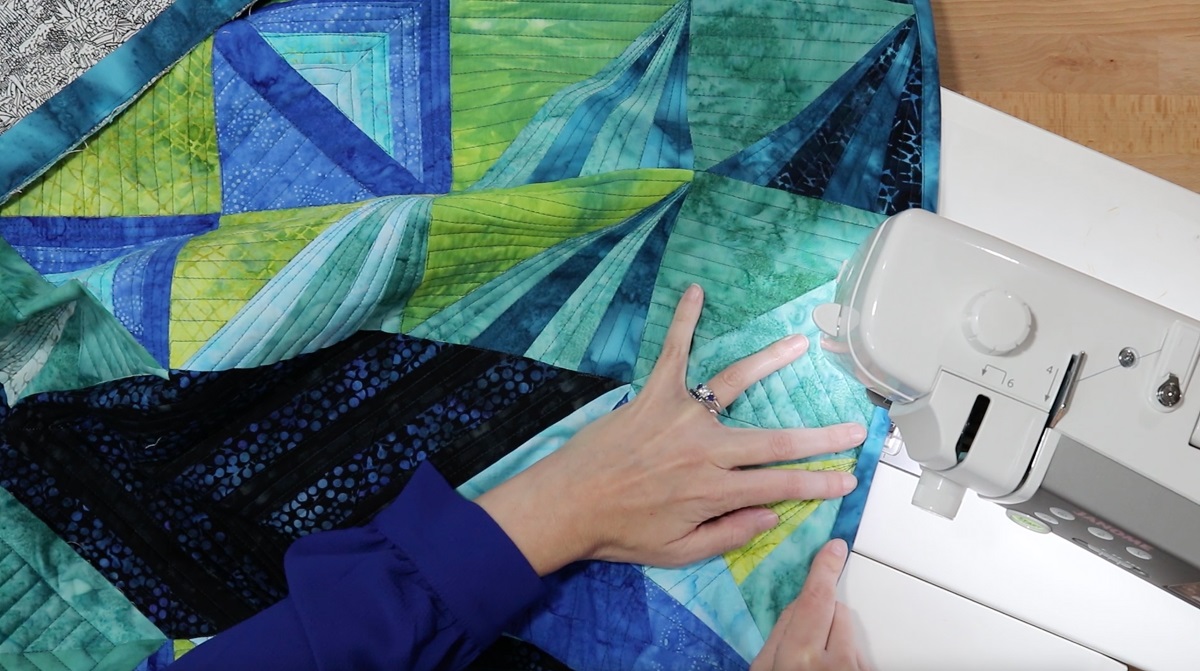
Step 7: Quilting the Layers
Quilting the layers together is a significant step in creating a finished quilt. This process involves stitching through all the layers—quilt top, batting, and backing—to securely hold them in place and create decorative patterns. Follow these steps to quilt your layers:
- Choose your quilting design: Decide on the quilting design and pattern you want to stitch onto your quilt. Consider factors such as the complexity of the design, your quilting experience, and the overall aesthetic you want to achieve. Options include free-motion quilting, straight-line quilting, or using a quilting template.
- Baste the layers: Basting is a temporary way to hold the layers together before quilting. You can baste using safety pins, curved safety pins, or long basting stitches. Start from the center of the quilt and work your way outwards to ensure even distribution and prevent puckers.
- Set up your machine or prepare your hand-sewing supplies: If you’re using a sewing machine, attach the walking foot or quilting foot for smoother and more even stitches. Ensure you have a full bobbin and a fresh needle appropriate for quilting. If you prefer hand quilting, thread a needle with a strong quilting thread and make sure you have a thimble handy for added comfort.
- Start quilting: Begin stitching your chosen quilting design onto the quilt. If using a machine, carefully guide the quilt under the sewing machine’s needle. For hand quilting, make small, evenly spaced stitches through all the layers. Work methodically, section by section, until the entire quilt is quilted.
- Secure loose threads and trim excess batting and backing: Once you complete the quilting, check for any loose threads and secure them by hand or with a knot. Trim any excess batting and backing fabric, ensuring that the edges are neat and tidy.
Quilting the layers adds texture, stability, and visual interest to your quilt. Experiment with different designs and techniques to achieve the desired effect. Take your time during this step, as it requires focus and precision.
Once you have finished quilting the layers, you are ready for the final step: binding the quilt and giving it a polished, finished look.
Step 8: Binding the Quilt
The final step in finishing your quilt is binding. Binding not only provides a clean and professional edge to your quilt but also helps to secure the raw edges and add durability. Follow these steps to bind your quilt:
- Prepare the binding fabric: Cut fabric strips for binding, ensuring they are wide enough to cover the quilt’s raw edges with some overlap. The length of the binding strips will depend on the size of your quilt. Join the strips together using diagonal seams to create one long continuous strip.
- Prepare the quilt edges: Trim the excess batting and backing fabric, making sure the quilt top and batting align neatly with the edges of the backing fabric. Press the quilt edges to ensure they are smooth and even.
- Attach the binding: Start by leaving a tail of binding fabric and align one raw edge of the binding strip with the raw edge of the quilt’s front side. Begin sewing a quarter-inch seam allowance along the edge, stopping a few inches before reaching the corner.
- Miter the corners: To create mitered corners, fold the binding fabric up at a 45-degree angle, creating a neat corner fold. Then, fold the binding back down, aligning it with the next edge, and continue stitching along the new edge. Repeat this process for all corners.
- Join the binding ends: When you reach the starting point, leave a tail of binding fabric and cut the strip, allowing for some overlap. Open the tails, fold one tail back on itself, and place the other tail over it. Stitch the tails together, trim any excess fabric, and re-fold the binding before stitching it down to the quilt.
- Finishing touches: Fold the binding over the raw edges to the back of the quilt and hand stitch it securely using a blind stitch. Take care to ensure the stitches are discreet and evenly spaced along the entire binding edge. Press the binding once it’s attached to give it a crisp, finished look.
Binding the quilt completes your project and gives it a polished appearance. Take your time during this step to make sure the binding is secure and neatly stitched. The choice of binding fabric and color can also enhance the overall aesthetic of your quilt.
Once the binding is attached and secured, stand back and admire your finished quilt. The journey from gathering supplies to binding the quilt has resulted in a beautiful and functional work of art that you can enjoy for years to come.
Conclusion
Making a quilt is a labor of love that requires creativity, patience, and attention to detail. Throughout the eight steps of quilting, from gathering supplies to binding the quilt, you have embarked on a journey that allows you to express your creativity and create a unique piece of art.
While the amount of time it takes to make a quilt varies depending on factors such as the design complexity, skill level, and time dedicated to the project, the process itself can be deeply rewarding. Each step in quilting, from choosing a pattern to sewing the quilt blocks, adds to the satisfaction of bringing your vision to life.
By gathering the necessary supplies, selecting a quilt pattern, cutting the fabric with precision, and sewing the blocks together, you have carefully constructed a quilt top that showcases your artistic choices and personal style. Adding the quilt batting, quilting the layers together, and finally binding the quilt provide the finishing touches that make it a complete and functional piece.
Throughout the quilting process, remember to embrace your own creativity and make the quilt your own. Take your time and enjoy the journey. Each stitch and decision you make contributes to the final outcome, making it a truly special creation.
Whether you keep the quilt for yourself, gift it to a loved one, or even enter it into a quilting show, you can take pride in knowing that you have created something beautiful and enduring. Quilts have a way of wrapping us in warmth and nostalgia, carrying with them not only the hours of dedicated work, but also the love and care poured into every stitch.
So, embrace the art of quilting and let your creativity soar. The possibilities are endless, and with each quilt you create, you’ll continue to refine your skills and leave a lasting legacy of creativity and craftsmanship.
Frequently Asked Questions about How Long Does It Take To Make A Quilt
Was this page helpful?
At Storables.com, we guarantee accurate and reliable information. Our content, validated by Expert Board Contributors, is crafted following stringent Editorial Policies. We're committed to providing you with well-researched, expert-backed insights for all your informational needs.


0 thoughts on “How Long Does It Take To Make A Quilt”