Articles
How To Cook Hashbrowns In Electric Skillet
Modified: August 24, 2024
Learn how to cook hashbrowns in an electric skillet with our informative articles. Discover the best techniques and tips for delicious results.
(Many of the links in this article redirect to a specific reviewed product. Your purchase of these products through affiliate links helps to generate commission for Storables.com, at no extra cost. Learn more)
Introduction
Craving a delicious and crispy breakfast? Look no further than homemade hashbrowns cooked in an electric skillet. Whether you’re a breakfast aficionado or just looking to switch up your morning routine, this article will guide you through the process of making perfectly cooked hashbrowns using your trusty electric skillet.
Hashbrowns are a classic breakfast staple that are both simple to make and incredibly versatile. These crispy and golden-brown delights are made from shredded potatoes, seasoned to perfection and cooked until they reach the perfect level of crispiness. The electric skillet provides an excellent cooking platform for hashbrowns, ensuring even heat distribution and a consistent result.
In this article, we’ll go through step-by-step instructions on how to prepare and cook hashbrowns using an electric skillet. From preheating the skillet to serving up a plate of mouth-watering hashbrowns, you’ll learn all the tips and tricks for achieving the perfect breakfast treat.
So, grab your electric skillet and let’s get started on this delicious journey of making homemade hashbrowns!
Key Takeaways:
- Master the art of creating crispy and flavorful hashbrowns in your electric skillet with simple steps, from prepping the skillet to perfecting the seasoning and achieving the ideal level of crispiness.
- Impress your family and friends with a breakfast feast featuring your homemade hashbrowns. Get creative with toppings and seasonings to customize your hashbrowns and elevate your breakfast experience.
Read more: How To Cook On Electric Skillet
Preparing the Electric Skillet
Before diving into the hashbrown-making process, it’s important to ensure that your electric skillet is properly prepared. Here are a few steps to follow:
- Check the Skillet’s Condition: Before using your electric skillet, inspect it for any damage or signs of wear and tear. Make sure the power cord is intact and that the skillet is clean and free of any debris.
- Choose the Right Size: Consider the size of your electric skillet in relation to the quantity of hashbrowns you plan to make. It’s important not to overcrowd the skillet as this can prevent the hashbrowns from cooking evenly.
- Preheat the Skillet: Most electric skillets have a temperature control setting. Preheat your skillet to medium-high heat, around 375°F (190°C). This will provide an optimal cooking temperature for the hashbrowns.
- Add Cooking Oil: To prevent the hashbrowns from sticking to the skillet, it’s essential to add a thin layer of cooking oil. You can use vegetable oil, canola oil, or any other oil with a high smoke point. Make sure to spread the oil evenly across the entire surface of the skillet.
Once you’ve completed these steps, your electric skillet will be ready for the hashbrown-making adventure. Now, gather all the necessary ingredients and let’s move on to the next step: shredding the potatoes!
Ingredients
To make delicious hashbrowns in an electric skillet, you’ll need the following ingredients:
- 4 large russet potatoes
- 2 tablespoons of cooking oil (vegetable oil or canola oil)
- 1 teaspoon of salt
- ½ teaspoon of black pepper
- Optional toppings (shredded cheese, chopped green onions, sour cream, etc.)
The number of potatoes can be adjusted based on your desired serving size. If you’re cooking for a larger group, you may want to increase the quantity accordingly.
Feel free to add other seasonings or spices to customize the flavor of your hashbrowns. Garlic powder, onion powder, or paprika are great additions that can take your hashbrowns to a whole new level.
Once you have gathered all the necessary ingredients, it’s time to move on to the next step: preheating the electric skillet.
Step 1: Preheating the Electric Skillet
Preheating the electric skillet is an essential step in ensuring that your hashbrowns cook evenly and achieve that perfect crispy texture. Here’s how to preheat the skillet:
- Plug in your electric skillet and turn it on. Set the temperature control to medium-high heat, typically around 375°F (190°C).
- Allow the electric skillet to heat up for a few minutes, giving it enough time to reach the desired temperature. This will ensure that the heat is evenly distributed across the cooking surface.
- To test if the skillet is ready, sprinkle a few drops of water onto the surface. If the water immediately sizzles and evaporates, then the skillet is hot enough to start cooking. If the water doesn’t sizzle, give it a little more time to heat up.
Properly preheating the electric skillet is crucial as it allows the hashbrowns to cook more efficiently and reduces the risk of them sticking to the surface. Once the skillet is hot and ready, it’s time to move on to the next step: shredding the potatoes.
Step 2: Shredding the Potatoes
Shredding the potatoes is a key step in creating the perfect texture for your hashbrowns. Here’s how to shred the potatoes:
- Start by washing the potatoes thoroughly under cold water to remove any dirt or debris. Pat them dry with a clean towel.
- Using a box grater or a food processor with a grater attachment, grate the potatoes. Aim for a medium to fine shred, depending on your preference.
- As you grate the potatoes, transfer them to a large bowl filled with cold water. This will help remove excess starch from the potatoes, keeping them from sticking together and achieving a crispy texture.
Shredding the potatoes directly into the water will prevent them from turning brown due to oxidation. Make sure to shred all the potatoes and submerge them in the water to keep them fresh until you’re ready to proceed with the next step.
Once all the potatoes are shredded and submerged in water, it’s time to move on to the next step: removing excess moisture from the potatoes.
Read more: How To Cook Pasta In Electric Skillet
Step 3: Removing Excess Moisture from the Potatoes
Removing excess moisture from the shredded potatoes is crucial for achieving crispy hashbrowns. Here’s how to do it:
- Drain the shredded potatoes using a colander or a fine-mesh sieve. This will help get rid of the water they were soaking in and prevent the hashbrowns from becoming soggy.
- Using your hands or a clean kitchen towel, squeeze the shredded potatoes firmly to remove as much water as possible. This step is crucial as excess moisture can hinder the browning process.
- Transfer the squeezed potatoes to a clean, dry bowl. It’s important to work quickly at this stage to prevent any further moisture absorption.
Removing excess moisture will ensure that your hashbrowns cook evenly and have a delightful crispy texture. The drier the potatoes, the crispier the hashbrowns will be. With the excess moisture removed, it’s time to move on to the next step: seasoning the potatoes.
Step 4: Seasoning the Potatoes
Seasoning the potatoes is an important step to add flavor and enhance the taste of your hashbrowns. Here’s how to season the potatoes:
- In the bowl with the drained and dried shredded potatoes, add the salt and black pepper. These two basic seasonings will provide a good foundation of flavor for your hashbrowns.
- Using your hands or a spoon, toss the potatoes gently to ensure that the seasonings are evenly distributed. You can also add additional seasonings at this stage to customize the flavor to your liking. Garlic powder, onion powder, or paprika are popular choices.
Remember that the amount of seasoning can be adjusted based on your personal preference. Start with a moderate amount and taste the raw potato mixture to see if it needs more salt or other seasonings before moving on to the cooking process.
Once the potatoes are well-seasoned, it’s time to move on to the next step: cooking the hashbrowns in the electric skillet.
To cook hashbrowns in an electric skillet, make sure the skillet is preheated and the hashbrowns are spread out evenly to ensure even cooking. Use a spatula to flip them halfway through for a crispy texture.
Step 5: Cooking the Hashbrowns
Now that the potatoes are seasoned and ready, it’s time to cook the hashbrowns in the electric skillet. Here’s how to do it:
- Preheat the electric skillet to medium-high heat, around 375°F (190°C).
- Add the cooking oil to the hot skillet, spreading it evenly across the cooking surface.
- Once the oil is heated, carefully transfer the seasoned shredded potatoes into the skillet, distributing them evenly to cover the entire surface.
- Using a spatula, press down on the potatoes gently to create an even layer. This will promote even cooking and help the hashbrowns hold their shape.
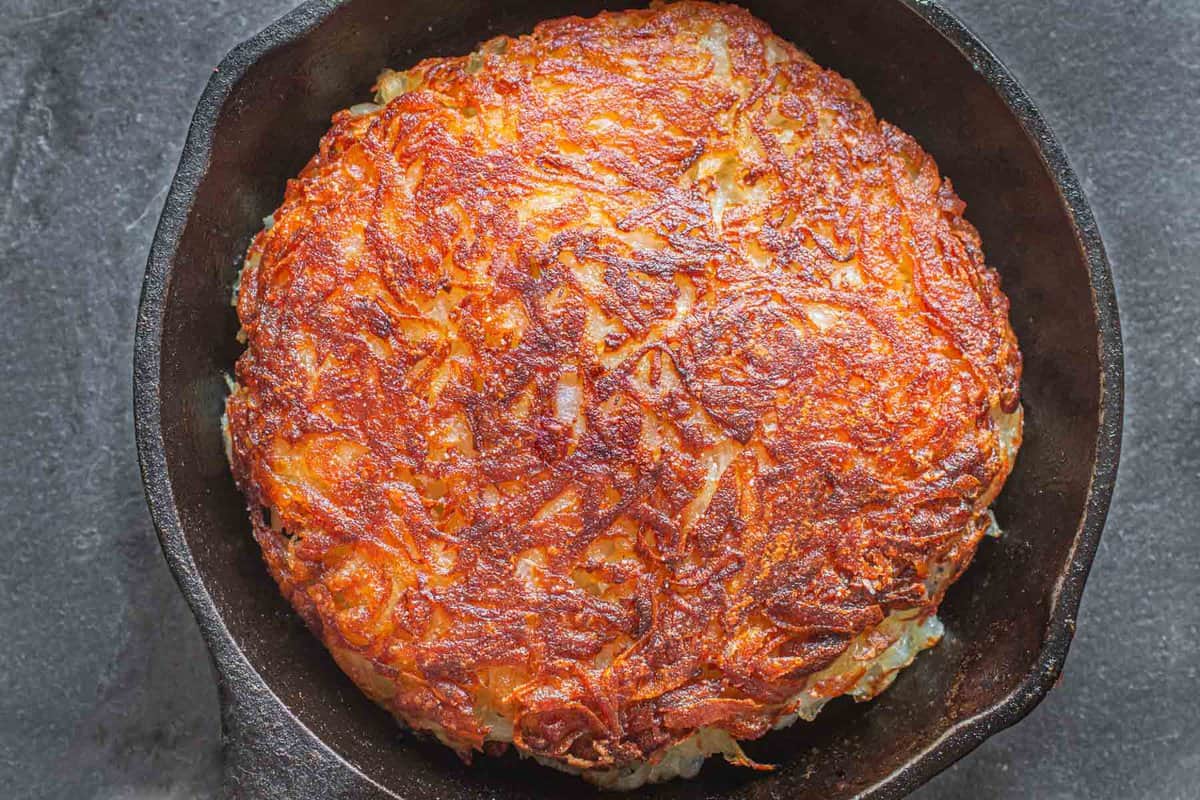
- Cook the hashbrowns for about 8-10 minutes, or until the bottom side becomes golden brown and crispy. Avoid stirring or flipping them during this time to allow for uninterrupted browning.
While the hashbrowns are cooking, you’ll notice a mouth-watering aroma filling the air. Resist the temptation to peek or stir too early, as this can disrupt the browning process.
Once the bottom side of the hashbrowns is nicely browned, it’s time to move on to the next step: flipping the hashbrowns!
Step 6: Flipping the Hashbrowns
Flipping the hashbrowns is an important step to ensure that both sides are evenly cooked and achieve that perfect golden-brown color. Here’s how to flip the hashbrowns:
- Using a spatula, carefully loosen the edges of the hashbrowns from the skillet to prevent sticking.
- Place a large plate or cutting board upside down over the skillet.
- With one hand firmly holding the plate or cutting board, and the other hand holding the skillet handle, flip the skillet and plate together so that the uncooked side of the hashbrowns is now facing up on the plate.
- Gently lift the skillet off the plate, revealing the flipped hashbrowns.
This flipping technique ensures that the hashbrowns hold their shape and maintain their crispy texture. If any pieces stick to the skillet, simply use a spatula to place them back onto the flipped hashbrowns.
With the hashbrowns flipped, it’s time to move on to the next step: cooking the other side to perfection.
Read more: What Is An Electric Skillet
Step 7: Cooking the Other Side
Now that you’ve successfully flipped the hashbrowns, it’s time to cook the other side to achieve that delightful golden-brown color and crispy texture. Here’s how to cook the other side:
- Carefully slide the flipped hashbrowns from the plate back into the electric skillet, ensuring that the cooked side is now facing up.
- Using a spatula, gently press down on the potatoes to create an even layer.
- Cook the hashbrowns for another 8-10 minutes, or until the second side becomes golden brown and crispy.
- Again, avoid stirring or flipping the hashbrowns too often during this time to allow for even browning.
As the aroma of the cooking hashbrowns fills your kitchen, you’ll be greeted with anticipation for the delicious results to come. The second side will take slightly less time to cook compared to the first side, so keep a close eye on them to avoid burning.
Once the hashbrowns are beautifully golden brown on both sides, it’s time to move on to the next step: checking for crispiness.
Step 8: Checking for Crispiness
Checking for crispiness is an essential step to ensure that your hashbrowns have achieved the desired texture. Here’s how to check for crispiness:
- Using a spatula, lift a small portion of the cooked hashbrowns from the skillet and take a bite. Pay attention to the texture and flavor.
- If the hashbrowns are crispy and golden brown on the outside, with a tender and fluffy interior, they are ready to be served. If they need more crispiness, continue cooking for an additional few minutes, checking periodically.
- Remember that personal preference for crispiness can vary, so adjust the cooking time to achieve the desired level of crunch.
It’s important to note that the hashbrowns may appear crispy on the outside but still have a slightly undercooked interior. If this is the case, you can place them in a preheated oven at a low temperature (around 250°F/120°C) for a few minutes to ensure they are cooked through.
Once the hashbrowns have reached the perfect level of crispiness, it’s time to move on to the final step: serving up a plate of delicious homemade hashbrowns!
Step 9: Serving the Hashbrowns
Congratulations! You’ve successfully cooked a batch of crispy and delicious hashbrowns in your electric skillet. Now, it’s time to serve them up and enjoy the fruits of your labor. Here’s how to serve the hashbrowns:
- Using a spatula, carefully transfer the cooked hashbrowns from the skillet onto a serving platter or individual plates.
- For added flavor and variety, consider serving your hashbrowns with a side of ketchup, hot sauce, or sour cream. Alternatively, you can sprinkle some shredded cheese, chopped green onions, or cooked bacon bits on top.
- Garnish the hashbrowns with a sprinkle of fresh herbs, such as parsley or chives, for a touch of freshness.
- Serve the hashbrowns while they are still hot and crispy to fully enjoy their wonderful texture and flavor.
Hashbrowns make a delightful addition to any breakfast or brunch spread. They pair well with eggs, bacon, sausage, or even as a side dish with pancakes or waffles. Get creative and customize your hashbrowns to your liking with additional toppings and seasonings.
Now that you’ve mastered the art of making hashbrowns in an electric skillet, invite your family and friends over for a breakfast feast and impress them with your homemade culinary skills!
So, grab a fork and dig into a plate of mouthwatering hashbrowns that are crispy on the outside, tender on the inside, and bursting with flavor. Enjoy!
Conclusion
Congratulations on learning how to cook hashbrowns in an electric skillet! This versatile and delicious breakfast dish is now within your culinary repertoire. With just a few simple steps, you can create golden-brown, crispy hashbrowns that are sure to be a hit at your breakfast table.
We started by preparing the electric skillet, ensuring it was in good condition and properly preheated. Then, we shredded the potatoes, removed excess moisture, and seasoned them to perfection. Cooking the hashbrowns involved careful flipping and cooking both sides until they were crispy and golden brown.
By following these steps, you can achieve hashbrowns with a crispy exterior and a tender interior, the perfect balance of texture and taste. Whether enjoyed on its own or as a delicious side with your favorite breakfast dishes, homemade hashbrowns are a wonderful way to start your day.
Remember to get creative with your toppings and seasonings, tailoring the hashbrowns to your personal preference. Add some shredded cheese, sour cream, or chopped green onions for extra flavor and visual appeal.
Now that you have mastered the art of making hashbrowns in an electric skillet, it’s time to show off your culinary skills to family and friends. Prepare a delicious breakfast spread featuring your homemade hashbrowns, and watch as everyone enjoys the crispy, flavorful bites.
So, grab your electric skillet, some potatoes, and your favorite seasonings, and embark on a journey of creating mouthwatering hashbrowns that will make your breakfasts unforgettable. Happy cooking!
Now that you've mastered cooking hashbrowns in your electric skillet, why not expand your culinary skills further? Discover various other cooking methods tailor-made for your electric skillet that can transform your everyday meals into something extraordinary. For those who crave more variety, dive into a collection of must-try skillet recipes that promise to deliver mouth-watering dishes for every occasion in 2024. These guides are perfect for enhancing your cooking repertoire and impressing friends and family with new, delightful flavors.
Frequently Asked Questions about How To Cook Hashbrowns In Electric Skillet
Was this page helpful?
At Storables.com, we guarantee accurate and reliable information. Our content, validated by Expert Board Contributors, is crafted following stringent Editorial Policies. We're committed to providing you with well-researched, expert-backed insights for all your informational needs.


0 thoughts on “How To Cook Hashbrowns In Electric Skillet”