Articles
How To Make A Solar Space Heater
Modified: August 17, 2024
Learn how to make a solar space heater with our detailed articles. Harness the power of the sun to heat your space efficiently and sustainably.
(Many of the links in this article redirect to a specific reviewed product. Your purchase of these products through affiliate links helps to generate commission for Storables.com, at no extra cost. Learn more)
Introduction
Welcome to the exciting world of solar space heating! If you’re looking for a cost-effective and eco-friendly way to warm up your living space, a solar space heater is the perfect solution. Unlike traditional heating systems that rely on fossil fuels or electricity, solar space heaters harness the power of the sun to provide warmth.
Not only does using solar energy help reduce your carbon footprint, but it also helps you save money in the long run by decreasing your dependence on conventional heating methods. Plus, creating your own solar space heater can be a fun and rewarding DIY project that allows you to customize it according to your needs.
In this article, we will guide you through the process of making a solar space heater from scratch. Whether you’re a seasoned DIY enthusiast or a beginner looking to embark on your first solar project, we’ve got you covered. So, let’s dive in and discover how you can harness the power of the sun to heat your space in an environmentally friendly way.
Key Takeaways:
- Building a solar space heater is a rewarding DIY project that provides a cost-effective and eco-friendly way to heat your living space. By harnessing the power of the sun, you can reduce your carbon footprint and lower your energy bills while enjoying a more sustainable heating solution.
- The step-by-step process of building a solar space heater involves understanding solar space heaters, determining the heater size, designing the structure, installing insulation, building the solar collector, connecting the collector to the heater, adding a fan or heat exchanger, and testing and adjusting the heater. Each step is crucial in ensuring the efficiency and effectiveness of your solar space heater.
Understanding Solar Space Heaters
Before we jump into the nitty-gritty of building a solar space heater, let’s take a moment to understand how these ingenious devices work.
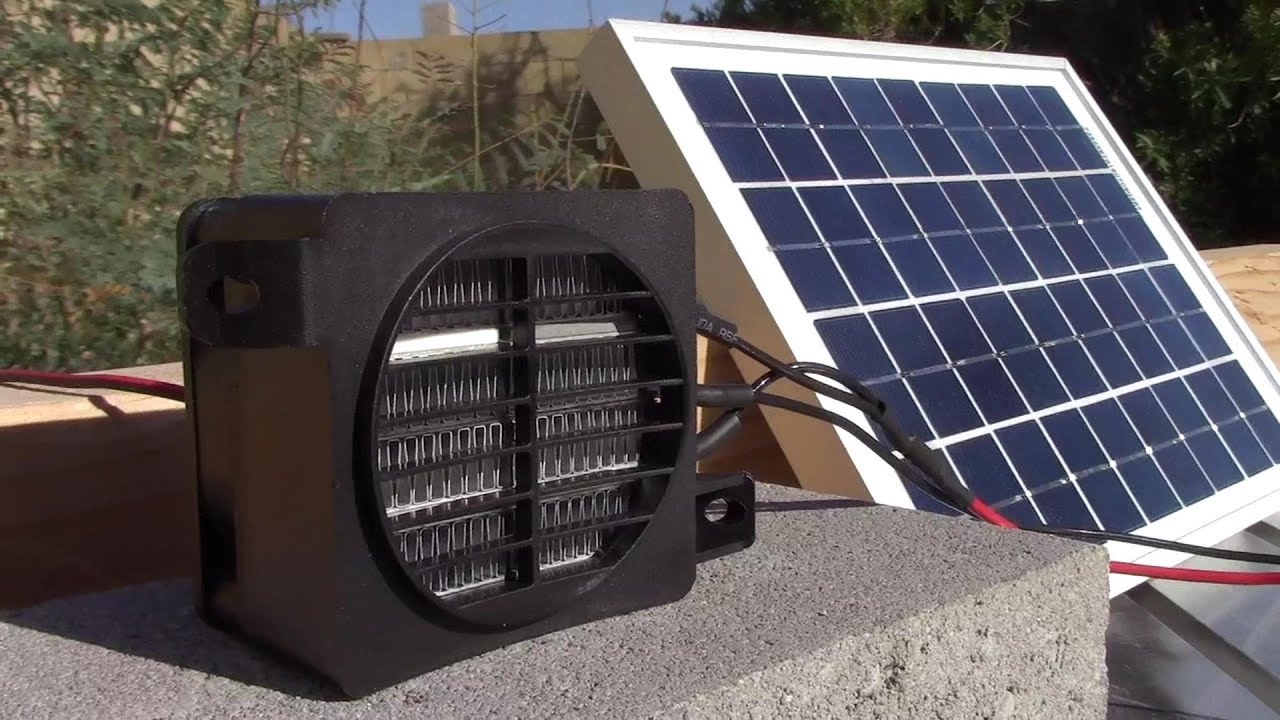
A solar space heater operates on a simple principle: it captures sunlight and converts it into heat energy that can be used to warm up a room or an entire living space. The basic components of a solar space heater include a solar collector, which absorbs the sunlight, and a heat exchanger or fan, which transfers the captured heat into the room.
There are two main types of solar space heaters: passive and active. Passive solar space heaters rely on the principles of convection and radiation to distribute the heat. These heaters typically have a south-facing window or wall that absorbs sunlight during the day and releases the stored heat slowly throughout the night.
Active solar space heaters, on the other hand, use mechanical devices such as fans or heat exchangers to circulate the captured heat more efficiently. These heaters can be integrated with existing heating systems or operate as standalone units.
It’s important to note that solar space heaters are most effective in regions with ample sunlight throughout the year. However, even in areas with less sunshine, solar space heaters can still provide a significant reduction in heating costs.
In addition to their environmental and cost-saving benefits, solar space heaters offer a few other advantages. They provide a more sustainable heating solution, reduce dependence on non-renewable energy sources, and can even increase the value of your property. Plus, by generating heat locally, they allow you to have more control over your heating needs and avoid fluctuations in energy prices.
Now that we have a basic understanding of solar space heaters, let’s move on to the materials needed to build one of these innovative devices.
Materials Needed
When it comes to building a solar space heater, you’ll need a few essential materials to get started. Here’s a list of what you’ll need:
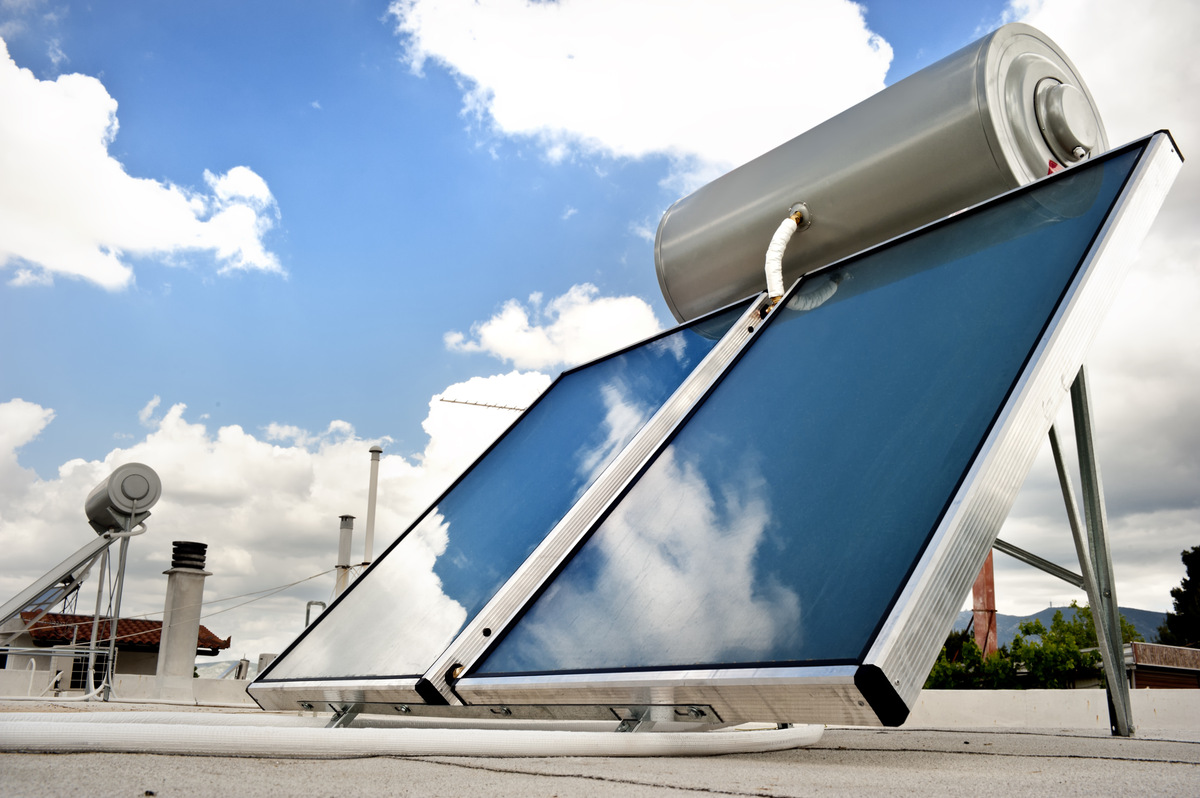
- Solar collector: This is the heart of your solar space heater. You can either purchase a pre-made solar collector or build one from scratch using materials like copper pipes, aluminum fins, and a glazing material such as glass or polycarbonate. The size of the collector will depend on the size of the space you want to heat.
- Insulation: Insulating your space properly is crucial to maintain the heat generated by the solar heater. You’ll need insulation material like fiberglass batts, foam board, or reflective insulation to prevent heat loss through walls, windows, and ceilings.
- Frame: A sturdy frame is needed to support and protect the solar collector. You can use materials like wood or metal to construct a frame that fits the dimensions of your collector.
- Fan or heat exchanger: If you want to enhance the efficiency of your solar space heater, you’ll need a fan or a heat exchanger to distribute the captured heat evenly throughout the room. These can be purchased from a store or salvaged from old appliances.
- Piping and connectors: To connect the solar collector to your heating system, you’ll need pipes and connectors. Copper pipes are commonly used due to their excellent thermal conductivity.
- Pump: If you’re opting for an active solar space heater, you’ll need a small circulating pump to move the heat-transfer fluid through the collector and into the heating system.
- Controller (optional): A controller can help regulate the operation of your solar space heater. It allows you to monitor the temperature, set timers, and control the fan or pump.
These are the basic materials you’ll need to build a solar space heater. Depending on your specific design and preferences, you may require additional tools and equipment. Now that we have our materials ready, let’s move on to the step-by-step process of building a solar space heater.
Step 1: Determine the Heater Size
The first step in building a solar space heater is to determine the appropriate size of the heater. This will depend on several factors, including the size of the space you want to heat, the amount of sunlight available in your location, and your desired temperature increase.
To calculate the required size of the heater, you’ll need to consider the heat loss of the space. This can be measured in British Thermal Units (BTUs) or kilowatts (kW). You can use online calculators or consult with a heating professional to estimate the heat loss.
Once you have the heat loss figure, you can determine the size of the solar collector. As a general guideline, a rule of thumb is to have a solar collector area that is about 50-100% of the floor area you intend to heat. For example, if you have a 200 square foot room, you’ll want a solar collector area of approximately 100 to 200 square feet.
Keep in mind that larger collectors can capture more sunlight, resulting in higher heat output. However, it’s also important to consider practicality and space limitations when determining the heater size.
Additionally, you’ll need to consider factors such as insulation, local climate, and solar access. If your space is well-insulated, you may require a smaller heater. Conversely, if you live in a colder climate with less sunlight, you may need a larger heater to compensate for the lower solar input.
By accurately determining the size of your solar space heater, you can ensure optimal heating efficiency and comfort in your living space. Once you have the heater size determined, you can move on to designing the structure of the heater in the next step.
Step 2: Design the Structure of the Heater
After determining the size of your solar space heater, the next step is to design the structure that will house the solar collector and effectively capture the sunlight. The design of the structure will depend on factors such as available space, aesthetic preferences, and ease of installation.
One common design option is to build a box-like structure to enclose the solar collector. The box can be made from materials like wood, metal, or even plastic. Make sure the structure is sturdy and weatherproof, as it will be exposed to the elements.
The dimensions of the structure should allow for a snug fit around the solar collector, with enough space for proper airflow and insulation. Remember to consider the orientation and tilt of the solar collector to optimize sunlight absorption.
It’s essential to incorporate an access panel or window in the structure to allow for cleaning and maintenance of the solar collector. This panel should be made from a transparent or translucent material such as glass or polycarbonate to allow sunlight to pass through.
Furthermore, consider the placement of the structure. Ideally, it should be located in an area with ample sunlight exposure, such as a south-facing wall or roof. Additionally, ensure that there are no obstructions like trees or nearby buildings that could block the sunlight.
Keep in mind that the design of the structure can vary depending on the type of solar space heater you’re building. For passive heaters, the structure may need to incorporate an inlet and outlet for airflow. For active heaters, the structure will need to accommodate the pump, fan, and other components.
Remember to plan the structure design carefully to maximize the efficiency and effectiveness of your solar space heater. Once you have the design finalized, you can proceed to the next step: installing the insulation.
Read also: 11 Best Solar Powered Space Heater For 2025
Step 3: Install the Insulation
Insulation is a critical component of your solar space heater as it helps to prevent heat loss and maintain the captured warmth within the designated space. Proper insulation ensures that the heat produced by the solar collector remains inside your living area, making your solar space heater more efficient and effective.
The type of insulation material you choose will depend on your personal preference, budget, and the specific requirements of your space. Some common insulation options include fiberglass batts, foam board, reflective insulation, and spray foam. Each material has its own pros and cons, so it’s important to do some research and select the one that best suits your needs.
When installing insulation, make sure to cover any walls, ceilings, and floors that are exposed to the outside environment. Additionally, pay attention to areas around windows, doors, and any other potential points of heat loss. You may need to cut the insulation material to fit the specific dimensions of your space.
Seal any gaps or cracks in walls and windows using caulk or weatherstripping to further prevent heat loss. This step is crucial in ensuring that your solar space heater operates efficiently and minimizes energy waste.
Remember to follow proper safety precautions when handling insulation materials, such as wearing gloves, long sleeves, and a mask to protect yourself from any potential irritants.
By installing insulation correctly, you can significantly improve the performance of your solar space heater and maximize the heating benefits it provides. Once the insulation is in place, it’s time to move on to building the solar collector in the next step.
Ensure that the solar space heater is positioned in a location that receives maximum sunlight exposure throughout the day to maximize its heating efficiency.
Step 4: Build the Solar Collector
The solar collector is the heart of your solar space heater. It is responsible for absorbing sunlight and converting it into heat energy that can be used to warm up your space. Building a well-designed and efficient solar collector is crucial for the success of your solar space heating system.
There are several different types of solar collectors to choose from, including flat plate collectors, evacuated tube collectors, and air collectors. The specific design of the collector will depend on factors such as your heating needs, available materials, and budget.
If you’re building a flat plate collector, here are the basic steps to follow:
- Start by selecting a suitable material for the absorber plate. Copper is a popular choice due to its excellent thermal conductivity, but aluminum or steel can also work. Cut the plate to the desired size and shape.
- Add a black coating to the absorber plate to enhance its heat absorption capabilities. This can be achieved by painting the plate with heat-resistant black paint or applying a selective coating.
- Next, attach tubes or fins to the back of the absorber plate to improve heat transfer. Copper or aluminum tubes are commonly used for this purpose. Ensure they are securely attached to maximize heat absorption.
- Construct an insulated box or frame to enclose the absorber plate and tubes. Use materials like wood or metal, and ensure there is insulation surrounding the sides and back of the collector to minimize heat loss.
- Seal the collector to prevent air leakage and moisture penetration. Use materials like caulking or weatherstripping to ensure a tight seal.
- Finally, add a glazing material to the front of the collector to trap heat inside while allowing sunlight to pass through. Glass or polycarbonate are commonly used for this purpose.
Remember to follow safety guidelines and seek professional advice if needed when building your solar collector. It’s important to ensure that the collector is well-designed, properly insulated, and efficient at capturing sunlight.
Once your solar collector is built, it’s time to move on to the next step: connecting the solar collector to the heater.
Step 5: Connect the Solar Collector to the Heater
Now that you have built the solar collector for your space heater, it’s time to connect it to the heating system. This step is crucial for transferring the captured heat from the collector to your living space.
There are a few different methods you can use to connect the solar collector to the heater, depending on whether you have a passive or active solar space heating system.
For a passive system, you will typically connect the solar collector directly to a south-facing window or wall. This allows the heat absorbed by the collector to naturally radiate into the room. Make sure to seal any gaps or openings around the connection point to minimize heat loss. Additionally, consider using a fan or heat exchanger to improve heat distribution if needed.
For an active system, you will need to install a heat exchanger or connect the collector to your existing heating system. The heat exchanger allows the heat captured by the collector to be transferred to a heat transfer fluid, such as water or antifreeze solution. This fluid is then pumped into your heating system, where it releases the captured heat.
To connect the collector to the heat exchanger or heating system, you will need pipes, connectors, and a circulating pump if one is not already installed. Copper pipes are commonly used due to their excellent thermal conductivity. Follow proper plumbing guidelines and consult with a professional if needed to ensure a secure and efficient connection.
Ensure that any connections and joints are properly sealed to prevent leaks. Proper insulation around the pipes can also help minimize heat loss during the transfer process.
Remember, the goal is to transfer the captured heat from the solar collector to your living space in the most efficient and effective way. Take into consideration factors like pipe length, flow rate, and insulation to optimize the system’s performance.
Once the solar collector is successfully connected to the heater, you can move on to the next step: adding a fan or heat exchanger to further enhance heat distribution.
Step 6: Add a Fan or Heat Exchanger
To improve the efficiency and effectiveness of your solar space heater, you can add a fan or heat exchanger to help distribute the captured heat evenly throughout the room. This step is particularly important for active solar space heating systems.
A fan can be used to circulate the warm air produced by the solar collector. It helps to distribute the heat more quickly and evenly, ensuring that your space is heated efficiently. You can choose from various types of fans, such as axial fans or centrifugal fans, based on your specific needs and preferences.
If you prefer a more indirect approach, you can opt for a heat exchanger. A heat exchanger transfers the captured heat from the solar collector to the air in your heating system. It works by using a series of tubes or fins to facilitate the exchange of heat between the two mediums. As the warm air from the collector passes through the heat exchanger, it transfers its heat energy to the circulating air, warming it up before releasing it into the room.
When adding a fan or heat exchanger, ensure that they are properly integrated into your solar space heating system. This may involve adjusting the airflow, installing ductwork or vents, and connecting the necessary electrical components.
If you are unsure about the technical aspects of adding a fan or heat exchanger, it’s best to consult with a professional to ensure safe and optimal function. They can provide guidance on the appropriate size and type of fan or heat exchanger, as well as help with installation and system integration.
Remember, the purpose of adding a fan or heat exchanger is to enhance heat distribution and ensure that your space is heated efficiently. By incorporating these components, you can maximize the benefits of your solar space heater and enjoy a warm and comfortable living environment.
Once the fan or heat exchanger is installed, you are ready for the final step: testing and adjusting your solar space heater.
Read more: How To Build A Solar Water Heater
Step 7: Test and Adjust the Heater
Now that your solar space heater is complete, it’s time to test and adjust it to ensure optimal performance and efficiency. This step is crucial to fine-tune your system and make any necessary adjustments for maximum heat output.
Start by conducting a thorough inspection of your entire solar space heating system. Check for any leaks, loose connections, or malfunctions in components such as the solar collector, pipes, pump, fan, or heat exchanger. Address any issues promptly to prevent further complications and ensure safety.
Next, test the operation of your solar space heater by turning it on and monitoring its performance. Observe the temperature rise in the space being heated and compare it with your desired temperature increase. Note any discrepancies or areas where heat distribution may be uneven.
If you notice any inconsistencies in heat output or distribution, consider the following adjustments:
- Check the angle and orientation of the solar collector: Ensure that it is positioned correctly to maximize sunlight absorption throughout the day.
- Inspect the insulation: Make sure it is properly installed and sealed to prevent heat loss.
- Check the airflow: Adjust the fan speed or ductwork to ensure even distribution of warm air.
- Consider adjusting the flow rate of the heat transfer fluid: This can be done by adjusting the speed of the circulating pump or installing valves to control the flow.
- Take note of any changes in weather conditions: Adjustments may be required to optimize the system’s performance during varying levels of sunlight.
Keep in mind that some trial and error may be necessary to achieve the desired heating results. Don’t hesitate to experiment with different settings and configurations to find what works best for your specific space and environment.
Additionally, it’s important to monitor and maintain your solar space heating system regularly. Clean the solar collector periodically to remove any dust or debris that may hinder its performance. Inspect the system for any signs of wear and tear, and address any maintenance needs promptly.
By testing and adjusting your solar space heater, you can ensure that it operates at its full potential, providing you with a reliable and efficient source of heat. Enjoy the benefits of your DIY solar space heating system and revel in the warmth it brings to your living space.
Congratulations! You have successfully completed all the steps to build and optimize your solar space heater. Embrace the comfort and sustainability that this eco-friendly heating solution offers.
Conclusion
Building a solar space heater is not only a rewarding DIY project, but it also provides a cost-effective and eco-friendly way to heat your living space. By harnessing the power of the sun, you can reduce your carbon footprint, lower your energy bills, and enjoy a more sustainable heating solution.
Throughout this article, we covered the step-by-step process of building a solar space heater. We began by understanding the concept of solar space heaters and the different types available, including passive and active systems. We then discussed the materials needed, such as the solar collector, insulation, and frame.
Next, we delved into the specific steps of determining the heater size, designing the structure, installing insulation, building the solar collector, connecting the collector to the heater, adding a fan or heat exchanger, and testing and adjusting the heater. Each step plays a vital role in ensuring the efficiency and effectiveness of your solar space heater.
By following these steps and making any necessary adjustments along the way, you can create a solar space heating system that meets your heating needs while minimizing energy consumption. You’ll not only enjoy a warm and comfortable living environment but also contribute to a cleaner and more sustainable future.
Remember to periodically maintain and monitor your solar space heater to ensure its continued performance. Clean the solar collector, check for any leaks or malfunctions, and make adjustments as needed to optimize heat distribution.
Embrace the benefits of your DIY solar space heater and encourage others to explore the possibilities of renewable energy. By transforming solar energy into heat, we can reduce our reliance on conventional heating methods and make a positive impact on our planet.
So, gather your materials, unleash your creativity, and embark on the journey of building your solar space heater. Enjoy the warmth and satisfaction that comes with harnessing the power of the sun while contributing to a greener and more sustainable world.
Frequently Asked Questions about How To Make A Solar Space Heater
Was this page helpful?
At Storables.com, we guarantee accurate and reliable information. Our content, validated by Expert Board Contributors, is crafted following stringent Editorial Policies. We're committed to providing you with well-researched, expert-backed insights for all your informational needs.


0 thoughts on “How To Make A Solar Space Heater”