Articles
How To Store A Car For The Winter
Modified: October 19, 2024
Learn effective strategies for storing your car during the winter months in this informative articles. Discover expert tips to keep your vehicle in optimal condition.
(Many of the links in this article redirect to a specific reviewed product. Your purchase of these products through affiliate links helps to generate commission for Storables.com, at no extra cost. Learn more)
Introduction
Storing a car for the winter is essential to protect it from the harsh weather conditions and keep it in optimal condition until spring arrives. Whether you’re going on a long vacation or simply want to safeguard your car during the cold months, proper storage is crucial. In this article, we’ll guide you through the steps to store your car for the winter, ensuring that it stays in top shape and is ready to hit the road again when the cold weather subsides.
Key Takeaways:
- Properly storing your car for the winter involves steps such as choosing the right location, cleaning the car thoroughly, changing the oil, and adding fuel stabilizer. These measures protect the vehicle from damage and ensure it’s ready for use in the spring.
- Periodically checking on the car during winter storage is crucial for addressing maintenance issues, monitoring battery health, fluid levels, tire pressure, and preventing pest infestations. This proactive approach maintains the car’s condition and performance.
Read more: How To Store Ferns For The Winter
Step 1: Choose the Right Location
The first step in storing your car for the winter is selecting the right location. Ideally, you want to find a place that is dry, well-ventilated, and protected from extreme temperatures. Here are a few options to consider:
1. Garage: If you have access to a garage, it’s the best place to park your car during the winter. It provides shelter from rain, snow, and ice, and helps maintain a more stable temperature, preventing the car from freezing.
2. Car Storage Facility: If you don’t have a garage or need a larger storage space, you can opt for a car storage facility. These facilities offer climate-controlled units that protect your vehicle from the elements. Make sure to choose a reputable facility that offers security measures like surveillance cameras and alarm systems.
3. Carport: If a garage or storage facility is not available, a carport can provide some protection from the elements. While it may not offer complete insulation, it can still shield your car from direct exposure to snow, rain, and sunlight.
When choosing the location, it’s also important to consider the accessibility. Ensure that you can easily access the car if needed, as you may want to check on it periodically or perform maintenance tasks.
Once you have determined the right location, clear out any clutter or potential hazards, such as tools, chemicals, or flammable materials. This will help create a safe and clean space for your car to be stored.
Step 2: Clean the Car Thoroughly
Before storing your car for the winter, it’s crucial to give it a thorough cleaning. This not only helps to maintain its appearance but also protects the paint and prevents any potential damage. Here’s how to clean your car properly:
1. Exterior Cleaning: Start by washing the exterior of the car with a gentle car wash soap and water. Use a sponge or a soft cloth to remove any dirt, salt, and debris – paying extra attention to the areas prone to corrosion, such as the wheel wells and undercarriage. Rinse the car thoroughly to remove all the soap residue.
2. Waxing and Polishing: Once the car is clean and dry, apply a coat of wax to protect the paint and provide a barrier against the winter elements. Choose a high-quality car wax and follow the instructions for application. Additionally, consider polishing the car to restore its shine and further protect the surface.
3. Interior Cleaning: Don’t neglect the interior of your car when cleaning it for winter storage. Vacuum the carpets, seats, and floor mats to remove any dirt or debris. Wipe down the dashboard, console, and other surfaces with a mild interior cleaner. Don’t forget to clean the windows from the inside for a clear view.
4. Remove All Food Items: It’s essential to remove any food items from the car, as they can attract pests and cause unpleasant odors. Check all storage compartments, under the seats, and in the trunk for any forgotten snacks or beverages.
5. Empty and Clean the Trunk: Empty out the trunk and give it a thorough cleaning. Remove any unnecessary items or debris that may have accumulated over time.
Taking the time to clean your car thoroughly before storing it will not only protect its appearance but also prevent any potential damage or deterioration during the winter months. A clean car is less likely to attract pests and is easier to assess for any pre-existing issues before storage.
Step 3: Change the Oil and Filter
Changing the oil and filter before storing your car for the winter is a crucial step in maintaining its engine health. Over time, engine oil can accumulate contaminants and lose its effectiveness, which can lead to engine damage if left unchanged. Here’s how to change the oil and filter:
1. Gather the Necessary Supplies: You will need a new oil filter, the recommended type and amount of oil for your car, an oil pan or container to collect the old oil, a wrench or socket set to remove the drain plug, a funnel, and gloves.
2. Warm up the Engine: Start by warming up the engine for a few minutes. This helps to liquefy the old oil and makes it easier to drain.
3. Locate the Oil Drain Plug: Consult your car’s owner manual to locate the oil drain plug. Place the oil pan or container underneath it to catch the old oil.
4. Drain the Old Oil: Carefully loosen the drain plug with a wrench or socket set and slowly allow the old oil to drain into the pan. Be cautious as the oil might be hot. Once the oil has completely drained, replace the drain plug tightly.
5. Replace the Oil Filter: Locate the oil filter, which is typically located near the oil pan. Unscrew the old oil filter in a counterclockwise direction using an oil filter wrench or by hand. Before installing the new filter, apply a small amount of oil onto the rubber gasket to ensure a proper seal. Screw the new filter on clockwise until it is snug, but avoid overtightening.
6. Add New Oil: Remove the oil cap on top of the engine and insert a funnel. Slowly pour the recommended amount and type of new oil into the engine. Consult your car’s owner manual for the correct specifications. Once the oil is added, replace the oil cap securely.
7. Check Oil Level: Start the engine and let it run for a few minutes. Turn off the engine and wait a few moments for the oil to settle. Use the dipstick to check the oil level. Add more oil if necessary to reach the proper level.
8. Properly Dispose of the Old Oil: Oil is hazardous waste, so it needs to be disposed of properly. Take the used oil to a designated recycling center or an auto repair shop that accepts used oil for recycling.
Changing the oil and filter ensures that your car’s engine is protected during the storage period. Fresh oil provides better lubrication and helps prevent any internal damage that can occur when the car is not in use for an extended period.
Step 4: Fill up the Gas Tank
Filling up the gas tank before storing your car for the winter may seem counterintuitive since the car will not be in use. However, it is an important step to prevent fuel-related problems and ensure the preservation of your vehicle. Here’s why you should fill up the gas tank:
1. Condensation Prevention: When your gas tank is partially filled, there is a higher chance of condensation occurring inside the tank. During colder temperatures, the moisture in the air can accumulate and mix with the fuel, leading to water contamination. A full tank minimizes the amount of air and moisture inside the tank, reducing the risk of condensation.
2. Fuel Stabilization: Fuel can break down over time, especially if it is not used regularly. By filling up the gas tank, you are reducing the surface area inside the tank where air can come in contact with the fuel. This helps to slow down the oxidation process and keep the fuel stable for a longer period.
3. Preventing Fuel Line Freezing: In colder climates, there is a risk of fuel line freezing due to the low temperatures. When the gas tank is full, there is less space for condensation to occur, reducing the chances of freezing up the fuel lines. This is especially important if you live in an area with extremely cold temperatures.
4. Improved Fuel Quality: If you leave the gas tank empty or partially filled, the fuel can degrade over time and become less reliable when you need to start the car again. By keeping a full tank of fuel, you have access to fresh fuel when it’s time to use the car again, ensuring better performance.
In addition to filling up the gas tank, consider adding a fuel stabilizer to the fuel before storing the car. A fuel stabilizer helps to prevent the fuel from deteriorating and keeps it fresh for a longer period. Follow the instructions on the fuel stabilizer product for the recommended amount to add to your tank.
By filling up the gas tank before storing your car, you’re taking proactive measures to safeguard the fuel system and ensure a smooth start when you’re ready to use the vehicle again. It’s a simple step that goes a long way in preserving the condition of your car during the winter months.
Read more: How To Store Winter Shoes
Step 5: Add Fuel Stabilizer
Adding a fuel stabilizer to your car’s fuel system is an important step when storing your vehicle for the winter. Fuel stabilizers help to prevent fuel degradation and protect the engine from potential damage. Here’s why you should add fuel stabilizer:
1. Fuel Degradation Prevention: Over time, fuel can break down and become less stable, especially when not used regularly. This can result in varnish and gum formation, which can clog fuel lines, injectors, and carburetors. Fuel stabilizers contain additives that help to slow down the oxidation process and prevent the fuel from deteriorating.
2. Carburetor and Fuel Injector Protection: If your car has a carburetor or fuel injectors, adding fuel stabilizer is even more essential. These components can become clogged or damaged when exposed to degraded fuel. Fuel stabilizers help to keep the fuel system clean and prevent the buildup of deposits, ensuring optimal performance.
3. Easy Startup: When you’re ready to use your car again after the winter storage period, adding a fuel stabilizer makes the starting process smoother. It helps to keep the fuel system clean and prevents clogging, making it easier for the engine to fire up.
4. Fuel System Protection: Fuel stabilizers also provide lubrication to the fuel system components, such as the fuel pump and fuel lines. This helps to prevent corrosion or rusting that can occur when the car is not in use for an extended period.
To add a fuel stabilizer, follow these steps:
1. Purchase a fuel stabilizer that is suitable for your car’s fuel type (gasoline or diesel). There are many reputable brands available in automotive stores or online.
2. Refer to the instructions on the fuel stabilizer bottle for the correct amount to add. Typically, the recommended dosage is based on the fuel tank capacity.
3. Park your car in a well-ventilated area and turn off the engine.
4. Open the fuel filler cap and pour the appropriate amount of fuel stabilizer into the tank.
5. Replace the fuel filler cap securely.
6. Start the engine and let it run for a few minutes to allow the fuel stabilizer to circulate through the system.
By adding fuel stabilizer before storing your car, you’re taking proactive measures to protect the fuel system and ensure smooth operation when you’re ready to use the vehicle again. It’s a simple yet effective step that helps to maintain the fuel quality and prolong the life of your car’s engine.
Before storing your car for the winter, make sure to change the oil and filter, fill up the gas tank, and add a fuel stabilizer to prevent fuel system issues.
Step 6: Disconnect the Battery
Disconnecting the battery is a crucial step when storing your car for an extended period, such as during the winter. By disconnecting the battery, you prevent it from draining and ensure that it retains its charge until you’re ready to use the car again. Here’s how to disconnect the battery:
1. Turn off the Engine: Before disconnecting the battery, make sure the engine is turned off and the car is in park (for automatic transmission) or in gear (for manual transmission). Engage the parking brake for added safety.
2. Locate the Battery: The battery is usually located under the hood of the car. Refer to your car’s owner manual if you’re unsure about the exact location.
3. Safety Precautions: It’s important to take some safety precautions when working with the battery. Wear protective gloves and safety glasses to prevent any accidents. It’s also a good idea to have a clean cloth or rag nearby to wipe off any dirt or grime.
4. Disconnect the Negative Terminal: The negative terminal is usually marked with a “-” symbol or the color black. Use a wrench or socket set to loosen the nut on the negative terminal. Once loosened, gently remove the negative cable from the terminal and place it away from the battery. Make sure it does not come in contact with the positive terminal or any metal parts of the car.
5. Disconnect the Positive Terminal: The positive terminal is usually marked with a “+” symbol or the color red. Follow the same procedure as with the negative terminal – loosen the nut and remove the positive cable from the terminal. Just like with the negative terminal, keep the positive cable away from any metal parts.
6. Store the Cables: Once the battery is disconnected, you can store the cables in a safe place. Avoid placing them near any metal surfaces or where they can be damaged.
When it’s time to use the car again, you’ll need to reconnect the battery. Start by connecting the positive cable to the positive terminal, followed by the negative cable to the negative terminal. Ensure that the connections are secure and tighten the nuts.
By disconnecting the battery during storage, you prevent it from draining and potentially losing its charge. This helps to prolong the battery’s lifespan and ensures that your car is ready to start when you need it.
Step 7: Remove the Spark Plugs and Spray Fogging Oil
Removing the spark plugs and spraying fogging oil into the engine cylinders is an important step in preparing your car for winter storage. This helps to prevent corrosion and ensure that the engine components remain lubricated during the idle period. Here’s how to perform this step:
1. Safety Precautions: Before starting, make sure the engine is cool to avoid any burns. Also, ensure that the ignition is turned off and the keys are removed from the car.
2. Locate the Spark Plugs: The spark plugs are typically located on the top side of the engine. Refer to your car’s owner manual if you’re unsure about their exact location.
3. Remove the Spark Plug Wires: Start by gently pulling off the spark plug wires from each spark plug. It’s recommended to remove one wire at a time to avoid mixing up the firing order. Pull the wire from the boot (the rubber part connected to the spark plug) and set it aside.
4. Remove the Spark Plugs: Use a spark plug socket and a ratchet or a spark plug wrench to loosen and remove each spark plug. Turn the socket counterclockwise to loosen the plugs and then unscrew them by hand.
5. Inspect the Spark Plugs: Take a moment to inspect the condition of each spark plug. Look for any signs of damage, excessive wear, or carbon buildup. If you notice any issues, it may be a good idea to replace the spark plugs before storing the car.
6. Spray Fogging Oil: Once the spark plugs are removed, it’s time to spray fogging oil into the engine cylinders. Fogging oil is specifically designed to protect the internal components of the engine during periods of inactivity. Follow the instructions on the fogging oil can for proper usage and application. Generally, you’ll need to spray a small amount of fogging oil directly into each spark plug hole. This will help lubricate the cylinder walls and prevent rust and corrosion.
7. Turn the Engine: Before reinstalling the spark plugs, turn the engine over using the starter or a wrench on the crankshaft pulley. This will evenly distribute the fogging oil inside the cylinders.
8. Reinstall the Spark Plugs: Carefully reinstall the spark plugs by hand and tighten them with the appropriate spark plug socket and ratchet or spark plug wrench. Refer to your car’s owner manual for the recommended torque specifications.
9. Reconnect the Spark Plug Wires: Once the spark plugs are secure, reattach the spark plug wires by firmly pushing them onto the corresponding spark plugs. Make sure they are securely connected.
By removing the spark plugs and spraying fogging oil, you are taking proactive steps to protect the engine and ensure its smooth operation when you’re ready to use the car again. This step helps prevent internal corrosion and keeps the engine components in good condition during the winter storage period.
Step 8: Inflate the Tires to the Recommended Pressure
Inflating the tires to the recommended pressure is a crucial step when storing your car for an extended period. Properly inflated tires help to maintain their shape and prevent flat spots from developing. Here’s how to inflate the tires correctly:
1. Check the Recommended Tire Pressure: Look for the recommended tire pressure for your car in the owner’s manual or on a sticker located on the driver’s side door jamb, glove compartment, or fuel filler flap. The recommended pressure may vary based on the tire size and load capacity of your specific vehicle.
2. Gather the Necessary Tools: You’ll need a tire pressure gauge and an air compressor. If you don’t have an air compressor at home, you can use a gas station air pump instead.
3. Start with Cold Tires: It’s important to check and inflate the tires when they are cold. If the car has been recently driven, allow the tires to cool down for a few hours before proceeding.
4. Remove the Valve Caps: Unscrew the valve caps on each tire to expose the valve stem.
5. Use the Tire Pressure Gauge: Press the tire pressure gauge onto the valve stem and press firmly to get an accurate reading of the tire pressure. The gauge will display the pressure in PSI (pounds per square inch).
6. Inflate the Tires: If the tire pressure reading is below the recommended level, connect the air compressor to the valve stem and add air until you reach the proper pressure. Check the pressure frequently using the tire pressure gauge to avoid overinflation. If you accidentally overinflate a tire, you can release some air by pressing the center pin on the valve stem.
7. Repeat the Process for Each Tire: Move on to the remaining tires and repeat steps 4 to 6 to check and inflate their pressures.
8. Double-Check the Pressure: Once you’ve inflated all the tires, double-check their pressures using the tire pressure gauge. Ensure that each tire has reached the recommended pressure.
9. Replace the Valve Caps: After inflating the tires, screw the valve caps back onto each valve stem to protect them from dirt and debris.
By inflating the tires to the recommended pressure, you’re ensuring that they maintain their shape during the storage period. This helps to prevent flat spots and uneven tire wear. Properly inflated tires also improve fuel efficiency and handling when you’re ready to use the car again.
Remember to periodically check the tire pressure throughout the storage period, as tires can lose pressure over time. If necessary, reinflate the tires to the recommended pressure before driving the vehicle again.
Read more: How To Store Winter Hats
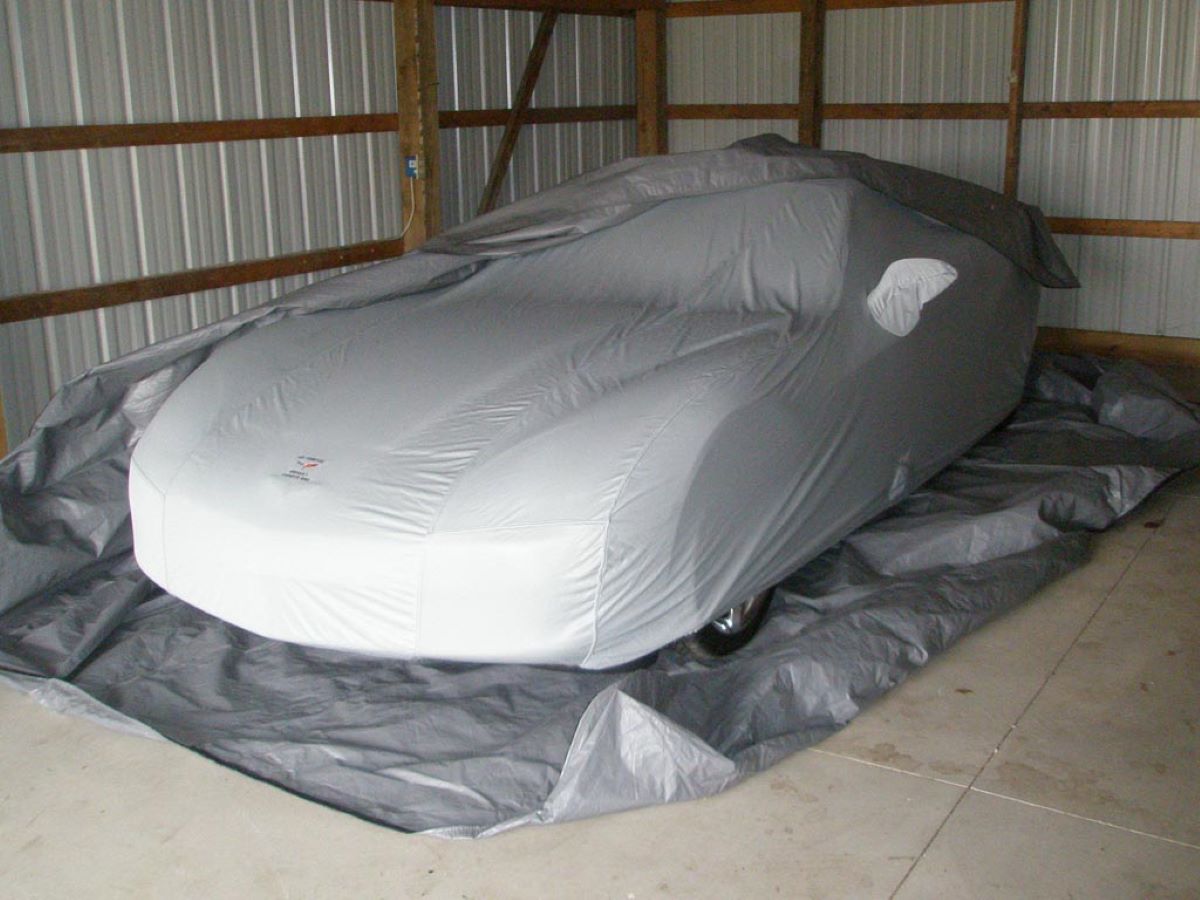
Step 9: Place a Cover over the Car
Placing a cover over your car is an important step in protecting it from dust, dirt, and any potential damage during the winter storage period. A car cover serves as a barrier between the exterior of the vehicle and the surrounding environment. Here’s how to properly place a cover over your car:
1. Choose the Right Car Cover: Select a high-quality car cover that is specifically designed for outdoor use. Look for a cover that is breathable, waterproof, and provides UV protection. Ensure that it fits your car’s dimensions properly to provide optimal coverage.
2. Clean and Dry the Car: Before placing the cover, make sure the car is clean and dry. Remove any dirt, debris, or moisture that may be on the exterior using a gentle car wash soap and water. Dry the car thoroughly to prevent any water spots or moisture buildup underneath the cover.
3. Position the Cover: Start by unfolding the car cover and position it near the rear of the car. Gradually pull the cover over the vehicle, ensuring it is evenly placed over all sides. Make sure the cover extends down to the bottom of the car, covering the entire body and wheels.
4. Fasten the Cover: Most car covers come with straps, buckles, or elasticized hems to secure the cover in place. Follow the instructions provided with the cover to fasten it securely. Make sure the cover is taut but not overly tight, allowing for some airflow underneath.
5. Protect the Vulnerable Areas: To provide extra protection, consider using additional covers or foam blocks for areas prone to damage, such as the side mirrors, antennas, and windshield wipers. These additional coverings can be secured in place using tape or ties.
6. Check for a Snug Fit: After securing the cover, walk around the car and check for any loose areas or gaps. Adjust the cover as needed to ensure a snug fit and complete coverage.
7. Store the Car in a Sheltered Area: If possible, park the car in a sheltered area, such as a garage or carport, after covering it. This provides an extra layer of protection against the elements.
A car cover acts as a shield, protecting your car’s exterior from dust, debris, sunlight, and other potential hazards. It helps maintain the car’s paintwork and prevents any damage that may occur during the winter storage period.
During the storage period, periodically check the cover for any damage or signs of wear. Remove the cover and inspect the car for any moisture buildup or condensation. If necessary, dry the car and the cover before placing it back on.
By properly covering your car, you are taking proactive measures to preserve its appearance and protect it from potential harm, ensuring it remains in optimal condition throughout the winter season.
Step 10: Check on the Car Periodically
Checking on your car periodically during the winter storage period is essential to ensure that it remains in good condition and address any potential issues that may arise. Here’s why you should check on your car and what to look out for:
1. Preventative Maintenance: Regularly checking on your car allows you to identify any maintenance issues early on. This gives you the opportunity to address them promptly and prevent any further damage or deterioration. Checking the car periodically also helps to ensure that it is ready to start and operate smoothly when you need it again.
2. Battery Health: Even with the battery disconnected, some battery drain may still occur over time. Checking the battery voltage periodically using a multimeter or battery tester can help you determine if the battery needs to be recharged or replaced. If the voltage drops significantly, it may be necessary to recharge the battery or use a battery maintainer to keep it charged.
3. Fluid Levels: Check the fluid levels, such as engine oil, coolant, and brake fluid, to ensure they are at the appropriate levels. If any fluids are low, top them up as needed. This helps to maintain proper lubrication and cooling for the various systems in your car.
4. Tire Pressure: Check the tire pressure periodically and ensure all tires are inflated to the recommended levels. Cold temperatures can cause a slight drop in tire pressure over time. Properly inflated tires help to prevent flat spots and ensure safe and efficient performance when you start using the car again.
5. Moisture and Condensation: Check for any signs of moisture or condensation inside the car or on the windows. Moisture buildup can lead to mold, mildew, or even rust. If moisture is present, use a dehumidifier or moisture-absorbent products to control the humidity inside the storage area.
6. Pest Infestations: While checking the car, look out for any signs of pest infestations, such as nesting materials, droppings, or chewed wires. Pests can cause significant damage to the interior and wiring of the car. If you notice any signs of pests, take appropriate measures to remove them and prevent further infestations.
7. General Inspection: Take the time to visually inspect the exterior and interior of the car for any signs of damage, such as scratches, dents, or leaks. Address any issues promptly to prevent further damage or deterioration.
By checking on your car periodically, you ensure that it remains in good condition and address any potential problems before they escalate. This proactive approach helps to maintain the longevity and performance of your vehicle during the winter storage period.
Remember to document any maintenance tasks or inspections performed on your car, including dates and details. This will help you keep track of the car’s maintenance history and ensure that you’re providing the necessary care and attention it needs during storage.
Be sure to follow any specific recommendations or guidelines provided in your car’s owner manual for maintaining and checking your specific vehicle model during the storage period.
Conclusion
Storing your car for the winter requires careful preparation and attention to detail to ensure that it remains in optimal condition during the idle period. By following the ten steps outlined in this article, you can confidently store your car knowing that you’ve taken the necessary measures to protect it from the harsh winter elements and potential damage.
From choosing the right location and cleaning the car thoroughly to changing the oil, filling up the gas tank, adding fuel stabilizer, disconnecting the battery, removing the spark plugs, inflating the tires, placing a cover over the car, and checking on it periodically, each step plays a vital role in preserving the longevity and performance of your vehicle.
Properly storing your car helps to prevent issues such as rust, corrosion, flat spots on tires, battery drain, and fluid degradation. Taking the time to perform these steps ensures that your car will be in great shape and ready to hit the road again when the winter season is over.
Remember, being proactive in maintaining your car during winter storage prolongs its lifespan, saves you from costly repairs, and provides peace of mind knowing that your car is protected.
Lastly, always refer to your car’s owner manual for specific instructions and recommendations regarding winter storage. Different car models may have unique requirements or additional steps that need to be followed.
By following these steps and providing the necessary care and attention, you can confidently store your car for the winter and eagerly await the arrival of the warmer months when you can once again enjoy the open road.
Frequently Asked Questions about How To Store A Car For The Winter
Was this page helpful?
At Storables.com, we guarantee accurate and reliable information. Our content, validated by Expert Board Contributors, is crafted following stringent Editorial Policies. We're committed to providing you with well-researched, expert-backed insights for all your informational needs.


0 thoughts on “How To Store A Car For The Winter”