
Articles
How To Store Deer Meat
Modified: October 21, 2024
Learn the best methods for storing deer meat with these informative articles. Discover tips to preserve its freshness and flavors for longer durations.
(Many of the links in this article redirect to a specific reviewed product. Your purchase of these products through affiliate links helps to generate commission for Storables.com, at no extra cost. Learn more)
Introduction
When it comes to hunting, one of the most coveted prizes is a fresh deer. The succulent, lean meat of a deer provides a delicious and nutritious addition to any meal. However, once the hunt is over, it’s important to properly store the deer meat to maintain its quality and prevent spoilage.
Storing deer meat correctly not only ensures its freshness and flavor but also helps to prevent the growth of bacteria and other contaminants that can cause foodborne illnesses. Whether you plan on refrigerating, freezing, vacuum sealing, canning, or smoking/jerking the meat, proper storage techniques are essential for preserving its quality.
This article will guide you through the process of storing deer meat, providing helpful tips and insights along the way. We will discuss the factors to consider before storing the meat, the preparation steps, as well as various storage methods. By following these guidelines, you can extend the shelf life of your deer meat and continue to enjoy its delicious taste for months to come.
Key Takeaways:
- Proper storage of deer meat is crucial for maintaining its freshness, flavor, and safety. Factors such as temperature, time, and packaging materials play a significant role in determining the best storage method.
- Whether refrigerating, freezing, vacuum sealing, canning, or smoking/jerking deer meat, following the right storage techniques ensures its delicious taste can be enjoyed for an extended period. Temperature control, proper packaging, and safe thawing practices are essential for successful storage.
Read more: How To Store Deer Jerky
Factors to Consider Before Storing Deer Meat
Before you begin the process of storing deer meat, there are a few important factors to consider. These factors will help you determine the best storage method and ensure the meat stays fresh and safe to consume:
- Temperature: The temperature at which you store your deer meat plays a crucial role in maintaining its quality. Ideally, meat should be stored at a temperature below 40°F (4°C) to prevent bacterial growth. If the temperature exceeds this range, the meat can spoil quickly, so it’s important to have a suitable storage location.
- Time: The duration for which you plan to store the deer meat will also influence the storage method you choose. If you plan to consume the meat within a few days, refrigeration may be sufficient. However, if you wish to store it for a longer period, freezing or canning may be more suitable.
- Quality: The quality of the deer meat at the time of storage can affect its shelf life. It’s important to properly handle and process the meat immediately after the hunt to minimize any bacterial contamination and ensure its freshness.
- Storage Space: Consider the amount of storage space you have available for storing deer meat. Different storage methods require different space requirements. Freezing, for example, requires sufficient freezer space, while canning may require jars and storage space in a pantry.
- Packaging Materials: The type of packaging materials you choose will impact the preservation of the meat. Proper packaging materials, such as airtight containers or vacuum-sealed bags, can help minimize exposure to air and prevent freezer burn.
By considering these factors, you can make an informed decision about the best storage method for your deer meat. Each factor contributes to the overall quality and safety of the meat, ensuring it remains fresh and delicious until you’re ready to enjoy it.
Preparing the Meat for Storage
Before storing your deer meat, it’s essential to properly prepare it to ensure its longevity and quality. Here are the steps to follow:
- Butchering: Start by properly butchering the deer meat. This involves removing the hide, cutting the meat into manageable portions, and trimming away any excess fat or connective tissue. Ensure that you handle the meat with clean hands and use clean utensils and cutting surfaces to prevent contamination.
- Cooling: Cooling the meat as soon as possible after butchering is vital to prevent bacterial growth. Place the meat on a clean surface, elevated off the ground, and allow it to cool for a few hours. If the ambient temperature is high, you may consider placing the meat inside a refrigerator or cooler to accelerate the cooling process.
- Trimming: Once the meat has cooled, inspect it for any remaining traces of fat or silver skin. Trim off these unwanted parts, as they can contribute to off-flavors and spoilage during storage.
- Seasoning: If you plan to cook the meat immediately after storage, you can season it before storing. However, if you are unsure about the final use, it’s best to leave the meat unseasoned and add flavors later to maintain versatility.
- Dividing Portions: Divide the meat into manageable portions based on your anticipated usage. This will enable you to thaw and use smaller portions without having to defrost the entire batch.
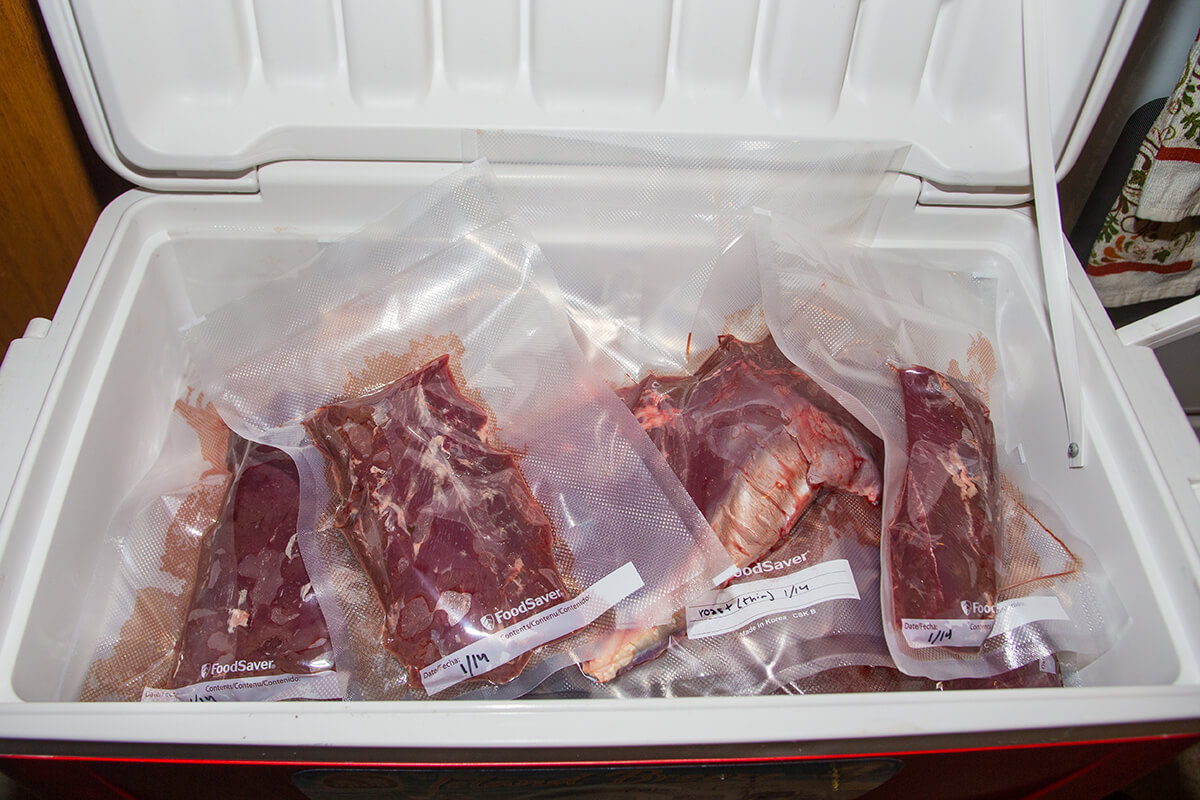
- Labeling: It’s crucial to label each package with the date of packaging, as well as any additional information such as the cut of meat or special instructions. This will help you keep track of the age of the meat and ensure you use the older packages first.
By following these steps, you can ensure that your deer meat is properly prepared for storage. These preparations will help maintain the quality, flavor, and safety of the meat throughout the storage period.
Refrigerating Deer Meat
If you plan to consume your deer meat within a few days or up to a week, refrigeration can be a suitable storage method. Here’s how to properly refrigerate your deer meat:
- Temperature: Ensure that your refrigerator is set to a temperature below 40°F (4°C). This temperature range helps slow down bacterial growth and keeps the meat fresh.
- Storage Container: Opt for airtight containers or vacuum-sealed bags to store the deer meat in the refrigerator. These containers will help protect the meat from air exposure and prevent any cross-contamination with other foods.
- Organization: Arrange the meat in a way that allows for proper airflow and prevents it from coming into direct contact with other food items in the refrigerator. You can use trays or racks to separate the packages and maintain cleanliness.
- Raw and Cooked Separation: Keep raw deer meat separate from cooked or ready-to-eat foods to avoid potential cross-contamination. Place them on different shelves or use separate containers within the refrigerator.
- Storage Time: When refrigerating deer meat, it’s crucial to note its storage time. Fresh cuts of deer meat can be stored in the refrigerator for up to 3-5 days, depending on the condition of the meat at the time of storage. Ground deer meat should be used within 1-2 days.
- Odor Containment: Deer meat can have a distinct gamey odor, which may transfer to other foods if not properly contained. Consider wrapping the meat in airtight packages or using odor-reducing products to prevent any undesirable odors.
Remember to always practice good food safety habits when handling and storing deer meat in the refrigerator. Regularly check for any signs of spoilage, such as a foul odor, sliminess, or discoloration. If you notice any of these signs, discard the meat immediately to prevent the risk of foodborne illness.
Refrigeration is a convenient option for short-term storage of deer meat and allows you to enjoy its freshness and flavor within a few days. However, if you plan to extend the storage time beyond a week, it’s best to consider freezing the meat using the guidelines outlined in the next section.
Freezing Deer Meat
If you want to store deer meat for an extended period, freezing is the most effective method. Freezing helps to preserve the quality and flavor of the meat. Here’s how to properly freeze deer meat:
- Temperature: Set your freezer to 0°F (-18°C) or below. Maintaining a consistent low temperature is crucial for preserving the meat’s integrity and preventing the growth of bacteria.
- Preparation: Properly package the deer meat before freezing. Wrap it tightly in moisture-proof and airtight materials, such as freezer-grade plastic wrap, freezer bags, or freezer paper. Ensure that all the air is removed from the packaging to prevent freezer burn.
- Portioning: Divide the deer meat into suitable portion sizes based on your anticipated usage. By portioning the meat, you can thaw only what you need, reducing waste and preserving the quality of the remaining meat.
- Labeling and Dating: Label each package with the date of freezing and any additional information you find helpful, such as the cut of meat or seasoning. This will allow you to keep track of the age of the meat and use the older packages first.
- Storage Time: When properly packaged and stored at 0°F or below, deer meat can be safely stored in the freezer for around 6-12 months. However, for the best quality, it is recommended to consume the meat within 3-6 months.
- Freezer Organization: Arrange the packaged meat in a well-organized manner in your freezer. Keep similar cuts or portions together, making it easier to find what you need without causing unnecessary thawing and refreezing.
- Thawing: When you’re ready to use the frozen deer meat, always thaw it safely. It is best to thaw the meat in the refrigerator overnight or use the defrost function on your microwave. Avoid thawing meat at room temperature, as it can lead to bacterial growth.
- Quality Check: After thawing the meat, give it a visual and smell check. If it appears discolored, has an off odor, or feels slimy, it may have suffered freezer burn or spoilage and should be discarded.
Properly freezing deer meat allows you to store it for several months while maintaining its quality. By following these guidelines, you can enjoy delicious venison year-round and make the most of your hunting harvest.
After butchering, wrap deer meat in butcher paper or vacuum-seal it to prevent freezer burn. Label with the date and use within 6-9 months.
Read more: How To Store Deer Hide Before Tanning
Vacuum Sealing Deer Meat
Another effective method for storing deer meat is vacuum sealing. Vacuum sealing removes all the air from the packaging, preventing the meat from coming into contact with oxygen and reducing the risk of freezer burn. Here’s how to properly vacuum seal deer meat:
- Invest in a Vacuum Sealer: Purchase a vacuum sealer specifically designed for home use. These machines come with vacuum-sealing bags or rolls that are compatible with the sealer.
- Prepare the Meat: Package the deer meat in suitable portion sizes for your needs. Trim excess fat and wrap each portion tightly in plastic wrap to prevent moisture from leaking, as it can interfere with the vacuum sealing process.
- Insert into Vacuum-Seal Bag: Place the wrapped meat into a vacuum-seal bag, ensuring it’s placed in the center of the bag for maximum efficiency. Leave enough space at the top of the bag for the vacuum sealer to create a proper seal.
- Seal the Bag: Close the vacuum-seal bag, ensuring that there is no air trapped inside. Place the open end of the bag into the vacuum sealer and follow the manufacturer’s instructions to create a tight seal. The sealer will remove the air from the bag and create an airtight seal.
- Label and Date: Write the date of sealing and any other relevant information on the vacuum-sealed bag. This will help you keep track of the age and contents of the meat.
- Freeze for Long-Term Storage: Once the deer meat is vacuum-sealed, place the packages in the freezer at 0°F or below. The vacuum-sealed bags will help protect the meat from freezer burn and preserve its quality for an extended period.
- Thawing and Usage: When you’re ready to enjoy the vacuum-sealed deer meat, thaw it safely in the refrigerator overnight or using the defrost function on your microwave. Follow safe food handling practices and cook the meat to the appropriate internal temperature before consuming.
Vacuum sealing is an excellent option for preserving the quality and flavor of your deer meat. The airtight seal created by the vacuum sealer helps prevent freezer burn, allowing you to enjoy the delicious taste of venison even after months of storage.
Canning Deer Meat
Canning deer meat is an excellent method for long-term preservation that allows you to enjoy tender and flavorful meat at any time. Canning helps to kill bacteria and create a sealed environment that prevents spoilage. Here’s how to properly can deer meat:
- Gather Required Equipment: Ensure you have the necessary canning equipment, including jars, lids, pressure canner, and other utensils. Follow the manufacturer’s instructions for safe canning.
- Prepare the Meat: Cut the deer meat into suitable-sized pieces for the jars. Remove any excess fat or tough connective tissue. It is recommended to use lean cuts of meat for canning.
- Season (Optional): If desired, season the deer meat with herbs, spices, or marinades before canning. This will infuse the meat with additional flavors during the canning process.
- Pre-Cook the Meat: Pre-cook the deer meat until it is partially cooked, but not fully done. This step helps to ensure the meat is safe to consume after canning and helps minimize the cooking time during reheating.
- Pack the Jars: Place the partially cooked deer meat into sterilized jars, leaving appropriate headspace according to the canning instructions. Avoid compacting the meat too tightly, as it may interfere with heat distribution during canning.
- Add Liquid: Add a canning liquid to the jars, such as broth or water, leaving the recommended headspace. The liquid helps to enhance the flavor, texture, and moisture content of the canned meat.
- Seal the Jars: Wipe the jar rims to ensure they are clean and free from any food debris. Place lids and rings on the jars, and tighten them just until they are snug. Do not overtighten as it may hinder the proper sealing process.
- Pressure Canning: Place the filled and sealed jars into the pressure canner according to the manufacturer’s instructions. Follow the recommended processing time and pressure for canning deer meat. The pressure canner creates a high-temperature environment to kill bacteria and ensure the safety of the canned meat.
- Cooling and Storage: After the pressure canning process is complete, allow the jars to cool naturally. Listen for the familiar “pop” sound, indicating that the jars have properly sealed. Once cooled, remove the rings, check the seals, and properly label and date the jars. Store the canned deer meat in a cool, dark place, such as a pantry or cellar.
- Usage: When you’re ready to enjoy the canned deer meat, open the jar, inspect the contents, and smell for any off odors. If all seems well, prepare the meat as desired, whether that be adding it to stews, soups, or other recipes.
Canning deer meat allows you to enjoy the taste of venison throughout the year. By following these steps and adhering to safe canning practices, you can safely preserve your deer meat and savor its deliciousness for months or even years to come.
Smoking or Jerking Deer Meat
Smoking or jerking deer meat is a traditional method of preserving meat that imparts a unique smoky flavor while removing moisture, making it shelf-stable. Both smoking and jerking methods are suitable for long-term storage and provide delicious, portable snacks. Here’s how to smoke or jerk deer meat:
- Cut and Prepare the Meat: Start by trimming the deer meat and removing any excess fat. For smoking, slices or chunks of meat work well, while for jerking, thin strips are ideal.
- Brining (Optional): If desired, you can brine the deer meat in a flavorful solution before smoking or jerking. Brining helps enhance the flavor and tenderize the meat. Follow a brine recipe or use your favorite marinade for this step.
- Seasoning: Coat the deer meat with a dry rub or marinade of your choice. This step adds flavor and helps to create a tasty outer crust during the smoking or jerking process.
- Smoking Method:
- For smoking, set up your smoker according to the manufacturer’s instructions and preheat it to the desired temperature. Aim for a lower temperature, around 180-225°F (82-107°C), to slowly cook and smoke the meat.
- Place the seasoned deer meat on the grill grates and close the smoker. Maintain a consistent temperature throughout the smoking process, adding wood chips or chunks to produce smoke.
- Smoke the meat for several hours, depending on the thickness of the cuts. It’s crucial to reach a safe internal temperature of at least 160°F (71°C) to eliminate any potential bacteria.
- Once the deer meat reaches the desired smoky flavor and internal temperature, remove it from the smoker and allow it to cool before storing or consuming.
- Jerking Method:
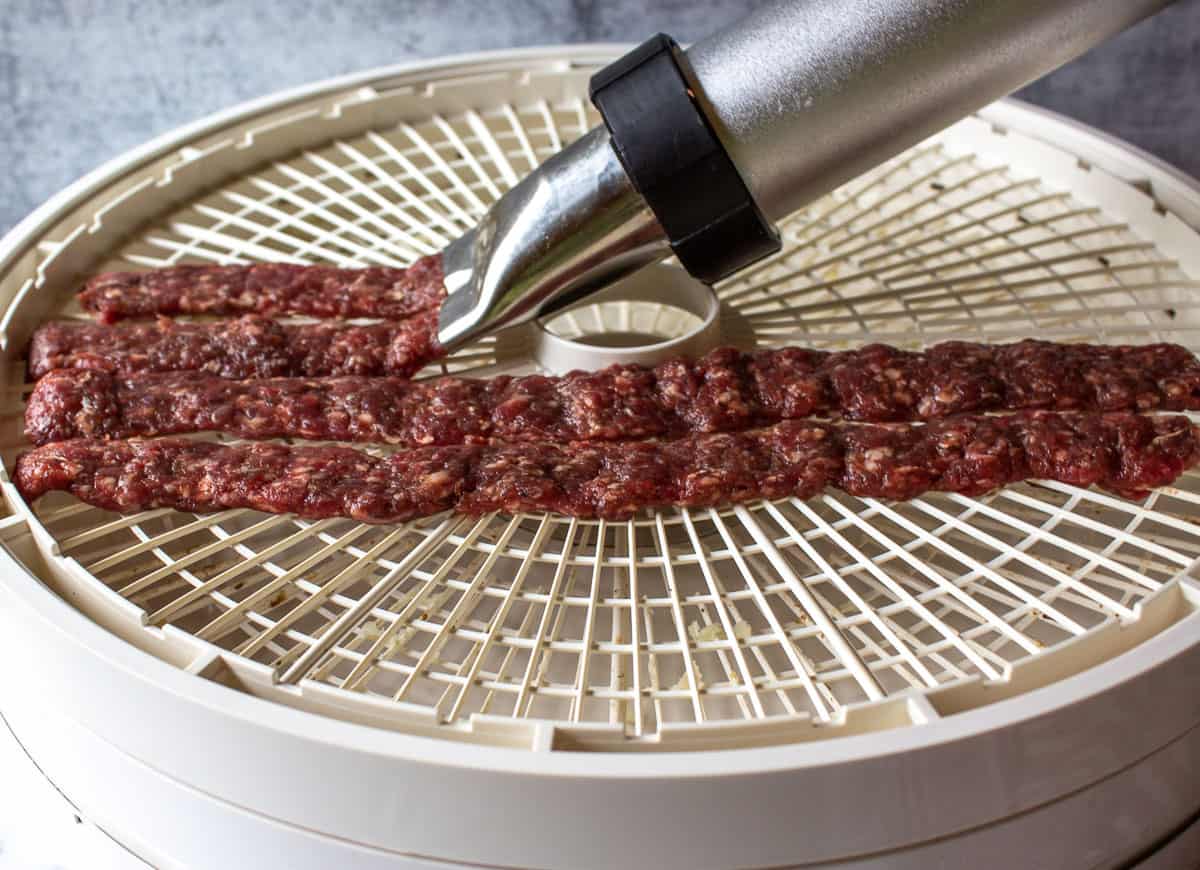
- For jerking, you can use a dehydrator or an oven with low heat. Set the dehydrator or oven to a low temperature, around 140-160°F (60-71°C).
- Place the seasoned deer strips onto the dehydrator trays or wire racks, ensuring they don’t overlap. This allows for proper air circulation and drying.
- Leave the meat to dry for several hours or even overnight, depending on the thickness and desired texture. Check the meat periodically for dryness, making sure it is firm but still tender.
- Once the deer meat has reached the desired dryness, remove it from the dehydrator or oven, and allow it to cool completely before storing in airtight containers.
- Storage: Store the smoked or jerked deer meat in a cool, dry place, such as a pantry or cellar. Properly sealed and stored, it can last for several months, providing you with a convenient and flavorful snack.
- Usage: When you’re ready to enjoy the smoked or jerked deer meat, simply grab a piece or a strip and savor the smoky, savory flavor. It makes a perfect portable snack for outdoor adventures, hiking, or road trips.
Smoking or jerking deer meat not only preserves it for long-term storage but also adds a delicious smoky flavor that enhances its natural taste. Whether you opt for smoking or jerking, the result is a flavorful and shelf-stable deer meat that can be enjoyed whenever cravings strike.
Tips for Properly Storing Deer Meat
Proper storage of deer meat is essential for maintaining its quality, flavor, and safety. Here are some tips to help you store deer meat effectively:
- Keep it Cold: Temperature control is crucial for preventing bacterial growth. Store deer meat at a temperature below 40°F (4°C). Use a refrigerator or freezer, depending on your storage method.
- Minimize Air Exposure: The exposure to air can lead to freezer burn and degrade the quality of the meat. Use airtight containers, vacuum-sealed bags, or other suitable packaging to minimize air contact.
- Prevent Cross-Contamination: Store deer meat separately from other food items to avoid cross-contamination. Raw meat should not come into direct contact with cooked or ready-to-eat foods.
- Label and Date: Always label each package with the date of storage and any additional information, such as the cut of meat or seasoning. This helps you keep track of the age and contents of the stored meat.
- Organize and Rotate: Keep your storage space organized to easily access the oldest packages first. This helps ensure that the meat is used promptly and avoids letting it stay in storage for too long.
- Monitor for Spoilage: Regularly check the deer meat for any signs of spoilage, such as a foul odor, sliminess, or discoloration. If you notice any of these signs, discard the meat immediately to prevent the risk of foodborne illnesses.
- Use Proper Freezing Techniques: When freezing deer meat, follow proper freezing techniques. Make sure to remove as much air as possible, use freezer-grade packaging materials, and maintain a consistent and cold temperature in your freezer.
- Consider Smaller Portions: Divide the meat into smaller portions before storing. This allows you to thaw only the amount you need, reducing waste and preventing frequent thawing and refreezing.
- Practice Safe Thawing: When thawing deer meat, do so safely to prevent bacterial growth. Thaw it in the refrigerator overnight, use the defrost function of the microwave, or submerge it in cold water, changing the water every 30 minutes.
- Store in Appropriate Containers: Choose the right storage containers for your specific storage method. Use glass jars for canning, airtight containers for refrigeration, and freezer-grade bags or containers for freezing.
By following these tips, you can ensure that your deer meat remains fresh, flavorful, and safe to consume. Proper storage practices help you make the most of your hunting harvest, allowing you to enjoy delicious venison meals throughout the year.
Read more: How To Build Deer Fence
Conclusion
Properly storing deer meat is essential to preserve its flavor, quality, and safety. Whether you choose to refrigerate, freeze, vacuum seal, can, or smoke/jerk your deer meat, following the right storage techniques ensures that you can enjoy its delicious taste for an extended period.
Before storing deer meat, consider factors such as temperature, time, quality, storage space, and packaging materials. These factors will help you determine the most suitable storage method and ensure optimal freshness.
Preparing the meat for storage involves butchering, cooling, trimming, seasoning, and properly dividing portions. These steps lay the foundation for successful storage and maintain the meat’s integrity.
In refrigerating deer meat, it’s important to set the proper temperature, use airtight containers, organize the storage space, and be mindful of storage times to prevent spoilage.
Freezing deer meat requires setting the right temperature, proper packaging to prevent freezer burn, labeling and dating, and organizing the freezer for easy access. Freezing extends the shelf life of deer meat for several months, allowing you to enjoy it throughout the year.
Vacuum sealing deer meat provides an airtight seal, preserving the meat’s quality and preventing freezer burn. Proper packaging, labeling, and freezer organization are crucial for successful vacuum sealing.
Canning deer meat involves following the recommended canning techniques, pre-cooking the meat, ensuring proper sealing, and storing in a cool, dark place. Canned venison provides a convenient, long-lasting option for enjoying the meat’s flavor and tenderness.
Smoking or jerking deer meat adds a unique smoky flavor and removes moisture, resulting in delicious, shelf-stable snacks. Proper preparation, seasoning, temperature control, and storage are vital for a successful smoking or jerking process.
Lastly, some general tips to remember include keeping the meat cold, minimizing air exposure, preventing cross-contamination, labeling and dating each package, monitoring for spoilage, using proper freezing techniques, considering smaller portions, practicing safe thawing, and using appropriate storage containers.
By following these guidelines, you can ensure that your deer meat stays fresh, flavorful, and safe to consume for an extended period, allowing you to make the most of your hunting harvest and enjoy venison delicacies whenever the craving strikes.
Frequently Asked Questions about How To Store Deer Meat
Was this page helpful?
At Storables.com, we guarantee accurate and reliable information. Our content, validated by Expert Board Contributors, is crafted following stringent Editorial Policies. We're committed to providing you with well-researched, expert-backed insights for all your informational needs.


0 thoughts on “How To Store Deer Meat”