Articles
How To Store Inoculated Spawn Bags
Modified: February 23, 2024
Learn the proper techniques for storing inoculated spawn bags and keep your articles in optimal condition for successful mushroom cultivation.
(Many of the links in this article redirect to a specific reviewed product. Your purchase of these products through affiliate links helps to generate commission for Storables.com, at no extra cost. Learn more)
Introduction
Storing inoculated spawn bags is a crucial step in maintaining the vitality and effectiveness of your mushroom cultivation process. Proper storage conditions and practices are essential for ensuring the growth and development of healthy mycelium. In this article, we will explore the step-by-step process of storing inoculated spawn bags to maximize the chances of successful mushroom cultivation.
When it comes to storing inoculated spawn bags, there are several key factors to consider. These include creating the ideal storage environment, proper placement of the bags, monitoring temperature and humidity levels, preventing contamination, and regular inspection and maintenance. By following these guidelines, you can increase the longevity and viability of your spawn bags, ultimately maximizing your chances of achieving a bountiful mushroom harvest.
Before we delve into the specifics of storing inoculated spawn bags, it is important to understand the significance of this step in the mushroom cultivation process. The spawn bags contain a substrate that is inoculated with mycelium, which is the vegetative part of the fungus. Stored correctly, the mycelium will continue to grow and spread throughout the substrate, eventually forming the fruiting bodies we know as mushrooms.
However, if the spawn bags are not stored properly, the mycelium can become weak or contaminated, leading to poor or failed mushroom yields. Therefore, it is crucial to give careful attention to the storage process, ensuring the conditions are favorable for mycelium growth and minimizing the risk of contamination.
In the following sections, we will discuss how to create the ideal storage environment for your inoculated spawn bags, the proper placement of the bags, how to monitor temperature and humidity levels, techniques for preventing contamination, and the importance of regular inspection and maintenance. By following these steps diligently, you can set yourself up for success and increase your chances of a successful mushroom cultivation journey.
Key Takeaways:
- Proper storage of inoculated spawn bags is crucial for successful mushroom cultivation. Creating an ideal environment, monitoring temperature and humidity, and preventing contamination are key steps to maximize mycelium growth and ensure a bountiful harvest.
- Maintaining cleanliness, regular inspection, and proactive maintenance are essential for the health and viability of inoculated spawn bags. By following these steps diligently, you can increase the longevity and success of your mushroom cultivation journey.
Read more: How To Store Grain Spawn
Materials Needed
Before you begin storing your inoculated spawn bags, it’s important to gather the necessary materials. Here are the essentials you’ll need:
- Quality spawn bags: Ensure that you have high-quality spawn bags designed specifically for mushroom cultivation. These bags should be made of a breathable material like polypropylene and have a filter patch to allow for gas exchange.
- Storage container: Select a suitable container for storing the spawn bags. Ideally, this should be a clean and sterile plastic container with a tight-fitting lid to maintain a sealed environment.
- Thermometer and hygrometer: These tools will help you monitor the temperature and humidity levels in your storage area. Choose reliable and accurate devices that are specifically designed for measuring these parameters.
- Desiccant packets: Desiccant packets are used to absorb excess moisture and maintain proper humidity levels within the storage area. Make sure to use food-grade desiccant packets to prevent any potential contamination.
- Labels and marker: Have labels and a marker on hand to properly label and identify the contents of each spawn bag. This will help you keep track of the various strains and batches.
- Clean gloves: Wearing disposable gloves while handling the spawn bags will help minimize the transfer of contaminants and ensure a sterile environment.
- Clean, disinfectant spray: Keep a disinfectant spray handy to clean your hands, work area, and any tools or surfaces that come into contact with the spawn bags.
Having these materials prepared before you start the storage process will ensure that you can proceed smoothly without any interruptions. It’s important to maintain cleanliness and sterility throughout the storage process to prevent contamination and ensure the best possible conditions for your spawn bags.
Step 1: Creating the Ideal Storage Environment
Creating the ideal storage environment is crucial for maintaining the viability and health of your inoculated spawn bags. The goal is to provide conditions that promote mycelium growth while minimizing the risk of contamination. Follow these steps to create an ideal storage environment:
- Clean and sterile area: Before you begin, make sure your storage area is clean and free from contaminants. Thoroughly clean and disinfect all surfaces, including shelves, containers, and any tools or equipment that will come into contact with the spawn bags. This will help prevent the introduction of unwanted contaminants.
- Temperature control: Maintaining the proper temperature is crucial for mycelium growth. The ideal temperature range for storing most mushroom species is typically between 50°F (10°C) and 65°F (18°C). Avoid extreme temperature fluctuations, as this can stress the mycelium. Use a thermometer to monitor the temperature regularly and make adjustments if necessary.
- Humidity management: Proper humidity levels are essential to create a favorable environment for mycelium growth. Aim for a relative humidity (RH) of around 90% to 95%. Use a hygrometer to measure the humidity in the storage area and employ techniques like misting or using desiccant packets to maintain the desired humidity level.
- Adequate air circulation: While it’s important to maintain a sealed environment to prevent contamination, you still need to provide adequate air circulation. Air exchange is necessary to supply fresh oxygen to the mycelium and remove any buildup of carbon dioxide. Avoid keeping the bags in a completely airtight container to allow for some airflow.
- Darkness: Most mushroom species prefer to grow in darkness, so it’s important to store your spawn bags in a dark area. This helps simulate the natural environment for mushroom growth and prevents any unwanted exposure to light, which can inhibit the development of fruiting bodies.
By carefully creating the ideal storage environment, you provide the optimal conditions for the mycelium to thrive and colonize the substrate in the spawn bags. This sets the stage for successful mushroom cultivation in the future.
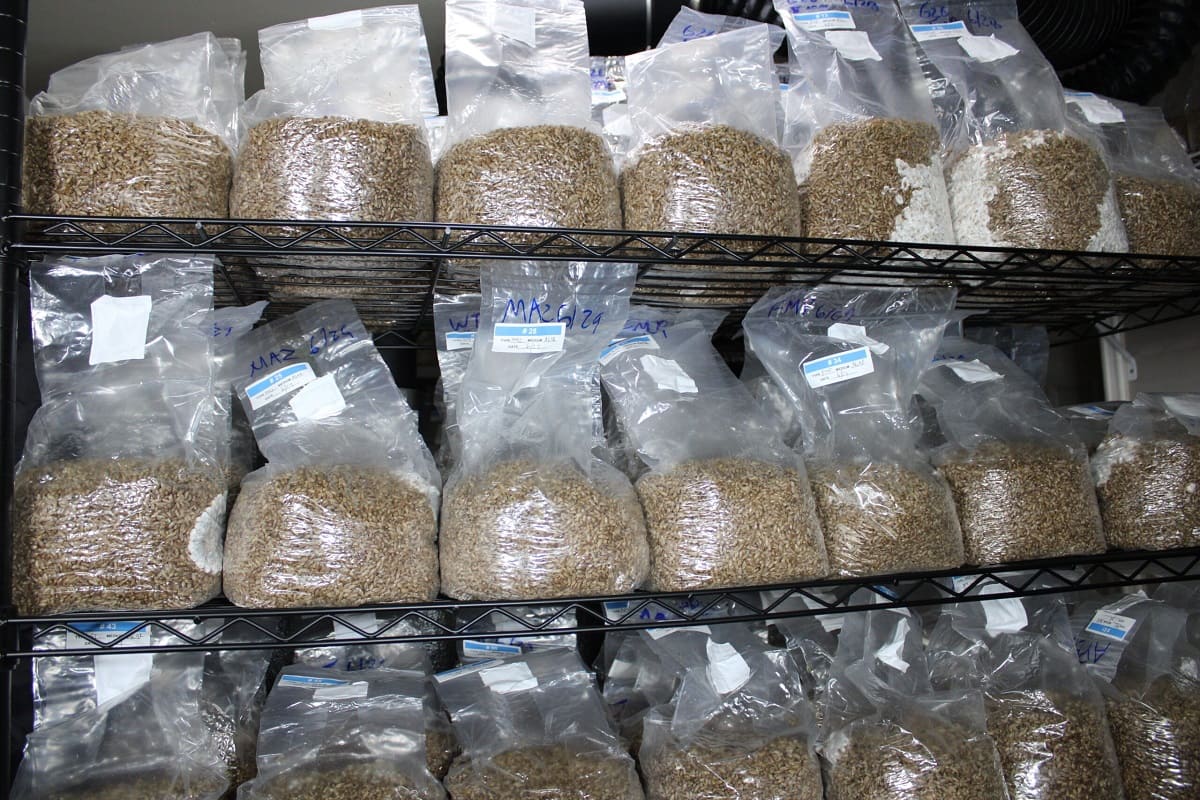
Step 2: Proper Placement of the Inoculated Spawn Bags
Once you have created the ideal storage environment, it’s time to properly place the inoculated spawn bags. The placement of the bags is crucial for ensuring proper air circulation and preventing contamination. Follow these guidelines to ensure the best placement:
- Spacing and stacking: Leave space between each spawn bag to allow for proper air circulation. Stacking the bags too closely together can restrict airflow and increase the chances of contamination. Place them in such a way that there is enough space for the air to flow around each bag.
- Elevate your spawn bags: It’s recommended to elevate your spawn bags off the ground or surface they are placed on. This helps prevent moisture build-up and potential contamination from the surface. Use clean, elevated racks or shelves to keep the bags off the ground. Ensure that the area under and around the bags is clean and sterile as well.
- Uniform orientation: Maintain a uniform orientation for your spawn bags. This means ensuring that the filter patch, usually located near the top of the bag, is facing upwards. This allows for better gas exchange and helps prevent any potential condensation from accumulating on the filter patch, which can lead to contamination.
- Labeling: Properly label each spawn bag with essential details such as the mushroom species, strain, and the date of inoculation. This will help you keep track of the different batches and strains and assist in organizing your storage area.
- Separation of different strains: If storing multiple strains, it’s advisable to separate them to minimize the risk of cross-contamination. Keep different strains at least a few feet apart and ensure they are properly labeled to avoid any mix-ups during the cultivation process.
By following these placement guidelines, you provide optimal conditions for the spawn bags to develop mycelium without the risk of contamination. Careful placement also ensures proper air circulation and allows for easy monitoring and maintenance of the bags.
After inoculating spawn bags, store them in a dark, temperature-controlled environment to allow the mycelium to colonize the substrate. Avoid direct sunlight and extreme temperatures to prevent contamination.
Step 3: Monitoring Temperature and Humidity Levels
Monitoring the temperature and humidity levels in your storage area is crucial for the health and development of the mycelium in your inoculated spawn bags. Fluctuations in temperature and humidity can weaken the mycelium or create an environment conducive to contamination. Follow these steps to effectively monitor and maintain the desired conditions:
- Use a thermometer and hygrometer: Invest in a reliable thermometer and hygrometer to accurately measure the temperature and humidity in your storage area. Place the thermometer and hygrometer near your spawn bags for accurate readings.
- Check the temperature daily: Monitor the temperature in your storage area daily to ensure it stays within the optimal range for mushroom growth. If the temperature exceeds or falls below the desired range, make appropriate adjustments to maintain a stable environment.
- Maintain the desired temperature: Adjust the temperature by using insulation, heating mats, or cooling devices as necessary. If the temperature is too high, use fans or air conditioning to bring it down. If it’s too low, consider using heating mats or other heating methods to raise the temperature.
- Maintain the desired humidity: Use misting or humidifiers to increase humidity if it falls below the optimal level. Conversely, if humidity is too high, use desiccant packets to absorb excess moisture. Regularly monitor humidity levels and make adjustments accordingly.
- Check for condensation: Condensation can lead to excess moisture, which can increase the risk of contamination. Check the spawn bags regularly for any signs of condensation on the filter patch. If you notice condensation, gently pat it away with a clean, sterile cloth. Consider adjusting humidity levels if condensation becomes a recurring issue.
- Document temperature and humidity readings: Keep a record of your temperature and humidity readings to track any patterns or changes over time. This documentation will help you identify any issues and make informed adjustments to maintain optimal conditions.
By diligently monitoring temperature and humidity levels, you ensure that your inoculated spawn bags have the best chance of developing healthy mycelium. Consistency in temperature and humidity is key to successful mushroom cultivation, so make it a priority to regularly check and monitor these factors.
Read more: How To Store Mushroom Spawn
Step 4: Preventing Contamination
Preventing contamination is crucial to ensure the successful growth and development of your inoculated spawn bags. Contaminants can hinder mycelium growth and result in poor or failed mushroom yields. Follow these steps to minimize the risk of contamination:
- Maintain cleanliness: Practice good hygiene by washing your hands thoroughly with soap and water before handling the spawn bags. Use disposable gloves to minimize the transfer of contaminants. Keep your storage area clean and sterile by regularly disinfecting surfaces, tools, and equipment.
- Work in a controlled environment: Create a designated area for handling and storing your spawn bags. This area should be separate from other activities, such as cooking or gardening, to minimize the introduction of potential contaminants. Keep doors and windows closed to prevent the entry of airborne contaminants.
- Use proper sterile techniques: When handling the spawn bags, be mindful of keeping them sterile. Avoid touching the filter patch and handle the bags with clean gloves or by holding onto the sealed edges. Never open a spawn bag unless you are ready to proceed with the inoculation or cultivation process.
- Avoid cross-contamination: To prevent cross-contamination, handle each strain separately and avoid touching multiple bags without sterilizing your hands or changing gloves. Keep different strains separated and properly labeled to minimize any mix-ups.
- Regularly inspect for signs of contamination: Regularly inspect your spawn bags for any signs of contamination, such as mold growth or unusual colors or odors. If you suspect contamination, remove the affected bags immediately to prevent further spread. Document any observations for future reference.
- Implement proper air filtration: Consider using HEPA air filters or air purifiers in your storage area to reduce the concentration of airborne contaminants. This can help create a cleaner and safer environment for your spawn bags.
- Quarantine new cultures or spawn: When introducing new mushroom cultures or spawn to your storage area, quarantine them separately for a period of time before integrating them with the rest. This allows you to observe for any signs of contamination before risking the contamination of your existing batches.
By practicing proper cleanliness, maintaining a controlled environment, and implementing sterile techniques, you can significantly reduce the risk of contamination in your inoculated spawn bags. Vigilance in monitoring and taking prompt action at the first sign of contamination will help protect the health of your mycelium and increase the chances of successful mushroom cultivation.
Step 5: Regular Inspection and Maintenance
Regular inspection and maintenance are essential to ensure the continued health and viability of your inoculated spawn bags. By regularly checking on the bags, you can identify and address any issues or potential risks promptly. Follow these steps for effective inspection and maintenance:
- Schedule regular inspections: Set a schedule for regularly inspecting your spawn bags. Depending on the stage of growth and the mushroom species, inspections may vary from daily to weekly. Consistency is key to catching any potential problems early.
- Observe for signs of healthy growth: During your inspections, look for signs of healthy mycelium growth. Healthy mycelium should be white and fluffy, covering the substrate. Be observant for any signs of discoloration, unusual odors, or abnormal growth patterns, as these can indicate issues such as contamination or mold.
- Monitor temperature and humidity levels: Continuously monitor the temperature and humidity levels in your storage area. Make adjustments as necessary to maintain optimal conditions. Fluctuations in temperature and humidity can stress the mycelium or create an environment favorable for contamination.
- Address any issues promptly: If you notice any signs of contamination or other problems during your inspections, take immediate action. Remove any contaminated bags to prevent further spread. Adjust environmental conditions, such as temperature and humidity, if necessary. Document any issues and the steps taken to address them for future reference.
- Rotate bags: To ensure even colonization and prevent the development of ‘dead zones’, periodically rotate the position of your spawn bags. This helps distribute the mycelium growth throughout the bag and promotes more uniform colonization.
- Monitor for fruiting conditions: As the mycelium develops within the spawn bags, keep an eye out for the onset of fruiting conditions. This may include the formation of pins or the appearance of mushroom primordia. Once fruiting conditions are detected, the bags can be transferred to a fruiting chamber to encourage the growth of mushroom fruits.
- Clean and disinfect the storage area: Regularly clean and disinfect your storage area to maintain a sterile environment. This helps prevent the buildup of contaminants and ensures a healthy growing environment for the mycelium.
By conducting regular inspections and proactively addressing any issues, you can maintain optimal conditions for the growth and development of your inoculated spawn bags. This diligent maintenance will contribute to successful mushroom cultivation and increase your chances of a fruitful harvest.
Conclusion
Storing inoculated spawn bags is a crucial step in the mushroom cultivation process. By carefully creating the ideal storage environment, properly placing the bags, monitoring temperature and humidity levels, preventing contamination, and conducting regular inspections and maintenance, you increase the chances of achieving successful mushroom cultivation.
Remember to maintain cleanliness and sterility throughout the storage process, practicing good hygiene and using proper sterile techniques. Create a controlled environment with the right temperature, humidity, and air circulation to provide optimal conditions for mycelium growth. Regularly monitor temperature and humidity levels, adjusting them as necessary to maintain stability.
Preventing contamination is essential for the health and development of the mycelium. Practice proper cleanliness, minimize cross-contamination, and promptly address any signs of contamination. Regularly inspect the spawn bags for signs of healthy growth and address any issues promptly.
By following these steps, you increase the longevity and viability of your inoculated spawn bags, maximizing your chances of a successful mushroom cultivation journey. Remember to document your process, learn from each batch, and make necessary adjustments for future cultivations. With patience, care, and attention to detail, you will be rewarded with a bountiful harvest of delicious and nutritious mushrooms.
Frequently Asked Questions about How To Store Inoculated Spawn Bags
Was this page helpful?
At Storables.com, we guarantee accurate and reliable information. Our content, validated by Expert Board Contributors, is crafted following stringent Editorial Policies. We're committed to providing you with well-researched, expert-backed insights for all your informational needs.


0 thoughts on “How To Store Inoculated Spawn Bags”