Articles
How To Store Pears Long Term
Modified: August 17, 2024
Discover helpful articles on how to store pears long term and keep them fresh for longer. Follow our expert tips and techniques for optimal pear storage.
(Many of the links in this article redirect to a specific reviewed product. Your purchase of these products through affiliate links helps to generate commission for Storables.com, at no extra cost. Learn more)
Introduction
Welcome to this comprehensive guide on how to store pears long-term. Pears are a delightful and versatile fruit, enjoyed by many for their juicy and sweet flavor. However, pears have a relatively short shelf-life compared to other fruits, which poses a challenge when trying to store them for an extended period. But fear not! With the right methods and techniques, you can enjoy the delectable taste of pears long after their peak season.
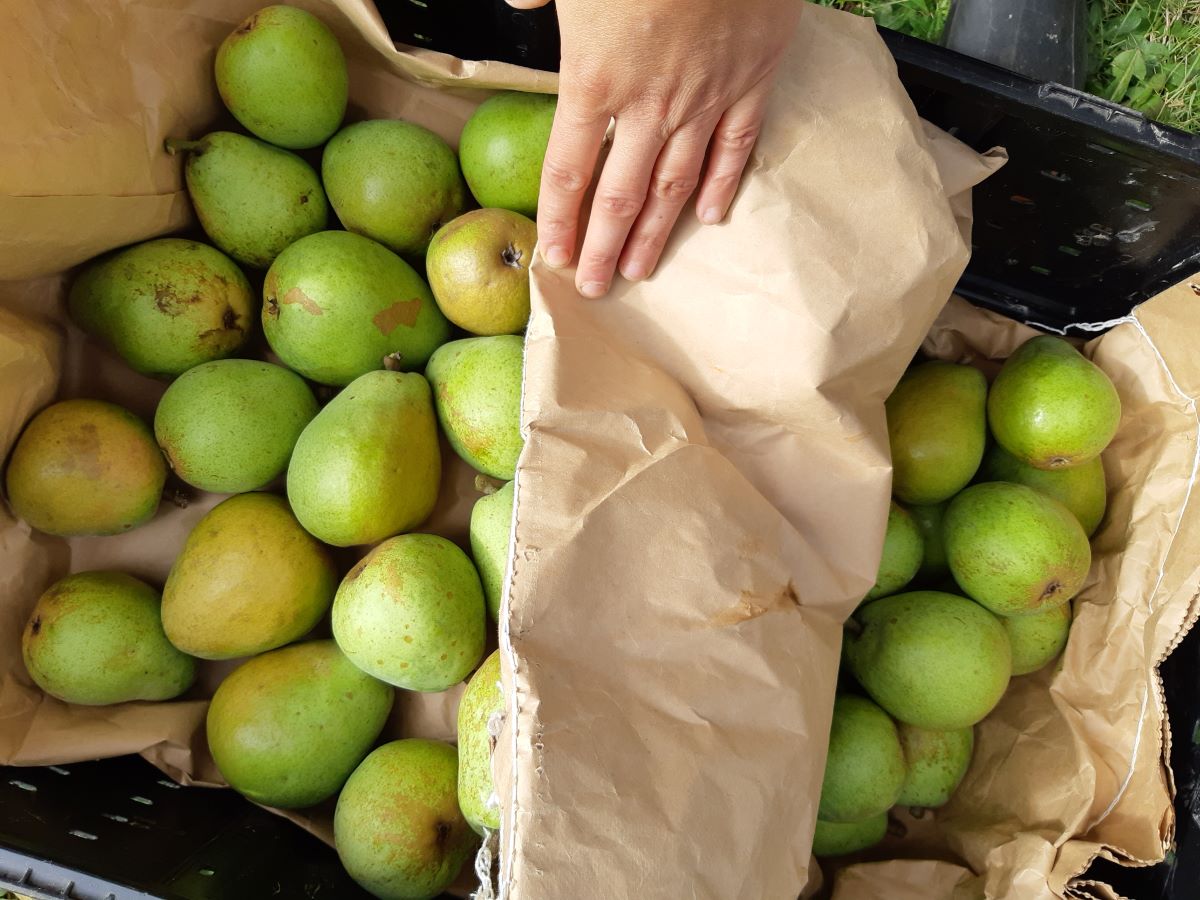
Selecting the right pears is the first step to ensure successful long-term storage. Look for pears that are firm but not too ripe – they should yield slightly to gentle pressure but still maintain their shape. It’s important to choose pears that are free from bruises, blemishes, or signs of decay. Varieties such as Bartlett, Bosc, Anjou, and Comice are known for their excellent storage potential.
Once you have chosen the perfect pears, it’s time to prepare them for long-term storage. Start by gently washing the pears to remove any dirt or residue. Do not soak them in water as this can make them susceptible to rot. After washing, allow the pears to air dry completely or pat them dry with a clean kitchen towel.
Before storing the pears, it’s important to determine the most suitable storage location. There are a few options to consider depending on your preferences and available space. A cool, dark, and well-ventilated area is ideal for long-term storage. This could be a cellar, root cellar, refrigerator, or even the freezer. Each method has its own advantages and considerations, so let’s explore each option in detail.
Key Takeaways:
- Choose firm, slightly underripe pears like Bartlett, Bosc, Anjou, or Comice for long-term storage. Properly prepare and store them in a cool, dark, well-ventilated cellar, refrigerator, or freezer to enjoy their delicious taste year-round.
- Wash, dry, and inspect pears before storage. Utilize a cellar, refrigerator, or freezer for long-term storage, ensuring proper temperature, humidity, and regular checks for spoilage. Enjoy the delightful taste of pears beyond their peak season.
Read more: How To Store Barley Long Term
Selecting the Right Pears
When it comes to long-term storage, selecting the right pears is crucial. Not all pears are created equal, and some varieties are better suited for extended storage than others. Here are a few things to consider when choosing pears:
- Firmness: Look for pears that are firm but not rock hard. They should yield slightly to gentle pressure when squeezed. Avoid pears that are too soft as they may not hold up well during long-term storage.
- Ripeness: Pears that are slightly underripe are ideal for long-term storage. They should have a slight green tinge to their skin and feel firm when touched. Avoid overly ripe pears as they may spoil quickly.
- Variety: Certain pear varieties have better storage potential than others. Bartlett, Bosc, Anjou, and Comice are renowned for their ability to retain their flavor and texture for extended periods. These varieties are a safe bet when it comes to long-term storage.
- Appearance: Inspect the pears for any signs of bruising, blemishes, or decay. Choose pears that are free from visible flaws, as they are more likely to deteriorate quickly during storage.
It’s worth noting that pears continue to ripen after they are harvested, so selecting slightly underripe ones ensures that they will be in an optimal condition for an extended period. If you’re unsure about the ripeness of the pears, you can always consult the assistance of a knowledgeable produce vendor or rely on the advice of experienced fruit growers.
Remember, different pear varieties have different flavors and textures, so choose the ones that best suit your preferences. Whether you prefer the crispness of a Bosc pear or the smooth sweetness of a Bartlett, selecting the right pears sets the foundation for successful long-term storage.
Preparing Pears for Long-Term Storage
Before storing pears for the long-term, it’s essential to properly prepare them to ensure their freshness and quality. Follow these steps to prepare your pears for extended storage:
- Wash the Pears: Start by gently washing the pears under cool running water. Use your hands or a soft brush to remove any dirt or residue. It’s important not to soak the pears in water as excessive moisture can lead to rot. Rinse them thoroughly and pat them dry with a clean kitchen towel or allow them to air dry completely.
- Sort and Inspect: Once the pears are dry, sort through them and remove any damaged or spoiled fruits. Pears that show signs of bruising, soft spots, or mold should be discarded as they can affect the overall quality of the batch and potentially lead to spoilage of other pears during storage.
- Handle with Care: Pears are delicate fruits, so handle them with care to prevent bruising. Avoid dropping or roughly handling the pears to minimize the risk of damage.
- Wrap Individually (Optional): If you prefer extra protection for your pears, you can individually wrap them in soft paper or tissue. Wrapping the pears can help prevent them from touching each other and minimize the risk of spreading any potential spoilage. However, it’s important to note that wrapping them is not necessary and can slightly reduce the air circulation around the pears, so only consider this step if you have concerns about the specific condition of your pears.
By following these steps, you can ensure that your pears are clean, free from damage, and ready for long-term storage. Proper preparation is crucial for maintaining the quality and freshness of the pears throughout the storage period.
Choosing the Right Storage Location
When it comes to long-term storage, choosing the right location is key to ensuring the longevity of your pears. The storage location should provide the ideal conditions to maintain the freshness and flavor of the fruit. Here are a few considerations when selecting the storage location for your pears:
- Cool Temperature: Pears are best stored in a cool environment to slow down the ripening process and prolong their shelf life. Ideally, the temperature should be around 30 to 40 degrees Fahrenheit (0 to 4 degrees Celsius). Avoid storing pears in areas where the temperature fluctuates significantly or where it becomes too warm, as this can accelerate ripening and lead to spoilage.
- Darkness: Pears should be stored in a dark location to protect them from direct sunlight. Exposure to light can cause the fruit to ripen faster and potentially result in undesirable changes in flavor and texture. Find a spot away from windows or any other sources of natural or artificial light.
- Proper Ventilation: Good airflow is essential for preventing the accumulation of moisture and the growth of mold and bacteria. Ensure that the storage location has adequate ventilation to allow for proper air circulation. Avoid storing pears in sealed containers as this can create a humid environment that encourages spoilage.
- Absence of Ethylene Gas: Pears are sensitive to ethylene gas, a natural plant hormone that promotes ripening. To prevent premature ripening and softening, store pears away from ethylene-producing fruits like apples, bananas, and avocados. Separating these fruits can help maintain the quality of your pears for a longer period.
Based on these considerations, there are a few storage options to choose from:
- Cellar or Root Cellar: If you have access to a cool, dark, and well-ventilated cellar or root cellar, it can be an excellent place to store pears. Ensure the temperature remains within the recommended range and that there is no exposure to sunlight. Store the pears in open crates or on racks to allow for proper airflow.
- Refrigerator: Most households have a refrigerator, which can serve as a convenient storage option. Place the pears in a plastic bag or airtight container and store them in the crisper drawer. Keep them separate from other fruits and vegetables to minimize the risk of ethylene exposure.
- Freezer: If you want to extend the storage period even further, you can freeze pears. Peel and slice the pears, removing the core and any bruised or damaged parts. Place the slices in a freezer-safe container or bag, ensuring they are well-sealed to prevent freezer burn. Frozen pears are perfect for use in smoothies, baked goods, or as a refreshing frozen treat.
Consider your available space, the quantity of pears you have, and your preference when deciding on the storage location. Each option has its benefits and limitations, so choose the one that suits your needs best.
By selecting the right storage location and maintaining the optimal conditions, you can enjoy the delicious taste of pears long after their peak season. Let’s now explore each specific storage method in more detail.
Storing Pears in a Cellar or Root Cellar
If you have access to a cellar or root cellar, it can be an ideal storage location for pears. The cool, dark, and well-ventilated environment of a cellar provides the perfect conditions to prolong the shelf life of your pears. Follow these steps to store pears in a cellar:
- Prepare the Pears: Before storing the pears, ensure they are clean, dry, and free from any bruises or damage. It’s a good idea to individually inspect each pear and remove any that show signs of spoilage.
- Choose the Right Containers: Select open crates, baskets, or shelves to store the pears. Avoid using plastic bags or sealed containers, as they restrict airflow and can lead to excess moisture accumulation.
- Arrange the Pears: Place the pears in a single layer on the crates or shelves, leaving space between each fruit for air circulation. Avoid stacking the pears on top of each other, as this can lead to pressure points and bruising.
- Check Regularly: Periodically check on the stored pears to ensure they are in good condition. Remove any pears that show signs of spoilage, as they can negatively impact the quality of the surrounding fruits.
- Monitor the Environment: Keep an eye on the temperature and humidity levels in the cellar. The temperature should be maintained between 30 to 40 degrees Fahrenheit (0 to 4 degrees Celsius). The humidity level should ideally be around 80 to 90 percent. If the environment becomes too humid, consider using a dehumidifier or improving the ventilation.
Storing pears in a cellar allows them to slowly ripen and develop a more complex flavor over time. It’s important to note that not all cellars or root cellars have the same conditions, so monitoring and adjusting as necessary is crucial.
Keep in mind that pears stored in a cellar will eventually ripen, so it’s essential to check them regularly and consume them before they become overly ripe. As a general guideline, pears stored in a cellar can generally last for several weeks to a couple of months, depending on the variety and initial ripeness.
By utilizing a cellar or root cellar for pear storage, you can enjoy the fruit’s fresh taste for an extended period. However, if a cellar is not available, don’t worry! There are other storage options, such as refrigeration and freezing, which we will explore in the next sections.
Store pears long term by keeping them in the refrigerator crisper drawer, where they can last for 3-4 weeks. Keep them separate from other fruits to prevent them from ripening too quickly.
Read more: How To Store Fabric Long Term
Storing Pears in the Refrigerator
If you don’t have access to a cellar or root cellar, storing pears in the refrigerator is a convenient and effective option. The cool temperature of the refrigerator helps slow down the ripening process and extends the shelf life of the pears. Follow these steps to properly store pears in the refrigerator:
- Prepare the Pears: Before placing the pears in the refrigerator, make sure they are clean, dry, and free from any bruises or damage. Inspect each pear individually and remove any that show signs of spoilage.
- Choose the Right Containers: Place the pears in a plastic bag or an airtight container. This helps maintain humidity and prevents the pears from absorbing odors from other foods in the refrigerator. Avoid storing them directly on the fridge shelves, as this can lead to bruising.
- Store in the Crisper Drawer: The crisper drawer in the refrigerator provides an ideal environment for storing pears. It helps regulate humidity levels and minimizes exposure to ethylene gas produced by other fruits and vegetables.
- Keep Separate: To prevent the transfer of flavors and hastened ripening, it’s best to keep pears separate from other fruits and vegetables in the refrigerator.
- Check Regularly: Regularly check the stored pears for any signs of spoilage. Remove any pears that are overripe or show signs of decay to prevent them from affecting the remaining ones.
When stored correctly in the refrigerator, pears can maintain their quality for up to several weeks. However, it’s important to consume them within a reasonable time frame, as they will eventually ripen and become too soft for consumption.
Keep in mind that the texture of refrigerated pears may become slightly softer compared to pears stored in a cellar or at room temperature. However, the flavor and juiciness should remain relatively intact.
Storing pears in the refrigerator is a convenient option, especially if you don’t have access to other storage methods. By following these steps, you can prolong the freshness and enjoy the delicious taste of your pears for an extended period.
Storing Pears in the Freezer
If you want to extend the storage life of your pears even further, freezing them is an excellent option. Freezing pears allows you to enjoy their flavor and texture long after their peak season. Here’s a step-by-step guide on how to store pears in the freezer:
- Prepare the Pears: Start by washing the pears thoroughly to remove any dirt or residue. Peel them and remove the core and any bruised or damaged parts. Cut the pears into slices or cubes, depending on your preference.
- Blanching (Optional): Blanching the pears before freezing can help preserve their color and texture. Bring a pot of water to a boil and carefully place the pear slices or cubes in the boiling water for about 1-2 minutes. Then, transfer them to an ice bath to cool rapidly. Drain the pears well before proceeding.
- Package for Freezing: Place the prepared pears into airtight containers, freezer bags, or vacuum-sealed bags. Make sure to remove as much air as possible from the containers to reduce the risk of freezer burn. Label the containers with the date for easy reference. Alternatively, you can arrange the blanched pears in a single layer on a baking sheet and freeze them until firm, then transfer them to freezer bags.
- Freeze: Place the packed pears in the freezer and ensure they are placed in a flat position to prevent them from sticking together. It’s important to maintain a temperature of 0 degrees Fahrenheit (-18 degrees Celsius) or below to keep the pears properly frozen.
- Storage Duration: Frozen pears can be stored for up to 10-12 months. However, it’s best to consume them within the first few months for the best flavor and texture.
Frozen pears can be used in various ways, such as in smoothies, baked goods, or as a refreshing frozen treat. They retain most of their flavor and nutritional value when properly frozen and stored.
When you’re ready to use the frozen pears, simply thaw them in the refrigerator overnight or briefly in the microwave. The texture may soften slightly after thawing, but they will still be delicious for your culinary adventures.
Freezing pears is a fantastic way to enjoy their taste and benefits throughout the year. By following these steps, you can stock up on your favorite pears and have them readily available whenever you need them.
Wrapping Up: Tips for Long-Term Pear Storage
As we conclude this comprehensive guide on storing pears long-term, let’s summarize some key tips to help you achieve successful pear storage:
- Select the Right Pears: Choose firm, slightly underripe pears that are free from damage or decay. Varieties like Bartlett, Bosc, Anjou, and Comice are known for their excellent storage potential.
- Prepare the Pears: Wash and dry the pears thoroughly before storage. Remove any damaged fruits to prevent spoilage.
- Choose the Ideal Storage Location: If possible, store pears in a cool, dark, and well-ventilated cellar or root cellar. Alternatively, refrigeration or freezing can also be effective options.
- Store in the Cellar: In a cellar or root cellar, use open crates or shelves to arrange the pears. Check regularly for signs of spoilage and maintain proper temperature and humidity levels.
- Store in the Refrigerator: Place pears in a plastic bag or airtight container in the crisper drawer, separate from other fruits and vegetables. Monitor the condition of the pears and consume within a few weeks.
- Store in the Freezer: Peel, remove the core, and slice or cube the pears. Blanching is optional but can help preserve color and texture. Pack in airtight containers or freezer bags, removing excess air, and freeze for up to 10-12 months.
Remember, the storage duration may vary depending on the condition of the pears and the storage method used. Regularly check the stored pears for any signs of spoilage and discard any that are no longer suitable for consumption.
By following these tips, you can enjoy the delicious taste of pears long after their peak season. Whether you choose to store them in a cellar, refrigerator, or freezer, proper storage techniques will help maintain their quality and flavor for extended periods.
So, the next time you come across an abundance of pears, don’t let them go to waste. Put these tips into practice and enjoy a steady supply of delicious pears throughout the year!
Conclusion
In conclusion, storing pears long-term is a practical and rewarding way to enjoy their delicious taste beyond their peak season. With the right selection, preparation, and storage techniques, you can prolong the shelf life of pears and savor their juicy sweetness throughout the year.
Start by selecting the right pears – firm, slightly underripe varieties such as Bartlett, Bosc, Anjou, and Comice are excellent choices. Ensure that the pears are clean and free from any damage before storing them.
Choosing the right storage location is crucial. Options include a cool, dark, and well-ventilated cellar or root cellar, a refrigerator with a crisper drawer, or the freezer for long-term storage. Each method has its own advantages and considerations, so choose the one that suits your needs and available space.
Properly preparing the pears before storage is essential. Wash and dry them thoroughly and consider individually wrapping them for added protection, though it is not necessary. Handling them with care helps prevent bruising and damage.
Whether storing in a cellar, refrigerator, or freezer, it’s important to check the condition of the pears regularly and discard any that show signs of spoilage. Each storage method has its own recommended temperature and humidity levels, so maintaining proper storage conditions is key.
By following the storage tips and techniques outlined in this guide, you can enjoy the delightful taste of pears for an extended period of time. Whether you’re using them in recipes, enjoying them as a healthy snack, or freezing them for later use, the versatility and sweetness of pears will continue to delight your taste buds.
So the next time you come across a surplus of pears, don’t let them go to waste. Utilize the knowledge and tips from this guide to store your pears long-term and relish in their incredible flavor all year round. Happy pear storing!
Frequently Asked Questions about How To Store Pears Long Term
Was this page helpful?
At Storables.com, we guarantee accurate and reliable information. Our content, validated by Expert Board Contributors, is crafted following stringent Editorial Policies. We're committed to providing you with well-researched, expert-backed insights for all your informational needs.


0 thoughts on “How To Store Pears Long Term”