Articles
How To Store Rice Balls
Modified: August 27, 2024
Learn how to store rice balls properly with our informative articles. Keep your delicious snacks fresh and tasty for longer periods.
(Many of the links in this article redirect to a specific reviewed product. Your purchase of these products through affiliate links helps to generate commission for Storables.com, at no extra cost. Learn more)
Introduction
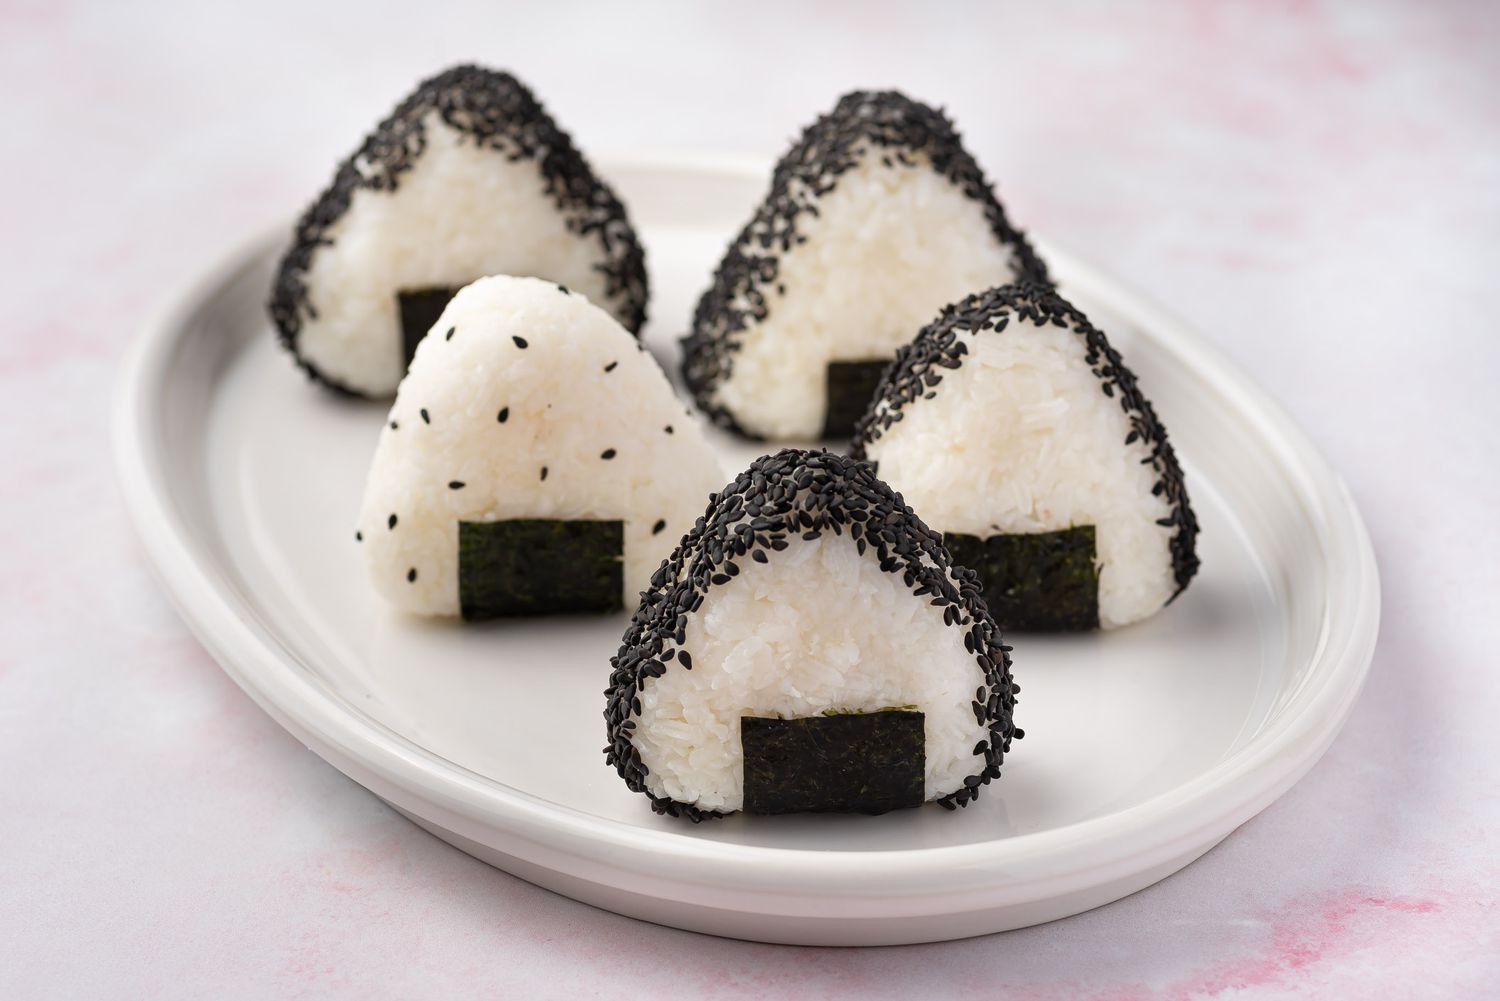
Welcome to the ultimate guide on how to store rice balls! Rice balls, also known as onigiri, are a popular and versatile Japanese dish. Made from cooked rice and various fillings, they are a convenient and delicious snack or meal option. Whether you’re making a large batch for a party or simply have leftovers from a homemade sushi night, learning how to properly store rice balls is essential to maintain their taste and texture.
In this article, we will walk you through the step-by-step process of storing rice balls to ensure that they stay fresh and enjoyable for as long as possible. We will cover the necessary ingredients and tools, the cooking and preparation process, assembling the rice balls, and finally, storing and reheating them.
By following these guidelines, you will be able to keep your rice balls delicious and fresh, whether you plan on enjoying them the next day or throughout the week. So let’s get started with the first step: gathering your ingredients and tools!
Key Takeaways:
- Keep your rice balls fresh by storing them properly in the refrigerator or freezer, and label them with fillings and date for easy identification. Reheat and enjoy within a day for optimal flavor and texture.
- Enjoy the convenience of onigiri anytime by following these easy steps to store, reheat, and serve your rice balls with confidence. Get creative with fillings and savor the deliciousness of traditional Japanese cuisine!
Read more: How To Store Popcorn Balls
Step 1: Gather Ingredients and Tools
Before you begin preparing and storing your rice balls, make sure you have all the necessary ingredients and tools on hand. Here’s what you’ll need:
Ingredients:
- Cooked rice – Use short-grain Japanese rice for the best texture and stickiness.
- Fillings – Common fillings include pickled plum (ume), salmon, tuna, teriyaki chicken, or vegetables. Choose your favorite or mix and match!
- Nori seaweed sheets – These are optional but add a delicious flavor and crunch to your rice balls.
- Salt – A small amount for seasoning the rice.
Tools:
- Bowl and wooden spatula – For mixing and seasoning the cooked rice.
- Plastic wrap or airtight container – To store the rice balls and keep them fresh.
- Cutting board and sharp knife – For shaping and cutting the rice balls.
Once you have gathered all the necessary ingredients and tools, you’re ready to move on to the next step: cooking the rice!
Step 2: Cook Rice
The foundation of any great rice ball is, of course, the rice itself. Follow these steps to cook the perfect rice for your onigiri:
- Measure the desired amount of rice using a measuring cup. A general rule of thumb is to use around 1/2 to 1 cup of uncooked rice per rice ball, depending on how large you want them to be.
- Rinse the rice under cold water to remove excess starch. Place the rice in a fine-mesh sieve or colander and gently rinse it until the water runs clear.
- Transfer the rinsed rice to a pot and add the appropriate amount of water. The ratio of rice to water is usually 1:1, but this may vary depending on the type of rice you’re using. Consult the package instructions for the exact measurements.
- Place the pot on the stove over medium heat and bring the water to a boil.
- Once the water is boiling, reduce the heat to low and cover the pot with a lid. Let the rice simmer for about 15-20 minutes or until all the water is absorbed and the rice is tender.
- Remove the pot from the heat and let the rice sit, covered, for an additional 5-10 minutes to allow it to fully steam and become fluffy.
- Transfer the cooked rice to a large bowl and season it with a sprinkle of salt. Use a wooden spatula to gently mix the salt into the rice, being careful not to squash the grains.
Now that your rice is cooked and seasoned, it’s time to move on to the next step: preparing the fillings for your rice balls!
Read more: How To Store Oreo Balls
Step 3: Prepare Fillings
The fillings you choose for your rice balls will add flavor and texture to each bite. Here are the steps to prepare the fillings:
- If you’re using pre-cooked fillings such as grilled salmon or teriyaki chicken, make sure they are cooled and shredded or chopped into small pieces. Alternatively, you can use canned tuna or cooked vegetables.
- If you’re using fresh vegetables as fillings, such as cucumber or avocado, wash and slice them thinly. You can also lightly blanch vegetables like spinach or asparagus before adding them to the rice balls.
- If you prefer pickled fillings, such as ume (pickled plum), be sure to remove the pits and cut them into smaller pieces.
- Once your fillings are prepared, it’s time to assemble the rice balls!
Remember to get creative with your fillings. You can mix and match different flavors and textures to create unique and delicious combinations. Now, let’s move on to the next step: assembling the rice balls!
Step 4: Assemble the Rice Balls
Now that you have your cooked rice and prepared fillings, it’s time to assemble the rice balls. Follow these steps to create perfectly shaped onigiri:
- Take a small handful of cooked rice, roughly the size of your palm.
- Make a small indent in the center of the rice to create a space for the filling.
- Place a small amount of filling into the indent. Be careful not to overfill, as it might make the rice ball difficult to shape and close.
- Close the rice ball by folding the rice over the filling, using your hands to gently squeeze and shape it into a triangle, oval, or ball shape. Wetting your hands slightly with water can help prevent the rice from sticking.
- If desired, you can wrap the rice ball with a strip of nori seaweed to add more flavor and make it easier to hold.
- Repeat the process with the remaining rice and fillings until you’ve made as many rice balls as desired.
Now that your rice balls are assembled, it’s time to move on to the next step: storing them properly to maintain their freshness!
Store rice balls in an airtight container to prevent them from drying out. You can also place a damp paper towel in the container to help maintain moisture. Keep them in the refrigerator for up to 3 days.
Step 5: Store the Rice Balls
Proper storage is crucial to keep your rice balls fresh and delicious. Here’s how you can store them:
- Wrap each rice ball tightly with plastic wrap to prevent them from drying out. Make sure to cover them completely and seal the edges.
- If you prefer to use an airtight container, place the wrapped rice balls inside, ensuring that there is minimal air exposure.
- Store the wrapped rice balls in the refrigerator to keep them cool. They can usually last for up to 24 hours without losing their taste and texture.
- If you want to store the rice balls for a longer period, you can freeze them. Place the wrapped rice balls in a freezer bag or airtight container, ensuring they are properly sealed. They can be stored in the freezer for up to one month.
Remember to label the rice balls with the fillings and date if you’re making different varieties or planning to store them for an extended period.
When you’re ready to enjoy the rice balls, simply remove them from the refrigerator or freezer and let them thaw at room temperature for a few minutes. Avoid leaving them at room temperature for too long, as this may affect their taste and quality.
Now that you know how to properly store rice balls, let’s move on to the last step: reheating and serving!
Step 6: Reheating and Serving
When it’s time to enjoy your stored rice balls, follow these steps to reheat and serve them:
- If the rice balls are refrigerated, remove them from the plastic wrap and place them on a plate.
- Lightly dampen a paper towel with water and cover the rice balls to prevent them from drying out during reheating.
- Reheat the rice balls in the microwave on medium power for about 30 seconds to 1 minute, or until they are warmed through. You can also use a steamer to reheat them for a few minutes.
- If the rice balls were frozen, thaw them in the refrigerator overnight before reheating. Follow the same reheating instructions as above.
- Once the rice balls are heated, you can remove the paper towel and serve them as they are or accompany them with additional side dishes, such as miso soup or a salad.
- Enjoy your freshly reheated rice balls! They make a great grab-and-go snack or can be part of a satisfying lunch or dinner.
Remember to consume the reheated rice balls within a day to ensure optimal flavor and texture.
With these easy steps, you can store, reheat, and serve your rice balls with confidence. Whether you’re enjoying them at home or taking them on the go, you can now savor the deliciousness of onigiri whenever you desire!
As a final note, it’s important to trust your senses when consuming stored rice balls. If you notice any strange smells, flavors, or changes in texture, it’s best to discard them as a precaution.
Happy rice ball making and storing!
Read more: How To Store Exercise Ball
Conclusion
Congratulations! You’ve reached the end of our comprehensive guide on how to store rice balls. By following these steps, you can ensure that your rice balls remain fresh, flavorful, and enjoyable for an extended period.
Remember, gathering the right ingredients and tools, cooking the perfect rice, preparing delicious fillings, assembling the rice balls, and storing them properly are essential steps to maintain their taste and texture.
With proper storage techniques, you can refrigerate rice balls for up to 24 hours or freeze them for up to one month. When you’re ready to enjoy them, reheating them in the microwave or steamer will restore their warmth and delectable flavors.
Rice balls offer a convenient and versatile meal option that can be enjoyed for breakfast, lunch, dinner, or as a snack on the go. With various fillings and shapes to choose from, you can get creative and experiment with different flavor combinations to suit your taste preferences.
So don’t hesitate to make a batch of rice balls, whether you’re hosting a party, preparing a quick meal, or looking for a delicious and satisfying snack. Practice the art of onigiri-making, store them properly, and enjoy the taste of traditional Japanese cuisine anytime, anywhere.
Thank you for joining us on this exciting journey to learn how to store rice balls. We hope that this guide has provided you with valuable insights and useful tips. Now, go forth and indulge in the delightful world of onigiri!
Frequently Asked Questions about How To Store Rice Balls
Was this page helpful?
At Storables.com, we guarantee accurate and reliable information. Our content, validated by Expert Board Contributors, is crafted following stringent Editorial Policies. We're committed to providing you with well-researched, expert-backed insights for all your informational needs.


0 thoughts on “How To Store Rice Balls”