Articles
How To Store Wood Scraps
Modified: August 21, 2024
Learn how to efficiently store wood scraps and keep your workspace organized with helpful articles.
(Many of the links in this article redirect to a specific reviewed product. Your purchase of these products through affiliate links helps to generate commission for Storables.com, at no extra cost. Learn more)
Introduction
Welcome to the world of woodworking! As you embark on your woodworking journey, you’ll quickly discover that wood scraps are an inevitable part of the process. Whether it’s leftover pieces from a project or intentionally saved cut-offs for future use, storing wood scraps in an organized and efficient manner is essential. In this article, we will delve into the importance of proper wood scrap storage and provide you with practical tips and strategies for keeping your workshop tidy and your wood scraps readily accessible.
Properly storing your wood scraps is not just about maintaining a clean and organized workspace; it also has several practical benefits. Firstly, it allows you to maximize the utility of your wood scraps. By having them neatly organized and easily accessible, you can quickly locate the perfect piece for a small project or use them for repairs and touch-ups. Moreover, storing wood scraps properly helps to protect them from environmental factors that can deteriorate their quality over time, such as moisture damage or pest infestations. By implementing effective storage solutions, you not only save money on purchasing new materials but also contribute to the sustainability of your woodworking practice by reducing waste.
When it comes to storing wood scraps, there are a few key considerations to keep in mind. Firstly, you need to think about the available space in your workshop. Consider the size and quantity of wood scraps you have and assess how much storage space you can allocate for them. It’s important to strike a balance between utilizing the available space efficiently without overcrowding your workshop. Secondly, you need to consider the different sizes and shapes of your wood scraps. It’s crucial to organize them in a way that allows easy identification and access, so you can find the right piece for your project without wasting time searching through a disorganized pile of scraps.
In the following sections, we will explore various storage solutions and strategies to help you store your wood scraps effectively. From selecting the right storage area to utilizing vertical wall space and implementing a labeling system, we have got you covered. So, let’s dive in and ensure that your wood scraps are stored in a way that maximizes their utility and keeps your workshop clutter-free!
Key Takeaways:
- Proper wood scrap storage is crucial for maximizing utility, cost savings, and workshop safety. Organize by size, use containers, and implement a labeling system for an efficient and sustainable woodworking practice.
- Utilize vertical storage, prevent moisture and pest damage, and prioritize safety to create a hazard-free workshop environment. Proper wood scrap storage enhances organization, efficiency, and woodworking experience.
Read more: How To Store Fabric Scraps
Why Proper Wood Scrap Storage Matters
Proper wood scrap storage is not just a matter of organization; it plays a vital role in maximizing the value of your materials and maintaining a safe and efficient workspace. Here are a few key reasons why investing time and effort in proper wood scrap storage is important:
Maximizing Utility: Wood scraps may seem insignificant at first, but they can come in handy for various purposes. From small crafts and repairs to inlay work and accents, having a well-organized stash of wood scraps allows you to tap into their potential whenever needed. By storing them in a structured manner, you can quickly locate the right size and type of wood scrap for a particular project, saving valuable time and resources.
Cost Savings: By effectively storing your wood scraps, you can reduce your reliance on purchasing new materials for smaller projects. Instead of buying new lumber for a small repair job or a unique accent piece, you can browse through your collection of scraps to find the perfect fit. This not only saves money but also promotes sustainability by minimizing waste and unnecessary consumption.
Environmental Impact: Proper wood scrap storage contributes to a more eco-friendly woodworking practice. By keeping your wood scraps organized and accessible, you are more likely to use them in future projects rather than discarding them as waste. This reduces the amount of wood that ends up in landfills, conserves natural resources, and minimizes the environmental footprint of your woodworking activities.
Workshop Safety: A cluttered workshop is not only inefficient but also hazardous. Wood scraps scattered around the work area can pose a tripping hazard and impede movement, increasing the risk of accidents. By storing your wood scraps properly, you create a safer workspace that allows for easy navigation and reduces the likelihood of injuries.
Preserving Wood Quality: Wood is susceptible to damage from moisture, pests, and other environmental factors. Storing your wood scraps in a dry and controlled environment helps protect them from moisture absorption, which can lead to warping, splitting, and fungal growth. Additionally, proper storage minimizes the risk of pest infestations, ensuring that your precious wood scraps remain in good condition for future use.
By recognizing the importance of proper wood scrap storage, you can take proactive steps to ensure that your workshop remains organized, efficient, and safe. In the next sections, we will explore practical considerations and effective strategies for storing wood scraps, helping you make the most of your woodworking materials and maintain a clutter-free workspace.
Considerations for Storing Wood Scraps
When it comes to storing wood scraps, there are several important considerations to keep in mind. These considerations will help you utilize the available space efficiently and ensure that your wood scraps are easily accessible. Here are some key factors to consider:
1. Available Space: Take stock of the available space in your workshop designated for wood scrap storage. Assess the size and quantity of your wood scraps and determine how much space you can allocate for their storage. It’s crucial to strike a balance between utilizing the available space efficiently and avoiding overcrowding, which can lead to a disorganized and cluttered workspace.
2. Size and Shape of Wood Scraps: Wood scraps come in various sizes and shapes, ranging from small cut-offs to larger pieces of lumber. Organizing them based on size and shape can make it easier to locate specific pieces when needed. Consider separating your wood scraps into different categories, such as small, medium, and large, or by type of wood, to streamline your storage system.
3. Accessibility: Make sure your wood scraps are easily accessible. Avoid piling them in hard-to-reach corners or burying them under other materials. Organize your wood scraps in a way that allows quick and convenient access to each piece. This will save you time and effort when searching for the perfect scrap for a project.
4. Safety: Ensure that your storage solution does not compromise safety in your workshop. Avoid storing wood scraps in areas that block walkways or impede movement. Keep them away from machines or equipment that could cause accidental damage or injury. Clear pathways and maintain a clutter-free workspace to minimize the risk of accidents.
5. Future Use: Consider the future use of your wood scraps when determining your storage approach. If you have specific projects in mind that will require certain sizes or types of wood, keep those scraps readily accessible. It’s also helpful to label and organize your wood scraps based on their potential applications, making it easier to find suitable pieces for future projects.
6. Integration with Workshop Layout: Incorporate your wood scrap storage solution into the overall layout of your workshop. This could be vertical storage on walls, under workbenches, or as part of a dedicated storage shelving system. By integrating your wood scrap storage into the existing workshop setup, you can optimize your workspace and create a more efficient workflow.
By considering these factors, you can develop a storage plan that works best for your specific woodworking needs. In the next sections, we will explore different storage solutions and strategies to help you store your wood scraps effectively, keeping your workshop organized and your materials easily accessible.
Selecting the Right Storage Area
Choosing the right storage area for your wood scraps is crucial for maintaining an organized and efficient workspace. Here are some considerations to help you select the optimal storage area:
1. Dedicated Space: Allocate a dedicated area in your workshop for storing wood scraps. This ensures that they have a designated spot and prevents them from mixing with other materials or tools. Having a dedicated space also makes it easier to keep track of your inventory and maintain an organized workflow.
2. Dry and Controlled Environment: Moisture is one of the biggest enemies of wood. Avoid storing your wood scraps in areas that are prone to dampness or high humidity levels, such as basements or outdoor sheds. Instead, choose a dry and controlled environment within your workshop. This could be a corner away from windows or areas near water sources.
3. Temperature Considerations: Extreme temperature fluctuations can have negative effects on wood. Avoid storing your wood scraps in areas that experience significant temperature changes, such as near heating or cooling systems. Ideally, aim for a storage area that maintains a consistent temperature to prevent warping or cracking of the wood over time.
4. Ventilation: Good airflow is essential for preventing the buildup of humidity and preventing mold or mildew. Ensure that your chosen storage area has adequate ventilation to promote air circulation and prevent moisture retention. This can be achieved by using open shelves or providing gaps between containers or bins to allow airflow.
5. Accessibility: Choose a storage area that is easily accessible and convenient to reach. Consider factors such as proximity to your workbench or the frequency with which you need to access your wood scraps. If possible, select a location that allows you to quickly grab the required piece without disrupting your workflow.
6. Safety Considerations: Prioritize safety when selecting a storage area for your wood scraps. Ensure that the chosen location does not obstruct walkways or pose a hazard to you or others in the workshop. Keep in mind any potential risks, such as storing wood scraps near flammable materials or chemicals, and take appropriate precautions to mitigate those risks.
7. Space Considerations: Assess the amount of space available in your workshop for wood scrap storage. Consider the quantity and size of your wood scraps and select a storage area that can accommodate them comfortably. Utilize vertical space by installing shelves or racks, or utilize underutilized space such as the space under workbenches or tables.
By considering these factors, you can choose the right storage area for your wood scraps that enhances organization, protects the quality of the wood, and promotes a safe and efficient workspace. In the next sections, we will explore different storage solutions and strategies to help you store your wood scraps effectively.
Organizing Wood Scraps by Size
One of the key considerations when storing wood scraps is organizing them by size. Sorting your wood scraps based on their dimensions not only helps maximize storage space but also makes it easier to locate the right piece for your projects. Here are some tips for organizing wood scraps by size:
1. Sorting Categories: Start by establishing sorting categories based on the size of your wood scraps. You can create general categories like small, medium, and large or be more specific, such as 1-inch thick, 2-inch thick, and so on. Determine what works best for your storage system and the types of projects you typically undertake.
2. Containers or Bins: Use containers or bins to store wood scraps of similar sizes together. Plastic bins or sturdy boxes work well for this purpose. Label each container with their respective size category to easily identify and locate specific pieces when needed. Choose containers that are stackable to maximize vertical space.
3. Vertical Storage: Employ vertical storage solutions, such as shelving units or racks, to organize wood scraps by size. By utilizing vertical space, you can significantly increase storage capacity while still keeping everything easily accessible. Place the larger wood scraps on the bottom shelves and smaller pieces on higher levels for efficient use of space.
4. Dividers and Compartments: Consider using dividers or compartments within containers or on shelves to further organize and separate wood scraps of different sizes. This helps prevent larger pieces from toppling over and keeps everything neat and tidy, making it easier to find what you need quickly.
5. Labeling: Label each storage container, bin, or shelf with the respective size category to ensure clear identification. This makes it easier to locate specific wood scraps without needing to open every container or sort through piles of wood. Clear labeling also helps maintain the organization when adding new wood scraps to the storage area.
6. Wall-mounted Racks: Consider installing wall-mounted racks, pegboards, or hooks to hang wood scraps based on their size. This option is particularly useful for longer or irregularly shaped pieces. By hanging them on the wall, you not only save space but also keep the wood scraps visible and easily accessible.
7. Utilize Small Containers: For smaller wood scraps, consider using smaller containers like jars, bins, or small drawers. This allows you to store small scraps, such as dowels, pen blanks, or wooden accents, separately and prevents them from getting lost or buried among larger pieces.
8. Regular Maintenance: Regularly assess your wood scrap storage and make adjustments as needed. As you use wood scraps for various projects, some sizes may become more or less common. Rearrange and reorganize your storage system accordingly to maintain the efficiency of your workflow.
By organizing your wood scraps by size, you can easily locate the right piece for your projects without wasting time searching through chaotic piles of scraps. This systematic approach not only maximizes storage space but also ensures that your wood scraps remain in good condition for future use.
Read more: How To Store Food Scraps For Compost
Using Containers or Bins for Storage
Containers or bins are a practical and efficient solution for storing wood scraps. They provide a way to organize and protect your wood scraps, keeping them easily accessible and preventing clutter in your workshop. Here are some tips for using containers or bins for wood scrap storage:
1. Choose the Right Containers: Select containers or bins that are durable, stackable, and easy to access. Plastic storage bins with lids or clear containers are often popular choices, as they allow you to see the contents without opening them. Consider the size and quantity of your wood scraps to determine the appropriate container sizes.
2. Categorize by Size or Type: Organize your wood scraps within the containers or bins based on their size or type. This categorization makes it easier to find specific pieces when needed. Consider using dividers or compartments within the containers to further separate different sizes or types of wood scraps.
3. Labeling: Label each container or bin with the corresponding category or type of wood scraps stored inside. This helps you quickly identify and locate specific pieces without having to open multiple containers. Clear and legible labels make it easier to maintain organization and prevent mixing up different wood scraps.
4. Stackable Design: Opt for containers or bins that are stackable. This allows you to maximize vertical storage space in your workshop. Stacking containers also helps keep your wood scraps organized and prevents them from taking up unnecessary floor space.
5. Accessibility: Consider accessibility when storing wood scraps in containers or bins. If you frequently use certain sizes or types of wood scraps, place those containers within easy reach, ensuring effortless retrieval when working on projects. Less frequently used wood scraps can be stored in containers that are stacked or placed in slightly more inaccessible areas of your workshop.
6. Utilize Clear Containers: Clear containers provide the advantage of visibility, allowing you to easily see the contents without having to open them. This is especially useful when searching for specific wood scraps, saving you time and effort. If using opaque containers, consider attaching an inventory list or a photo of the wood scraps to the outside for quick reference.
7. Keep Containers Clean and Dry: Ensure that your containers or bins are clean and dry before storing wood scraps. Any moisture or debris present in the containers can potentially damage the wood scraps over time. Regularly inspect and clean the containers to maintain a suitable storage environment.
8. Regular Maintenance: Regularly assess and organize your wood scrap containers or bins. As you use wood scraps for different projects, some containers may become emptier or fuller. Adjust the arrangement and space allocation accordingly to maintain an organized system and optimize storage efficiency.
Using containers or bins for wood scrap storage helps keep your workshop tidy and makes it easier to locate specific pieces. This storage solution protects your wood scraps from damage and ensures that they remain in good condition for future use. Implement these tips to create a well-organized and efficient wood scrap storage system in your workshop.
Store wood scraps in a dry, well-ventilated area off the ground to prevent moisture damage and potential mold growth. Stack them neatly to maximize space and make it easier to find the pieces you need.
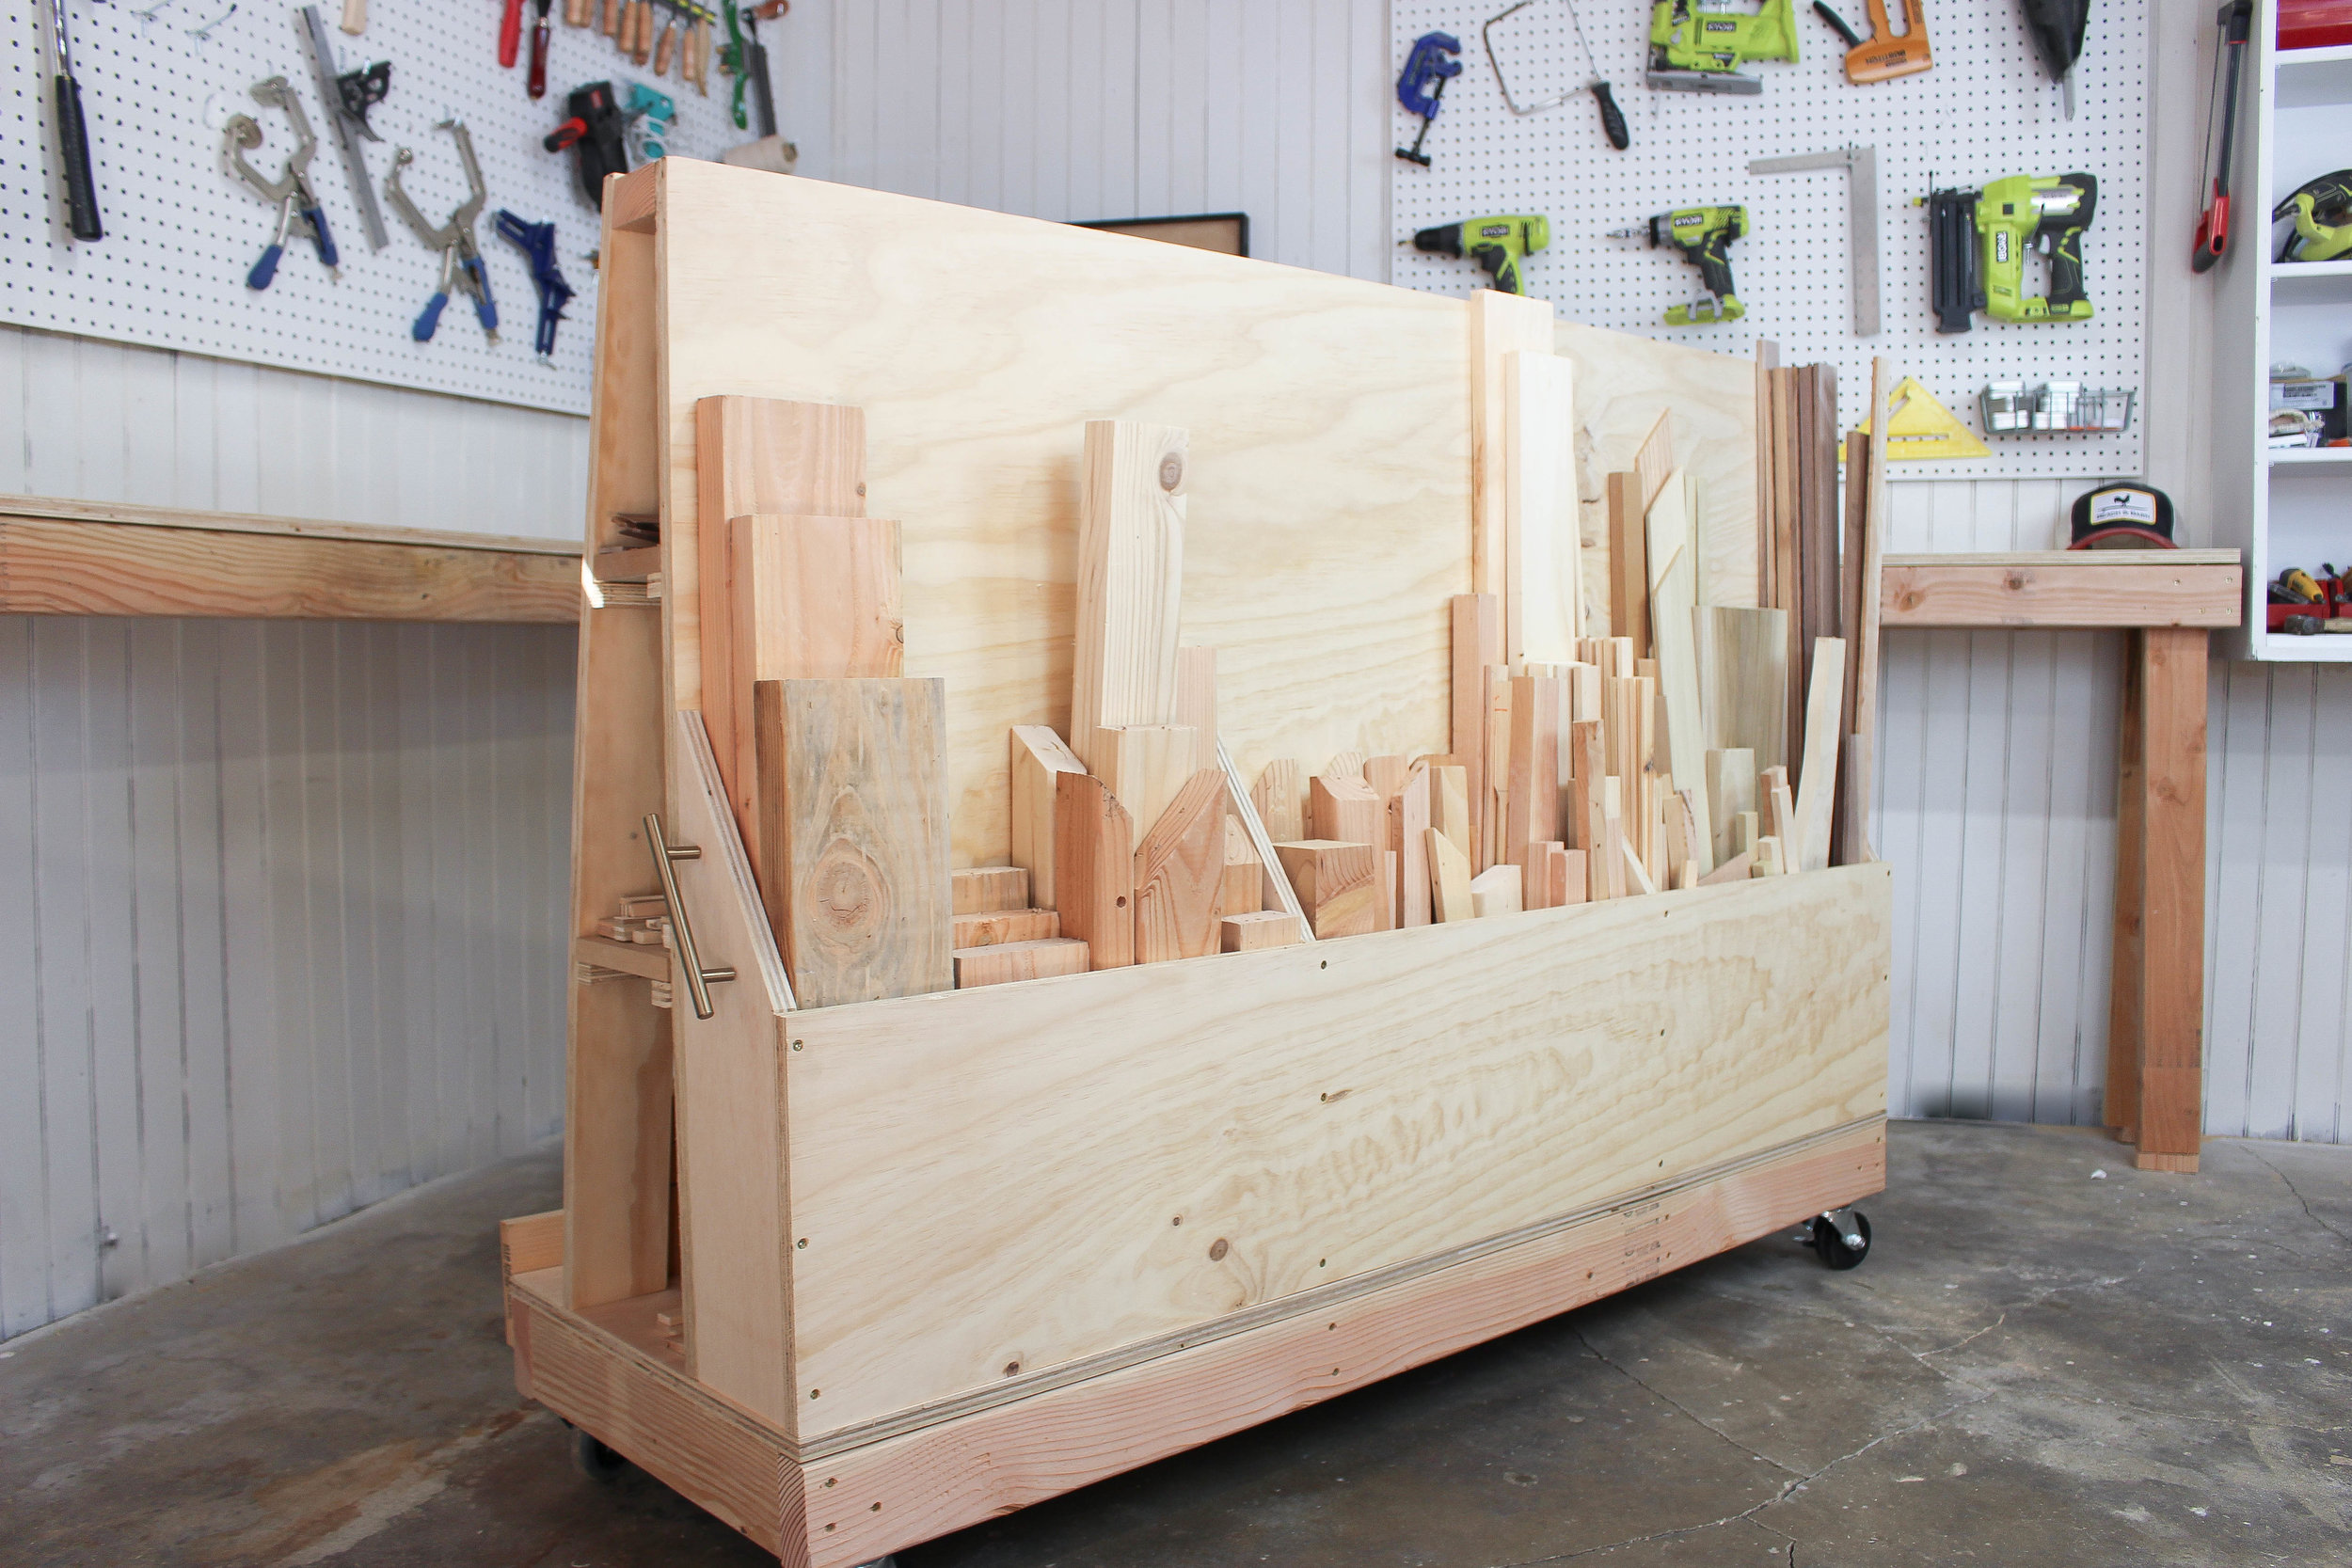
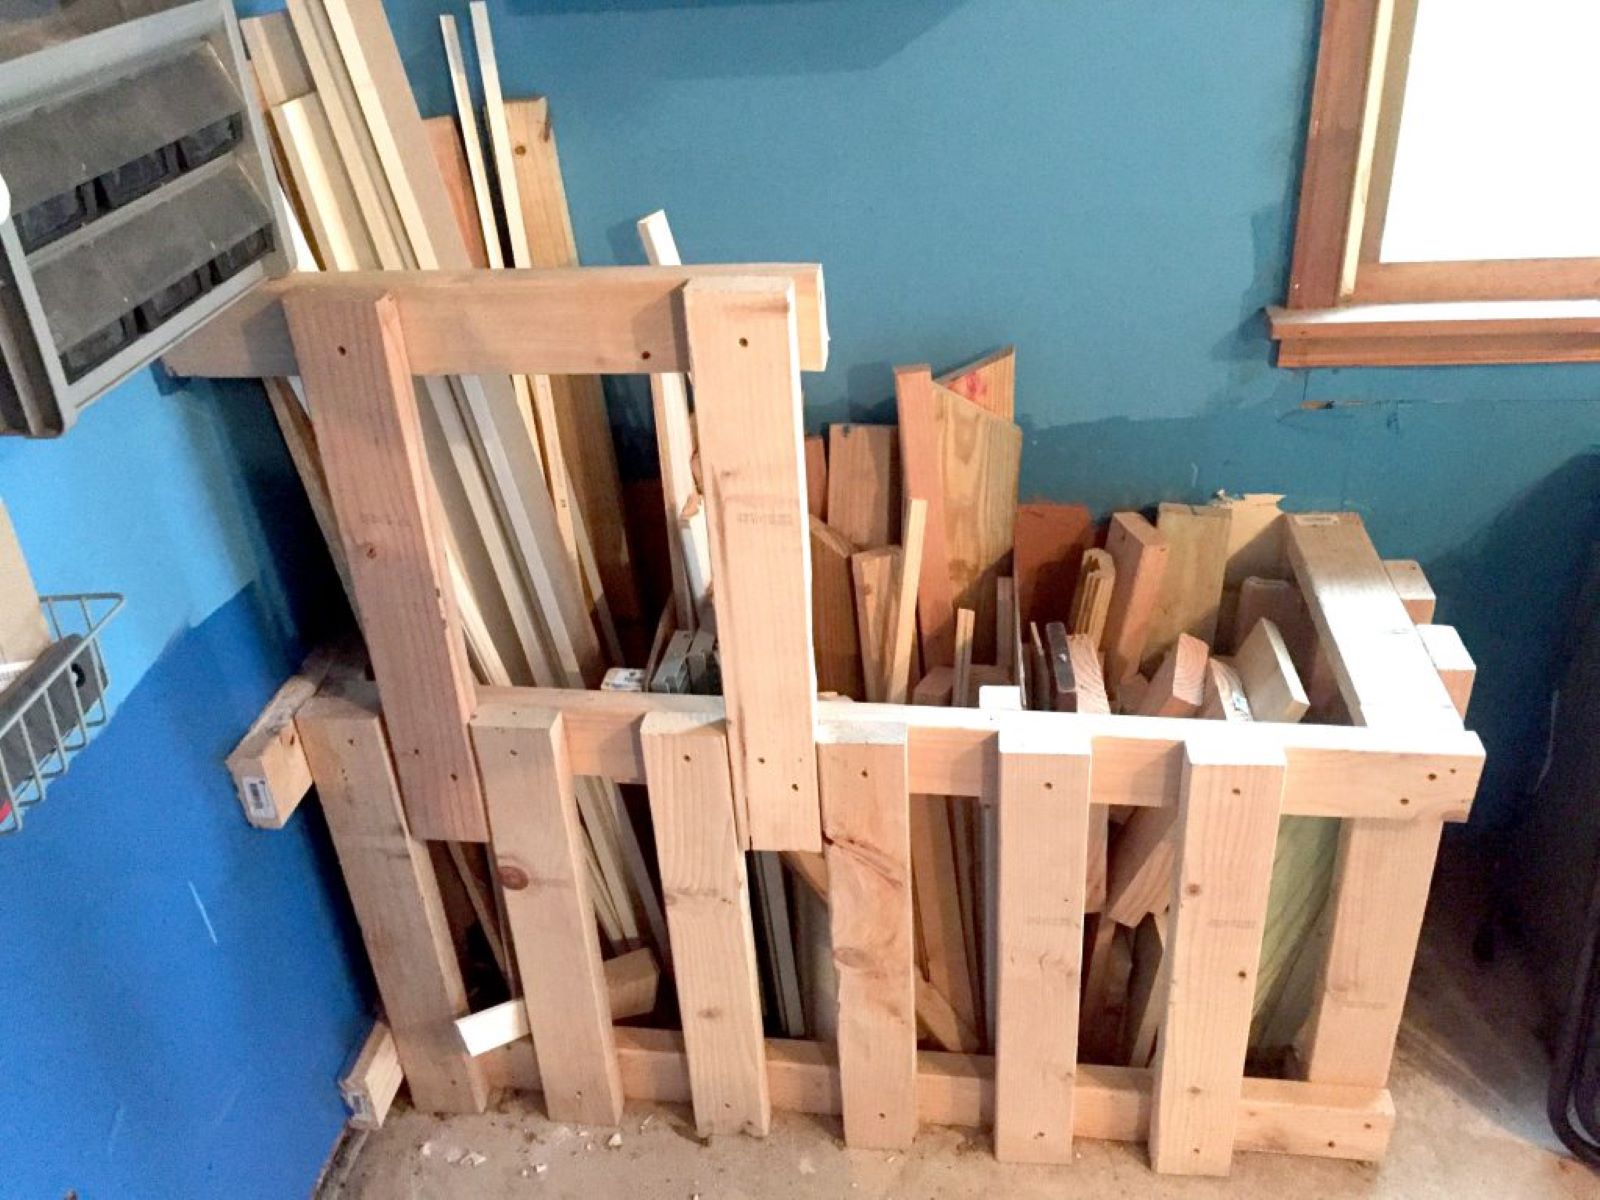
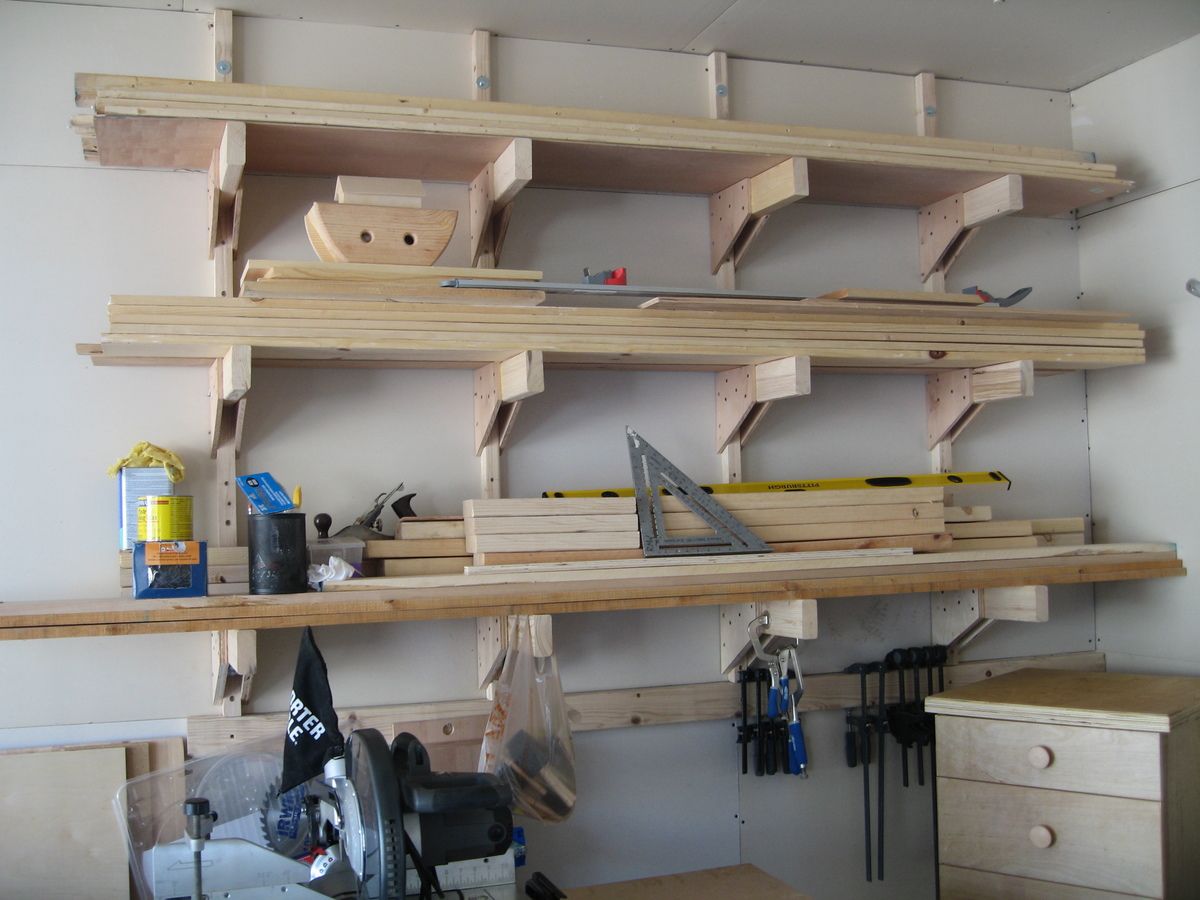
Vertical Storage Solutions
When it comes to storing wood scraps, utilizing vertical space in your workshop can be a game-changer. Vertical storage solutions not only maximize storage capacity but also make it easier to access and organize your wood scraps. Here are some tips for implementing vertical storage for your wood scraps:
1. Wall-Mounted Shelves: Install wall-mounted shelves to create vertical storage space for your wood scraps. Opt for sturdy and adjustable shelves that can accommodate different sizes and weights of wood scraps. Arrange the shelves in a way that allows easy visibility and access to the stored materials.
2. Pegboards: Using pegboards is an effective way to store smaller wood scraps and tools. Hang pegboards on your workshop walls and attach various hooks and pegs to hold your wood scraps. This solution not only offers vertical storage but also keeps your materials organized and easily accessible.
3. Racks or Ladders: Consider using racks or ladders to store longer or irregularly shaped wood scraps. Attach racks or ladders to the wall or suspend them from the ceiling to make use of vertical space effectively. Hang the wood scraps from the rungs, hooks, or other suitable attachments on the rack or ladder.
4. Magnetic Strips: Magnetic strips are perfect for storing smaller metal items, such as screws, nails, or drill bits. Attach magnetic strips to your workshop walls and attach metal containers or organizers to the strips. This solution keeps your wood scraps and small metal items visible and easily accessible.
5. Vertical Drawers or Cabinets: Install vertical drawers or cabinets designed for storing wood scraps. These storage units are specifically designed with compartments or dividers to keep your wood scraps organized by size or type. Label each drawer or cabinet for quick and easy identification.
6. Hanging Bins or Baskets: Hang bins or baskets from your workshop walls or ceiling to store smaller wood scraps. This solution is particularly useful for keeping wood scraps separated by size or type. Arrange the bins or baskets in an organized manner, ensuring that each one is clearly labeled.
7. Overhead Storage: Make use of the overhead space in your workshop by installing overhead storage systems. These can be overhead shelves, racks, or hanging storage units specifically designed for wood scraps. This solution allows you to take advantage of otherwise unused space while keeping your wood scraps easily accessible.
8. Utilize Corners: Don’t overlook the corners of your workshop when implementing vertical storage. Install corner shelves, racks, or hanging storage solutions to make the most out of these often unused areas. This provides additional storage space for your wood scraps without cluttering your main workspace.
Vertical storage solutions help optimize space in your workshop while keeping your wood scraps organized and easily accessible. By implementing these ideas, you can create a well-organized and efficient storage system for your wood scraps, making your woodworking projects more streamlined and enjoyable.
Utilizing Wall Space for Wood Scrap Storage
When it comes to efficient and organized wood scrap storage, utilizing wall space is key. Walls often offer ample storage potential and can help keep your wood scraps easily accessible while freeing up valuable floor space in your workshop. Here are some tips for effectively utilizing wall space for wood scrap storage:
1. Wall-Mounted Shelves: Install wall-mounted shelves to create vertical storage space for your wood scraps. Choose sturdy shelves that can support the weight of your wood scraps. Arrange the shelves at a height that allows for easy access and visibility of the stored materials.
2. Modular Shelving Systems: Consider using modular shelving systems that allow for adjustable shelving heights. This flexibility allows you to adapt the shelves to accommodate different sizes and lengths of wood scraps. Rearrange the shelves as needed to optimize space and maintain an organized storage system.
3. Hanging Racks or Hooks: Install hanging racks or hooks on the walls to hang longer or irregularly shaped wood scraps. This solution helps keep your wood scraps off the ground and prevents them from taking up valuable workspace. Arrange the racks or hooks in a way that allows for easy identification and access to the stored materials.
4. Pegboards: Use pegboards to create a versatile and customizable storage solution. Mount pegboards on the wall and attach hooks, pegs, and other accessories to hold your wood scraps. This allows for easy rearrangement and organization of your materials, making it convenient to find specific wood scraps for your projects.
5. Wall-Mounted Bins or Containers: Install wall-mounted bins or containers to store smaller wood scraps. Choose bins or containers with clear fronts to easily identify the contents. Arrange them systematically and consider categorizing your wood scraps by size, type, or project. Label each bin or container to maintain a neat and organized storage system.
6. Magnetic Strips or Panels: Utilize magnetic strips or panels on the walls to store metal objects such as screws, nails, or small tools. Attach metal containers or organizers to the magnetic surface to keep your metal items readily accessible. This solution helps declutter your workspace while ensuring your metal objects are within reach when needed.
7. Wall-Mounted Cabinets or Drawers: Install wall-mounted cabinets or drawers designed for wood scrap storage. These units typically come with compartments or dividers, providing an efficient way to organize and store your wood scraps. Label each cabinet or drawer to easily identify and retrieve specific wood scraps.
8. Wall-Mounted Lumber Racks: If you have larger pieces of wood, consider installing wall-mounted lumber racks. These racks allow you to store and organize longer boards securely. Properly arranged lumber racks keep your wood scraps off the ground, making it easier to access and prevents them from getting damaged.
By utilizing wall space effectively, you can maximize storage capacity, keep your wood scraps organized, and create a more efficient and productive workshop environment. Take advantage of the available wall space and implement these storage solutions to optimize your wood scrap storage.
Implementing a Labeling System
A labeling system is instrumental in maintaining an organized and efficient storage system for your wood scraps. By implementing a labeling system, you can easily identify and locate specific wood scraps, saving time and improving productivity in your workshop. Here are some tips for implementing an effective labeling system:
1. Clear and Consistent Labels: Use clear and legible labels that are easy to read. Consistency is crucial to ensure that everyone in the workshop understands and follows the labeling system. Choose a font size and color that is visible from a distance, making it effortless to identify and sort wood scraps.
2. Categorize by Size, Type, or Project: Determine the categories for your wood scraps, whether it’s by size, wood type, or specific projects. Aim for a system that aligns with your workflow and makes it easy to find the appropriate wood scraps for your projects. Use labels that indicate the respective category for each container or storage area.
3. Color Coding: Consider using a color coding system to enhance your labeling system. Assign specific colors to different categories or wood types. For example, label containers containing hardwoods with green labels and softwoods with blue labels. This visual cue can quickly and easily indicate the type of wood or category of wood scraps.
4. Labeling Containers or Bins: Label each container or bin storing your wood scraps. You can utilize adhesive labels, sticker tags, or even directly write on the containers using a marker. Include essential information such as the wood type, size category, and any other relevant details. This ensures that each container is clearly marked for easy identification.
5. Labeling Shelves or Racks: Consider labeling the shelves or racks used for wood scrap storage. Place labels in a visible location to easily identify the specific area or category of wood scraps. This is particularly helpful when using vertical storage solutions or having multiple shelves dedicated to different types of wood scraps.
6. Inventory List: Create an inventory list of your wood scraps, especially for larger collections or diverse types of wood. This list can be kept digitally or physically and can include details such as wood type, size, quantity, and location. Regularly update the inventory list as you add or use wood scraps to ensure accuracy.
7. Barcoding or QR Codes: For larger workshops or more extensive wood scrap collections, consider implementing a barcode or QR code system. Assign each storage container or area a unique code that can be scanned to retrieve detailed information about the wood scraps. This provides a more sophisticated and efficient way to track and locate specific items.
8. Regular Review and Maintenance: Periodically review and update your labeling system to ensure it remains accurate and effective. As you use wood scraps or adjust your storage system, make necessary modifications to labels to reflect changes in inventory or storage location.
By implementing a well-thought-out labeling system, you can enhance organization and improve efficiency in your workshop. Whether you opt for clear and consistent labels, utilize color coding, or utilize advanced barcoding technology, find a system that works best for you and ensures that your wood scraps are easily identifiable and readily accessible.
Read more: How To Scrap A Refrigerator
Preventing Moisture and Pest Damage
Moisture and pest damage can be major concerns when it comes to storing wood scraps. To ensure the longevity and quality of your wood scraps, it’s crucial to take preventive measures to protect them from these potential threats. Here are some tips for preventing moisture and pest damage:
1. Choose a Dry Storage Area: Select a dry storage area for your wood scraps. Avoid areas that are prone to moisture, such as basements or areas with high humidity. Ideally, store your wood scraps in a climate-controlled environment where the temperature and humidity levels can be regulated.
2. Proper Ventilation: Good airflow helps prevent moisture buildup and reduces the risk of mold or mildew. Ensure that your storage area has proper ventilation to promote air circulation. If necessary, use fans or dehumidifiers to maintain an optimal environment for storing wood scraps.
3. Use Sealable Containers: Store your wood scraps in sealable containers or bins to create a barrier against moisture and pests. Ensure that the containers have tight-fitting lids to prevent moisture from seeping in. This also helps keep pests like insects or rodents away from your wood scraps.
4. Elevate Wood Scraps: Keep your wood scraps off the ground to minimize the risk of moisture absorption. Place pallets or wooden blocks on the floor and stack your containers or bins on top of them. This elevates the wood scraps and prevents direct contact with the potentially damp floor.
5. Use Desiccants: Place moisture-absorbing desiccant packs inside the containers or bins to help control humidity levels. Silica gel packs are commonly used for this purpose. These desiccants help absorb excess moisture, reducing the risk of mold or mildew growth on your wood scraps.
6. Regular Cleaning: Keep your storage area clean and free from dust or debris. Regularly sweep or vacuum the space to minimize the presence of pests. Remove any spilled or rotting wood scraps promptly to prevent attracting pests or contributing to moisture buildup.
7. Inspect for Infestations: Regularly inspect your wood scraps for signs of pest infestations, such as sawdust, holes, or chew marks. If you notice any signs of pests, take immediate action to eliminate the infestation. Consider using natural pest deterrents or consult with a professional if the infestation is severe.
8. Monitor Humidity Levels: Invest in a hygrometer to regularly monitor the humidity levels in your storage area. Optimal humidity levels for wood storage typically range between 35% to 55%. If the humidity levels are consistently high, implement additional measures like dehumidifiers or moisture-absorbing materials to maintain a suitable environment.
By following these preventive measures, you can greatly reduce the risk of moisture and pest damage to your stored wood scraps. Protecting your wood from these threats ensures that your scraps remain in good condition and ready for future use in your woodworking projects.
Safety Tips for Wood Scrap Storage
While storing wood scraps in an organized and efficient manner is important, it is equally crucial to prioritize safety in your storage practices. Proper safety measures can help prevent accidents, injuries, and damage to both your workshop and yourself. Here are some essential safety tips to keep in mind when it comes to wood scrap storage:
1. Clear and Organized Workspace: Maintain a clear and organized workspace by properly storing your wood scraps. Keep pathways, entrances, and exits free from obstructions, allowing for easy movement and access to emergency exits if needed.
2. Avoid Overloading: Be mindful of weight limits when storing wood scraps on shelves or racks. Avoid overloading shelves to prevent them from collapsing or causing potential injuries. Distribute weight evenly and follow manufacturer guidelines for maximum weight capacity.
3. Secure Wall-Mounted Storage: If utilizing wall-mounted storage solutions, ensure that they are securely installed to prevent accidents. Use appropriate hardware and mounting techniques to ensure that the racks, shelves, or hooks are stable and able to support the weight of the wood scraps.
4. Heavy and Sharp Objects: Take extra precautions when storing larger or heavy wood scraps. Ensure that they are placed securely on stable surfaces or stored on lower shelves to prevent the risk of them falling or causing injuries. Be cautious of any sharp edges or protruding pieces that could pose a danger.
5. Proper Lifting Techniques: When moving or lifting wood scraps, use proper lifting techniques to avoid straining your muscles or causing injury. Bend at your knees, not your back, and use your leg muscles to lift the weight. If an item is too heavy to lift safely, ask for assistance or use mechanical aids like dollies.
6. Eye and Respiratory Protection: When handling wood scraps, especially when cutting or sanding, wear appropriate eye protection such as safety goggles to shield your eyes from flying debris. Additionally, use a dust mask or respirator to protect against the inhalation of wood dust, which can be harmful to your respiratory system.
7. Fire Safety: Keep wood scraps away from potential fire hazards such as open flames, sparks, or flammable liquids. Avoid storing wood scraps near heat sources or electrical equipment that could cause ignition. Implement proper fire prevention measures in your workshop, including fire extinguishers and smoke detectors.
8. Regular Maintenance: Regularly inspect your wood scrap storage areas for any signs of damage or deterioration. Repair or replace any worn-out shelves, racks, or containers to ensure their stability and strength. Also, periodically check for any loose or protruding nails or screws that could cause injuries.
9. Safety Training: Prioritize safety training and education for yourself and others who work in your workshop. Stay updated on proper safety procedures, handling techniques, and emergency protocols. Encourage everyone to be vigilant and aware of potential hazards associated with wood scrap storage.
By adhering to these safety tips, you can minimize the risk of accidents or injuries related to wood scrap storage in your workshop. Prioritizing safety not only protects you and others but also contributes to a more efficient and productive woodworking environment.
Conclusion
Properly storing wood scraps is essential for a well-organized, efficient, and safe workshop. By implementing effective storage solutions and strategies, you can make the most of your wood scraps, maximize their utility, and maintain their quality for future projects. Let’s recap the key points covered in this article:
We began by emphasizing the importance of proper wood scrap storage, highlighting its role in maximizing utility, cost savings, environmental impact, workshop safety, and preserving wood quality.
We then explored various considerations for storing wood scraps, such as available space, size and shape of wood scraps, accessibility, future use, integration with the workshop layout, and safety considerations.
We discussed different storage solutions, including utilizing vertical space, choosing the right storage area, organizing wood scraps by size, using containers or bins for storage, and maximizing wall space for storage purposes.
Furthermore, we touched on the importance of implementing a labeling system to easily identify and locate specific wood scraps. We also provided tips on preventing moisture and pest damage, as well as safety guidelines for wood scrap storage to ensure a secure and hazard-free workshop environment.
By following these guidelines and implementing the suggested strategies, you can create a well-organized storage system for your wood scraps, save time and money, and contribute to a sustainable woodworking practice.
Remember to regularly review and maintain your storage system, considering any changes in wood scrap inventory or workflow. Safety should always remain a top priority in your workshop, so practice proper lifting techniques, use protective gear, and prioritize fire safety measures.
In conclusion, proper wood scrap storage not only promotes organization and efficiency but also enhances your woodworking experience. By taking the time to implement effective storage solutions and adhere to safety guidelines, you can enjoy a clutter-free workspace, extend the lifespan of your wood scraps, and embark on your woodworking projects with ease.
Frequently Asked Questions about How To Store Wood Scraps
Was this page helpful?
At Storables.com, we guarantee accurate and reliable information. Our content, validated by Expert Board Contributors, is crafted following stringent Editorial Policies. We're committed to providing you with well-researched, expert-backed insights for all your informational needs.


0 thoughts on “How To Store Wood Scraps”