Articles
How To Make A Simple Scrap Quilt
Modified: March 23, 2024
Discover the art of making a simple scrap quilt with our informative articles. Explore various techniques and unleash your creativity today.
(Many of the links in this article redirect to a specific reviewed product. Your purchase of these products through affiliate links helps to generate commission for Storables.com, at no extra cost. Learn more)
Introduction
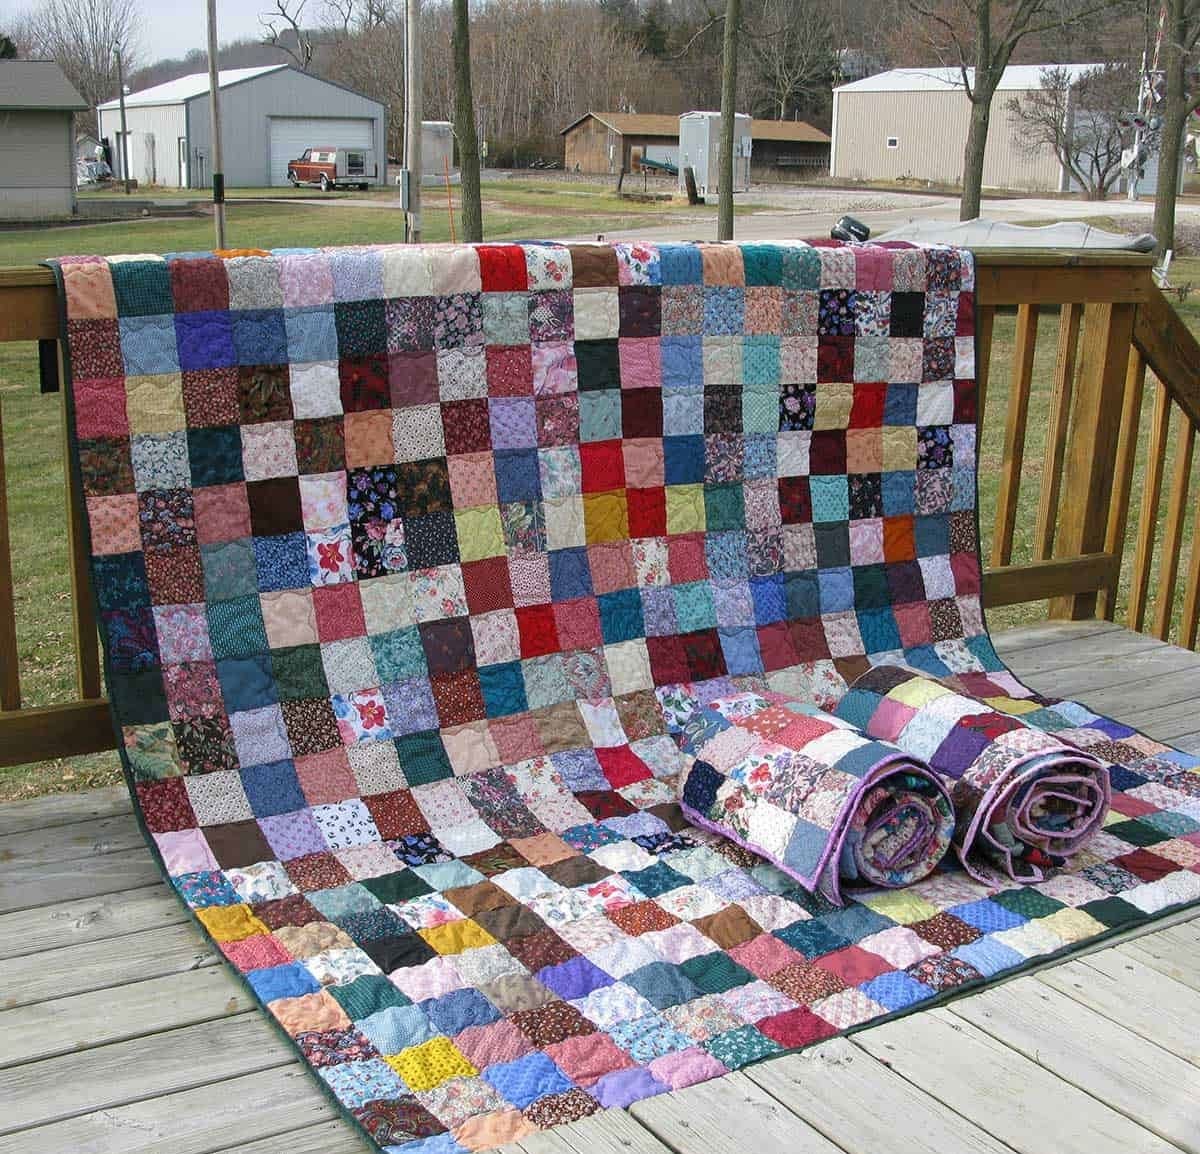
Quilting is a beloved craft that allows for creativity, expression, and the warmth of a handmade item. If you’re looking to start a quilting project but want something simple and beginner-friendly, a scrap quilt is a perfect option. Scrap quilts are not only a great way to utilize leftover fabric scraps, but they also create a charming, eclectic aesthetic.
In this article, we will guide you through the process of making a simple scrap quilt step by step. From choosing and gathering fabric to putting the finishing touches on your quilt, you’ll learn all the necessary techniques and tips to create a stunning and cozy quilt.
Whether you’re a seasoned quilter or a complete novice, making a scrap quilt is an accessible project that allows you to experiment with different fabric combinations, colors, and patterns. It’s a wonderful way to showcase your personal style and create a unique piece that reflects your individuality.
So, grab your fabric scraps, thread, and needle, and let’s dive into the exciting world of scrap quilting!
Key Takeaways:
- Embrace creativity and personal style by making a stunning scrap quilt using leftover fabric scraps. Experiment with colors, textures, and patterns to create a unique and cozy quilt that reflects your individuality.
- Enjoy the process of quilting and take pride in creating a beautiful and durable scrap quilt. From choosing fabric to adding finishing touches, each step contributes to a cozy and cherished work of art.
Read more: How To Make A Simple Quilt
Choosing and Gathering Fabric
The first step in making a scrap quilt is to choose and gather your fabric. Scrap quilts are all about using up leftover fabric pieces, so don’t be afraid to mix and match different colors, patterns, and textures. Here are some tips to help you select and collect the perfect fabric for your quilt:
- Assess your fabric scraps: Start by going through your fabric stash and gathering any leftover fabric pieces you have. Sort them by color or pattern to give yourself a better idea of what you have available.
- Look for a theme or color scheme: Decide on a theme or color palette for your scrap quilt. You can choose a specific color scheme, such as warm tones or pastels, or opt for a more eclectic mix of colors. Having a general idea of the colors you want to incorporate will help guide your fabric selection process.
- Consider fabric weights and textures: Mixing different fabric weights and textures can add dimension and visual interest to your scrap quilt. Play with combining lightweight cottons with heavier denims or adding in some textured fabrics like flannel or velvet.
- Don’t be afraid to add in new fabrics: While scrap quilts are primarily made from leftover fabric, you can also incorporate new fabrics if you find something that complements your overall design. Just be mindful of the proportion of new fabric versus scraps.
- Add in solids or neutrals: Mixing in some solid or neutral fabrics can help balance out the busyness of the scrap quilt and give the eyes a place to rest. These fabrics can also be used as borders or sashing between quilt blocks.
Once you’ve gathered your fabric scraps and made your selections, make sure to wash and press them before cutting. This will remove any dirt or sizing and ensure that all the fabrics have the same shrinkage rate.
Remember, scrap quilts are a wonderful opportunity to get creative and let your personal style shine. Have fun with your fabric selection and trust your instincts – there are no hard and fast rules when it comes to creating a beautiful scrap quilt!
Cutting the Fabric
Once you have chosen and gathered your fabric for your scrap quilt, the next step is to cut the fabric into the desired shapes and sizes. Precise cutting is crucial to ensure that your quilt blocks fit together seamlessly. Here’s how to cut the fabric for your quilt:
- Prepare your cutting tools: Before you begin cutting, make sure you have a rotary cutter, a clear ruler, and a cutting mat. These tools will allow for more accurate and efficient cutting.
- Decide on the quilt block size: Determine the size of your quilt blocks. Common sizes for scrap quilts are 6 inches, 8 inches, or 12 inches. The block size will depend on your personal preference and the overall design of your quilt.
- Cut strips: Start by cutting fabric into strips that are slightly wider than the width of your quilt blocks. For example, if your blocks are 6 inches wide, cut strips that are about 6.5 inches wide.
- Sub-cut the strips: Take the strips you just cut and sub-cut them into squares or rectangles that match the size of your quilt block. Use your ruler and rotary cutter to make precise cuts.
- Label and organize: As you cut the fabric, label each piece if necessary and organize them based on color, pattern, or any other organizational system you prefer. This will make it easier to keep track of your fabric pieces during the sewing process.
- Repeat the process: Continue cutting fabric strips and sub-cutting them into squares or rectangles until you have enough pieces for your desired number of quilt blocks or until you have used up your fabric scraps.
It’s important to note that accuracy is key when cutting fabric for quilt blocks. Taking the time to measure and cut your fabric precisely will ensure that your quilt blocks fit together smoothly and create a visually pleasing result.
Once you have cut all your fabric pieces, you’re ready to move on to the next step: organizing the fabric pieces for your scrap quilt.
Organizing the Fabric Pieces
Now that you have cut the fabric for your scrap quilt into the desired shapes and sizes, it’s time to organize the fabric pieces before sewing them together. This step will help you create a cohesive and balanced design. Here’s how to organize your fabric pieces:
- Design your quilt layout: Take a moment to envision the overall design of your scrap quilt. You can opt for a random arrangement or a more structured pattern, such as a checkerboard or a diagonal stripe. Consider the colors, patterns, and textures of your fabric pieces as you plan the layout.
- Sort the fabric pieces: Organize the fabric pieces into piles based on their color, pattern, or any other criteria you’ve chosen. This will make it easier to see the range of fabrics you have and help you determine the placement for each piece in your quilt layout.
- Play with color and contrast: Experiment with different color combinations and contrasts to achieve the desired effect. Mix complementary colors for a vibrant look or pair lighter and darker shades for a more subtle contrast. Play with the arrangement of fabrics to find the perfect balance.
- Consider fabric direction: Pay attention to the direction of any directional prints in your fabric. You may want to rotate some pieces to ensure that the design elements will all face the same way when sewn together.
- Lay out the fabric pieces: Lay out the fabric pieces on a design wall, floor, or large table, following your planned quilt layout. This will give you a visual representation of how the fabrics will come together and allow you to make any necessary adjustments before sewing.
- Take a step back: Once you have arranged the fabric pieces, step back and take a moment to evaluate the overall design. Make sure you’re happy with the placement and balance of the fabrics. If something feels off, don’t hesitate to rearrange the pieces until you’re satisfied with the layout.
Remember that organizing the fabric pieces is a creative process. Don’t be afraid to trust your instincts and make adjustments as needed. The goal is to create a visually appealing and harmonious arrangement that reflects your personal style.
Once you’re satisfied with the organization of the fabric pieces, it’s time to move on to the exciting part: sewing the quilt blocks together.
Sewing the Quilt Blocks
Now that you have organized the fabric pieces for your scrap quilt, it’s time to start sewing the quilt blocks together. This step will bring your quilt design to life and is where your vision begins to take shape. Follow these steps to sew the quilt blocks:
- Prepare your sewing machine: Ensure your sewing machine is in good working condition and threaded with the appropriate thread color. Select a stitch length suitable for quilting, typically around 2.5mm.
- Take the first two fabric pieces: Choose two fabric pieces that will form the first block. Place them right sides together, aligning the edges that need to be sewn.
- Sew the seam: Sew a 1/4-inch seam along the edge of the fabric pieces. Backstitch at the beginning and end of the seam to secure it. Press the seam open or to one side, depending on your preference.
- Add more fabric pieces: Continue adding fabric pieces to the sewn unit, sewing each seam and pressing the seams open or to one side after each addition. Build the block one piece at a time, ensuring that the edges align properly.
- Repeat the process: Repeat steps 2 to 4 for each quilt block, following your planned layout. Take your time to sew each seam accurately, as it will contribute to the overall quality of your quilt.
- Trim and square up the blocks: Once you have sewn the quilt blocks, trim any excess fabric and square up the blocks to the desired size. Use a ruler and rotary cutter to cut the blocks evenly, ensuring that all edges are straight.
As you sew the quilt blocks together, take care to maintain accurate seam allowances and align the fabric pieces properly. This will ensure that your quilt blocks fit together smoothly and create a cohesive design.
Once you’ve sewn all the quilt blocks, stand back and admire your work. Your scrap quilt is starting to take shape, and it’s time to move on to the next step: assembling the quilt.
When making a simple scrap quilt, try to use a consistent background color to tie the different scraps together and create a cohesive look. This will help the quilt appear more organized and intentional.
Assembling the Quilt
Assembling the quilt is an exciting step that brings together all the quilt blocks you painstakingly sewed. This step involves arranging the blocks in the desired pattern and sewing them together to create the quilt top. Follow these steps to assemble your scrap quilt:
- Arrange the quilt blocks: Lay out the quilt blocks on a design wall, floor, or large table, following your planned quilt layout. Take your time to achieve the desired arrangement, ensuring a balanced distribution of colors, patterns, and textures.
- Consider block orientation: Pay attention to the orientation of the blocks and rotate them as needed to create visual interest. Experiment with different arrangements to find the one that appeals to you the most.
- Join the blocks: Once you’re happy with the layout, start joining the blocks together. Place two blocks right sides together, aligning the edges that need to be sewn. Pin them together to hold them in place.
- Sew the seams: Sew a 1/4-inch seam along the pinned edge, backstitching at the beginning and end to secure the seam. Continue joining the blocks one by one until you have sewn all the rows or sections together.
- Press the seams: Press the seams open or to one side, depending on your preference. Pressing the seams ensures a flatter and more professional-looking finished quilt top.
- Join the rows: Once the blocks are joined in rows, pin the rows together, matching seam intersections and ensuring the blocks align properly. Sew the rows together, being careful to maintain accurate seam allowances.
Throughout the assembling process, it’s important to double-check the placement and alignment of the quilt blocks. Taking the time to sew accurately and match seams will result in a quilt top that lays flat and looks cohesive.
Once you have assembled the entire quilt top, take a moment to step back and admire your work. Congratulations! You have successfully completed the assembly of your scrap quilt. The next step is optional but can add a nice finishing touch: adding borders.
Adding Borders (Optional)
If you want to enhance the look of your scrap quilt and give it a more polished finish, you can choose to add borders. Borders not only add visual interest but also help frame the quilt top and provide a clean edge. Here’s how to add borders to your quilt:
- Measure the quilt top: Start by measuring the length and width of your quilt top. This will help you determine the size and amount of fabric needed for the borders.
- Select the border fabric: Choose a fabric that complements the colors and patterns in your quilt top. Consider using a solid or neutral fabric to create a contrast with the busy scrap blocks.
- Cut the border fabric: Determine the width of the borders you want to add. A common width is around 4 to 6 inches, but you can adjust it based on your preference. Cut the border fabric into strips that match the length of the quilt top.
- Sew the border strips: Take the border strips and sew them to the sides of the quilt top. Start by sewing the vertical borders, aligning the raw edges and using a 1/4-inch seam allowance. Press the seams towards the border fabric.
- Add the top and bottom borders: Once the vertical borders are sewn on, measure the width of the quilt top, including the newly attached vertical borders. Cut the border fabric into strips that match this width and sew them to the top and bottom, aligning the raw edges and pressing the seams.
- Press the borders: After sewing the border strips, press the borders away from the quilt top to ensure that they lie flat. This will give your quilt a neat and professional finish.
- Trim the borders: Trim any excess fabric from the ends of the border strips so that they align with the edges of the quilt top. Use a ruler and rotary cutter to achieve clean and straight edges.
Remember to adjust the measurements and sizes based on your quilt top and desired border width. Borders can add a beautiful frame to your scrap quilt and provide an opportunity to showcase a complementary fabric.
Once the borders are added, you have completed the main construction of your quilt. The next step is to quilt the layers together to create a cozy and durable quilt.
Quilting the Layers
The process of quilting involves stitching the layers of the quilt together to add stability, texture, and visual interest. Quilting also ensures that the layers stay intact over time. Here’s how to quilt your scrap quilt:
- Prepare the quilt sandwich: Place the quilt top right side up on a flat surface. On top of it, layer the batting (the middle layer of the quilt) and the backing fabric (the bottom layer of the quilt). Smooth out any wrinkles or folds in the layers.
- Baste the layers together: To hold the layers in place during the quilting process, you’ll need to baste them together. Choose your preferred basting method – either hand basting, safety pins, or using a spray adhesive, ensuring that the layers remain smooth and taut.
- Choose your quilting design: Decide on the quilting design you want to use. You can choose from various options such as straight lines, free-motion quilting, or even specific patterns that complement your quilt’s theme or block design.
- Mark the quilting lines (optional): If you’re quilting with straight lines, use a fabric marker or quilting ruler to mark the quilting lines on your quilt top. This will help you maintain consistent spacing and angles as you sew.
- Quilt the layers: Starting from the center of the quilt and working your way outward, begin quilting the layers together. If you’re using a sewing machine, attach the walking foot or the appropriate quilting foot to ensure smooth and even stitching. If hand quilting, use a quilting needle and thread.
- Follow your chosen quilting design: Sew along the marked lines or free-motion quilt following your desired pattern. Take your time and maintain steady, even stitches for the best results.
- Continue quilting: Move around the quilt, adjusting the layers as needed, and continue quilting until you have covered the entire quilt top. Take breaks as needed to avoid fatigue and maintain focus.
Quilting is a time-consuming process that requires patience and attention to detail. Take pleasure in watching the quilt come together as you stitch each line or pattern, knowing that you are creating a unique and beautiful piece of art.
Once you’ve completed the quilting, the final step in the quilt-making process is to bind the edges to provide a finished look.
Binding the Quilt
Binding is the final step in completing your scrap quilt. Binding not only adds a polished and professional finish to your quilt but also helps to secure the edges and provide durability. Here’s how to bind your quilt:
- Prepare the binding fabric: Choose a fabric that complements your quilt design. Cut binding strips that are 2.5 inches wide and long enough to cover the perimeter of your quilt.
- Join the binding strips: If necessary, stitch the binding strips together at a 45-degree angle to create a continuous strip. Trim the seam allowance and press the seams open or to one side for a neater appearance.
- Prepare the quilt edges: Trim the excess batting and backing fabric so that they are even with the quilt top. This will ensure that your quilt has straight edges for attaching the binding.
- Attach the binding: Starting on one side of the quilt, leave a tail of about 6-8 inches of binding strip and align the raw edges of the binding strip with the raw edges of the quilt. Use binding clips or pins to secure the binding in place.
- Sew the binding: Using a ¼-inch seam allowance, sew along the raw edges of the quilt, securing the binding to the quilt. Sew until you reach approximately 12 inches away from the starting point, backstitching to secure the stitching.
- Miter the corners: When you reach a corner, stop sewing ¼ inch away from the edge and pivot the quilt. Fold the binding strip up, creating a 45-degree angle fold. Then, fold the binding strip back down, aligning it with the next edge. This will create a neat mitered corner. Continue sewing along the next edge, repeating this process at each corner.
- Finish the binding: Once you have sewn all the way around the quilt, stop stitching approximately 12 inches from the starting point, leaving another 6-8 inch tail of binding. Trim the excess binding, leaving a ½-inch overlap with the starting tail.
- Join the tails: Open up both ends of the binding strips and place the starting tail inside the ending tail. Fold the binding over, aligning the raw edges, and sew the tails together using a diagonal seam. Trim the excess binding.
- Secure the binding: Fold the binding over the quilt edge to the back side, enclosing the raw edge, and secure it in place using clips or pins. Hand stitch the binding in place using a blind stitch or invisible stitch, ensuring that the stitches are not visible from the front of the quilt.
Binding adds a lovely finishing touch to your quilt, giving it a clean and professional look. Take your time with this step to ensure that the binding is smooth, even, and securely attached.
Once the binding is complete, your scrap quilt is now fully finished and ready to be enjoyed or gifted to someone special. Take pride in your accomplishment and admire the cozy and beautiful quilt you have created!
Read more: What To Do With Quilt Scraps
Final Touches and Finishing
Congratulations! You have successfully completed your scrap quilt. Before you display or use your quilt, there are a few final touches and steps you can take to ensure it looks its best and lasts for years to come:
- Trim any stray threads: Carefully examine the quilt and trim any loose threads that may be sticking out from the seams or the edges of the quilt. This will give the quilt a clean and tidy appearance.
- Inspect the quilting stitches: Take a close look at the quilting stitches to make sure they are even and secure. Double-check for any areas that might need reinforcement or additional stitching.
- Press the quilt: Give your completed quilt a final press with a warm iron to smooth out any wrinkles or creases. Be cautious not to iron over any areas with decorative buttons or embellishments.
- Label your quilt (optional): Consider adding a label to your quilt that includes your name, the date, and any other information you’d like to include. This will serve as a record of your quilt and add a personal touch.
- Inspect for any repairs or adjustments: Take a last look at all the seams, corners, and binding to ensure everything is secure and intact. Sew on any missing buttons or make any necessary repairs before enjoying your quilt.
- Showcase your quilt: Find the perfect spot to proudly display or use your scrap quilt. Whether it’s on a bed, as a wall hanging, or draped over a couch, your quilt will bring warmth and beauty to your space.
- Care instructions: You’ll want to protect your quilt and keep it in its best condition. Follow the care instructions for the fabric and batting you used, which may include gentle machine washing or hand washing and air drying. Proper storage in a cool, dry place will also help preserve your quilt.
Remember, your scrap quilt is a unique piece of art that reflects your creativity and effort. It holds sentimental and practical value, and caring for it will ensure it remains cherished for years to come.
Enjoy the comfort and beauty of your scrap quilt, and be proud of the stunning work of art you’ve created!
Frequently Asked Questions about How To Make A Simple Scrap Quilt
Was this page helpful?
At Storables.com, we guarantee accurate and reliable information. Our content, validated by Expert Board Contributors, is crafted following stringent Editorial Policies. We're committed to providing you with well-researched, expert-backed insights for all your informational needs.


0 thoughts on “How To Make A Simple Scrap Quilt”