Articles
11 Amazing Vocal Steamer for 2025
Modified: June 9, 2025
Looking for the best vocal steamer in 2025? Discover 11 amazing options that will help you achieve flawless vocal performances.
(Many of the links in this article redirect to a specific reviewed product. Your purchase of these products through affiliate links helps to generate commission for Storables.com, at no extra cost. Learn more)
Introducing 11 Amazing Vocal Steamers for 2025, the ultimate guide for performers and vocal enthusiasts. In this ever-evolving world of technology, vocal steaming has become a vital tool for artists to optimize their vocal quality and maintain overall vocal health. Whether you are a professional singer or someone who enjoys singing as a hobby, investing in a high-quality vocal steamer can make a significant difference in your performance. From portable options for on-the-go singers to advanced steaming systems for studio use, this comprehensive list showcases the top vocal steamers that you should consider for the year 2025.

Overall Score: 9/10
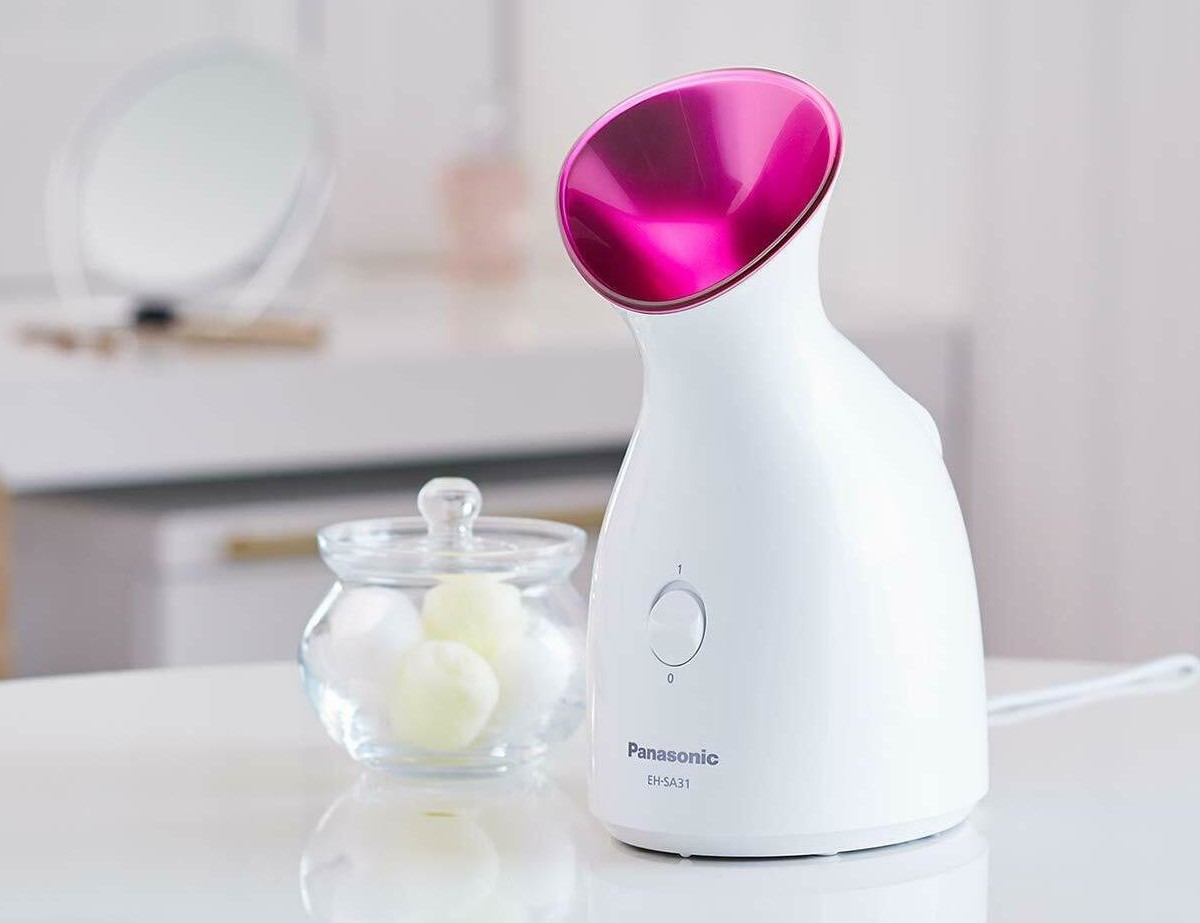
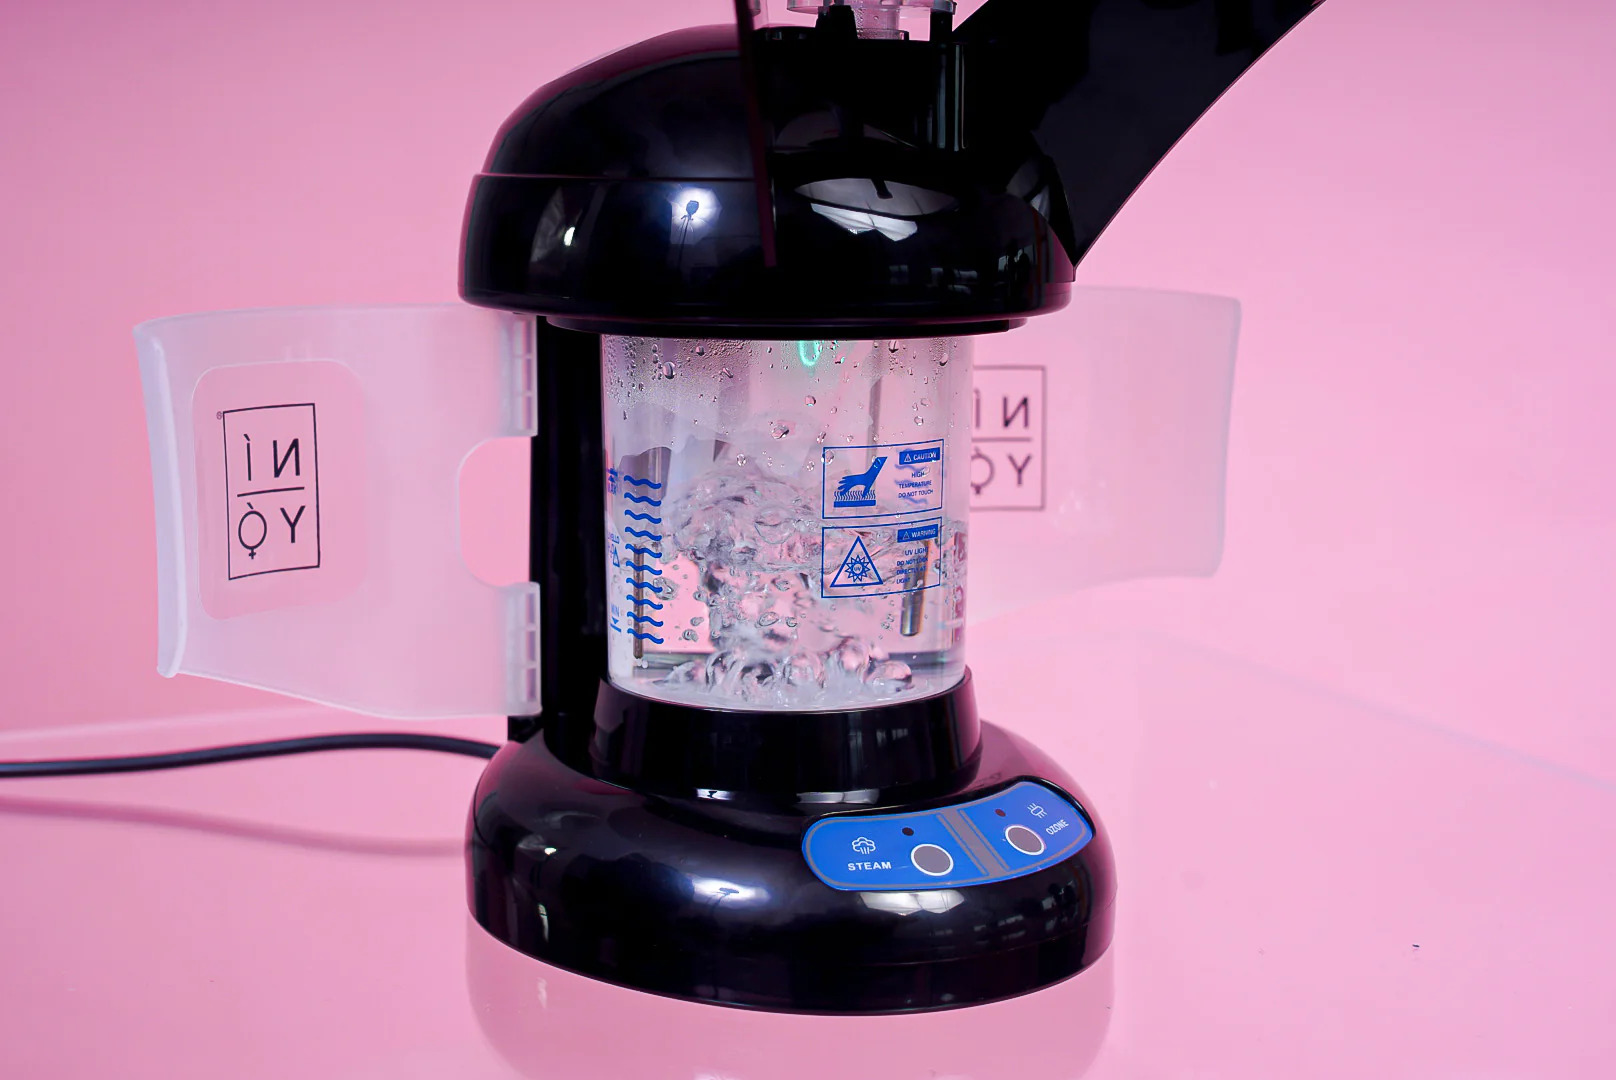
The Facial Steamer Nano Ionic Hot Mist is a professional facial steamer that helps clean dirt and impurities from the skin while providing deep moisture. With its new nano-ionic technology, it produces ultra-fine steam particles that penetrate the skin effectively. The steamer allows for 15 minutes of skincare golden time, optimizing the benefits without causing harm. It is designed for home use, offering a relaxing spa-like facial sauna treatment. The facial steamer has a petal-like nozzle and a nice appearance. It also has been tested to applicable standards and has obtained UL certification for safe use. Overall, it is a high-quality facial steamer that makes a great gift for loved ones.
Key Features
- Nano-Ionic Steam Purify Light
- 20X Penetration
- 15Mins Golden Time
- Professional Facial Care
- High Evaluation
Specifications
- Color: A-rosegold
- Size: 6 Piece Set
Pros
- Easy to use and consistent steam temperature
- Improves absorption rate of skincare products
- Safe for use with tested UL certification
- Attractive packaging for gifting
Cons
- Small water container
- Short steam time for some users
The Facial Steamer Nano Ionic Hot Mist is a highly recommended product for anyone looking to enhance their skincare routine. It effectively cleanses and moisturizes the skin with its nano-ionic steam particles. The 15-minute golden time provides optimal results without causing harm. Its professional quality and safe certification make it a reliable choice. Though the water container may be small for some users, and the steam time may be short for others, these minor drawbacks are outweighed by the overall performance and benefits of this facial steamer. It is an excellent addition to any at-home spa experience and makes for a thoughtful gift.

Overall Score: 8.5/10
The V1200 Vicks Personal Steam Inhaler provides temporary relief from allergies, congestion, and coughs. With its soft face mask and compatibility with soothing menthol VapoPads, it offers a warm mist of steam for a 5-15 minute treatment. This personal steam inhaler is designed to help individuals breathe more easily and features a targeted delivery of pure mist. It is suitable for sinus relief, bronchitis, allergies, and colds. The Vicks Personal Steam Inhaler is ideal for individuals seeking temporary relief from coughing and congestion, providing a rest from coughing fits and allowing for freer breathing. With Vicks' range of humidifiers and steam inhalers, you can experience easier breathing wherever you are.
Key Features
- Vicks Personal Steam Inhaler with soft face mask
- Compatible with soothing menthol Vicks Vapo Pads
- Provides warm mist of steam for temporary relief
- Suitable for allergies, congestion, and coughs
- Targeted delivery of pure mist for easier breathing
Specifications
- Color: White and Clear
- Dimension: 9.37Lx17.40Wx9.37H
- Size: 1 Count (Pack of 1)
Pros
- Temporary relief from coughing and congestion
- Suitable for sinus relief and bronchitis
- Soft, comfortable face mask for targeted delivery
- Compatible with Vapo Pads for soothing menthol
Cons
- Some users experienced cheap construction
- Small holding cup provides 30-minute maximum inhalation
- Face piece not very pliable for a proper seal
- Leaves white residue in the water compartment
- Relatively expensive compared to similar products
The V1200 Vicks Personal Steam Inhaler offers effective temporary relief from allergies, congestion, and coughs. Its soft face mask provides targeted delivery of pure mist, helping individuals breathe more easily. While some users experienced issues with construction and pliability, the overall performance and benefits of this steam inhaler make it a valuable tool for sinus relief and bronchitis. The compatibility with VapoPads for soothing menthol further enhances the experience. However, the relatively higher price and occasional residue in the water compartment may be minor drawbacks. With its convenience and effectiveness, the V1200 Vicks Personal Steam Inhaler is worth considering for those seeking respiratory relief.

Overall Score: 7/10
The Handheld Nebulizer Machine is a portable and efficient solution for respiratory treatments on-the-go. With high atomization rate and small atomized particles, it provides dependable and efficient nebulization treatment. It comes with two modes and two masks, making it suitable for both adults and kids. The nebulizer is stable and long-lasting, thanks to its micro-mesh technology and high-quality PVC material. It is also portable and easy to use, powered by 2 AA batteries or USB cable. This nebulizer is available in both electric and battery-operated versions. Although it requires batteries and lacks a rechargeable option, it is still a great choice for those who need a nebulizer for travel or emergency use.
Key Features
- Efficient nebulization with high atomization rate
- Two modes and two masks for adults and kids
- Stable and long-lasting with micro-mesh technology
- Portable and easy to use with battery or USB power
- Available in both electric and battery-operated versions
Specifications
- Color: Gray
- Size: Kidwerkz
Pros
- Compact size and lightweight design
- Self-cleaning mode saves time and hassle
- Complete set of accessories included
- Highly portable for use on-the-go
- Efficient and safe nebulization
Cons
- Not rechargeable, requires batteries
- Battery-powered design can be inconvenient and expensive
The Handheld Nebulizer Machine is a reliable and efficient solution for respiratory treatments on-the-go. While it lacks a rechargeable option and requires batteries, it makes up for it with its compact and lightweight design. The nebulizer’s high atomization rate and small atomized particles ensure effective absorption, and the two modes and masks cater to both adults and kids. The micro-mesh technology and high-quality material provide stability and long-lasting usage. It is easy to use, powered by batteries or USB, and can be taken anywhere. If you’re in need of a portable nebulizer for travel or emergency use, this is definitely a recommended choice.

Overall Score: 8/10
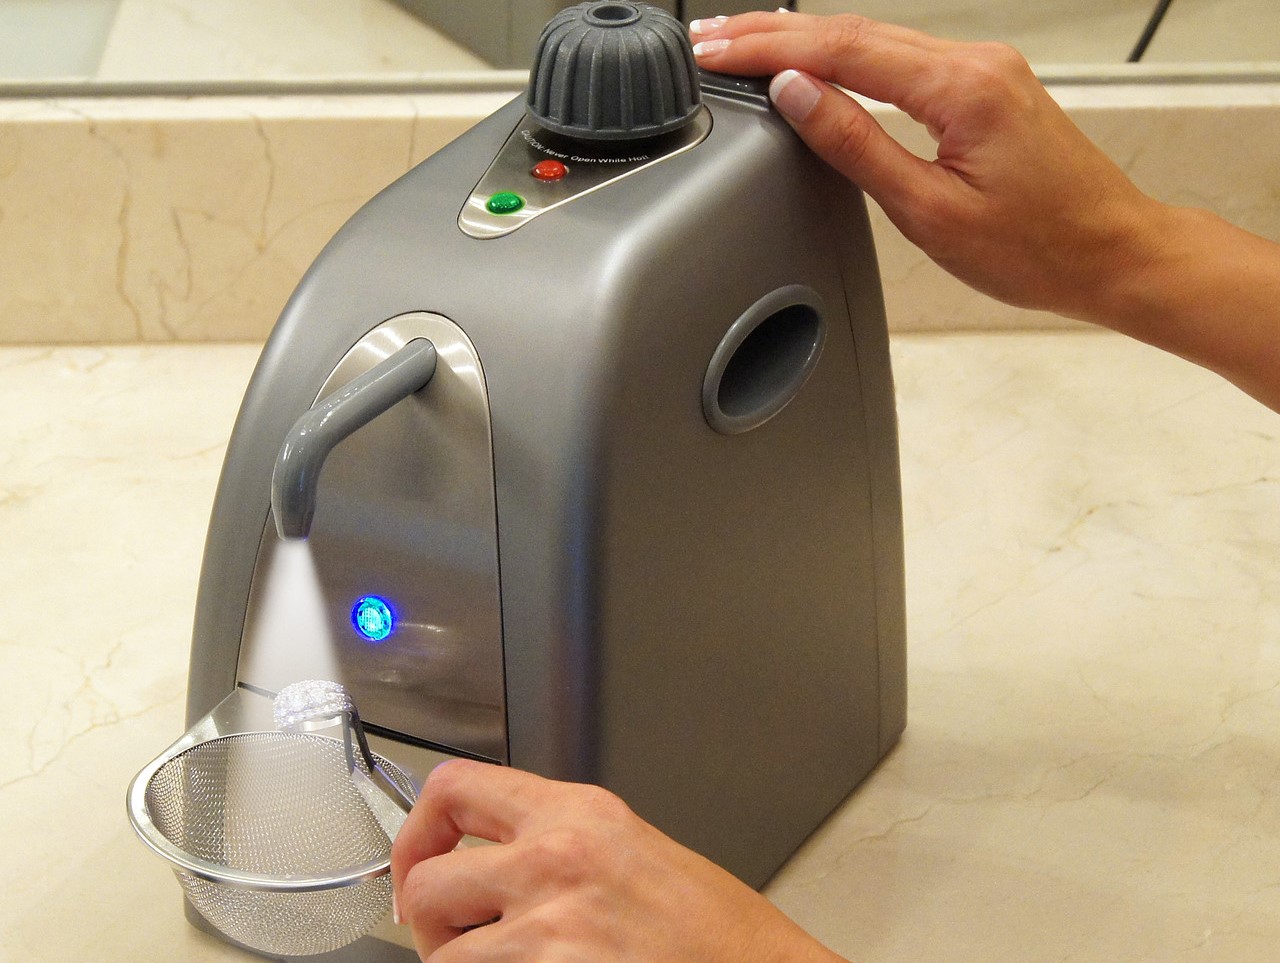
The NanoSteamer Large 3-in-1 Nano Ionic Facial Steamer is a versatile and effective beauty and wellness device. It combines a conventional heating element with an ultrasonic vaporizer to generate nano-ionic steam with negatively charged ionic particles. This powerful steam, combined with the included 5-piece stainless steel skin kit, can effectively unclog pores, remove blackheads, and provide a spa-quality facial experience. The device can also be used as a humidifier or to warm towels for ultimate refreshment or quick makeup removal. With a large 200ml water tank, it offers a long 30-minute working time and a completely silent operation. The NanoSteamer even features an auto-shutoff sensor for safety. Enjoy a professional-level skincare experience with this innovative and multifunctional facial steamer.
Key Features
- Nano-Ionic Facial Steamer & Humidifier
- Professional 5-Piece Skin Kit Included
- Genuine 3-in-1 Beauty & Wellness Device
- Full Size Steamer with Longest Running Time
- Includes 1 Nano Steamer Facial Steamer, 5-piece stainless steel skin kit, Power cable, Instruction and support contact manual
Specifications
- Color: Silver
- Dimension: 9.84L x 5.91W x 1.97H
- Size: 9 Piece Set
Pros
- Generates nano-ionic steam for better skin penetration
- Comes with a bonus 5-piece stainless steel skin kit
- Multiple functions including steaming, humidifying, and towel warming
- Large water tank allows for 30 minutes of silent operation
- Auto-shutoff sensor for safety
Cons
- Cleaning the device can be challenging
- Steam may not hit the face directly without adjustments
- Occasional spewing of hot water instead of steam
The NanoSteamer Large 3-in-1 Nano Ionic Facial Steamer is a highly functional and versatile beauty device that delivers spa-quality results. With its nano-ionic steam technology, it provides superior skin penetration for effective pore unclogging and blackhead removal. The included stainless steel skin kit is a valuable bonus, perfect for achieving flawless skin. While there are a few minor downsides, such as the cleaning process and occasional issues with steam direction, overall, this facial steamer offers excellent value for the money. Whether you’re looking to recreate a professional facial experience at home or simply enhance your skincare routine, the NanoSteamer is a reliable and effective choice.

Overall Score: 8.5/10
The Mypurmist Free is a cordless ultrapure steam inhaler, vaporizer, and humidifier that provides natural and drug-free therapy for sinus congestion, colds, and allergies. It uses a medical-grade HEPA air filter and sterile ultrapure water to produce therapeutic pure warm mist, free from irritants and pollutants. With its cordless design, it offers the freedom to enjoy instant natural therapy anywhere, anytime. This handheld device is doctor-recommended and provides instant relief for congestion. It is compact and easy to use, making it a convenient option for sinus and respiratory health. However, some customers have experienced issues with the device's temperature, face mask, and durability. Overall, the Mypurmist Free is a reliable and effective therapy option for those seeking natural relief from congestion.
Key Features
- 100% natural, drug-free, ultrapure therapy
- Combines HEPA air filter and sterile ultrapure water
- Cordless for use anywhere, anytime
- Doctor-recommended for sinuses, nose, and throat
- Provides instant relief for congestion
Specifications
- Dimension: 5.00Lx8.00Wx11.20H
- Size: Cordless
Pros
- Ultrapure therapy for sinus congestion, colds, and allergies
- Compact and portable design
- Instant relief for congestion
- Cordless for convenience
Cons
- Temperature may be too hot for some users
- Face mask may be warped or uncomfortable
- Durability issues reported by some customers
- Expensive water refills
The Mypurmist Free is a high-quality, portable steam inhaler that offers natural and effective therapy for sinus congestion, colds, and allergies. Its ultrapure technology ensures that the mist is free from irritants and pollutants, providing optimal relief for respiratory issues. The cordless design allows for convenient use anywhere, making it a versatile option for on-the-go relief. While some customers have experienced issues with temperature control and durability, overall, the Mypurmist Free is a reliable and recommended choice for those seeking drug-free congestion relief. Just be prepared for the cost of water refills, which can be pricey. Improve your respiratory health with the Mypurmist Free today!

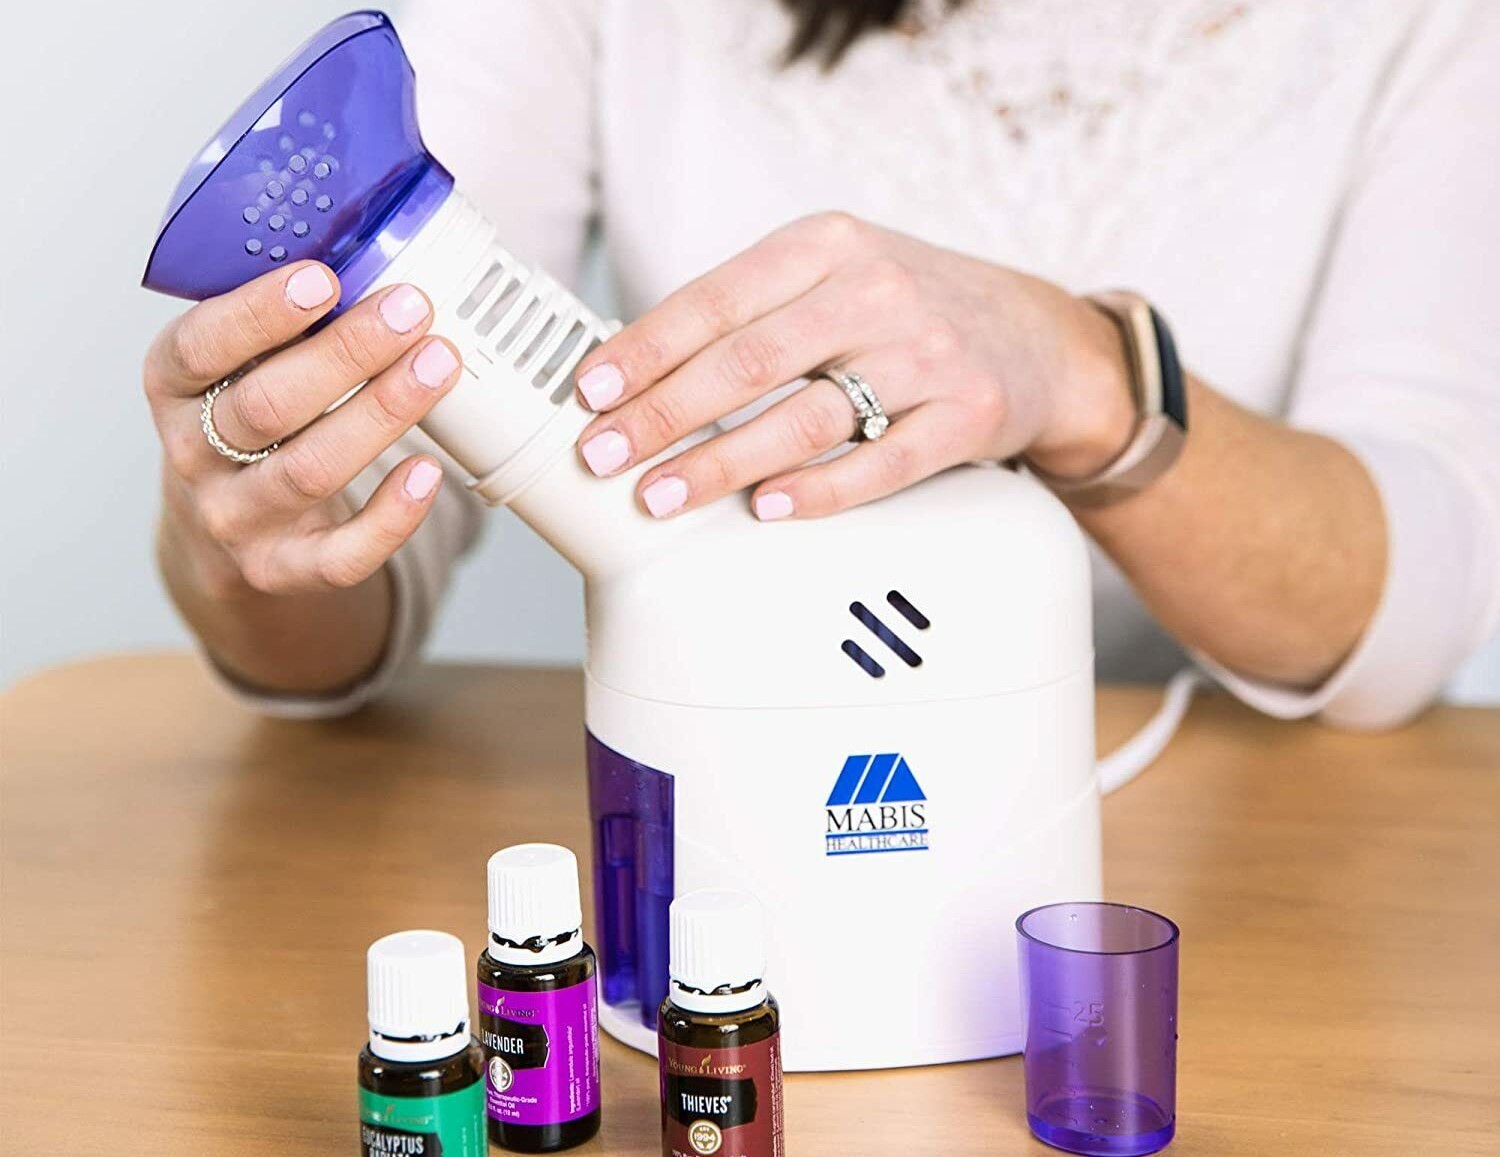
Overall Score: 7/10
The MABIS Facial Steamer is a versatile product that offers natural and effective relief for various respiratory symptoms, including colds, coughs, sinus pressure, and congestion. It can also be used as a vocal steamer or facial steamer by increasing moisture. With adjustable steam controls, users can customize the amount of steam according to their needs. The steamer also features an aromatherapy option, allowing users to infuse the steam with oils for a soothing experience. It operates quietly and comes with a soft, flexible mask for concentrated steam inhalation and pore cleansing. Compact and lightweight, this steamer is easy to use and comes with essential accessories such as a measuring cup and aromatherapy tank.
Key Features
- Relieves respiratory symptoms associated with various conditions
- Adjustable steam controls for personalized use
- Aromatherapy option for added relaxation
- Ultra-quiet operation for a peaceful experience
- Compact and lightweight design for portability
Specifications
- Color: White
- Dimension: 4.00Lx9.00Wx10.00H
- Size: Pack of 1
Pros
- Effective in opening up the voice
- Helps alleviate sinus issues and congestion
- Works well for individuals with respiratory problems
- Compact and portable design
Cons
- Missing measuring cup reported in one instance
- Mask can get hot when placed too close to the face
- Some durability issues with the lid
The MABIS Facial Steamer is a reliable and versatile product for individuals seeking relief from respiratory symptoms or those looking for a relaxing facial or vocal steaming experience. It offers adjustable steam controls, an aromatherapy option, and quiet operation for a soothing and personalized use. While there have been some reported issues with the lid’s durability and missing accessories, the overall performance and effectiveness of this steamer make it a worthwhile investment. Whether used for respiratory or cosmetic purposes, this steamer provides a convenient and portable solution for steam therapy.

Overall Score: 8/10
The Nascool Face or Vocal Steamer Device is a powerful tool for sinus congestion relief and facial steaming. It comes with three masks suitable for all ages, making it a versatile option. The steamer can also be used to help relieve tired voice throat after speaking continuously. With three different temperature modes, you can easily choose the one that suits you best. The steam spray starts working in just 15 seconds, providing fast relief. With no postures limits, you can use it while standing, sitting, or lying down. The device is durable and drug-free, ensuring a safe and effective experience. It includes a user manual, a steamer, an adapter, and other accessories.
Key Features
- Sinus congestion relief and facial steamer
- Three masks for all ages
- Relieves tired voice throat
- Three different temperature modes
- Fast and easy to use
- No postures limits
- Durable and drug-free
- Includes user manual and accessories
Specifications
- Color: White
Pros
- Effective for congestion relief
- Versatile with multiple masks
- Fast and easy to use
Cons
The Nascool Face or Vocal Steamer Device is a highly recommended product for sinus congestion relief and facial steaming. It offers three different temperature modes and can also help relieve tired voice throat. The device is fast, easy to use, and durable, ensuring a reliable experience. With no postures limits, it provides flexibility in usage. The included masks make it suitable for all ages. Overall, this steamer device is a great addition to one’s self-care routine.

Overall Score: 7/10
The MyPurMist Classic Handheld Personal Steam Inhaler provides fast and natural relief from sinus congestion, colds, and allergies. It uses steam therapy, a natural decongestant recommended by leading medical institutions. The device is easy to use, with instant on and no maintenance required. It can be used anywhere, anytime, for fast relief. The MyPurMist Classic utilizes patented hospital technology to deliver germ-free steam. It can be used with MyPurMist ultrapure sterile water or distilled water. The device features a blue and white color, with dimensions of 8.00Lx7.00Wx6.00H. It is available in a 1-Pack size. Customers have rated it 4.0 out of 5.
Key Features
- Fast Natural Relief from Sinus Congestion, Colds, and Allergies
- Use with My Pur Mist ultrapure sterile water OR distilled water
- Instant On and no maintenance; Use anywhere, anytime
- Steam therapy recommended by leading medical institution
- Uses patented hospital technology to deliver germ-free steam
Specifications
- Color: Blue and white
- Dimension: 8.00Lx7.00Wx6.00H
- Size: 1-Pack
Pros
- Provides fast and natural relief from respiratory issues
- Easy to use, with instant on and no maintenance
- Can be used anywhere, anytime
- Delivers germ-free steam using patented hospital technology
Cons
- Some customers experienced device malfunction
- Price is high compared to alternatives
- Replacement parts and accessories are not readily available
- Steam temperature could be hotter
The MyPurMist Classic Handheld Personal Steam Inhaler is a powerful device that offers fast and natural relief from sinus congestion, colds, and allergies. It utilizes steam therapy, a recommended decongestant by medical experts. The device is easy to use and provides instant relief without the need for maintenance. It can be used anywhere, making it convenient for on-the-go use. The MyPurMist Classic delivers germ-free steam, ensuring a hygienic experience. While some customers have experienced device malfunctions and find the price high, overall, it is a reliable product for respiratory issues. With its efficient steam delivery and convenient features, it offers a better alternative to over-the-counter medications. It receives a score of 7 out of 10.

Overall Score: 7.5/10
The Mypurmist 2 Ultrapure is a handheld personal steam inhaler, vaporizer, and humidifier. It provides drug-free and natural therapy for sinus and respiratory issues. With instant on-off functionality, it offers fast relief in 5-15 minutes. The device uses ultrapure steam, which is 99.97% free of irritants and pollutants, making it safe and effective. It has a comfortable warm mist temperature range of 100-115°F, reducing the risk of scalding. The Mypurmist 2 comes with a 2-year warranty and has a blue and white color design. Its compact size and portability make it easy to use and carry anywhere.
Key Features
- 100% natural therapy
- Instant on-off functionality
- Ultrapure steam
- Comfortable warm mist
- Compact and portable
- 2-year warranty
Specifications
- Color: Blue and White
- Dimension: 9.75Lx5.50Wx4.75H
- Size: 1 Count (Pack of 1)
Pros
- Provides symptom relief for sinuses and throat
- Easy to use and maintain
- High customer satisfaction
- Compact and travel-friendly design
- Includes a 2-year warranty
Cons
- Motor breakdown reported by some users
- Refills with small plastic bottles can be costly
- Requires a power outlet for operation
The Mypurmist 2 Ultrapure handheld personal steam inhaler offers effective and natural relief for sinus and respiratory issues. With its compact size and travel-friendly design, it provides convenience and ease of use. Although some users have experienced motor breakdown, the overall customer satisfaction is high with notable symptom relief. While the cost of refills can be a drawback, the device’s 2-year warranty provides added assurance. Overall, the Mypurmist 2 Ultrapure is a valuable tool for those seeking natural therapy and immediate relief from congestion and other respiratory discomforts.

Overall Score: 7/10
The Crane Corded Personal Steam Inhaler is a reliable and convenient way to relieve sinus congestion, allergies, and coughs. Its soft face mask and warm mist of steam provide temporary relief in just a 5-15 minute treatment. With instant, safe operation and the option to choose between low and high mist output, this inhaler is easy to use for adults. It also features an automatic shutoff when the water level is low, ensuring safety during use. Additionally, the inhaler can be used with Crane vapor pads for a more effective treatment. Overall, the Crane Corded Personal Steam Inhaler is a helpful solution for respiratory issues and is suitable for everyday use.
Key Features
- Allergy relief
- Personal steam inhaler
- Instant, safe operation
- Vapor pads
- Automatic shutoff
Specifications
- Color: White
- Dimension: 4.70Lx4.70Wx9.20H
- Size: 1 Count (Pack of 1)
Pros
- Provides temporary relief from sinus congestion and allergies
- Face mask for targeted delivery of steam
- Instant and safe operation
- Can be used with vapor pads for enhanced treatment
- Automatic shutoff for safety
Cons
- Intermittent steam production
- Easily tipped over
- Non-returnable
- Steam gets very hot
- Silicone mask may be too large for some
The Crane Corded Personal Steam Inhaler offers effective relief from respiratory issues. While there may be some minor drawbacks, such as intermittent steam production and the risk of tipping over, its overall performance and safety features make it a worthwhile investment. Users can expect temporary relief from congestion, allergies, and coughs with this inhaler. Additionally, the option to use vapor pads enhances the treatment experience. However, it’s important to note that the steam can get quite hot, so caution is advised during use. Overall, the Crane Corded Personal Steam Inhaler is a reliable choice for those seeking relief from respiratory discomfort.

Overall Score: 8.5/10
Get natural nasal congestion relief with the Beurer SI30 Personal Steam Inhaler. This handheld and portable sinus steamer is designed to provide quick and easy relief from cold and cough symptoms. With warm mist technology and adjustable mist output, it soothes sinus congestion effectively. The inhaler comes with a universal flexible steam mask that fits both kids and adults, making it perfect for the entire family. It uses filter-free technology and works with tap water, making it convenient to use. The package includes the device, flexible steam mask, and a measuring cup for easy refill. Enjoy the benefits of steam inhalation with this compact and efficient sinus steamer.
Key Features
- Quick and easy to use for natural nasal congestion relief
- Handheld and portable design for on-the-go use
- Warm mist technology with adjustable mist output
- Universal flexible steam mask for mouth and nose
- Works with tap water and comes with a measuring cup
- Filter-free technology for convenience
- Comes with a limited lifetime warranty
Specifications
- Color: White
- Dimension: 6.00Lx7.00Wx9.00H
Pros
- Provides quick relief from sinus congestion
- Compact and portable design for convenience
- Adjustable mist output for personalized use
- Universal steam mask suitable for the whole family
- Easy to use and works with tap water
- Comes with a lifetime warranty
Cons
- May be too fragile for some users
- Water container may rust after extended use
The Beurer SI30 Personal Steam Inhaler is a highly effective and convenient solution for nasal congestion relief. Its portable design and adjustable mist output make it suitable for use anywhere, whether at home or on the go. The universal steam mask ensures that the whole family can benefit from its soothing effects. With its filter-free technology and compatibility with tap water, it is hassle-free to use. While it may be too fragile for some users, the lifetime warranty provides peace of mind. Overall, this steam inhaler is a great investment for those seeking fast and long-lasting relief from cold and cough symptoms.
Vocal Steamer: A Buyer's Guide
Are you a professional singer or public speaker looking to maintain your vocal health and enhance your voice? Look no further! A vocal steamer could be the perfect tool for you. In this buyer's guide, we will explore everything you need to know about vocal steamers to help you make an informed purchase decision. Let your voice soar with the power of steam!
Read also: 11 Amazing Floor Steamer for 2025
Benefits of Vocal Steamers
- Moisturizes and hydrates your vocal cords: Vocal steamers use hot steam to deliver moisture directly to your vocal cords, helping to prevent dryness and irritation.
- Relieves throat issues: Steam can alleviate symptoms of a sore throat, vocal strain, hoarseness, and even respiratory issues, enabling you to perform at your best.
- Reduces vocal fatigue: By soothing and rejuvenating your voice, a vocal steamer can help reduce vocal fatigue during prolonged speaking or singing sessions.
- Improves vocal quality: Steam can help to clear mucus and phlegm from your throat, resulting in clearer and more resonant vocals.
- Enhances vocal warm-up: Incorporating a vocal steamer into your warm-up routine can effectively prepare your vocal cords for optimal performance.
Factors to Consider
When purchasing a vocal steamer, keep these important factors in mind to ensure you find the perfect fit for your needs:
1. Portability and Size
- Consider the dimensions and weight of the steamer. Will you primarily be using it at home or on-the-go? Portability can be crucial for performers who travel frequently.
2. Technology and Safety Features
- Look for steaming devices with advanced safety mechanisms, such as automatic shut-off or temperature control. This will prevent accidental burns and guarantee a safe user experience.
3. Water Tank Capacity
- Choose a steamer with an adequate water tank capacity to suit your needs. Larger tanks provide longer steaming sessions without the need for frequent refills.
4. Warm-Up Time
- Check the warm-up time of the steamer. Some steamers heat up quickly, allowing for immediate use, while others may require a longer wait before starting your vocal routine.
5. Adjustable Settings
- Opt for a steamer with adjustable settings, such as steam intensity and temperature. These features allow you to tailor the steaming experience to your preferences and requirements.
6. Maintenance and Cleaning
- Consider the ease of cleaning and maintenance required for the vocal steamer. Look for devices with detachable parts that are dishwasher safe or easy to clean manually.
7. Noise Level
- Some steamers may emit noise during operation. If noise levels are a concern, choose a steamer specifically designed to operate quietly for a more serene vocal experience.
8. Budget
- Set a budget for your vocal steamer purchase and consider models within your price range. Vocal steamers are available at various price points, so finding one that fits your budget is achievable.
Frequently Asked Questions about 11 Amazing Vocal Steamer For 2025
No, you can use regular tap water in most vocal steamers. However, if your water is extremely hard or mineral-rich, using distilled or filtered water might be more beneficial to prevent mineral buildup and prolong the lifespan of the steamer.
The duration of each session depends on personal preference and the manufacturer’s recommendations. Generally, a steaming session can last between 5 to 15 minutes. However, it’s important not to overdo it, as excessive steaming can lead to vocal cord irritation.
It is generally not recommended to add essential oils or herbs to your vocal steamer unless explicitly mentioned by the manufacturer. Some oils or herbs may cause damage or clog the device, impacting its performance. Always check the user manual and follow the manufacturer’s guidelines for safe usage.
While vocal steamers can be beneficial for individuals of all ages, it’s important to consider the age and maturity of the user. Children and teens should always be supervised when using steamers to ensure safe and appropriate usage.
Regular cleaning after each use is essential to maintain the hygiene and optimal performance of your vocal steamer. It is recommended to follow the manufacturer’s instructions regarding cleaning frequency and methods.
Vocal steamers are not a substitute for medical treatment. While they can provide temporary relief and help prevent vocal strain, it is essential to consult with a healthcare professional if you have persistent vocal issues or suspect any underlying medical conditions affecting your voice.
Was this page helpful?
Trust Storables.com for unbiased and honest product reviews. Our reviews are rigorously assessed by our Expert Board Contributors and adhere to strict Editorial Standards. We ensure that each review is transparent and trustworthy, helping you make informed purchasing decisions.


0 thoughts on “11 Amazing Vocal Steamer for 2025”