Home>Articles>Which Is An Approved Method For Storing In Use Utensils
Articles
Which Is An Approved Method For Storing In Use Utensils
Modified: October 20, 2024
Looking for an approved method for storing and organizing your in-use utensils in the kitchen? Explore our range of kitchen storage solutions designed to keep your utensils easily accessible and clutter-free.
(Many of the links in this article redirect to a specific reviewed product. Your purchase of these products through affiliate links helps to generate commission for Storables.com, at no extra cost. Learn more)
Introduction:
Properly storing in-use utensils is crucial for maintaining a neat and organized kitchen space. With the right storage methods, you can maximize efficiency and minimize clutter in your culinary workstation. In this article, we will explore various effective strategies for storing in-use utensils, ensuring easy access and preserving the longevity of your cooking tools.
From hanging utensil racks to utensil jars or canisters, we will cover a range of storage options that cater to different kitchen layouts and personal preferences. Whether you have limited counter space or an abundance of wall-mounted options, there is a storage solution to fit your unique needs.
By implementing these storage methods, you can say goodbye to rummaging through cluttered drawers or digging through overflowing utensil holders. With a well-organized kitchen, you’ll be able to navigate your cooking projects with ease and efficiency, making every meal preparation a breeze.
So, let’s dive into the world of practical and efficient utensil storage methods that will revolutionize your kitchen space.
Key Takeaways:
- Efficiently store in-use utensils with hanging racks, drawer organizers, and magnetic strips. Choose a method that suits your kitchen layout and personal style for a clutter-free and visually appealing cooking space.
- Embrace the versatility of utensil storage with options like wall-mounted hooks, utensil jars, and pegboards. Keep your kitchen organized, efficient, and visually pleasing while enjoying convenient access to your cooking tools.
Read more: How To Store Cooking Utensils
Storing In-Use Utensils: An Overview
When it comes to storing in-use utensils, the key is to strike a balance between accessibility and organization. You want your frequently used tools to be within arm’s reach while maintaining a tidy and clutter-free workspace. Fortunately, there are several storage methods designed specifically for this purpose.
One popular option is hanging utensil racks. These racks, often made of stainless steel or wood, can be mounted on the wall or suspended from the ceiling. With hooks or slots to hold your utensils, they provide a convenient and visually appealing storage solution. Hanging utensil racks are great for saving space and adding a decorative touch to your kitchen.
If you prefer a more discreet storage option, consider using drawer organizers. These narrow compartments fit neatly inside your kitchen drawers, allowing you to separate and store different types of utensils. With designated spaces for knives, spoons, and other tools, drawer organizers keep everything in order while maximizing drawer space.
Magnetic strips are another smart storage solution for in-use utensils. By attaching a strip of magnets to your wall, you can easily hang metal utensils such as knives, whisks, and spatulas. This method keeps your tools within reach and adds a modern, minimalist aesthetic to your kitchen.
For those who prefer a rustic or farmhouse-inspired vibe, wall-mounted hooks can be a charming storage option. By screwing hooks into the wall, you can hang your utensils, freeing up valuable counter space. Wall-mounted hooks are versatile and can be used in conjunction with other storage methods, such as hanging racks or magnetic strips.
If you’re looking for a classic storage option, consider utilizing utensil jars or canisters. These cylindrical containers, available in various materials like ceramic, glass, or stainless steel, keep your utensils upright and easily accessible. Utensil jars are especially useful for those who like to display their kitchen tools while keeping them organized.
To further streamline your storage system, you can incorporate utensil trays or dividers. These customizable organizers fit perfectly in your drawers or countertops and create separate compartments for each utensil type. Utensil trays or dividers are ideal for those who prefer a clean and sleek look in their kitchen without compromising functionality.
If you’re looking for a portable option, consider using utensil baskets or caddies. These versatile containers can be carried around the kitchen, making it convenient to transport utensils from the drawer to the counter or dining table. With compartments or dividers inside, utensil baskets or caddies keep your tools organized even while on the move.
For the ultimate storage flexibility, consider installing an utensil pegboard. This wall-mounted board comes with hooks and pegs that can be rearranged to accommodate your utensil collection. Utensil pegboards allow you to easily reconfigure your storage layout as your utensil needs change over time.
No matter what storage method you choose, the key is to find a solution that suits your kitchen layout, personal style, and convenience. By implementing these storage techniques, you will transform your kitchen into an efficient and well-organized space, where cooking becomes a joy rather than a hassle.
Method 1: Hanging Utensil Racks
Hanging utensil racks are a popular and practical storage solution for organizing in-use utensils. These racks come in various shapes and sizes, allowing you to customize your storage based on your kitchen’s layout and your personal preferences.
One of the key advantages of hanging utensil racks is their space-saving nature. By utilizing vertical wall or ceiling space, you can free up valuable counter or drawer space for other kitchen essentials. This is especially beneficial for those with smaller kitchens or limited storage options.
There are different types of hanging utensil racks available, such as wall-mounted racks and ceiling-mounted racks. Wall-mounted racks are typically attached directly to the wall with screws or adhesive, while ceiling-mounted racks are suspended from the ceiling using chains or hooks.
When choosing a hanging utensil rack, consider the material and design that best suits your kitchen decor. Stainless steel racks provide a sleek, modern look, while wooden racks add a warm and rustic touch. Additionally, some racks offer additional features like adjustable hooks or shelves for added versatility.
To effectively use a hanging utensil rack, follow these steps:
- Clean and prepare the area where you plan to install the rack. Ensure that there is enough space and clearance for your utensils to hang freely without obstructing any other kitchen elements.
- Measure and mark the desired location for the rack on the wall or ceiling, keeping in mind the height and accessibility.
- If necessary, use a level to ensure that the rack will be installed straight and even.
- Securely attach the rack to the wall or ceiling according to the manufacturer’s instructions. Make sure to use appropriate screws or hardware suitable for your specific wall type.
- Once the rack is installed, arrange your utensils by hanging them on the hooks or slots provided. Group similar utensils together, such as wooden spoons, spatulas, or ladles, for easy access.
- Periodically inspect the rack and ensure that it remains stable and secure. Tighten any loose screws or make any necessary adjustments to maintain the integrity of the storage system.
Hanging utensil racks not only provide a convenient storage solution but also add a decorative element to your kitchen. The visibility of your utensils can inspire creativity while cooking and showcase your unique collection to guests.
By utilizing hanging utensil racks, you can maximize your kitchen space, keep your frequently used utensils easily accessible, and create a visually appealing and organized cooking area.
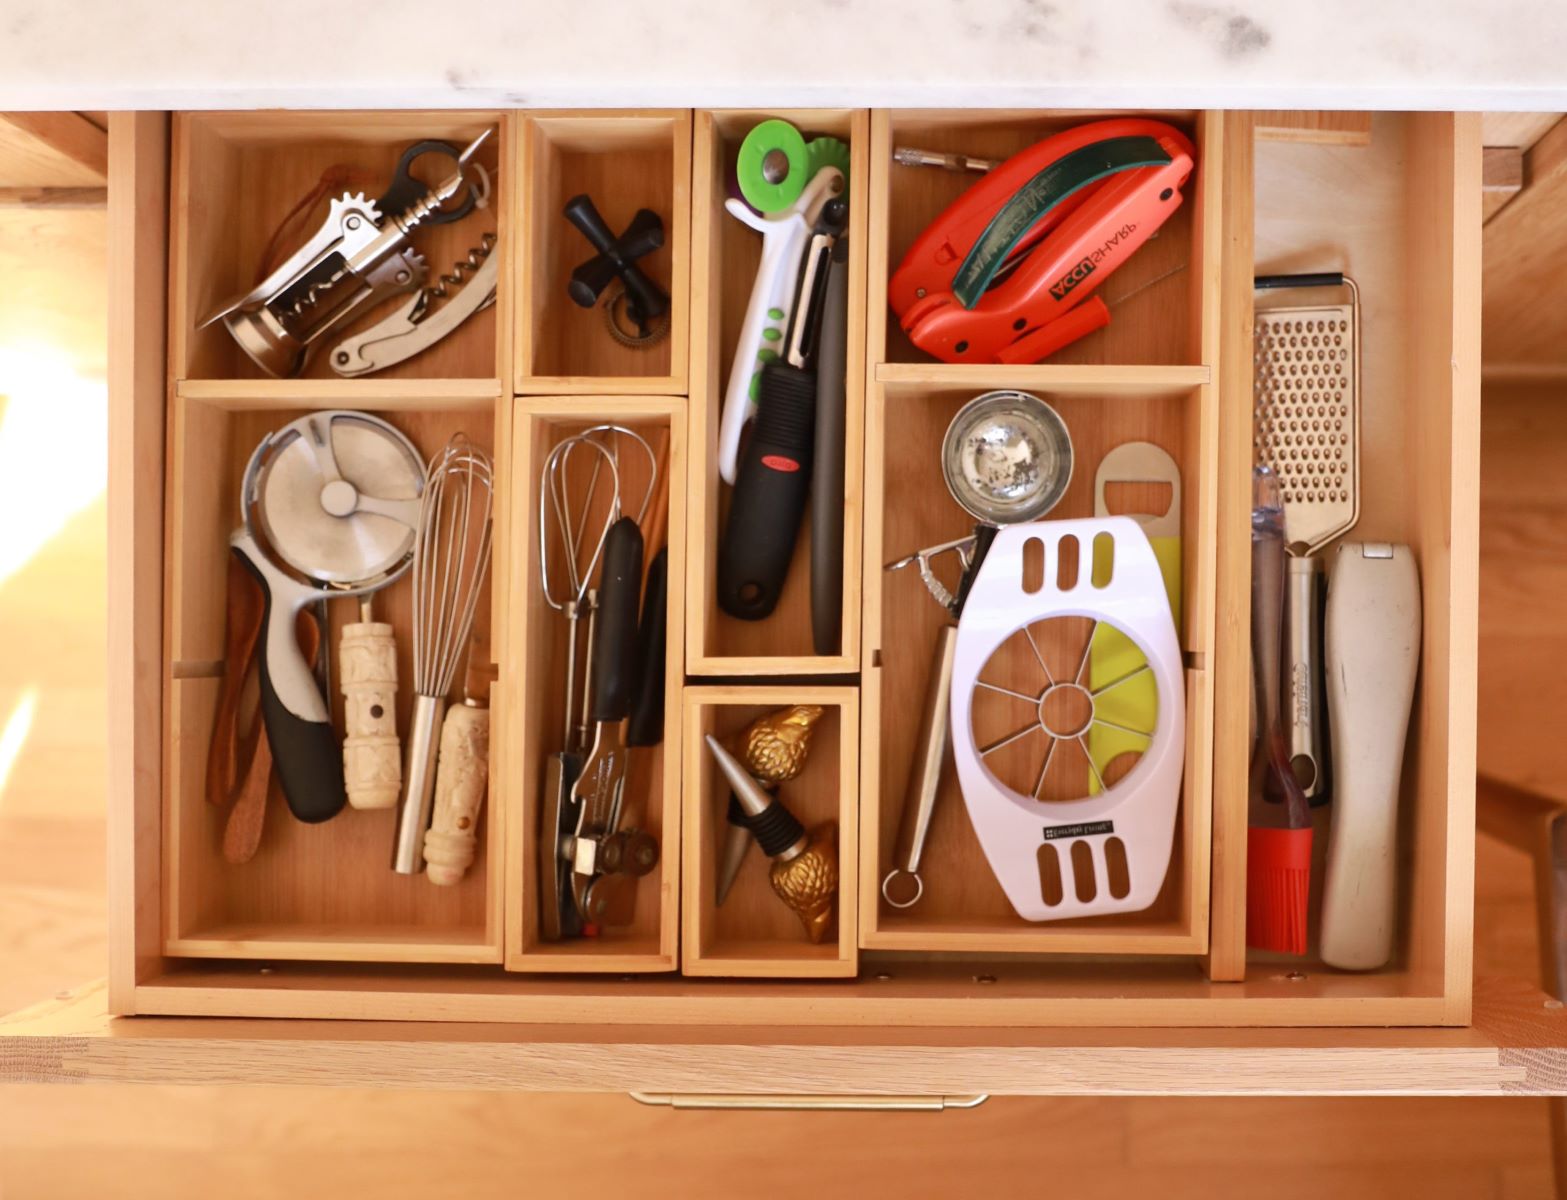
Method 2: Drawer Organizers
In the quest for an organized kitchen, drawer organizers are a practical and efficient solution for storing in-use utensils. These handy organizers help maximize space and keep your utensils neatly separated, making them easy to find and access whenever you need them.
Drawer organizers come in various shapes and sizes to fit different drawer dimensions and utensil collections. They are typically made of materials like plastic, bamboo, or metal, offering durability and ease of maintenance.
When choosing drawer organizers, consider the configuration that best suits your specific utensil collection. Some organizers have multiple compartments of different sizes, allowing you to organize and segregate different types of utensils, such as knives, forks, spoons, and cooking tools.
To make the most of your drawer organizers, follow these steps:
- Empty the drawer and remove any existing utensils or clutter.
- Clean and sanitize the drawer to ensure a fresh and hygienic storage space.
- Measure the dimensions of your drawer to choose the appropriately sized organizers that fit snugly inside.
- Place the selected drawer organizers inside the drawer, arranging them in a way that maximizes space while keeping the compartments easily accessible.
- Sort and group your utensils according to their type or usage. For example, keep your measuring spoons together in one compartment, and your spatulas and tongs in another.
- Organize your utensils within the organizers, placing each utensil in its designated compartment. This will help you locate specific utensils quickly and efficiently.
- Periodically check and adjust the placement of your utensils to ensure the organizers remain tidy and organized.
The benefits of using drawer organizers for storing in-use utensils are manifold. Firstly, they keep your utensils neatly arranged, preventing them from getting tangled or damaged. Secondly, they optimize drawer space, allowing you to store other kitchen items alongside your utensils in the same drawer. Lastly, drawer organizers make it effortless to find and retrieve the utensils you need, streamlining your cooking process.
Remember to clean your drawer organizers regularly to maintain hygiene and prevent the accumulation of food particles or residue. Simply remove the organizers from the drawer, wash them with warm soapy water, and allow them to dry completely before placing them back in the drawer.
By incorporating drawer organizers into your kitchen storage system, you will experience the joy of a clutter-free workspace, where your utensils are easily accessible and neatly organized.
Method 3: Magnetic Strips
If you’re looking for a sleek and space-saving storage solution for your in-use utensils, magnetic strips are a perfect choice. These strips, typically made of metal or plastic with magnetic properties, provide a convenient and visually appealing way to store your metal utensils within easy reach.
Magnetic strips offer several advantages over other storage methods. Firstly, they save valuable counter or drawer space by utilizing vertical wall space in your kitchen. Secondly, they keep your utensils neatly organized and easily accessible, preventing them from scattering and getting mixed up with other utensils. Lastly, they add a modern and minimalist aesthetic to your kitchen decor.
When selecting magnetic strips, consider the length and strength of the magnets. Longer strips can accommodate more utensils, while stronger magnets ensure a secure hold. Ensure that the magnetic strip you choose is suitable for the weight and size of your utensils.
To effectively utilize magnetic strips for storing your utensils, follow these steps:
- Clean and prepare the area of the wall where you intend to mount the magnetic strip. Ensure that it is easily accessible and within reach while you’re working in the kitchen.
- Measure and mark the desired location of the magnetic strip on the wall. Use a level to ensure it is straight and even.
- Securely install the magnetic strip using the appropriate screws or adhesive, following the manufacturer’s instructions. Ensure it is firmly attached to the wall to support the weight of your utensils.
- Arrange your metal utensils, such as knives, whisks, and spatulas, along the magnetic strip. Ensure they are evenly spaced for a balanced and visually appealing display.
- Periodically check the magnetic strip to ensure that it remains secure and stable. If any utensils become loose, readjust their position or reinforce the magnets if needed.
One of the great advantages of magnetic strips is the ease of cleaning. Since they are mounted on the wall, the utensils are kept away from any moisture or residue that may accumulate on kitchen surfaces. Additionally, the open design allows for quick and effortless cleaning of both the utensils and the strip itself.
Whether you have a small kitchen or simply prefer a minimalist approach, magnetic strips provide a stylish and efficient way to store and display your metal utensils. With your cooking tools easily accessible and within sight, you’ll be ready to whip up culinary masterpieces in no time.
Read more: How To Store Utensils Without Drawers
Method 4: Wall-Mounted Hooks
If you’re seeking a simple yet effective storage solution for your in-use utensils, wall-mounted hooks are a great option. These hooks offer convenience and accessibility while adding a touch of charm to your kitchen decor.
Wall-mounted hooks are versatile and can be easily installed on any available wall space in your kitchen. They are typically made of materials like metal, wood, or plastic, with a durable design that can support the weight of your utensils.
When choosing wall-mounted hooks, consider the size, number, and spacing of the hooks. This will depend on the size of your utensils and the amount of wall space you have available. Opting for hooks with a smooth or rounded design can help preserve the integrity of your utensils.
To effectively use wall-mounted hooks for utensil storage, follow these steps:
- Decide on the location for the hooks, ensuring they are within easy reach and convenient for your cooking processes.
- Use a measuring tape to mark the spacing and alignment of the hooks. Use a level to ensure they are straight.
- Install the hooks on the wall, carefully drilling or screwing them in according to the manufacturer’s instructions. Make sure the hooks are sturdy and secure.
- Organize your utensils by hanging them on the hooks. Group similar utensils together for easy access and a visually pleasing arrangement.
- Regularly inspect the hooks to ensure they remain securely fastened to the wall. Tighten any loose screws or make any necessary adjustments to maintain the stability of the hooks.
The advantage of using wall-mounted hooks for utensil storage is that they keep your tools easily accessible and visible at all times. You can quickly grab the utensil you need without rummaging through cluttered drawers or cabinets.
Wall-mounted hooks also offer the flexibility to rearrange and reorganize your utensils whenever necessary. As your utensil collection changes or your needs evolve, you can easily move the hooks or add more to accommodate your requirements.
In addition to their practical functionality, wall-mounted hooks can enhance the aesthetic appeal of your kitchen. They serve as decorative elements, adding character and personality to your culinary space. You can even consider using hooks in different colors or designs to create an eye-catching display.
With wall-mounted hooks, your in-use utensils will always be within reach, neatly organized, and visually appealing. Say goodbye to cluttered drawers and inefficient storage systems – wall-mounted hooks provide the perfect solution for keeping your favorite utensils at your fingertips.
Store in-use utensils in a clean, covered container to protect them from contamination. Make sure the container is easily accessible for staff to use and clean.
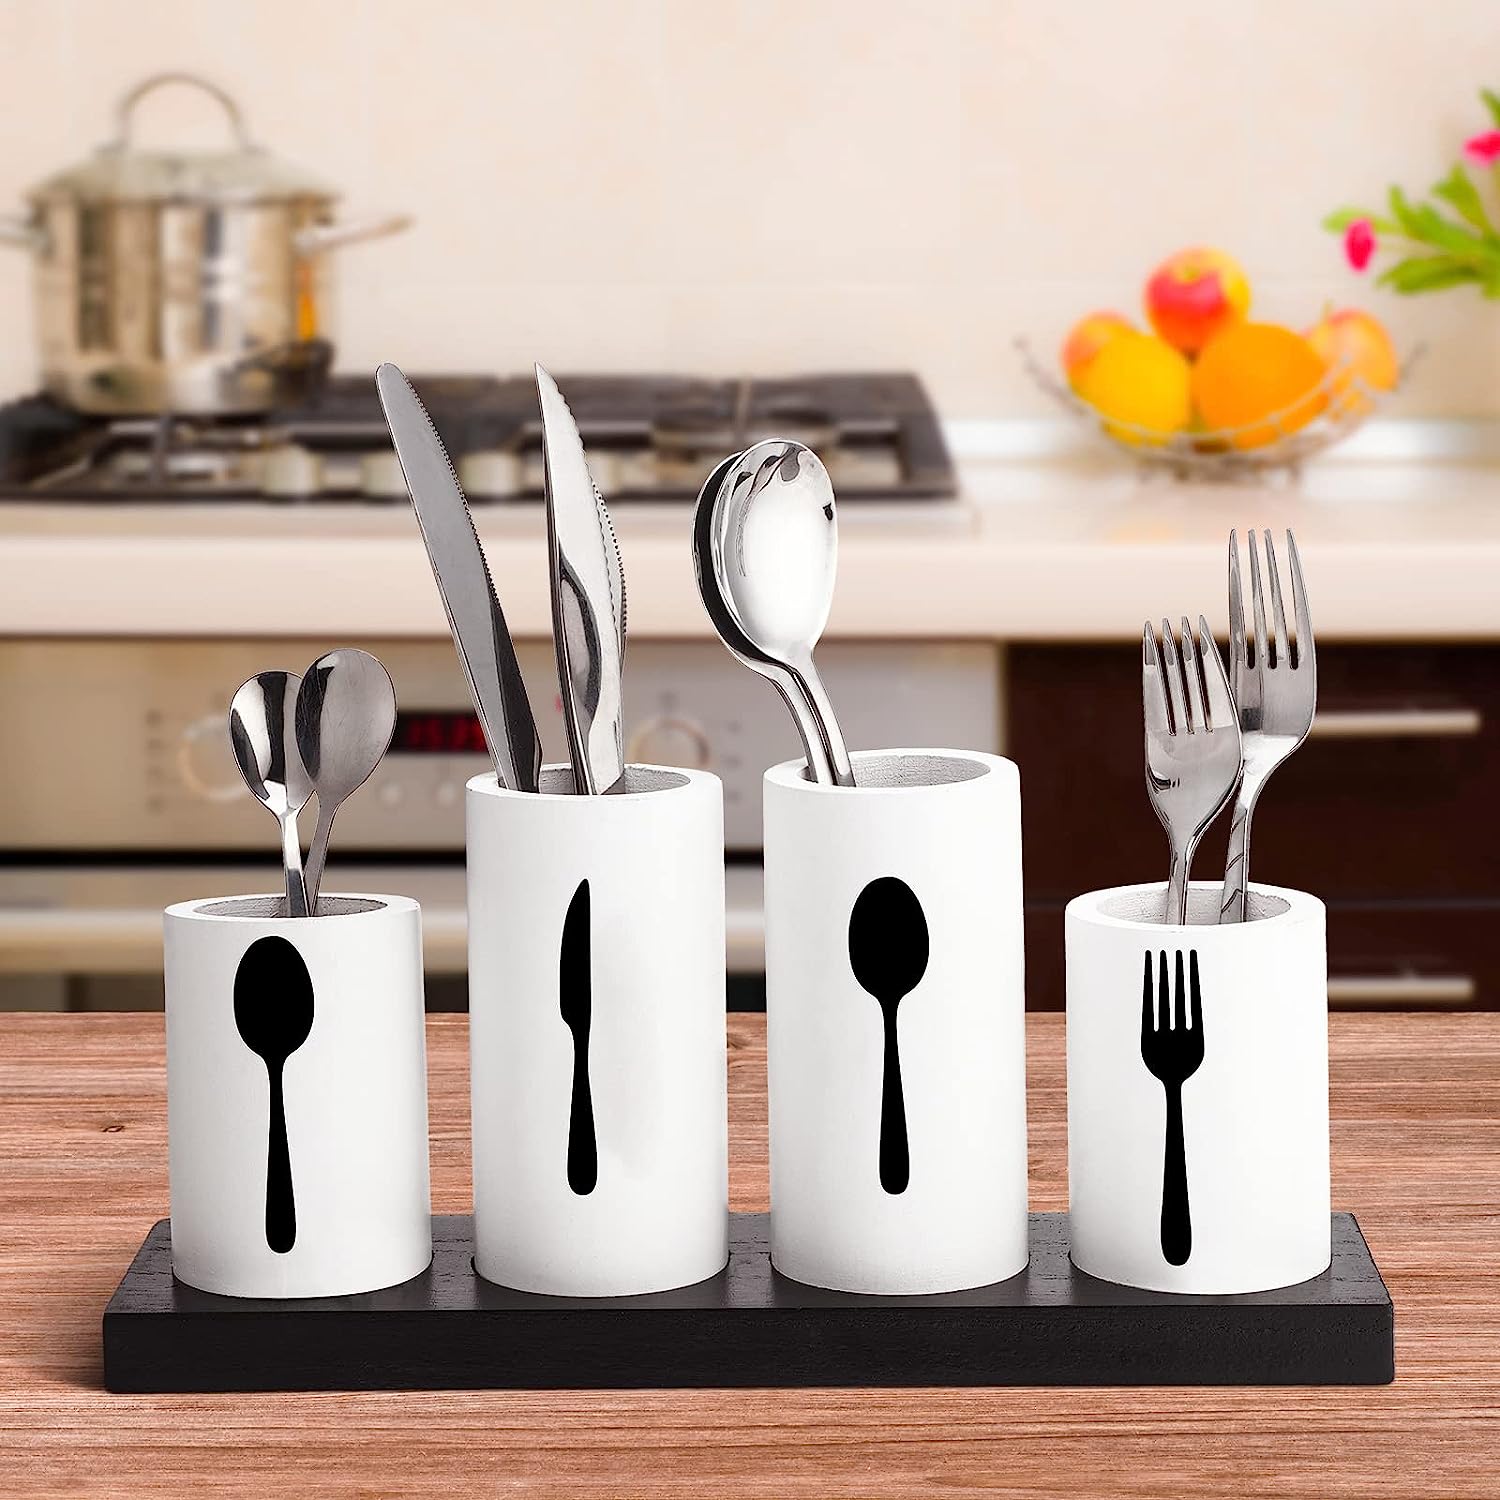
Method 5: Utensil Jars or Canisters
When it comes to storing in-use utensils, utensil jars or canisters are a classic and versatile choice. These cylindrical containers provide a practical solution for keeping your utensils readily accessible while adding a decorative touch to your kitchen.
Utensil jars or canisters can be made from a variety of materials like ceramic, glass, metal, or even sturdy plastic. They come in different sizes, shapes, and designs, allowing you to find the perfect match for your kitchen aesthetic.
One of the major advantages of using utensil jars or canisters is their simplicity and convenience. You can easily place them on your countertop or kitchen island, ensuring that your utensils are always within reach during your cooking sessions.
To effectively utilize utensil jars or canisters for storing your utensils, follow these steps:
- Select a utensil jar or canister that suits your personal style and kitchen decor. Consider the size and number of utensils you wish to store, ensuring that the container has ample space for them.
- Clean the utensil jar or canister thoroughly before use to remove any dirt or dust particles and ensure a hygienic storage space for your utensils.
- Arrange your utensils inside the jar or canister, making sure they are properly organized. You can group similar utensils together, such as wooden spoons, spatulas, or serving spoons, for easy access.
- Place the utensil jar or canister in a convenient location on your countertop or near your cooking area. Ensure that it is easily accessible and does not obstruct your workspace or other kitchen elements.
- Periodically clean and maintain the utensil jar or canister by washing it with warm, soapy water and drying it thoroughly. This will help keep your utensils and the container clean and free from any dirt or residue.
In addition to their functionality, utensil jars or canisters can add a decorative element to your kitchen. They come in various colors, patterns, and designs, allowing you to choose a style that complements your kitchen decor. You can even coordinate them with other kitchen accessories to create a cohesive and visually appealing look.
Utensil jars or canisters offer the advantage of easy customization. You can personalize them by adding labels, decorative ribbons, or even painting them to match your kitchen theme. This allows you to infuse your own unique style and personality into your kitchen storage solution.
Whether you prefer a minimalist or a more eclectic look, utensil jars or canisters provide a practical and stylish means of storing your in-use utensils. With easy access to your cooking tools, you can streamline your meal preparations and maintain a clutter-free kitchen workspace.
Method 6: Utensil Trays or Dividers
When it comes to organizing in-use utensils, utensil trays or dividers offer a practical and efficient solution. These customizable organizers fit inside drawers or on countertops, providing designated compartments to keep your utensils neatly separated and easily accessible.
Utensil trays or dividers come in various sizes, materials, and configurations, allowing you to find the perfect fit for your kitchen and utensil collection. They are typically made of durable materials like plastic, bamboo, or metal, ensuring longevity and ease of maintenance.
The advantage of using utensil trays or dividers is their ability to maximize drawer or countertop space while keeping your utensils organized. They prevent your utensils from getting tangled or cluttered, making it easy to find the tool you need and streamlining your cooking process.
Here are the steps to effectively use utensil trays or dividers for storing your utensils:
- Empty the drawer or clear the countertop surface where you plan to place the utensil tray or divider.
- Clean and sanitize the drawer or countertop area to create a fresh and hygienic storage space.
- Select a utensil tray or divider that fits the dimensions of your drawer or countertop. Consider how many compartments or dividers you need based on the number and type of utensils you plan to store.
- Place the utensil tray or divider in the designated storage space, ensuring a snug fit.
- Organize your utensils by placing them in the separate compartments or slots of the tray or divider. Group similar utensils together for easy access and a clutter-free arrangement.
- Periodically check and adjust the placement of your utensils to ensure that the tray or divider remains tidy and organized.
Utensil trays or dividers offer the advantage of easy customization. Many organizers come with removable dividers or adjustable compartments, allowing you to tailor the storage space to your specific utensil collection. This flexibility ensures that your utensils are stored in a way that works best for you.
In addition to their functionality, utensil trays or dividers can help preserve the condition of your utensils. By keeping them separated and preventing them from rubbing against each other, you reduce the risk of scratches or damage.
Utensil trays or dividers are not only suitable for drawers but can also be used on countertops, creating a designated space for your frequently used utensils. This keeps them within reach while maintaining an organized and clutter-free cooking area.
By incorporating utensil trays or dividers into your kitchen storage system, you can efficiently utilize your drawer or countertop space, keep your utensils neatly organized, and enjoy a more streamlined and enjoyable cooking experience.
Method 7: Utensil Baskets or Caddies
If you’re looking for a portable and versatile storage option for your in-use utensils, utensil baskets or caddies are an excellent choice. These handy containers provide a convenient and organized way to transport and store your utensils as you move around your kitchen.
Utensil baskets or caddies come in various materials such as plastic, metal, or woven materials like wicker or bamboo. They have compartments or dividers that keep your utensils separated and prevent them from clattering together.
The benefits of using utensil baskets or caddies are manifold. Firstly, they provide portability, allowing you to easily transport your utensils from one kitchen area to another or even from the kitchen to the dining area. Secondly, they keep your utensils organized and readily accessible, saving you time and effort when you need a specific tool. Lastly, utensil baskets or caddies can be decorative and add a rustic or farmhouse touch to your kitchen aesthetic.
Here are the steps to effectively use utensil baskets or caddies for storing your utensils:
- Select a utensil basket or caddy that suits your style and preferences. Consider the size and number of utensils you plan to store to ensure there is enough space within the container.
- Clean the utensil basket or caddy thoroughly before use to remove any dust or dirt particles and ensure a clean storage space for your utensils.
- Arrange your utensils neatly inside the compartments or dividers of the basket or caddy. Group similar utensils together for easy access and to maintain an organized arrangement.
- Place the utensil basket or caddy in a convenient location, ensuring that it is easily accessible during your cooking process.
- When needed, carry the utensil basket or caddy with you as you move around the kitchen, keeping your utensils close at hand.
- Periodically clean the utensil basket or caddy to maintain hygiene and prevent any food particles or residue from accumulating inside.
Utensil baskets or caddies offer flexibility in terms of storage options. They can be placed on the countertop, kitchen island, or even hung on a hook or pegboard for easy accessibility. Some baskets or caddies even come with handles for added convenience when carrying them around.
Whether you’re preparing a meal, setting the table, or doing outdoor cooking, utensil baskets or caddies make it effortless to have your utensils by your side. They keep everything organized and within reach, enhancing your efficiency and enjoyment in the kitchen.
Utensil baskets or caddies are also great for decluttering your drawers or cabinets. By transferring your frequently used utensils into the basket or caddy, you can free up drawer space for other items and ensure everything has its designated place.
By incorporating utensil baskets or caddies into your kitchen storage system, you can enjoy the convenience of portable organization, making your cooking experiences smoother and more efficient.
Method 8: Utensil Pegboards
If you’re looking for a versatile and customizable storage solution for your in-use utensils, utensil pegboards are worth considering. These wall-mounted boards with hooks and pegs offer a practical and visually appealing way to store and display your utensils.
Utensil pegboards provide several advantages. Firstly, they utilize vertical wall space, making them a great option for kitchens with limited countertop or drawer space. Secondly, the hooks and pegs on the board can be easily rearranged to accommodate different utensil sizes and shapes. This flexibility allows you to create a storage layout that suits your specific needs.
When selecting a utensil pegboard, consider the size that fits your available wall space and the number of utensils you plan to store. Pegboards come in a range of materials like wood, metal, or plastic, each offering its own aesthetic appeal and durability.
To effectively utilize a utensil pegboard for storing your utensils, follow these steps:
- Clean and prepare the wall where you plan to install the pegboard. Ensure it is free of any dirt or obstructions.
- Measure and mark the desired location for the pegboard on the wall, considering the height and accessibility.
- Install the pegboard onto the wall using appropriate screws or wall anchors, following the manufacturer’s instructions. Ensure it is securely fastened.
- Arrange the hooks and pegs on the pegboard, spacing them according to your utensil collection. You can group similar utensils together or create sections for different types of tools.
- Hang your utensils on the hooks or pegs, ensuring they are securely positioned. Adjust the arrangement as needed to maintain an organized and visually appealing display.
- Regularly inspect the pegboard to ensure it remains stable and secure. Tighten any loose screws or make necessary adjustments to maintain the integrity of the storage system.
Utensil pegboards not only provide functional storage but also add a decorative element to your kitchen. The utensils displayed on the pegboard can serve as decorative accents, showcasing your collection and adding visual interest to the space.
Furthermore, utensil pegboards offer the flexibility to adapt and change as your utensil needs evolve. You can easily rearrange the hooks and pegs to accommodate new utensils or adjust their positions as necessary.
By utilizing utensil pegboards, you can optimize your kitchen space, keep your utensils within reach, and adorn your kitchen walls with a practical and stylish storage solution.
Conclusion
Properly storing in-use utensils is essential for maintaining an organized and efficient kitchen. With the myriad of storage options available, you can find a method that suits your kitchen layout, personal style, and convenience.
In this article, we explored eight effective methods for storing in-use utensils. Hanging utensil racks provide a space-saving and decorative solution, while drawer organizers maximize drawer space and keep utensils neatly separated. Magnetic strips offer a sleek and modern way to store metal utensils, while wall-mounted hooks add charm and convenience. Utensil jars or canisters provide a classic and customizable storage option, and utensil trays or dividers keep utensils organized within drawers or on countertops. Utensil baskets or caddies offer portability and easy access, and utensil pegboards allow for versatile customization and display.
Each method has its unique advantages, and the one you choose will depend on your specific needs and preferences. Consider factors such as available space, storage capacity, ease of access, and the aesthetic appeal that each method brings to your kitchen.
By implementing these storage methods, you can transform your kitchen into an organized and functional workspace. You’ll enjoy convenient access to your utensils, streamlined meal preparations, and a visually pleasing environment that enhances your cooking experience.
Remember, maintaining cleanliness and periodic organization is key to sustaining an efficient storage system. Regularly clean and inspect your chosen storage method to ensure it remains durable and secure.
In conclusion, investing in the right storage solutions for your in-use utensils will bring order, functionality, and a touch of style to your kitchen. With a well-organized space, you can unleash your culinary creativity and enjoy a seamless cooking journey every day.
Frequently Asked Questions about Which Is An Approved Method For Storing In Use Utensils
Was this page helpful?
At Storables.com, we guarantee accurate and reliable information. Our content, validated by Expert Board Contributors, is crafted following stringent Editorial Policies. We're committed to providing you with well-researched, expert-backed insights for all your informational needs.


0 thoughts on “Which Is An Approved Method For Storing In Use Utensils”