Articles
How To Decorate Lockers
Modified: September 2, 2024
Learn the best tips and tricks for interior design to decorate your lockers and make them stand out. Create a stylish and organized space with our expert advice.
(Many of the links in this article redirect to a specific reviewed product. Your purchase of these products through affiliate links helps to generate commission for Storables.com, at no extra cost. Learn more)
Introduction
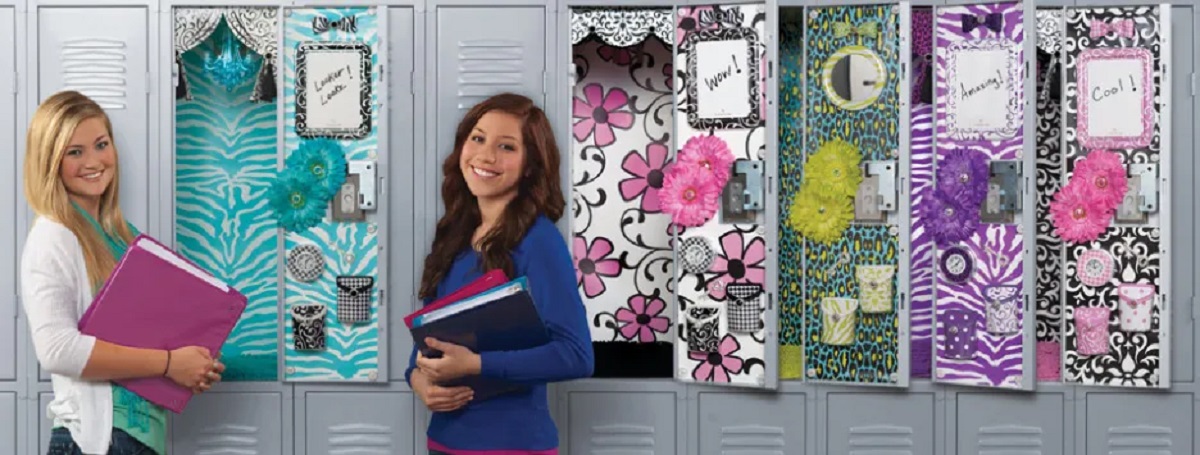
Decorating lockers is a fun and creative way to showcase your personality and make your school days more enjoyable. Whether you want to add a touch of style, organize your supplies, or create a space that reflects your interests, decorating your locker allows you to transform a mundane storage space into a personalized oasis.
In this article, we will guide you through the step-by-step process of how to decorate your locker. From choosing a theme to adding functional organizers, we will provide you with tips and ideas to make your locker stand out from the rest.
But before we dive into the decorating process, it’s important to note that different schools have different rules and regulations regarding locker decorations. Make sure to familiarize yourself with your school’s guidelines so you can stay within the permitted boundaries while still expressing your creativity.
Now, let’s get started on transforming your locker into a space that is uniquely yours!
Key Takeaways:
- Personalize your locker with a theme that reflects your interests, then add functional organizers, lighting, and personal touches to create a unique and organized space that brings joy to your school days.
- Keep your locker tidy and visually appealing by regularly cleaning, updating decorations, and respecting school rules. Let your creativity shine and make your locker a reflection of your unique style and personality.
Read more: How To Organize Locker
Step 1: Choosing a Theme
Choosing a theme for your locker decoration is an exciting first step. It sets the tone for the overall look and feel of your locker and helps you bring your personality to life. There are endless possibilities when it comes to themes, so consider what interests, hobbies, or aesthetics you want to incorporate.
One option is to choose a color scheme as your theme. Select two or three colors that go well together and use them as the foundation for your locker decor. You can find coordinating baskets, magnets, and accessories to match your chosen colors and create a cohesive look.
If you have a specific interest or hobby, consider basing your theme around that. For example, if you love music, you can create a music-themed locker by adding album covers, musical notes, and small instruments as decorations. If you’re a sports enthusiast, showcase your favorite team’s colors, jerseys, or sports memorabilia.
Another idea is to choose a seasonal or holiday theme. For fall, you can decorate with leaves, pumpkins, and warm earth tones. During the holiday season, incorporate festive ornaments, lights, and even a mini Christmas tree to bring some holiday cheer to your locker.
Don’t be afraid to think outside the box and get creative with your theme choice. You can go for a vintage-inspired look, a tropical paradise, or even a galaxy theme with starry decorations. The key is to choose something that resonates with you and makes you happy every time you open your locker.
Once you’ve settled on a theme, gather inspiration by browsing magazines, Pinterest, or Instagram. Look for images and ideas that align with your chosen theme and save them for reference later.
Remember, your theme doesn’t have to be set in stone. As your interests evolve or new trends emerge, feel free to update or change your locker theme to keep it fresh and exciting.
Now that you have chosen a theme, it’s time to move on to the next step: organizing your supplies.
Step 2: Organizing your Supplies
Keeping your locker organized is essential for both functionality and aesthetic appeal. Before you start decorating, take some time to declutter and organize your supplies.
Begin by emptying out your locker entirely. Sort through your items and determine what you want to keep and what can be discarded or stored elsewhere. Remove any unnecessary items, such as old papers, broken pens, or expired snacks.
Once you have cleared out the clutter, it’s time to bring in some organization tools. Consider investing in locker organizers, such as shelves, compartments, or hanging baskets. These can help keep your supplies neat and easy to access.
Categorize your supplies and assign designated spaces for each category. For example, use one compartment for textbooks and notebooks, another for stationery items like pens and pencils, and another for personal items like hand sanitizer or a small mirror.
Labeling containers or shelves can also be a helpful way to keep everything in its proper place. Use stickers or small labels to indicate what goes where, so you can quickly locate your items when needed.
Utilize the inside of your locker door as additional storage space. Hang a magnetic organizer or pocket file to store important papers, small gadgets, or even your daily schedule. This way, you can easily access these items without taking up valuable space inside the locker itself.
Keep in mind that maintaining an organized locker requires regular upkeep. Take a few minutes each week to declutter and reorganize if necessary. This will ensure that your locker remains tidy and functional throughout the school year.
Now that your supplies are neatly organized, let’s move on to the next step: preparing the locker surface.
Step 3: Preparing the Locker Surface
Before you start adding decorations to your locker, it’s important to prepare the surface so that everything sticks and stays in place. Follow these steps to ensure a smooth and durable surface for your decorations:
- Clean the surface: Start by wiping down the interior of your locker with a clean cloth or paper towel. Remove any dust, dirt, or sticky residue that may be present. A mild detergent solution can be used for tougher stains. Make sure to dry the surface thoroughly before moving on to the next step.
- Apply magnetic sheets or hooks: If your locker has a metal interior, consider adding magnetic sheets or hooks to increase the versatility of your decorations. These can be used to hang lightweight accessories, photos, or notes. Simply peel off the backing of the magnetic sheet or hook and press it firmly onto the desired spot inside your locker.
- Use adhesive putty or tape: For non-magnetic surfaces, adhesive putty or tape can be used to secure your decorations. Make sure to choose a high-quality putty or tape that won’t damage the locker surface when removed. Roll a small amount of putty into balls and press them onto the back of items you want to stick to the locker. Alternatively, cut small pieces of tape and apply them to the back of lightweight decorations.
- Consider using magnets or Velcro strips: Another option for attaching decorations is by using magnets or Velcro strips. Magnetic clips or holders can be used to display photos or artwork, while Velcro strips can be used to attach lightweight accessories like pencil holders or mirrors. Attach one side of the Velcro strip to the decoration and the other side to the locker surface.
Remember to test the adhesive strength of the putty, tape, magnets, or Velcro strips before attaching them to your locker. This will ensure that they hold up well and won’t cause any damage or fall off.
By properly preparing the locker surface, you can ensure that your decorations stay in place and create a visually appealing and personalized space. Now that you’ve prepared the surface, it’s time to move on to the next step: adding wallpaper or wrapping paper.
Step 4: Adding Wallpaper or Wrapping Paper
Adding wallpaper or wrapping paper to the interior of your locker can instantly transform its appearance and create a stylish and cohesive look. This step allows you to customize the background of your locker and serves as a great foundation for the rest of your decorations.
Here’s how you can add wallpaper or wrapping paper to your locker:
- Measure the dimensions: Measure the height and width of the interior walls of your locker, including the back wall and the sides. This will give you an idea of how much wallpaper or wrapping paper you’ll need. Make sure to account for any shelves, compartments, or hooks that may be present.
- Choose your design: Select a wallpaper or wrapping paper design that complements your chosen theme. Consider patterns, colors, and textures that reflect your personality and style. You can opt for bold and vibrant designs, subtle and minimalist patterns, or even textured papers for added visual interest.
- Cut to size: Using your measurements as a guide, cut the wallpaper or wrapping paper into strips or panels that fit the dimensions of your locker walls. It’s better to cut the pieces slightly larger than needed, as you can always trim them down to fit precisely.
- Attach the wallpaper or wrapping paper: Starting with the back wall of your locker, apply a small amount of adhesive putty or double-sided tape to the corners and edges of the paper. Carefully press the paper onto the wall, smoothing out any wrinkles or bubbles as you go. Continue applying the paper to the side walls, ensuring a seamless and secure attachment.
- Trim any excess: Once the wallpaper or wrapping paper is attached to all the walls, use a craft knife or scissors to trim any excess paper that extends beyond the edges of the locker. Be careful not to damage the locker or tear the paper while trimming.
Adding wallpaper or wrapping paper provides a vibrant backdrop for your locker decorations and helps tie everything together. It also acts as a protective barrier for the locker surface, preventing scratches or marks from daily use.
Remember, if you decide to change your locker’s theme in the future, the wallpaper or wrapping paper can easily be removed and replaced with a new design. Now that you’ve added the background to your locker, let’s move on to the next step: hanging decorative accessories.
Step 5: Hanging Decorative Accessories
Hanging decorative accessories is a great way to add personality and visual interest to your locker. From posters and banners to garlands and hanging organizers, these accessories will make your locker truly stand out. Here’s how you can hang them:
- Choose your accessories: Decide what type of decorative accessories you want to hang in your locker. This can include posters, inspirational quotes, photographs, or even mini plants. Select items that align with your chosen theme and reflect your interests.
- Consider magnetic options: If you have a metal interior, consider using magnetic accessories to hang your items. Magnetic clips, hooks, or strips can securely hold lightweight decorations without damaging the locker surface. Simply attach the magnets to the back of your accessories and place them on the desired spot inside the locker.
- Use adhesive hooks: For non-metal surfaces, adhesive hooks or removable hooks can be used to hang your accessories. These hooks have strong adhesive backings, allowing them to stick to the locker surface while still being removable without leaving behind any residue. Follow the instructions provided with the hooks for proper application and weight limits.
- String up garlands or banners: If you want to add a festive touch to your locker, consider hanging garlands or banners. Use string, twine, or adhesive hooks to suspend them from the top or sides of your locker. You can choose garlands with colorful pom-poms, paper cutouts, or even fairy lights for a magical touch.
- Arrange and layer: As you hang your accessories, consider arranging them in an aesthetically pleasing way. Layer different items, such as posters, photographs, and quotes, to create depth and dimension. Experiment with different placements until you achieve a visually pleasing arrangement.
When hanging your decorative accessories, be mindful not to overcrowd your locker. Leave some space between the items to maintain a clean and organized look. Consider the weight of each item and choose appropriate hanging methods to ensure that they stay securely in place.
Remember, the goal is to create a personalized and visually appealing locker that showcases your unique style. Have fun with the process and let your creativity shine through. Now that you’ve hung your decorative accessories, it’s time to move on to the next step: personalizing with photos and magnets.
Step 6: Personalizing with Photos and Magnets
One of the most popular ways to add a personal touch to your locker is by incorporating photos and magnets. These items can bring cherished memories to your locker and make it feel like a space that truly belongs to you. Here’s how you can personalize your locker with photos and magnets:
- Select your favorite photos: Gather your favorite photos that you’d like to display in your locker. These can be pictures of your friends, family, pets, or memorable moments. Choose photos that make you smile and reflect positive memories.
- Print and trim your photos: Print the selected photos in the desired sizes. You can do this at home or at a local print shop. Trim the photos to fit the space you have available in your locker.
- Use magnets to display photos: Attach small magnets to the back of each photo using adhesive putty, double-sided tape, or magnetic sheets. This will allow you to stick the photos to the interior walls of your locker. Arrange them in a visually pleasing way, creating a gallery wall effect.
- Add photo collages or grids: If you have multiple small photos, creating a collage or grid can be a great way to showcase them. Use adhesive putty or tape to arrange and stick the photos together in a unified display. This will save space and add visual interest to your locker.
- Layer with magnets and magnets: Personalize your locker even further by adding magnets that reflect your interests. Look for magnets with quotes, symbols, or images that align with your theme or passions. These magnets can be placed around your photos, adding pops of color and personality to your locker.
- Consider a magnetic whiteboard: If you want a space to write down reminders or leave messages, consider adding a magnetic whiteboard to your locker. This will allow you to personalize it with hand-written notes, quotes, or doodles. Attach the whiteboard using strong magnets or adhesive hooks.
Personalizing your locker with photos and magnets adds a sentimental touch to your space and helps create a sense of belonging. Every time you open your locker, you’ll be greeted by familiar faces and fond memories.
Remember, be mindful of the weight of the photos and magnets to ensure that they are securely attached and won’t fall off. Now that you’ve added your personal touch with photos and magnets, let’s move on to the next step: adding functional organizers.
Step 7: Adding Functional Organizers
Adding functional organizers to your locker is key to keeping it tidy and efficient. These organizers will help you maximize the space available and ensure that your belongings are easily accessible. Here’s how you can incorporate functional organizers into your locker:
- Assess your needs: Take a look at the items you keep in your locker and determine what type of organizers would be most useful. Consider whether you need compartments for books and notebooks, holders for pens and pencils, or even a basket for miscellaneous items.
- Choose the right organizers: Invest in locker-specific organizers that can be easily attached to the walls or doors of your locker. Some popular options include locker shelves, pencil holders, magnetic storage cups, and hanging baskets. Measure your locker’s dimensions beforehand to ensure a proper fit.
- Install the organizers: Follow the manufacturer’s instructions to install the organizers securely in your locker. Use adhesive strips, hooks, or magnets to attach the organizers to the walls or doors. Make sure they are properly anchored and won’t shift or fall when you open and close the locker.
- Categorize and arrange: Once the organizers are installed, categorize your belongings and place them in their designated spaces. Use the shelves for textbooks and notebooks, the pencil holders for writing utensils, and the baskets for smaller items like hand sanitizer or calculators. Make sure to arrange everything in a neat and organized manner.
- Utilize vertical space: If your locker has limited width, make use of vertical space by hanging organizers or bins from the inside of the locker door. This will allow you to free up shelf or floor space and keep small items easily accessible.
- Maintain and declutter: Regularly assess the contents of your locker and declutter any items that are no longer needed. This will help you maintain an organized and functional space. Consider rearranging the organizers as your needs change throughout the school year.
Adding functional organizers to your locker not only helps keep your belongings in order but also saves you time and stress when retrieving items throughout the day. By utilizing the available space efficiently, you can create a well-organized and clutter-free locker environment.
Now that you’ve added functional organizers to your locker, let’s move on to the next step: incorporating lighting.
Step 8: Incorporating Lighting
Incorporating lighting into your locker adds a touch of warmth, ambiance, and functionality to your space. Good lighting not only improves visibility but also enhances the overall aesthetic of your locker. Here’s how you can incorporate lighting into your locker:
- Assess your lighting needs: Consider how much lighting you need and what purpose it will serve. Do you simply want to brighten up your locker, or do you need focused lighting for specific tasks like reading or organizing? Assess your needs to determine the type and amount of lighting that will work best for you.
- Choose the right lighting option: There are various lighting options available for lockers, depending on your preferences and the layout of your locker. LED strip lights, battery-operated touch lights, or magnetic LED puck lights are some popular choices. Select a lighting option that is easy to install, low maintenance, and provides adequate brightness.
- Install the lighting: Follow the instructions provided with your chosen lighting option to install it securely in your locker. LED strip lights can be easily attached to the walls or shelves using adhesive backing. Battery-operated touch lights can be placed on the sides or top of your locker. Magnetic LED puck lights can be attached to the metal interior.
- Position the lighting strategically: Consider the placement of your lighting to ensure even distribution throughout your locker. You may want to position lights at the top to illuminate the entire space or place them strategically near shelves or organizers to provide focused lighting for specific areas.
- Test and adjust: Once the lighting is installed, test it to ensure it functions properly. Make any necessary adjustments to the positioning or angle of the lights to achieve your desired level of brightness and ambiance.
- Consider additional lighting features: If you want to add extra flair to your locker, consider lights with different color options or settings. Some LED strip lights come with remote controls that allow you to adjust the color and brightness according to your mood or theme.
Incorporating lighting in your locker not only adds a visually appealing element but also serves a functional purpose. It can make it easier to find items, read textbooks, or simply bring a cozy atmosphere to your space.
Remember to consider the safety aspect of the lighting option you choose. Ensure that any electrical components are properly installed and do not pose a fire hazard. Additionally, be mindful of your school’s policies regarding locker decorations and lighting.
Now that you have incorporated lighting into your locker, let’s move on to the next step: creating a mirror or whiteboard.
Use adhesive wallpaper or contact paper to add color and pattern to the inside of your locker. You can also use magnetic organizers and hooks to keep your items tidy and easily accessible.
Read also: 14 Best Storage Locker For 2025
Step 9: Creating a Mirror or Whiteboard
Creating a mirror or whiteboard in your locker can serve both practical and aesthetic purposes. A mirror allows you to quickly check your appearance before classes or activities, while a whiteboard provides a space for notes, reminders, and creative expression. Here’s how you can create a mirror or whiteboard in your locker:
- Decide on the type: Determine whether you want to add a mirror, a whiteboard, or both to your locker. Consider your needs and preferences, as well as the available space.
- Choose the size and shape: Select a mirror or whiteboard that fits the dimensions of your locker and complements its overall aesthetic. Mirrors can come in various shapes and sizes, while whiteboards can be customized to your desired dimensions.
- Attach the mirror or whiteboard: Use strong adhesive putty or hooks to securely attach the mirror or whiteboard to the interior of your locker. Make sure it is properly anchored and won’t shift or fall when you open and close the locker.
- Add decorative elements: Personalize the mirror or whiteboard by adding decorative elements around its edges. Use adhesive gems, washi tape, or colorful markers to create a frame or border that matches your locker’s theme.
- Mirror tips: If you opt for a mirror, consider placing it at eye level for convenient use. Ensure that it is securely attached to avoid any accidents or damage. Regularly clean the mirror to keep it clear and smudge-free.
- Whiteboard tips: If you choose a whiteboard, use wipe-off markers to write notes, reminders, or inspirational quotes. You can also use sticky notes or magnetic clips to attach important papers or to-do lists to the whiteboard. Remember to regularly erase and update the content to keep it relevant.
Having a mirror or whiteboard in your locker adds functionality and allows for quick organization and personalization. It’s also a great way to express your creativity and stay organized throughout the school year.
When placing a mirror or whiteboard in your locker, ensure that it doesn’t obstruct the use of other organizers or the accessibility of your belongings. Remember to be mindful of any school policies regarding the use of mirrors or whiteboards in lockers.
Now that you’ve created a mirror or whiteboard, let’s move on to the final step: adding final touches and maintenance tips for your beautifully decorated locker.
Step 10: Final Touches and Maintenance Tips
Now that you’ve decorated and organized your locker, it’s time to add those final touches and learn how to maintain your newly transformed space. These finishing touches will ensure that your locker remains visually appealing and functional throughout the school year. Here are some final touches and maintenance tips:
1. Add personal mementos:
Consider adding a small trinket or sentimental item that holds meaning to you. It could be a keychain, a small figurine, or a special token. These personal mementos add a unique touch and remind you of something or someone dear to you every time you open your locker.
2. Regularly clean and declutter:
Take a few minutes each week to clean and declutter your locker. Wipe down the surfaces, remove any unnecessary items, and reorganize if necessary. This will help maintain a tidy and organized space, making it easier for you to find what you need and preventing the accumulation of unnecessary clutter.
3. Refresh your decorations:
As the seasons change or your interests evolve, consider updating your decorations to keep your locker feeling fresh and exciting. Swap out posters, add new photos, or incorporate seasonal accents to reflect the current time of year or your current passions.
4. Be mindful of school rules:
Remember to adhere to your school’s guidelines and policies regarding locker decorations. Make sure your decorations and organization tools are within the permitted boundaries and follow any restrictions on size, content, or adhesive materials used.
5. Respect shared spaces:
If you share your locker with someone else, be respectful of their belongings and preferences. Keep your items organized and contained within your designated areas to ensure a harmonious and hassle-free sharing arrangement.
6. Seek inspiration:
Continue to seek inspiration for locker decoration ideas. Browse online platforms, such as social media, for creative and innovative ways to express your style and make your locker unique. Don’t be afraid to think outside the box and incorporate your own personal flair.
By adding these final touches and following these maintenance tips, your locker will not only be visually appealing but also functional and organized. It will be a space that reflects your personality and brings a little joy to your school days.
Now that you’ve completed all the steps and added those final touches, step back and admire your beautifully decorated locker. Enjoy the creativity and personalization that went into making it truly your own!
Should you ever want to change up your locker’s look in the future, simply revisit these steps and get ready to embark on another fun decorating adventure.
Read also: 14 Best Smart Lock For Locker For 2025
Conclusion
Decorating your locker is a fantastic way to add a personal touch, express your creativity, and make your school days a little more enjoyable. By following the ten steps outlined in this guide, you can transform your locker into a unique and organized space that reflects your personality and interests.
We started by choosing a theme that resonates with you, whether it’s based on colors, interests, or seasons. Then, we moved on to organizing your supplies, ensuring that everything has a designated place and is easily accessible. Preparing the locker surface was the next step, ensuring a clean and adhesive-friendly surface for your decorations.
Adding wallpaper or wrapping paper serves as the background for your locker, setting the tone for the overall aesthetic. Hanging decorative accessories, such as posters, garlands, and magnets, adds visual interest and personality to your locker. Personalizing with photos and magnets brings sentimental value and cherished memories to your locker space.
Functional organizers help you stay organized and maximize the available space in your locker. Incorporating lighting not only improves visibility but also creates ambiance and adds a cozy feel to your locker. Creating a mirror or whiteboard adds practicality and allows you to check your appearance or jot down important notes and reminders.
Adding the final touches and following maintenance tips keep your locker looking fresh and tidy. Regular cleaning and decluttering, respecting school rules, and refreshing your decorations as needed are essential to maintaining your beautifully decorated locker.
Remember, your locker is an extension of yourself and a space where you can express your individuality. Have fun with the process, experiment with different ideas, and let your creativity shine.
Now, armed with these steps and tips, it’s time to embark on your locker decoration journey. Take pride in creating a unique and inviting space that reflects your style and makes you excited to open your locker each day. Enjoy the process and make your locker a reflection of who you are!
Frequently Asked Questions about How To Decorate Lockers
Was this page helpful?
At Storables.com, we guarantee accurate and reliable information. Our content, validated by Expert Board Contributors, is crafted following stringent Editorial Policies. We're committed to providing you with well-researched, expert-backed insights for all your informational needs.

0 thoughts on “How To Decorate Lockers”