Articles
Why Is My Window AC Freezing Up
Modified: October 28, 2024
Learn why your window AC unit is freezing up and discover helpful articles to troubleshoot and fix the issue.
(Many of the links in this article redirect to a specific reviewed product. Your purchase of these products through affiliate links helps to generate commission for Storables.com, at no extra cost. Learn more)
Introduction
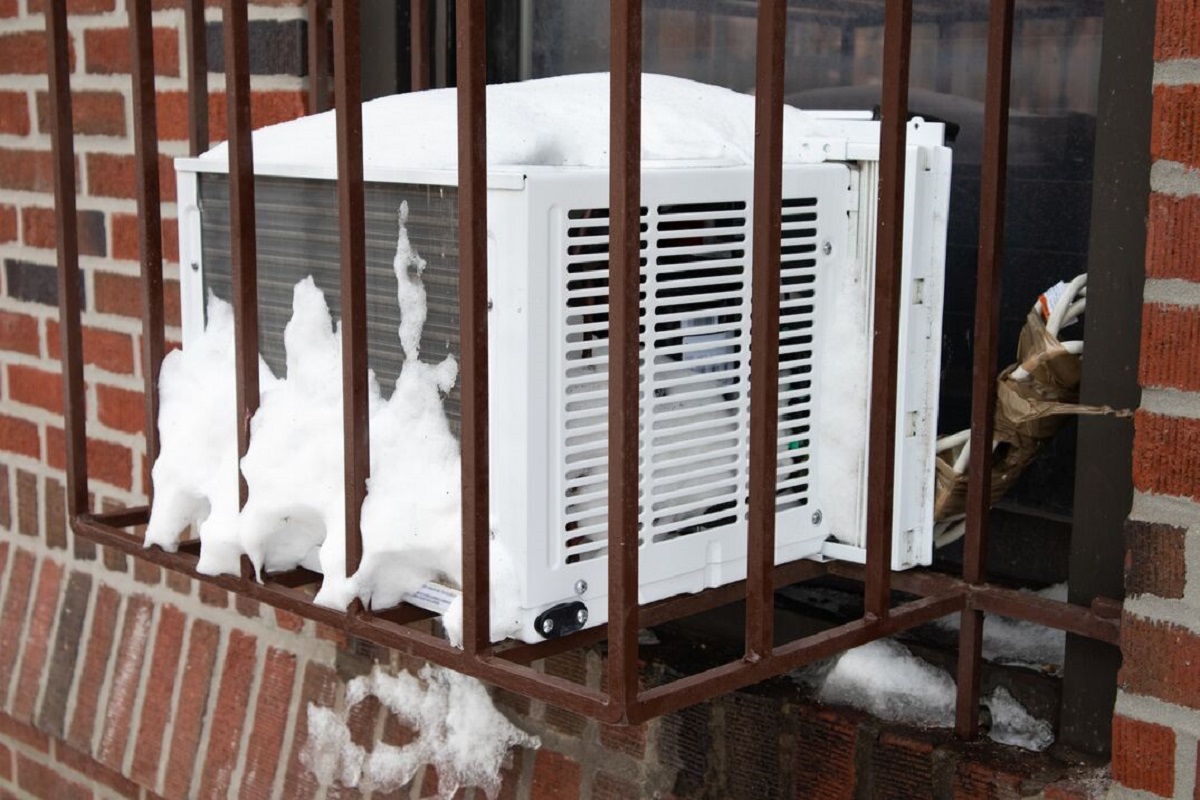
Window air conditioning units are a popular choice for cooling small spaces such as bedrooms, offices, or apartments. However, if you’ve ever experienced the frustrating issue of your window AC freezing up, you’re not alone. This phenomenon occurs when ice forms on the evaporator coils of your AC unit, hampering its cooling ability and causing it to work inefficiently.
In this article, we will delve into the causes behind a window AC freezing up and explore troubleshooting tips to help you resolve the issue. Understanding why your AC unit is freezing up can save you time, money, and the inconvenience of living without proper cooling.
Before we delve into the specifics, let’s take a brief overview of window AC units. These compact cooling devices consist of three major components: the evaporator coil, the condenser coil, and the compressor. The evaporator coil is responsible for cooling the air, while the condenser coil releases the heat extracted from the indoor air to the outside.
Now that we have a basic understanding of how window AC units work, let’s explore the various reasons why your AC might be freezing up.
Key Takeaways:
- Regularly cleaning or replacing the air filter is crucial to prevent a window AC unit from freezing up, ensuring proper airflow and efficient cooling performance.
- Professional maintenance, including checking for blockages, adjusting thermostat settings, and monitoring refrigerant levels, is essential to prevent a window AC unit from freezing up and ensure reliable cooling.
Read more: Why Is My AC Freezing Over
Understanding Window AC Units
Before we dive into the causes of a window AC freezing up, let’s take a closer look at how these units operate. Understanding the inner workings of your AC can help you identify and troubleshoot potential issues more effectively.
Window air conditioning units are designed to cool a single room or small space. They consist of a refrigeration system that circulates refrigerant, a fan that blows air across the evaporator coil, and a compressor that compresses and circulates the refrigerant.
The cooling process begins when warm air from the room is drawn into the unit through the intake grille. The air passes over the evaporator coil, which contains a cold refrigerant. As the warm air comes into contact with the cold coil, heat is transferred, cooling the air. The cooled air is then blown back into the room, while the heat extracted from the air is released through the condenser coil to the outside.
During this cooling process, condensation occurs on the evaporator coil, as the warm, humid air from the room comes into contact with the cold surface. Normally, this moisture is drained away through the condensate drain. However, when certain issues arise, the condensation can freeze on the evaporator coil, leading to a frozen AC unit.
Now that we have a better understanding of how window AC units work, let’s explore the common causes of a frozen AC unit and how to troubleshoot them effectively.
Causes of Freezing Up
A window AC unit freezing up can be attributed to a combination of factors that hinder the proper functioning of the cooling system. Let’s take a closer look at some of the common causes:
1. Insufficient Airflow:
Restricted airflow is one of the primary culprits behind a frozen AC unit. When the airflow is limited, the refrigerant in the evaporator coil does not receive enough warm air to evaporate properly, causing the coil temperature to drop below freezing point. Poor airflow can be caused by a blocked air filter, closed or obstructed vents, or a faulty blower fan.
2. Dirty Air Filter:
A dirty air filter can significantly impact the airflow and cooling efficiency of your AC unit. A clogged filter restricts the airflow, causing the evaporator coil to become excessively cold, leading to ice formation. Regularly cleaning or replacing the air filter is essential to maintain proper airflow and prevent freezing.
Read more: Why Does My Window Air Conditioner Freeze Up
3. Low Refrigerant Levels:
Refrigerant is the lifeblood of your AC unit, responsible for absorbing heat from the air. If your AC is low on refrigerant due to a leak or improper installation, the evaporator coil may freeze up. It’s important to have a professional HVAC technician check and recharge the refrigerant levels to avoid freezing and ensure optimal cooling performance.
4. Blocked Condensate Drain:
The condensate drain removes the excess moisture from the cooling process. If the drain becomes blocked or clogged with debris, the condensation cannot drain properly, causing it to freeze on the evaporator coil. Regularly inspect and clean the condensate drain to prevent freezing and water leakage.
5. Faulty Thermostat:
A malfunctioning thermostat can cause your AC unit to run continuously, causing the evaporator coil to become too cold and freeze up. Ensure that your thermostat is functioning correctly and set to the desired temperature.
6. Operating at Low Temperatures:
Window AC units are not designed to operate in extremely cold temperatures. If you run your AC when the ambient temperature is below 60°F (15°C), the evaporator coil can drop below freezing, leading to ice formation. Avoid using your AC in excessively cold conditions to prevent freezing.
Now that we understand the common causes of a frozen AC unit, let’s explore some troubleshooting tips to help resolve the issue.
Read more: Why Does an AC Unit Freeze Up
Insufficient Airflow
One of the primary causes of a window AC unit freezing up is insufficient airflow. When there is limited airflow over the evaporator coil, the coil becomes too cold and ice forms on its surface. Let’s delve into the various factors that can contribute to insufficient airflow and how to address them:
Blocked Air Filter:
A dirty or clogged air filter can significantly impede the flow of air through your AC unit. The filter accumulates dust, dirt, and debris over time, restricting the amount of air that passes through it. As a result, the evaporator coil doesn’t receive enough warm air to properly evaporate the refrigerant, causing it to freeze up. To address this issue, regularly inspect and clean the air filter. If the filter is excessively dirty or damaged, consider replacing it with a new one.
Restricted Vents:
Another factor that can contribute to insufficient airflow is closed or obstructed vents. Ensure that all the vents in the room where the AC is installed are open and unobstructed. Move furniture or other objects away from the vents to allow for proper airflow. If the vents are adjustable, ensure they are set to the correct position to ensure adequate air circulation.
Faulty Blower Fan:
A malfunctioning blower fan can also restrict airflow over the evaporator coil. The fan is responsible for drawing air into the AC unit and blowing it across the coil for cooling. If the fan is not functioning properly, it may not generate enough airflow to prevent the coil from freezing up. If you suspect a problem with the blower fan, it’s best to consult a professional HVAC technician for inspection and repair.
Read more: Why Does My Window AC Leak Water
Improper Installation:
In some cases, an improperly installed window AC unit can lead to restricted airflow. Incorrect placement of the unit or improper sealing around the window can cause air leaks, reducing the effectiveness of the cooling system. If you suspect an installation issue, consult the manufacturer’s instructions or seek assistance from a professional installer to ensure proper airflow.
By addressing issues of insufficient airflow, you can help prevent your window AC unit from freezing up. Regularly clean or replace the air filter, ensure vents are open and unobstructed, and have a professional inspect the blower fan and installation if needed. These steps will improve the airflow and allow your AC unit to operate more efficiently, reducing the risk of freezing and improving cooling performance.
Dirty Air Filter
One of the most common causes of a window AC unit freezing up is a dirty air filter. The air filter plays a crucial role in maintaining the airflow and overall performance of the cooling system. When the filter becomes clogged with dust, dirt, and debris, it obstructs the flow of air, leading to several issues, including a frozen AC unit. Let’s take a closer look at why a dirty air filter can cause freezing and how to address this problem:
Restricted Airflow:
A clogged air filter restricts the amount of air that can pass through the unit. As a result, the evaporator coil does not receive adequate airflow to evaporate the refrigerant properly. This lack of warm air causes the temperature of the coil to drop below freezing point, resulting in ice formation. The ice buildup obstructs the airflow even further and can eventually lead to the complete freezing of the AC unit.
Increased Energy Consumption:
When the airflow is restricted due to a dirty air filter, the AC unit has to work harder to circulate air and maintain the desired temperature. This excessive strain on the system can lead to increased energy consumption. Moreover, a frozen AC unit is less efficient in cooling the room, resulting in longer running times and higher energy bills.
Read more: Why Is My Window AC Not Blowing Cold Air
Reduced Cooling Capacity:
A dirty air filter hampers the cooling capacity of the AC unit. With limited airflow, the unit cannot effectively cool the air passing through it. This reduces the overall cooling efficiency of the system and can leave the room feeling warm and uncomfortable.
How to Address a Dirty Air Filter:
The simplest and most effective solution to prevent freezing due to a dirty air filter is to clean or replace the filter regularly. Here are the steps to follow:
- Refer to the manufacturer’s instructions to locate the air filter in your window AC unit.
- Remove the filter from the unit. It is typically located behind a removable panel or grille.
- If the filter is reusable, gently clean it by vacuuming or rinsing it with water. Allow the filter to dry completely before reinstalling it.
- If the filter is disposable, discard it and replace it with a new one of the appropriate size and type. Make sure to choose a filter that matches the specifications recommended by the manufacturer.
- Once the filter is clean or replaced, reinsert it into the unit and secure the panel or grille.
In addition to regular maintenance, it is advisable to check the air filter every month and clean or replace it as needed. This will ensure proper airflow, improve cooling performance, and minimize the risk of your window AC unit freezing up.
Low Refrigerant Levels
Low refrigerant levels can be another culprit behind a window AC unit freezing up. Refrigerant is the substance responsible for absorbing heat from the indoor air, cooling it down, and releasing it outside. When the refrigerant level is low, the evaporator coil does not receive enough heat to properly evaporate the refrigerant, causing the coil to become excessively cold and freeze. Let’s explore the causes of low refrigerant levels and how to address this issue:
Refrigerant Leak:
A refrigerant leak is a common cause of low refrigerant levels. Over time, the AC unit’s refrigerant lines and connections can develop leaks due to corrosion, wear and tear, or poor installation. These leaks gradually deplete the refrigerant, leading to a decrease in cooling efficiency and the potential for a frozen AC unit. If you suspect a refrigerant leak, it is crucial to have a professional HVAC technician identify and repair the leak before recharging the refrigerant.
Read more: Why Does My Window AC Leak Water
Improper Installation:
In some cases, low refrigerant levels can be attributed to improper installation. If the AC unit was not installed correctly, it may not have been charged with the appropriate amount of refrigerant initially. This can result in inadequate refrigerant levels from the start, causing the evaporator coil to freeze up. Proper installation by a qualified professional is essential to ensure the correct amount of refrigerant is charged into the system.
Addressing Low Refrigerant Levels:
If you suspect low refrigerant levels in your window AC unit, it’s best to consult a professional HVAC technician to diagnose and address the issue. Here are the general steps they may take:
- The technician will conduct a thorough inspection of the AC unit, checking for any visible signs of refrigerant leaks.
- If a leak is detected, the technician will repair the leak by replacing faulty components or sealing the leaking areas.
- Once the leak is repaired, the technician will recharge the refrigerant to the appropriate level, ensuring optimal cooling performance.
- It’s important to note that adding refrigerant without fixing the underlying leak is only a temporary solution and will result in the refrigerant levels depleting again. Therefore, it is crucial to address the leak to prevent future freezing and maintain efficient cooling.
Keep in mind that handling refrigerant requires specialized knowledge and equipment. It’s always recommended to rely on a qualified HVAC technician to handle refrigerant-related issues in your window AC unit safely and effectively.
Blocked Condensate Drain
A blocked condensate drain can contribute to a window AC unit freezing up. During the cooling process, the evaporator coil produces condensation as it cools the warm air from the room. The condensate is meant to flow through a drain pipe or hose and be properly disposed of outside or into a designated drain. However, if the condensate drain becomes blocked or clogged, the condensation cannot drain and may freeze on the evaporator coil, leading to a frozen AC unit. Let’s explore the causes of a blocked condensate drain and how to address this issue:
Debris and Algae Buildup:
Over time, debris such as dust, dirt, and even small insects can accumulate in the condensate drain. Additionally, algae and mold growth can occur in the presence of moisture. This accumulation of debris, algae, or mold can obstruct the drain, preventing proper drainage and causing water to back up and freeze on the evaporator coil.
Read more: Why Is My Refrigerator Freezing My Food
How to Unblock a Condensate Drain:
If you suspect a blocked condensate drain in your window AC unit, here are some steps to address the issue:
- Locate the condensate drain pipe or hose. It is typically situated at the back or bottom of the unit.
- Inspect the drain for any visible signs of blockage, such as debris or algae buildup.
- If you can see the blockage, carefully remove the debris using a small brush or a pipe cleaner. Be cautious not to damage the drainpipe or hose.
- If the blockage is not visible or cannot be easily removed, you may need to use a wet/dry vacuum or contact a professional HVAC technician to clear the drain more effectively.
- Once the blockage is cleared, pour a mixture of bleach and water (approximately 1:10 ratio) into the drain to disinfect and prevent future algae or mold growth. Alternatively, you can use commercially available condensate drain cleaners.
Regular maintenance is key to preventing future condensate drain blockages. Here are some preventive measures you can take:
- Inspect the condensate drain monthly for any signs of blockage.
- Clean the drain regularly by flushing it with warm water or a mixture of vinegar and water.
- Install a condensate drain line treatment tablet or strip to prevent algae and mold growth.
By addressing and preventing condensate drain blockages, you can ensure proper drainage of condensate and prevent the risk of your window AC unit freezing up.
Faulty Thermostat
A faulty thermostat can be a contributing factor to a window AC unit freezing up. The thermostat is responsible for sensing the temperature in the room and signaling the AC unit to turn on or off to maintain the desired temperature. If the thermostat malfunctions and does not accurately detect the room temperature, it can lead to the AC unit running continuously, causing the evaporator coil to become too cold and freeze. Let’s explore the signs of a faulty thermostat and how to address this issue:
Signs of a Faulty Thermostat:
- The AC unit constantly runs, even when the desired temperature is reached.
- The temperature displayed on the thermostat does not match the actual room temperature.
- The AC unit fails to cycle on or off in response to temperature changes.
- The thermostat buttons or controls are unresponsive or malfunctioning.
How to Address a Faulty Thermostat:
If you suspect a faulty thermostat as the cause of your window AC unit freezing up, here are some steps to address the issue:
- Check the thermostat settings: Ensure that the thermostat is set to the correct temperature range and cooling mode. In some cases, incorrect settings may cause the AC unit to run continuously and lead to freezing. Adjust the settings if needed.
- Replace the batteries: If your thermostat uses batteries, try replacing them with fresh ones. Weak or dead batteries can cause malfunctions in the thermostat’s operation.
- Calibrate the thermostat: Some thermostats may require calibration to ensure accurate temperature readings. Consult the manufacturer’s instructions or contact a professional for assistance with calibrating the thermostat.
- Clean the thermostat: Dust and debris on the thermostat’s sensors can interfere with its functionality. Gently clean the thermostat with a soft cloth or brush to remove any dirt that may be affecting its performance.
- Consider professional assistance: If the above steps do not resolve the issue, it’s best to consult a professional HVAC technician. They can diagnose the problem, determine if a thermostat replacement is necessary, and ensure proper installation and configuration.
Having a properly functioning thermostat is crucial for maintaining the ideal temperature and preventing your window AC unit from freezing up. By troubleshooting and addressing any issues with the thermostat, you can ensure efficient and reliable cooling performance.
Read more: Why Air Conditioning Unit Freezes Up
Operating at Low Temperatures
Operating a window AC unit at low temperatures can contribute to the unit freezing up. These air conditioners are designed to function optimally within a specific temperature range, typically above 60°F (15°C). When the ambient temperature drops below this range, the evaporator coil can become excessively cold, causing moisture to freeze on the coil and leading to a frozen AC unit. Let’s explore the reasons behind this issue and how to address it:
Limited Heat Exchange:
Window AC units rely on the exchange of heat between the indoor and outdoor environments to cool the air. When the outdoor temperature is cold, there is a limited amount of heat available to be extracted from the indoor air. As a result, the evaporator coil may become too cold, causing the moisture on the coil to freeze.
Insufficient Load:
Window AC units are designed to work efficiently under normal load conditions. When the temperature drops, the cooling load decreases, meaning that less cooling is required to maintain the desired temperature. As a result, the AC unit’s compressor may run for shorter cycles or remain off for extended periods, causing the evaporator coil to become excessively cold and freeze.
Preventing Freezing at Low Temperatures:
To prevent your window AC unit from freezing up when operating at low temperatures, consider the following tips:
- Avoid running the AC unit when the outdoor temperature is below 60°F (15°C). Instead, rely on alternative heating methods during cold weather.
- If you must use the AC unit at low temperatures, set the thermostat to a higher temperature to reduce the cooling load and prevent the evaporator coil from becoming too cold.
- Consider using a window insulator kit or weatherstripping around the unit to minimize cold air infiltration from outside and help maintain a stable indoor temperature.
- Regularly inspect and clean the unit’s coils, fins, and filters to ensure efficient airflow and improve overall performance.
- If you live in an area with consistently low temperatures, it may be worth considering a heating and cooling system that is better suited to handle cold weather conditions.
Remember that window AC units are primarily designed for cooling purposes and may not perform optimally in extreme cold temperatures. It’s essential to follow the manufacturer’s guidelines and avoid using the unit outside of its recommended temperature range to prevent freezing and potential damage.
Read more: Why Do My Car Windows Fog Up In Winter
Troubleshooting Tips
If your window AC unit is freezing up, there are several troubleshooting tips you can try to resolve the issue before seeking professional assistance. By following these steps, you may be able to identify and address the underlying cause of the freezing. Here are some helpful troubleshooting tips to consider:
Cleaning the Air Filter:
Start by inspecting and cleaning the air filter. A dirty or clogged filter restricts airflow, leading to a frozen evaporator coil. Remove the filter and clean it according to the manufacturer’s instructions. If the filter is damaged or excessively dirty, consider replacing it with a new one. Regularly cleaning or replacing the air filter can help maintain proper airflow and prevent freezing.
Checking for Blockages in the AC Unit:
Inspect the AC unit for any blockages that may be obstructing airflow. Ensure that vents and air ducts are unobstructed, and there are no objects or debris near the unit. Clear away any potential blockages to allow for proper airflow. Additionally, check the condenser coil and evaporator coil for any dirt or debris buildup. Clean the coils gently using a soft brush or cloth to improve heat exchange and airflow.
Recharging Refrigerant Levels:
If you suspect low refrigerant levels as the cause of the freezing, it is best to have a professional HVAC technician inspect and recharge the refrigerant. They can identify any leaks and ensure the system is properly charged with the correct amount of refrigerant. Adding refrigerant without addressing the underlying issue will only provide a temporary solution and may lead to further problems.
Unclogging the Condensate Drain:
If you suspect a blocked condensate drain, inspect the drain pipe or hose for any visible blockages. Remove any debris that may be obstructing the drain using a small brush or pipe cleaner. If the blockage is not visible or cannot be easily removed, consider using a wet/dry vacuum or contacting a professional technician for assistance. Keeping the condensate drain clear will ensure proper drainage and prevent freezing.
Adjusting the Thermostat Settings:
Check the thermostat settings to ensure they are correctly configured. Confirm that the desired temperature is set within the appropriate range and cooling mode is selected. If necessary, adjust the settings to a higher temperature to prevent the AC unit from running excessively and causing the evaporator coil to freeze.
It’s important to remember that these troubleshooting tips are general suggestions and may not address all potential causes of a frozen AC unit. If the issue persists or if you’re unsure about how to proceed, it’s recommended to consult a professional HVAC technician. They have the expertise to diagnose the specific problem and provide appropriate solutions to restore your window AC unit to optimal performance.
Cleaning the Air Filter
One of the essential troubleshooting steps to address a frozen window AC unit is to clean the air filter. A dirty or clogged air filter restricts airflow, impedes proper cooling, and can contribute to the freezing of the evaporator coil. Regularly cleaning the air filter is a simple and effective maintenance task that can help prevent freezing and optimize the performance of your AC unit. Here’s a step-by-step guide on how to clean the air filter:
1. Locate the Air Filter:
Refer to the manufacturer’s instructions or the user manual to locate the air filter in your window AC unit. Generally, the filter is located behind a removable panel or grille on the front of the unit or on the side.
2. Remove the Air Filter:
Once you have located the air filter, carefully remove it from the unit. Some filters may slide out easily, while others may have tabs or clips to secure them in place.
3. Inspect the Air Filter:
Take a close look at the air filter to assess its condition. Check for any visible dirt, dust, or debris accumulation. A clogged or dirty filter appears grayish or discolored and may have visible particles trapped in the filter material.
4. Clean the Air Filter:
If the filter is reusable, gently clean it to remove the accumulated dirt and debris. Here are several cleaning methods you can use:
- Vacuuming: Use a vacuum cleaner with a brush attachment to gently remove the dust and debris from both sides of the filter. Make sure to vacuum in the direction of the filter’s pleats.
- Rinsing with Water: If the filter is washable, rinse it under running water. Use a gentle stream of water to avoid damaging the filter. Gently rub the filter with your fingers to loosen stubborn dirt. Avoid using hot water, as it may cause the filter to warp or lose its shape.
5. Dry the Air Filter:
After cleaning the air filter, allow it to dry completely before reinserting it into the AC unit. Place the filter on a clean, dry surface or use a cloth to pat it dry. Do not rush the drying process by using a hairdryer or direct heat, as excessive heat can damage the filter material.
Read more: Why Isn’t My Freezer Freezing
6. Reinstall the Air Filter:
Once the air filter is fully dry, carefully reinsert it back into the unit. Ensure that it is aligned correctly and securely in its designated place. Follow the manufacturer’s instructions for proper installation.
7. Regular Maintenance:
Cleaning the air filter should be part of your regular maintenance routine. Depending on factors such as the environment, usage, and the manufacturer’s recommendations, clean the filter every two to four weeks. It is also advisable to replace the air filter periodically, especially if it is non-washable or damaged.
By regularly cleaning the air filter, you can prevent the buildup of dirt and debris, maintain proper airflow, and decrease the likelihood of your window AC unit freezing up. Clean air filters not only enhance the cooling performance but also contribute to better indoor air quality by filtering out dust, pollen, and other airborne particles.
Checking for Blockages in the AC Unit
Another important troubleshooting step to address a frozen window AC unit is to check for blockages that may be obstructing airflow. Restricted airflow can prevent proper cooling and contribute to the freezing of the evaporator coil. By inspecting the AC unit for potential blockages, you can identify and remove any obstacles that may hinder the performance of your AC unit. Here is a step-by-step guide on how to check for blockages in your AC unit:
1. Turn off the AC Unit:
Before inspecting the AC unit, ensure it is turned off and unplugged from the power source. This will prevent any potential hazards and allow you to work safely.
Read more: Why Are My Air Conditioning Pipes Freezing
2. Examine the Exterior:
Start by visually inspecting the external components of the AC unit for any visible blockages. Clear away any debris, leaves, or dirt that may have accumulated on or around the unit. Ensure that there are no objects obstructing the airflow, such as furniture or plants.
3. Inspect the Vents and Air Ducts:
Check the vents and air ducts both inside and outside the AC unit. Ensure that they are free from any signs of blockage, such as dust, dirt, or debris. Use a flashlight to shine inside the vents and ducts to get a clear view.
4. Clean the Condenser and Evaporator Coils:
Remove any dirt, dust, or debris that may have accumulated on the condenser coils located on the outside of the unit. Use a soft brush or cloth to gently clean the coils and improve their heat exchange efficiency. Similarly, clean the evaporator coils located inside the AC unit to ensure optimal airflow and heat transfer.
5. Clear Obstructions:
If you find any obstructions blocking the airflow, such as leaves or debris stuck in the vents or air ducts, carefully remove them. Use a soft brush or vacuum cleaner to remove dust and dirt from the vents, being mindful not to damage the delicate fins or coils.
Read more: Why Does My Television Keep Freezing?
6. Ensure Proper Clearance:
Make sure that the AC unit has adequate clearance around it according to the manufacturer’s recommendations. Maintain a distance of at least 2 feet (0.6 meters) between the unit and any walls, furniture, or other objects to allow for proper airflow and ventilation.
7. Regular Maintenance:
Performing regular maintenance on your AC unit, including checking for blockages, is important for its efficient operation. Schedule periodic inspections and cleanings to prevent the buildup of dust and debris that can obstruct airflow.
By checking for blockages in your AC unit and removing any obstructions, you can ensure proper airflow and prevent the freezing of the evaporator coil. This will enhance the overall performance of your window AC unit and extend its lifespan.
Recharging Refrigerant Levels
If your window AC unit is freezing up, low refrigerant levels could be to blame. Refrigerant is the substance responsible for absorbing heat from the indoor air and cooling it down. When there is insufficient refrigerant in the system, the evaporator coil may become excessively cold, leading to ice formation. Recharging the refrigerant levels is a crucial step in resolving this issue. Here’s a step-by-step guide on how to recharge refrigerant in your window AC unit:
1. Turn off the AC Unit:
Before attempting to recharge the refrigerant, ensure the AC unit is turned off and unplugged from the power source. Safety is paramount when working with refrigerants, so take precautions to prevent accidents.
Read more: Why Doesnt My AC Work In My Car
2. Locate the Service Valves:
Identify the service valves on your AC unit. These are typically located on the refrigerant lines leading into the unit. The service valves will have caps or knobs that need to be accessible for the refrigerant recharge.
3. Visual Inspection:
Inspect the refrigerant lines and valves for any visible signs of leaks, such as oil stains or frost accumulation. If you notice any indications of a leak, it is important to address the leak before recharging the refrigerant. Leaks can be repaired by a professional HVAC technician.
4. Connect the Gauges:
Attach the manifold gauges to the service valves of the AC unit. The gauges will allow you to measure the current refrigerant levels and monitor the recharging process.
5. Evacuate the System (If Necessary):
If the refrigerant system is completely empty or has a significant leak, it may be necessary to evacuate the system before recharging. Evacuation involves removing any remaining refrigerant from the system using a vacuum pump. This step should be handled by a professional technician.
Read more: Why Is My AC So Loud Inside My House
6. Recharge the Refrigerant:
Using the appropriate refrigerant type specified by the manufacturer, carefully follow the instructions for recharging. Typically, the refrigerant is added to the low-pressure side of the system. Begin by slowly turning the valve or opening the knob to allow the refrigerant to enter the system. Monitor the gauges and add refrigerant as needed until the desired pressure or level is reached.
7. Close the Valves and Disconnect the Gauges:
Once the refrigerant recharge is complete, close the service valves and disconnect the manifold gauges from the AC unit. Make sure the valves are tightly closed to prevent any refrigerant from leaking out.
8. Professional Assistance:
Recharging refrigerant requires knowledge and expertise. If you are not familiar with HVAC systems or handling refrigerants, it is recommended to seek professional assistance. A licensed HVAC technician will ensure the proper handling, recharging, and overall safety of the refrigerant system.
Recharging the refrigerant levels is a task that should be carried out by trained professionals. Improper refrigerant handling can be hazardous and lead to further damage to your AC unit. Contact an HVAC technician to evaluate and recharge the refrigerant levels in your window AC unit, ensuring proper cooling performance and preventing freezing issues.
Unclogging the Condensate Drain
If your window AC unit is freezing up, a clogged condensate drain could be the culprit. During the cooling process, moisture accumulates on the evaporator coil, and the condensate drain is responsible for removing this excess water. However, if the drain line becomes blocked or clogged, the condensate cannot properly drain, leading to water backup and potential freezing. Unclogging the condensate drain is an essential step in resolving this issue. Here’s a step-by-step guide on how to unclog the condensate drain in your window AC unit:
1. Turn off the AC Unit:
Prior to unclogging the condensate drain, ensure that the AC unit is turned off and unplugged from the power source. This will prevent any electrical hazards and allow you to work safely.
2. Locate the Condensate Drain:
Inspect your AC unit to locate the condensate drain. It is generally located at the back or bottom of the unit. The condensate drain is usually a PVC pipe or hose attached to the unit.
3. Inspect for Visible Blockages:
Visually examine the condensate drain for any visible blockages or obstructions. Debris, sludge, or algae growth can accumulate over time and hinder the flow of water. If you can see a blockage, gently remove it using a small brush or pipe cleaner. Be careful not to push the blockage further into the drain.
4. Use a Wet/Dry Vacuum:
If the blockage is not visible or cannot be easily removed, you can try using a wet/dry vacuum to unclog the condensate drain. Set the vacuum to the wet setting and attach the appropriate nozzle or attachment to the end of the hose. Place the nozzle over the opening of the condensate drain and create a seal. Turn on the vacuum and let it draw out the debris and blockage from the drain. Repeat as needed until the drain is clear.
Read more: Why Is My AC So Loud Inside My House
5. Commercial Drain Cleaners:
If the blockage persists, you can try using a commercial condensate drain cleaner. These products are specifically designed to break down algae, mold, and other organic matter that may be clogging the drain. Follow the instructions provided by the manufacturer, as the application method and dosage can vary.
6. Preventive Measures:
To prevent future clogs in the condensate drain, consider implementing preventive measures:
- Regularly inspect and clean the condensate drain to remove any potential blockages before they become a problem.
- Install a condensate drain line treatment tablet or strip that helps prevent algae and mold growth.
- Ensure that the condensate drain line is properly sloped to allow gravity to aid in the drainage process.
- Periodically flush the condensate drain line with a mixture of warm water and vinegar to remove buildup.
By unclogging the condensate drain and implementing preventive measures, you can ensure proper water drainage and prevent freezing in your window AC unit. If the blockage persists or if you are unsure about performing these steps yourself, it is recommended to seek professional assistance. HVAC technicians have the expertise to address complex clogs and ensure the proper functioning of your condensate drain system.
Adjusting the Thermostat Settings
If your window AC unit is freezing up, it’s possible that the thermostat settings are contributing to the problem. The thermostat is responsible for maintaining the desired temperature by signaling the AC unit to turn on or off. If the thermostat settings are incorrect or the thermostat is malfunctioning, it can cause the AC unit to run excessively and the evaporator coil to freeze. Adjusting the thermostat settings is a crucial step in resolving this issue. Here’s a step-by-step guide on how to adjust the thermostat settings of your window AC unit:
1. Access the Thermostat Controls:
To adjust the thermostat settings, locate the control panel or display of your window AC unit. The controls are typically located on the front of the unit, either on the control panel itself or accessed through a digital display.
Read more: Why Is My AC So Loud Inside My House
2. Set the Desired Temperature:
Determine the desired temperature at which you want to maintain the room. Use the up and down arrows or buttons on the thermostat to adjust the temperature setting. Aim for a temperature that is comfortable for your needs while preventing the AC unit from running excessively.
3. Select the Cooling Mode:
Ensure that the AC unit is set to the cooling mode. Some window AC units have different modes such as fan-only or dehumidification. Make sure that the cooling mode is selected to enable the proper function of the AC unit.
4. Confirm the Temperature Display:
Check the temperature displayed on the thermostat to ensure it matches the desired temperature you set. If the temperature reading is significantly different, it may suggest a thermostat malfunction. Consider performing a quick test by using a separate thermometer to measure the actual room temperature. If there is a discrepancy, you may need to recalibrate or replace the thermostat.
5. Adjusting Advanced Settings (if applicable):
Depending on your window AC unit, there may be additional advanced settings available. These settings could include fan speed, sleep mode, timer settings, or energy-saving options. Adjust these settings according to your preferences, but focus primarily on the temperature and cooling mode to prevent freezing.
Read more: Why Is My AC So Loud Inside My House
6. Regularly Monitor and Fine-Tune:
Keep an eye on the performance of your window AC unit after adjusting the thermostat settings. Observe if the unit runs for reasonable durations, maintaining the desired temperature. If you notice any issues, such as continuous running or insufficient cooling, further adjustments or professional assistance may be necessary.
By adjusting the thermostat settings of your window AC unit, you can help prevent the unit from freezing up. Proper temperature settings and mode selection are crucial for maintaining a comfortable and efficient cooling environment without placing unnecessary strain on the AC system. Regular monitoring and fine-tuning will ensure that your AC unit operates optimally and provides reliable cooling performance.
Preventive Maintenance Techniques
Preventive maintenance is essential for keeping your window AC unit in optimal condition and minimizing the risk of freezing. By implementing these techniques, you can help ensure the efficient operation and longevity of your AC unit. Here are some preventive maintenance techniques to consider:
1. Regularly Clean or Replace the Air Filter:
Cleaning or replacing the air filter is one of the most crucial maintenance tasks for a window AC unit. A dirty or clogged filter restricts airflow, hampers cooling performance, and contributes to freezing. Follow the manufacturer’s guidelines and clean or replace the filter every two to four weeks or as recommended.
2. Check for Blockages and Clean the Unit:
Inspect your AC unit regularly for any blockages that may obstruct airflow. Clear away debris, leaves, or dust that may accumulate on or around the unit. Use a soft brush or cloth to clean the condenser and evaporator coils to improve heat exchange and airflow.
Read more: Why Is My AC So Loud Inside My House
3. Schedule Professional Maintenance:
Consider scheduling annual or bi-annual professional maintenance for your window AC unit. A qualified HVAC technician can conduct a thorough inspection, clean the coils, check refrigerant levels, identify any potential issues, and ensure proper functioning of the system. Regular professional maintenance helps detect and address problems before they escalate.
4. Monitor and Adjust Thermostat Settings:
Regularly monitor and fine-tune the thermostat settings to maintain the desired temperature without excessive strain on the AC unit. Ensure that the thermostat readings align with the actual room temperature. Adjust the temperature and cooling mode as needed based on comfort preferences and ambient conditions.
5. Maintain Proper Clearance:
Ensure that your AC unit has sufficient clearance around it. Maintain a distance of at least 2 feet (0.6 meters) between the unit and any walls, furniture, or objects. This allows for adequate airflow, ventilation, and heat dissipation, preventing overheating and freezing.
6. Protect the Unit During Off-Season:
If you only use your window AC unit during certain seasons, protect it during the off-season. Cover the unit with a weatherproof cover or tarp to shield it from dust, dirt, and other debris. This helps maintain its cleanliness and prolong its lifespan.
Read more: Why Is My AC So Loud Inside My House
7. Follow Manufacturer’s Guidelines:
Always follow the manufacturer’s instructions and guidelines for your specific window AC unit. Each unit may have unique maintenance requirements or recommendations. Adhering to these instructions ensures that you are properly caring for and maintaining your AC unit.
By implementing these preventive maintenance techniques, you can reduce the likelihood of your window AC unit freezing up and optimize its performance. Regular cleaning, professional inspections, thermostat adjustments, and following manufacturer’s guidelines will contribute to a more reliable and efficient cooling experience.
Conclusion
A frozen window AC unit can be a frustrating and inconvenient problem to deal with, but understanding the causes and implementing preventive measures can help you prevent it from happening. In this article, we explored various factors that can cause a window AC unit to freeze up, including insufficient airflow, dirty air filters, low refrigerant levels, blocked condensate drains, faulty thermostats, and operating at low temperatures.
One of the essential steps in troubleshooting a frozen AC unit is to clean or replace the air filter regularly to ensure proper airflow. Checking for blockages in the AC unit, including vents and air ducts, is another crucial step to maintain adequate airflow. If low refrigerant levels are suspected, it’s important to seek professional assistance to diagnose any leaks and recharge the refrigerant properly.
Unclogging the condensate drain is another preventive measure to ensure that excess moisture is properly drained, reducing the risk of freezing. Faulty thermostats can also contribute to freezing, so adjusting the thermostat settings or seeking professional assistance is necessary to maintain accurate temperature control.
In addition to troubleshooting tips, we explored the importance of preventive maintenance techniques such as regular cleanings, professional inspections, proper clearance, and following manufacturer’s guidelines. These measures help optimize the performance and lifespan of your window AC unit while minimizing the chances of freezing.
Remember, if you are unsure about any aspect of troubleshooting or maintenance, it’s always best to consult a professional HVAC technician. They have the expertise to diagnose and address issues specific to your window AC unit.
By taking a proactive approach to maintain your window AC unit and addressing issues promptly, you can enjoy consistent and efficient cooling without the inconvenience and frustration of a frozen AC unit.
Frequently Asked Questions about Why Is My Window AC Freezing Up
Was this page helpful?
At Storables.com, we guarantee accurate and reliable information. Our content, validated by Expert Board Contributors, is crafted following stringent Editorial Policies. We're committed to providing you with well-researched, expert-backed insights for all your informational needs.
0 thoughts on “Why Is My Window AC Freezing Up”