Home>Home Maintenance>Why Is My RV Air Conditioner Freezing Up

Home Maintenance
Why Is My RV Air Conditioner Freezing Up
Modified: March 7, 2024
Learn why your RV air conditioner is freezing up and how to fix it. Get expert advice and tips for proper home maintenance to prevent this issue.
(Many of the links in this article redirect to a specific reviewed product. Your purchase of these products through affiliate links helps to generate commission for Storables.com, at no extra cost. Learn more)
Introduction
Welcome to the world of RV ownership! Whether you enjoy weekend getaways or extended road trips, having a functional and efficient air conditioner in your RV is essential for a comfortable journey. However, just like any other mechanical equipment, RV air conditioners can sometimes encounter issues. One common problem that RV owners may face is the freezing up of their air conditioning unit.
When your RV air conditioner freezes up, it can be frustrating and uncomfortable, especially if you’re in the midst of a scorching summer trip. But don’t worry, this article will delve into the reasons behind this issue and provide you with tips to prevent it from happening in the future.
Before we dive into the causes and solutions, let’s take a brief look at how an RV air conditioner works.
Key Takeaways:
- Regular maintenance and proper airflow are crucial to prevent RV air conditioner freezing. Cleaning air filters, checking refrigerant levels, and calibrating thermostats ensure efficient operation and a comfortable journey.
- Avoid overworking the AC unit and insulate your RV to maintain a stable temperature. Proper sizing, comfortable temperature settings, and additional cooling methods help prevent freezing and prolong the air conditioner’s lifespan.
Read more: Why Is My Air Conditioner Lines Freezing Up
How Does an RV Air Conditioner Work?
An RV air conditioner operates on the same basic principles as a regular household air conditioner. It consists of two main components: the evaporator unit and the condenser unit.
The evaporator unit is typically located inside the RV, usually in the ceiling or on a wall. It contains a refrigerant coil that cools the air by absorbing heat from it. The warm air from inside your RV is drawn into the unit, where it passes over the cold coil. As the air moves over the coil, the refrigerant absorbs the heat, cooling the air and removing the humidity.
The cool air is then circulated back into your RV through the air vents, providing a comfortable indoor climate. The evaporator unit also contains a fan that helps to distribute the cool air throughout the living space.
On the other hand, the condenser unit is located on the exterior of the RV, usually on the roof. It is responsible for releasing the heat absorbed by the evaporator unit. The condenser unit consists of a compressor, a condenser coil, and a fan. The compressor pressurizes the refrigerant, pushing it through the condenser coil. As the refrigerant flows through the coil, it releases the heat it absorbed from your RV’s interior to the outside air.
So, in simple terms, an RV air conditioner works by transferring heat from the inside of your RV to the outside, leaving you with a cool and comfortable living space.
Causes of RV Air Conditioner Freezing Up
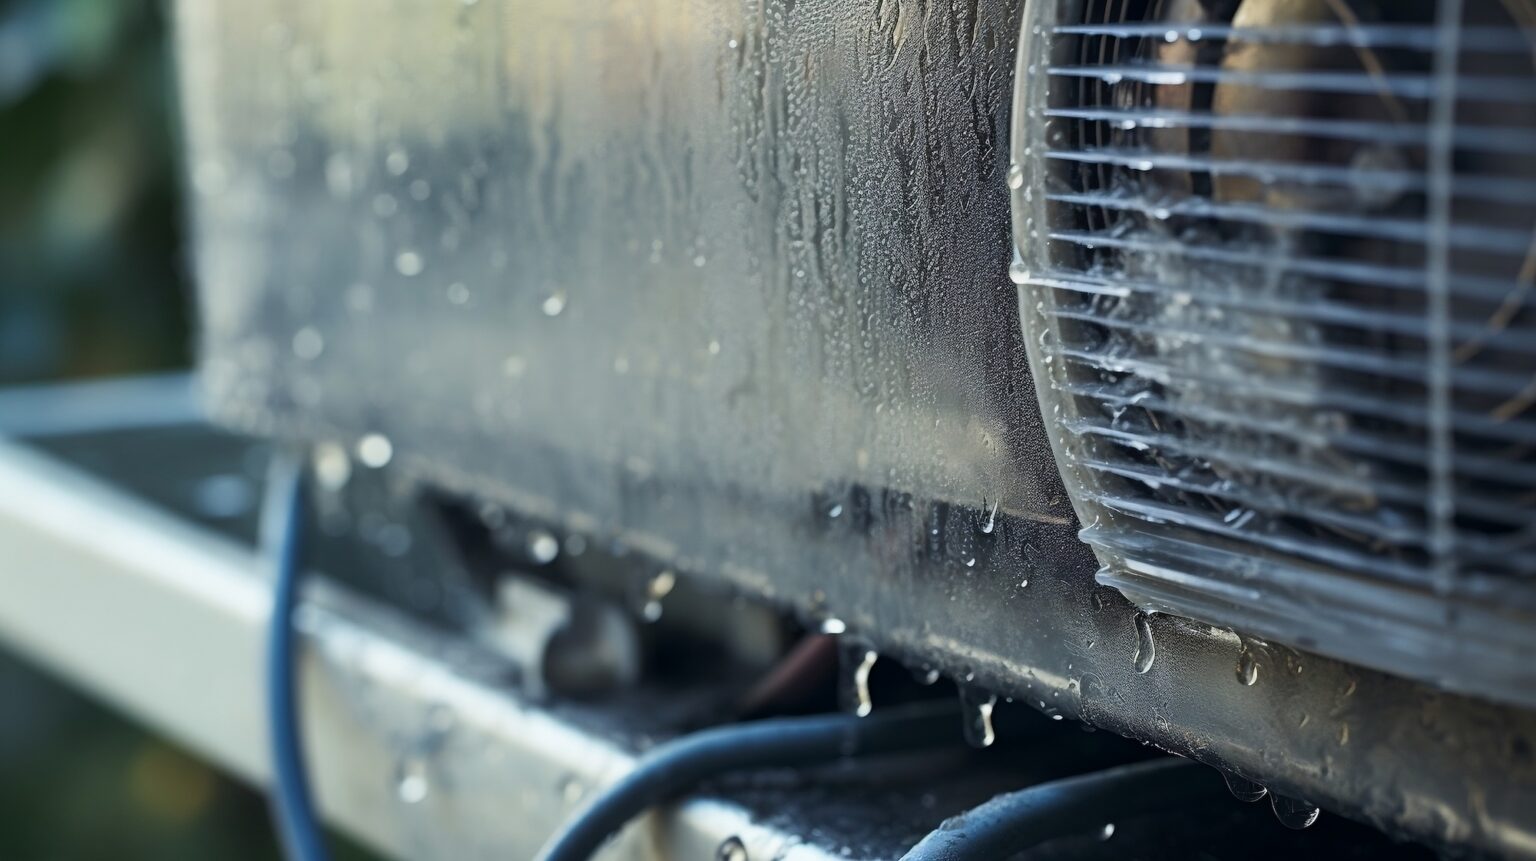
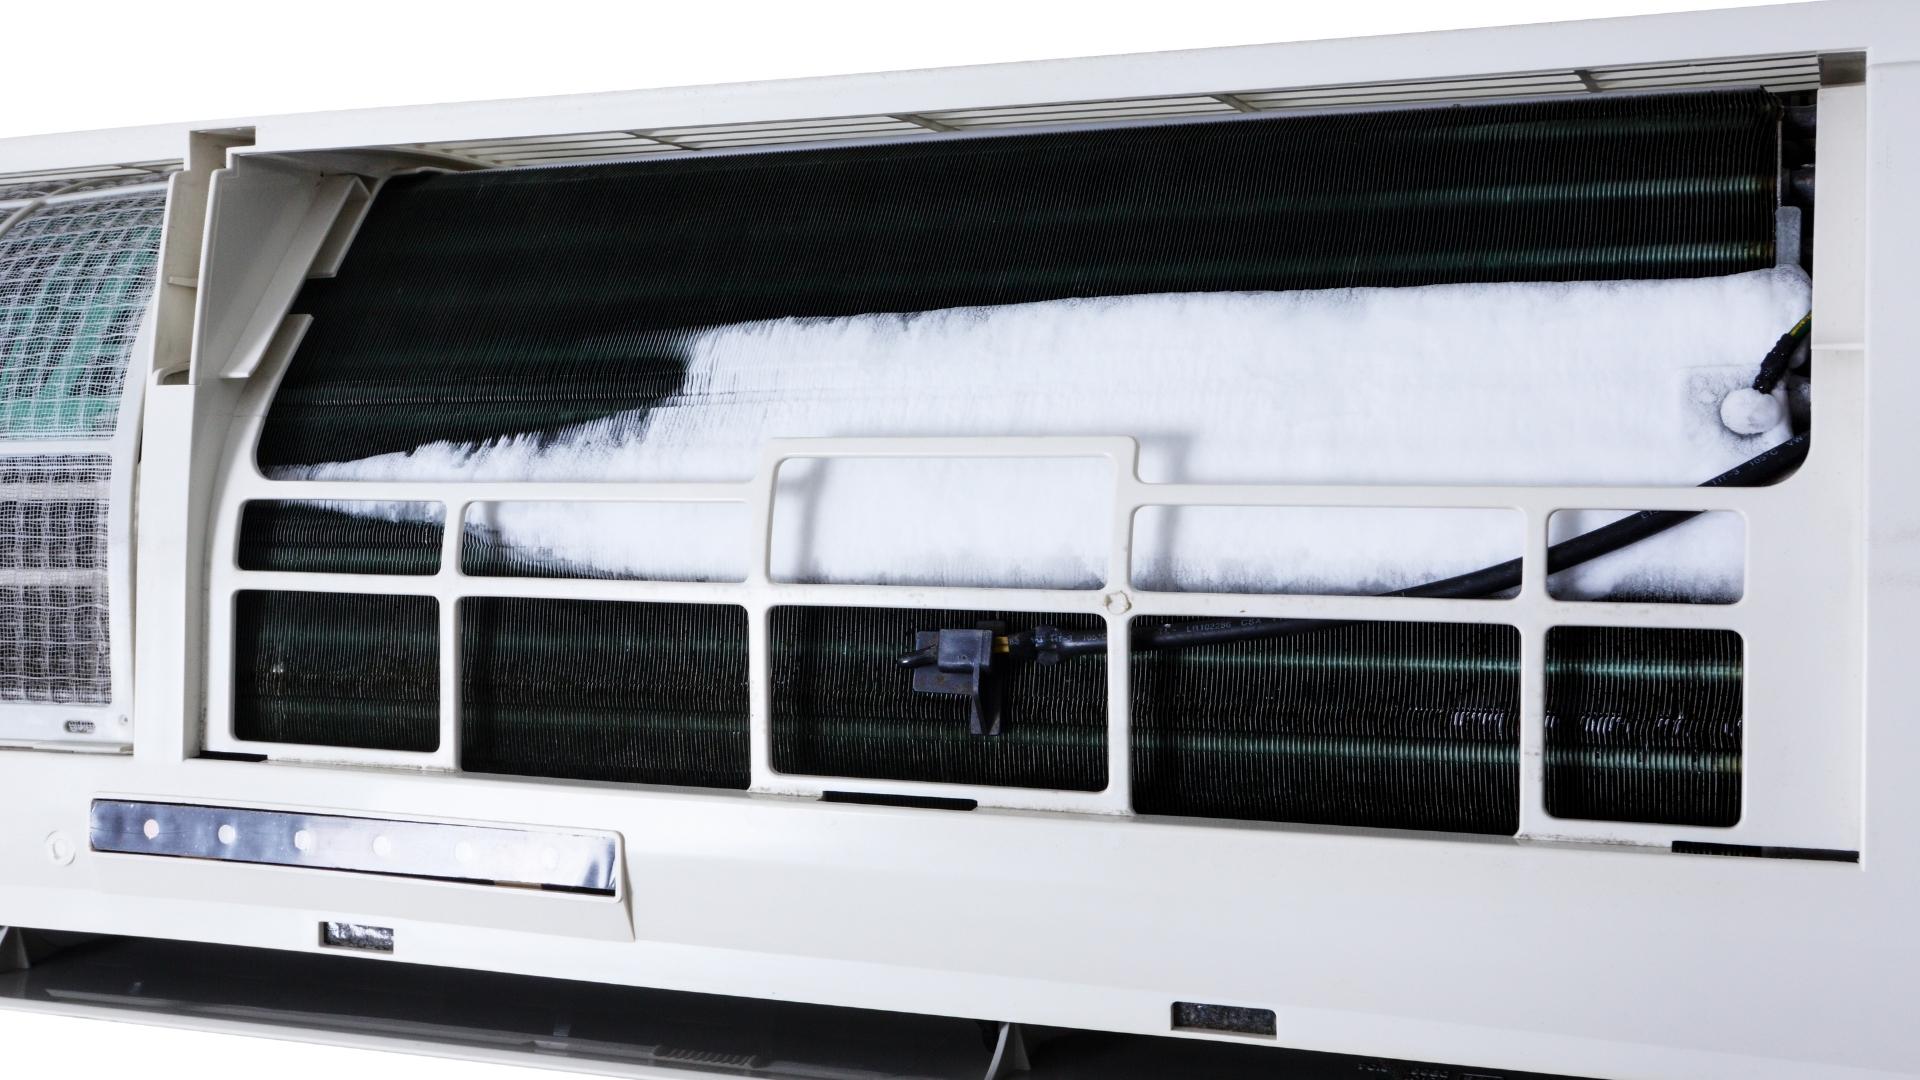
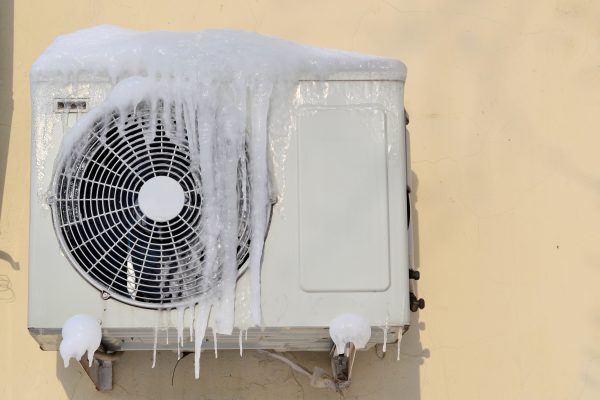
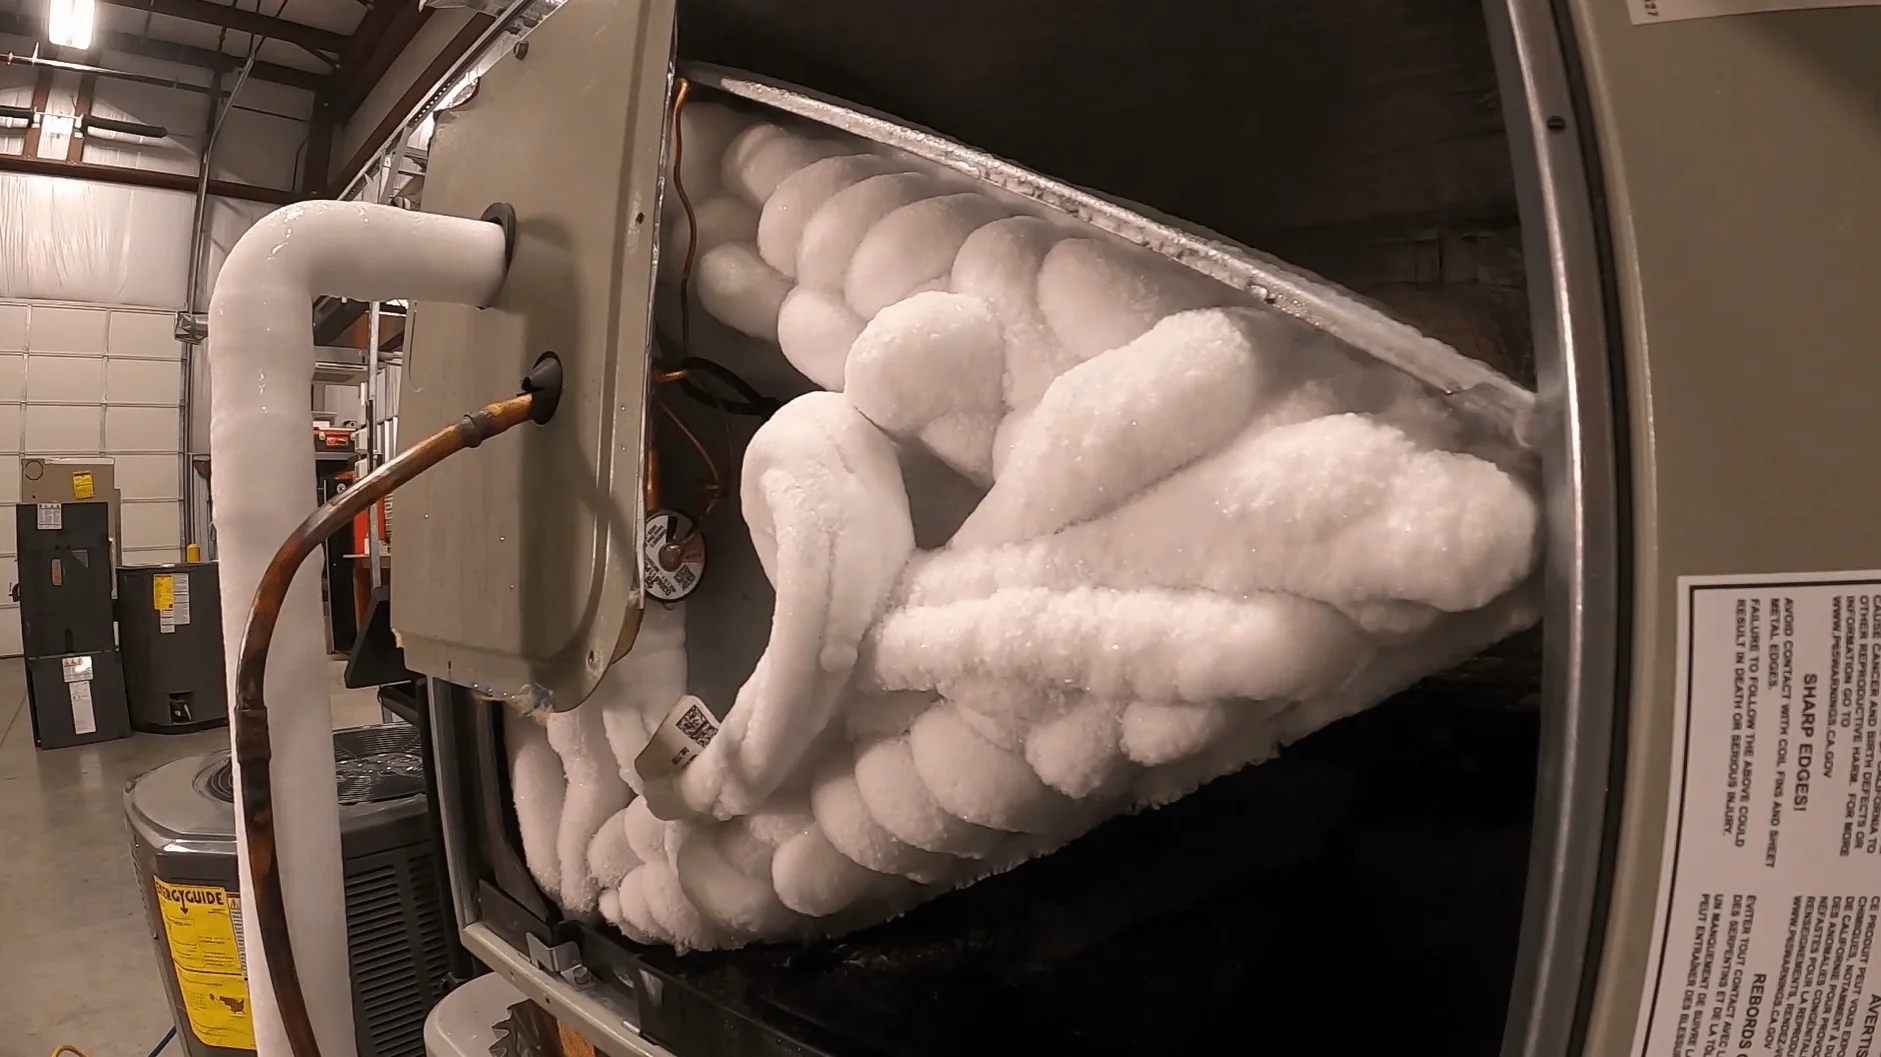
When an RV air conditioner freezes up, it means that the evaporator unit is becoming too cold, causing the moisture in the air to freeze on the coils. This can lead to decreased airflow and cooling efficiency. Understanding the causes of this issue is crucial to prevent it from recurring. Here are some common causes of RV air conditioner freezing up:
- Insufficient Airflow: Lack of proper air circulation can disrupt the cooling process and cause freezing. Restricted airflow can occur due to closed or blocked air vents, obstructions near the evaporator unit, or dirty air filters.
- Dirty Air Filter: A clogged or dirty air filter can impede airflow and reduce the unit’s cooling capacity. When the air filter is dirty, it restricts the air intake, allowing the evaporator coils to get too cold and freeze up.
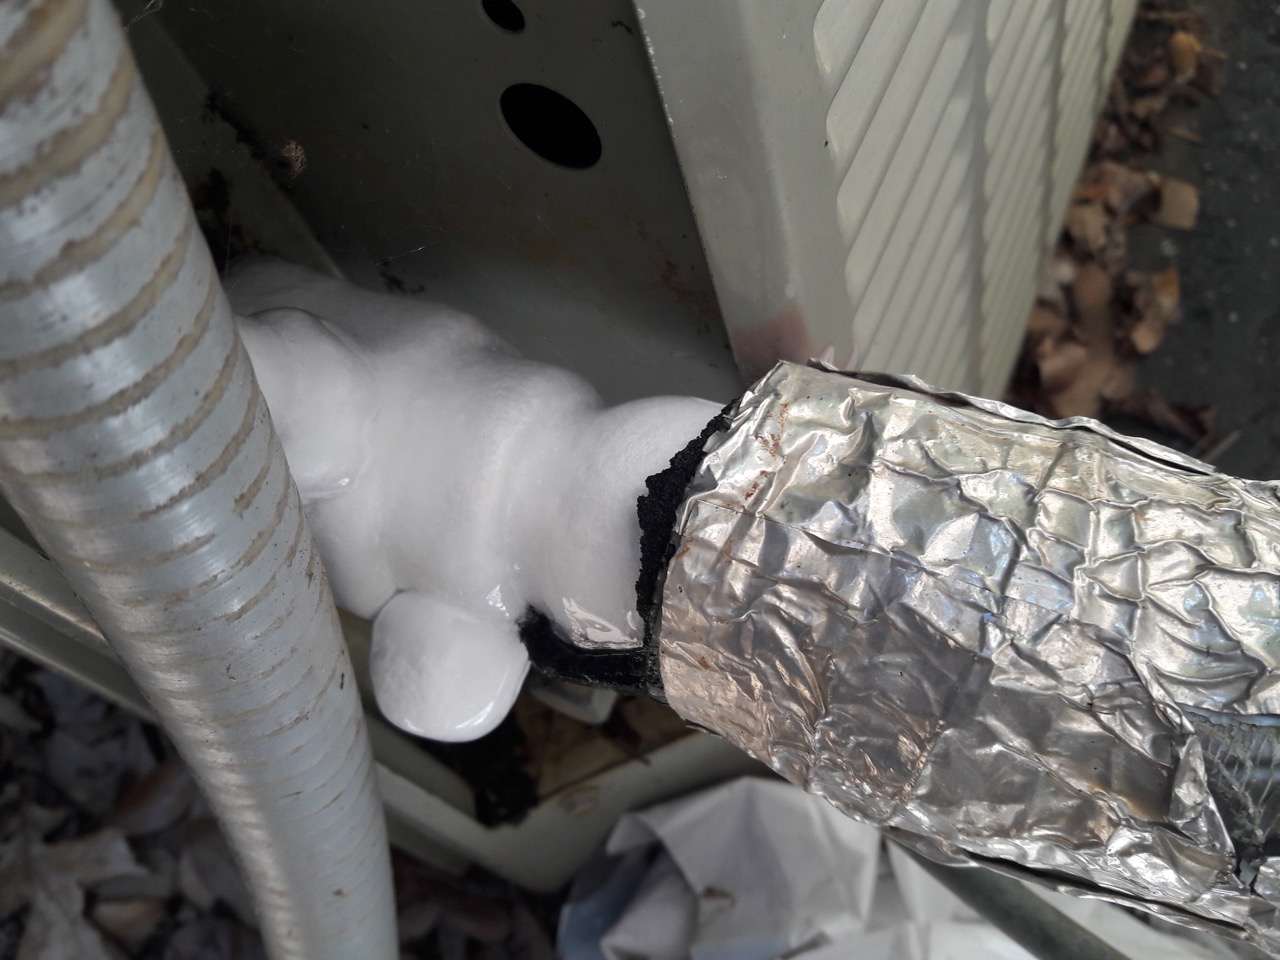
- Low Refrigerant Level: Refrigerant is the substance that absorbs heat from the air in your RV. If the refrigerant level is low, it can cause the coils to become excessively cold, leading to freezing. Low refrigerant levels can result from leaks in the system, which should be addressed by a professional technician.
- Faulty Thermostat: A malfunctioning thermostat can cause the air conditioner to run continuously, leading to the evaporator coils becoming too cold. Additionally, if the thermostat is not calibrated correctly, it may not accurately regulate the temperature, resulting in freezing.
- Overworking the AC Unit: Running the air conditioner at maximum capacity for extended periods can cause the coils to get too cold and freeze up. This can happen if your RV is located in an extremely hot environment or if the air conditioner is undersized for the space it is trying to cool.
- Insulation Issues: Poor insulation in your RV can contribute to the freezing of the air conditioner. Inadequate insulation can allow warm air from outside to enter your RV, causing the evaporator unit to work harder, potentially leading to freezing.
Now that we have identified the common causes of RV air conditioner freezing up, let’s explore some effective tips to prevent this issue from occurring.
Insufficient Airflow
Insufficient airflow is one of the primary causes of RV air conditioner freezing up. When there is limited air movement, the evaporator coils can become too cold, leading to condensation freezing on the coil surface. To prevent this issue, it is important to ensure proper airflow within your RV’s air conditioning system.
Here are some steps you can take to improve airflow:
- Check and clean the air vents: Inspect the air vents inside your RV to ensure they are not blocked or obstructed. Sometimes, furniture, curtains, or other items may inadvertently block the vents, reducing the airflow. Make sure the vents are open and clear of any obstructions to allow an unimpeded flow of air.
- Remove any debris near the evaporator unit: The area around the evaporator unit should be clear of any debris or objects that might impede airflow. Clear away leaves, branches, or any other debris that may have accumulated near the unit. Ensure there is enough space around the unit for unrestricted air circulation.
- Check the ductwork: Inspect the ductwork in your RV to ensure there are no kinks, bends, or loose connections that could restrict airflow. If you notice any issues, consider having a professional inspect and repair the ductwork to optimize airflow.
- Keep windows and doors closed: Ensure that windows and doors are properly closed when your air conditioner is running. This helps maintain the desired temperature inside your RV and prevents warm air from entering, which can interfere with the cooling process and contribute to freezing.
- Consider using fans: If you find that the airflow in your RV is still insufficient, you can use fans strategically to improve circulation. Position fans near the air vents to help distribute the cooled air more effectively throughout your RV. This can help prevent the evaporator coils from becoming too cold and freezing up.
By addressing and improving airflow within your RV’s air conditioning system, you can significantly reduce the risk of the air conditioner freezing up. This will not only keep you cool and comfortable during your travels but also help prolong the lifespan of your air conditioning unit.
Dirty Air Filter
A dirty air filter is a common culprit behind RV air conditioner freezing up. When the air filter becomes clogged with dust, debris, and other particles, it restricts the airflow passing through the evaporator coil. This can result in the coil becoming excessively cold and causing condensation to freeze on its surface.
To prevent this issue, it is important to regularly clean or replace your RV’s air filter. Here’s how you can maintain a clean air filter:
- Check the air filter regularly: Make it a habit to inspect your RV’s air filter at least once a month. This will allow you to identify any build-up of dirt or debris that may be obstructing airflow through the filter.
- Clean the air filter: If your air filter is reusable, you can clean it to remove accumulated dust and debris. Gently vacuum the filter or wash it with mild soap and water, depending on the manufacturer’s instructions. Allow the filter to dry completely before reinstalling it.
- Replace the air filter: If your RV’s air filter is disposable, replace it according to the manufacturer’s recommendations. Typically, air filters should be replaced every three to six months, but this can vary depending on usage and environmental conditions.
- Consider using higher quality filters: Upgrading to high-efficiency air filters can provide better filtration and improve airflow. These filters can catch smaller particles, reducing the risk of clogging and improving the overall air quality in your RV.
- Keep the filter housing clean: Apart from cleaning or replacing the air filter, it’s essential to keep the filter housing clean as well. Remove any debris, cobwebs, or dust that may have accumulated in the filter housing to ensure unrestricted airflow.
Regularly cleaning or replacing your RV’s air filter not only prevents the freezing of the air conditioner but also helps maintain a clean and healthy indoor environment. Good airflow is crucial for the efficient operation of your RV’s air conditioning system and can contribute to a more comfortable and enjoyable journey.
Read more: Why Does My Window Air Conditioner Freeze Up
Low Refrigerant Level
A low refrigerant level is another common cause of RV air conditioner freezing up. Refrigerant is the substance responsible for absorbing heat from the air, allowing your air conditioner to cool your RV. When the refrigerant level is low, the evaporator coil can become overly cold, causing condensation to freeze on its surface.
If you suspect that your RV’s air conditioner has a low refrigerant level, it is important to address the issue promptly. Here’s what you can do:
- Seek professional assistance: Refrigerant levels should be checked and adjusted by a qualified HVAC technician. They have the necessary tools and expertise to diagnose any leaks or issues in the system and recharge the refrigerant accordingly.
- Inspect for leaks: Low refrigerant levels are often the result of leaks in the system. The technician will perform a thorough inspection to identify and repair any leaks before recharging the refrigerant. This step is crucial to prevent future freezing and ensure the optimal functioning of your RV’s air conditioner.
- Follow recommended maintenance schedules: Regular maintenance is vital for early leak detection and prevention. Follow the recommended maintenance schedule for your RV’s air conditioning system, which may involve inspection, cleaning, and refrigerant checks, to keep it in good working condition.
- Avoid DIY refrigerant recharge: It is important to note that attempting to recharge refrigerant on your own may lead to further damage and may void any existing warranties. Always rely on a professional technician to handle any refrigerant-related issues.
Addressing low refrigerant levels promptly will not only prevent freezing but also ensure the overall efficiency and performance of your RV’s air conditioning system. Regular maintenance and professional assistance are essential in maintaining the optimal refrigerant levels in your RV’s air conditioner.
Faulty Thermostat
A faulty thermostat can contribute to the freezing up of an RV air conditioner. The thermostat is responsible for regulating the temperature and controlling the operation of the air conditioning system. If it is malfunctioning or not calibrated correctly, it can cause the air conditioner to run longer than necessary, leading to excessive cooling and freezing of the evaporator coil.
If you suspect that your RV’s thermostat is causing the freezing issue, here are some steps you can take to address the problem:
- Check the thermostat settings: Ensure that the thermostat is set to the appropriate cooling temperature. Sometimes, incorrect settings can cause the air conditioner to run longer than necessary, resulting in freezing. Adjust the temperature to a comfortable level and observe if the freezing issue persists.
- Calibrate the thermostat: If you notice inconsistencies in temperature or suspect that the thermostat is not accurately reading the temperature, consider calibrating it. Consult the manufacturer’s instructions or seek professional assistance to calibrate the thermostat properly.
- Replace the faulty thermostat: If your thermostat is consistently causing freezing or is not responding to adjustments, it may be time to replace it. Consult with a professional HVAC technician to help you choose a compatible thermostat and ensure proper installation.
- Consider upgrading to a programmable thermostat: Upgrading to a programmable thermostat can offer more precise temperature control and scheduling options. This can help prevent the air conditioner from running for extended periods and potentially freezing up the evaporator coil.
- Regular maintenance: Include the thermostat in your RV’s regular maintenance routine. Inspect it for any visible signs of damage, such as loose wires or faulty connections. Keeping the thermostat clean and in good condition can help ensure its proper functioning and prevent freezing issues.
By addressing any faults or calibration issues with your RV’s thermostat, you will be able to prevent excessive cooling and the subsequent freezing of the air conditioner. A properly functioning thermostat is crucial for maintaining a comfortable and controlled indoor climate during your RV travels.
Overworking the AC Unit
Overworking the RV air conditioning unit can lead to freezing of the evaporator coil. This can occur when the air conditioner is pushed beyond its capacity or run continuously for extended periods, causing the coils to become excessively cold and leading to condensation freezing on their surface.
To prevent overworking the AC unit and avoid freezing issues, here are some tips to keep in mind:
- Properly size your AC unit: Make sure that the air conditioning unit in your RV is properly sized for the space it is intended to cool. If the unit is too small, it may struggle to cool the RV adequately, leading to continuous operation and potential freezing. Consult with a professional to ensure that your AC unit is the right size for your RV.
- Maintain a comfortable temperature: While it’s tempting to crank up the air conditioner to the coldest setting, setting the temperature at a comfortable level can help prevent overworking the AC unit. Aim for a temperature that keeps you cool but doesn’t strain the air conditioner unnecessarily.
- Use other cooling methods: To reduce the workload on the air conditioner, consider employing other cooling methods alongside the AC unit. This can include using fans, opening windows during cooler periods, or utilizing shade coverings to minimize direct sunlight and heat inside the RV.
- Implement proper insulation: Insulating your RV can help maintain a stable temperature and reduce the strain on the air conditioning unit. Adequate insulation helps to keep the cool air trapped inside while preventing the intrusion of warm air from outside, reducing the need for the AC unit to work harder than necessary.
- Utilize a programmable thermostat: Investing in a programmable thermostat allows you to set specific temperature schedules, enabling the AC to run efficiently when needed and reducing operation during times when cooling demands are lower. This prevents excessive cooling and potential freezing of the evaporator coil.
- Take breaks: If you’re parked in a location with extremely high temperatures, consider giving your air conditioner periodic breaks. Allow it to rest for a short period between cooling cycles to prevent it from working continuously and potentially freezing up.
By being mindful of the workload on your RV’s air conditioning unit and implementing these tips, you can prevent overworking the AC and minimize the risk of the evaporator coil freezing. This will keep your RV cool and comfortable without putting unnecessary strain on the air conditioning system.
Insulation Issues
Insulation plays a crucial role in maintaining a comfortable temperature inside your RV and preventing freezing of the air conditioner. Inadequate insulation can allow warm air from outside to infiltrate your RV, causing the evaporator coil to work harder and potentially leading to freezing.
To address insulation issues and prevent freezing of the air conditioner, consider the following steps:
- Check for gaps and cracks: Inspect your RV for any gaps or cracks in the walls, windows, doors, or roof. These openings can let warm air in and cool air escape, making it harder for the air conditioner to maintain a consistent temperature. Seal any gaps or cracks using weatherstripping, caulking, or insulation to improve the efficiency of your RV’s insulation.
- Upgrade insulation materials: If you suspect that your current insulation is insufficient, consider upgrading to better insulation materials that provide improved energy efficiency. Options such as foam panels, reflective insulation, or spray foam insulation offer enhanced thermal properties and can help keep the interior of your RV cooler, reducing the strain on the air conditioner.
- Prioritize windows and doors: Windows and doors are common areas where heat can enter or escape from your RV. Install thermal or blackout curtains, or use insulating window shades to minimize heat transfer and improve insulation. Additionally, ensure that windows and doors are properly sealed to prevent air leaks.
- Utilize skirting: If you’re stationary for an extended period, consider adding skirting around the bottom of your RV. Skirting acts as a barrier against drafts and helps insulate the underbelly, reducing heat transfer and improving overall energy efficiency.
- Consider roof coatings: Applying a reflective roof coating to your RV can help reduce heat absorption from the sun. This can significantly decrease the demand on your air conditioner and minimize the risk of freezing by keeping the evaporator coil at an optimal temperature.
- Insulate exposed pipes and ducts: Insulating exposed pipes and ducts helps maintain the temperature of the air traveling through them. This prevents unnecessary heat gain or loss, ensuring that the air conditioner’s cooling capacity is utilized efficiently.
By addressing insulation issues and improving the energy efficiency of your RV, you can minimize heat infiltration, reduce the workload on your air conditioner, and prevent the freezing of the evaporator coil. A well-insulated RV not only enhances your comfort but also promotes the longevity and efficiency of your air conditioning system.
Check and clean the air filters regularly to ensure proper airflow. Low refrigerant levels or a dirty evaporator coil can also cause freezing, so have a professional inspect and service your RV air conditioner.
Read more: Why Is My Window AC Freezing Up
Tips to Prevent RV Air Conditioner Freezing Up
Experiencing a frozen RV air conditioner can be frustrating and uncomfortable, especially during hot summer trips. However, with proper maintenance and a few preventive measures, you can minimize the risk of your RV air conditioner freezing up. Here are some helpful tips to keep your air conditioning system running smoothly:
- Regular Maintenance: Implement a regular maintenance schedule for your RV’s air conditioner. This includes cleaning, inspecting, and servicing the unit at least once a year. Regular maintenance helps identify and address any potential issues before they escalate into major problems.
- Ensure Proper Airflow: Adequate airflow is crucial for optimal performance and preventing freezing. Regularly check and clean the air vents, ensuring they are not blocked or obstructed. Remove any debris or furniture that may impede the airflow near the evaporator unit. Proper airflow helps maintain a stable temperature and prevents the evaporator coil from becoming excessively cold.
- Clean the Air Filter: Dirty air filters can restrict airflow and decrease the efficiency of your air conditioner. Regularly clean or replace the air filter to ensure proper airflow and prevent the evaporator coil from freezing. Follow the manufacturer’s guidelines for cleaning or replacing the air filter to maintain the functionality of your RV air conditioner.
- Check Refrigerant Levels: Low refrigerant levels can cause the evaporator coil to freeze. If you suspect a refrigerant leak or low levels, seek assistance from a professional HVAC technician. They will be able to identify and fix any leaks and recharge the refrigerant to the appropriate level, ensuring the optimal performance of your RV air conditioner.
- Calibrate the Thermostat: A faulty or misaligned thermostat can lead to freezing issues. Ensure your thermostat is calibrated correctly to accurately regulate the temperature. Consider upgrading to a programmable thermostat for better temperature control and scheduling options, helping to prevent excessive cooling and freezing of the evaporator coil.
- Avoid Overworking the AC Unit: Running your air conditioner continuously or at maximum capacity for extended periods can contribute to freezing. Avoid overworking the AC unit by setting the temperature at a comfortable level and utilizing other cooling methods such as fans and shading. This allows your air conditioner to operate more efficiently and reduces the risk of freezing.
- Insulate Your RV: Proper insulation is essential for maintaining a stable temperature and preventing excessive strain on your air conditioner. Inspect your RV for gaps, cracks, and inadequate insulation. Seal any openings and consider upgrading your insulation materials if necessary. Insulated windows, skirting, and reflective roof coatings can also help improve the energy efficiency of your RV and reduce the risk of freezing.
By following these tips, you can greatly reduce the likelihood of your RV air conditioner freezing up. Remember, regular maintenance, proper airflow, clean air filters, and optimal insulation are key to keeping your RV cool and comfortable throughout your travels.
Regular Maintenance
Regular maintenance is essential to keep your RV air conditioner in optimal condition and prevent freezing issues. By incorporating regular maintenance into your RV care routine, you can identify and address any potential problems before they worsen. Here are some key maintenance tasks to keep your air conditioner running smoothly:
- Clean the Exterior: Start by cleaning the exterior of your RV air conditioner unit. Remove any dirt, debris, or leaves that may have accumulated on the unit. This helps improve airflow and prevents the buildup of contaminants that can affect its performance.
- Inspect the Wiring: Check the wiring connections of your air conditioner unit. Look for any signs of fraying, damage, or loose connections. If you spot any issues, consult a professional for repairs or replacements.
- Examine the Condenser Coil: The condenser coil is located on the exterior of your RV and plays a vital role in releasing heat. Inspect the coil for any blockages or debris. Clear any obstructions to maintain proper airflow and prevent overheating.
- Clean the Evaporator Coil: The evaporator coil is responsible for cooling the air inside your RV. Over time, it can accumulate dirt and dust, hindering its efficiency. Clean the coil regularly to ensure proper airflow and prevent it from freezing up. Use a soft brush or a vacuum cleaner to gently remove any debris.
- Check the Condensate Drain: The condensate drain carries moisture away from your RV air conditioner unit. Check the drain for any clogs or blockages that may impede its function. Clear any debris and ensure that the drain is free-flowing to prevent water buildup that can lead to freezing.
- Inspect and Lubricate the Fan Motor: The fan motor is responsible for circulating the air within your RV. Regularly inspect the fan motor and lubricate it as per the manufacturer’s guidelines. Proper lubrication helps prevent overheating and ensures smooth operation of the fan.
- Test and Calibrate the Thermostat: Check the accuracy of your thermostat by comparing the displayed temperature with an external thermometer. If there is a significant difference, consider recalibrating or replacing the thermostat to maintain accurate temperature control.
Remember to follow the manufacturer’s guidelines for maintenance and consult a professional if you are unsure about any specific procedures. Regular maintenance not only keeps your RV air conditioner running efficiently but also helps prolong its lifespan, saving you from costly repairs or replacements down the line.
Proper Airflow
Proper airflow is crucial for the efficient operation of your RV air conditioner and to prevent freezing issues. When there is insufficient airflow, the evaporator coil can become excessively cold, leading to condensation freezing on its surface. To ensure adequate airflow, there are several steps you can take:
- Clear Air Vents: Regularly check and clear any obstructions from the air vents inside your RV. Remove any furniture, curtains, or other items that may block or restrict airflow. Unobstructed vents allow the cooled air to circulate freely throughout your RV.
- Keep Obstacles Away: Ensure that there are no obstacles or obstructions near the evaporator unit or the exterior part of your RV air conditioner. Trim any vegetation or clear away any debris that may impede proper airflow. Adequate clearance around the unit promotes better ventilation.
- Inspect and Clean Ductwork: The ductwork in your RV carries the cooled air from the air conditioner to different areas of your RV. Regularly inspect and clean the ductwork to prevent blockages that can restrict airflow. Remove any dust, debris, or possible obstructions that may hinder the smooth flow of air.
- Check and Repair Leaks: Inspect the ductwork and the connections to ensure there are no air leaks. Leaks can cause a loss of cool air and reduce the overall efficiency of the air conditioning system. Seal any leaks with appropriate duct tape or consult a professional for repairs.
- Utilize Ceiling Fans: Ceiling fans can help improve air circulation within your RV. Turn on the ceiling fans to supplement the air conditioning system and ensure proper airflow throughout the space. The movement of air from the ceiling fans can distribute the cooled air more evenly and prevent the evaporator coil from freezing.
- Consider Portable Fans: In addition to the built-in fans in your RV air conditioner, consider using portable fans strategically to enhance airflow. Position them near the vents or in areas where air circulation is limited to promote better airflow and prevent freezing.
By actively promoting proper airflow, you can maintain a consistent temperature, enhance the performance of your air conditioner, and minimize the risk of the evaporator coil freezing. An adequately ventilated RV ensures a comfortable and refreshing environment during your travels.
Cleaning the Air Filter
Cleaning the air filter of your RV air conditioner is a crucial maintenance task that helps prevent freezing issues and ensures optimal airflow. The air filter plays a vital role in trapping dust, debris, and other particles that can impede the efficiency of your air conditioning system. Over time, the filter becomes clogged, restricting airflow and causing the evaporator coil to become excessively cold. To clean the air filter effectively, follow these steps:
- Locate the Air Filter: The air filter is typically located near the intake vent of your RV air conditioner. Refer to your RV’s owner’s manual to determine the exact location if you are unsure.
- Power Off the Air Conditioner: Before removing the air filter, make sure the air conditioner is turned off. This ensures your safety and prevents any accidental damage to the system.
- Remove the Air Filter: Gently remove the air filter from its housing. Take note of how the filter is positioned so that it can be reinserted correctly after cleaning.
- Inspect the Air Filter: Examine the air filter for any visible signs of dirt, dust, or debris. If the filter appears to be heavily soiled or damaged, it may be best to replace it instead of attempting to clean it.
- Clean the Air Filter: If the air filter is reusable and only lightly soiled, it can be cleaned. Depending on the type of filter, you can either vacuum it using a soft brush attachment or wash it with mild soap and water. Rinse thoroughly and allow the filter to dry completely before reinserting it.
- Reinsert the Air Filter: Once the air filter is dry, carefully reinsert it back into the housing, making sure it is positioned correctly. Pay attention to any arrows or markings that indicate the proper orientation of the filter.
- Regularly Clean or Replace: Cleaning or replacing the air filter should be done regularly to ensure proper airflow and prevent freezing. Refer to the manufacturer’s guidelines for the recommended cleaning intervals or replacement schedule. Factors such as usage, environmental conditions, and air quality will impact how often the air filter needs cleaning or replacement.
By incorporating regular cleaning of the air filter into your RV maintenance routine, you can maintain optimal airflow, improve the efficiency of your air conditioning system, and reduce the risk of the evaporator coil freezing. Clean air filters promote better air quality and contribute to a comfortable and healthy living environment in your RV.
Read more: Why Is My RV Air Conditioner Not Working
Checking Refrigerant Levels
Checking the refrigerant levels in your RV air conditioner is an essential maintenance task to ensure optimal performance and prevent freezing issues. Refrigerant is the substance responsible for absorbing heat from the air, allowing your air conditioner to cool the interior of your RV. Low refrigerant levels can cause the evaporator coil to become excessively cold and lead to condensation freezing on its surface. Here’s how you can check the refrigerant levels:
- Turn Off the Air Conditioner: Before checking the refrigerant levels, make sure the air conditioner is turned off and unplugged. This ensures your safety and prevents any potential accidents.
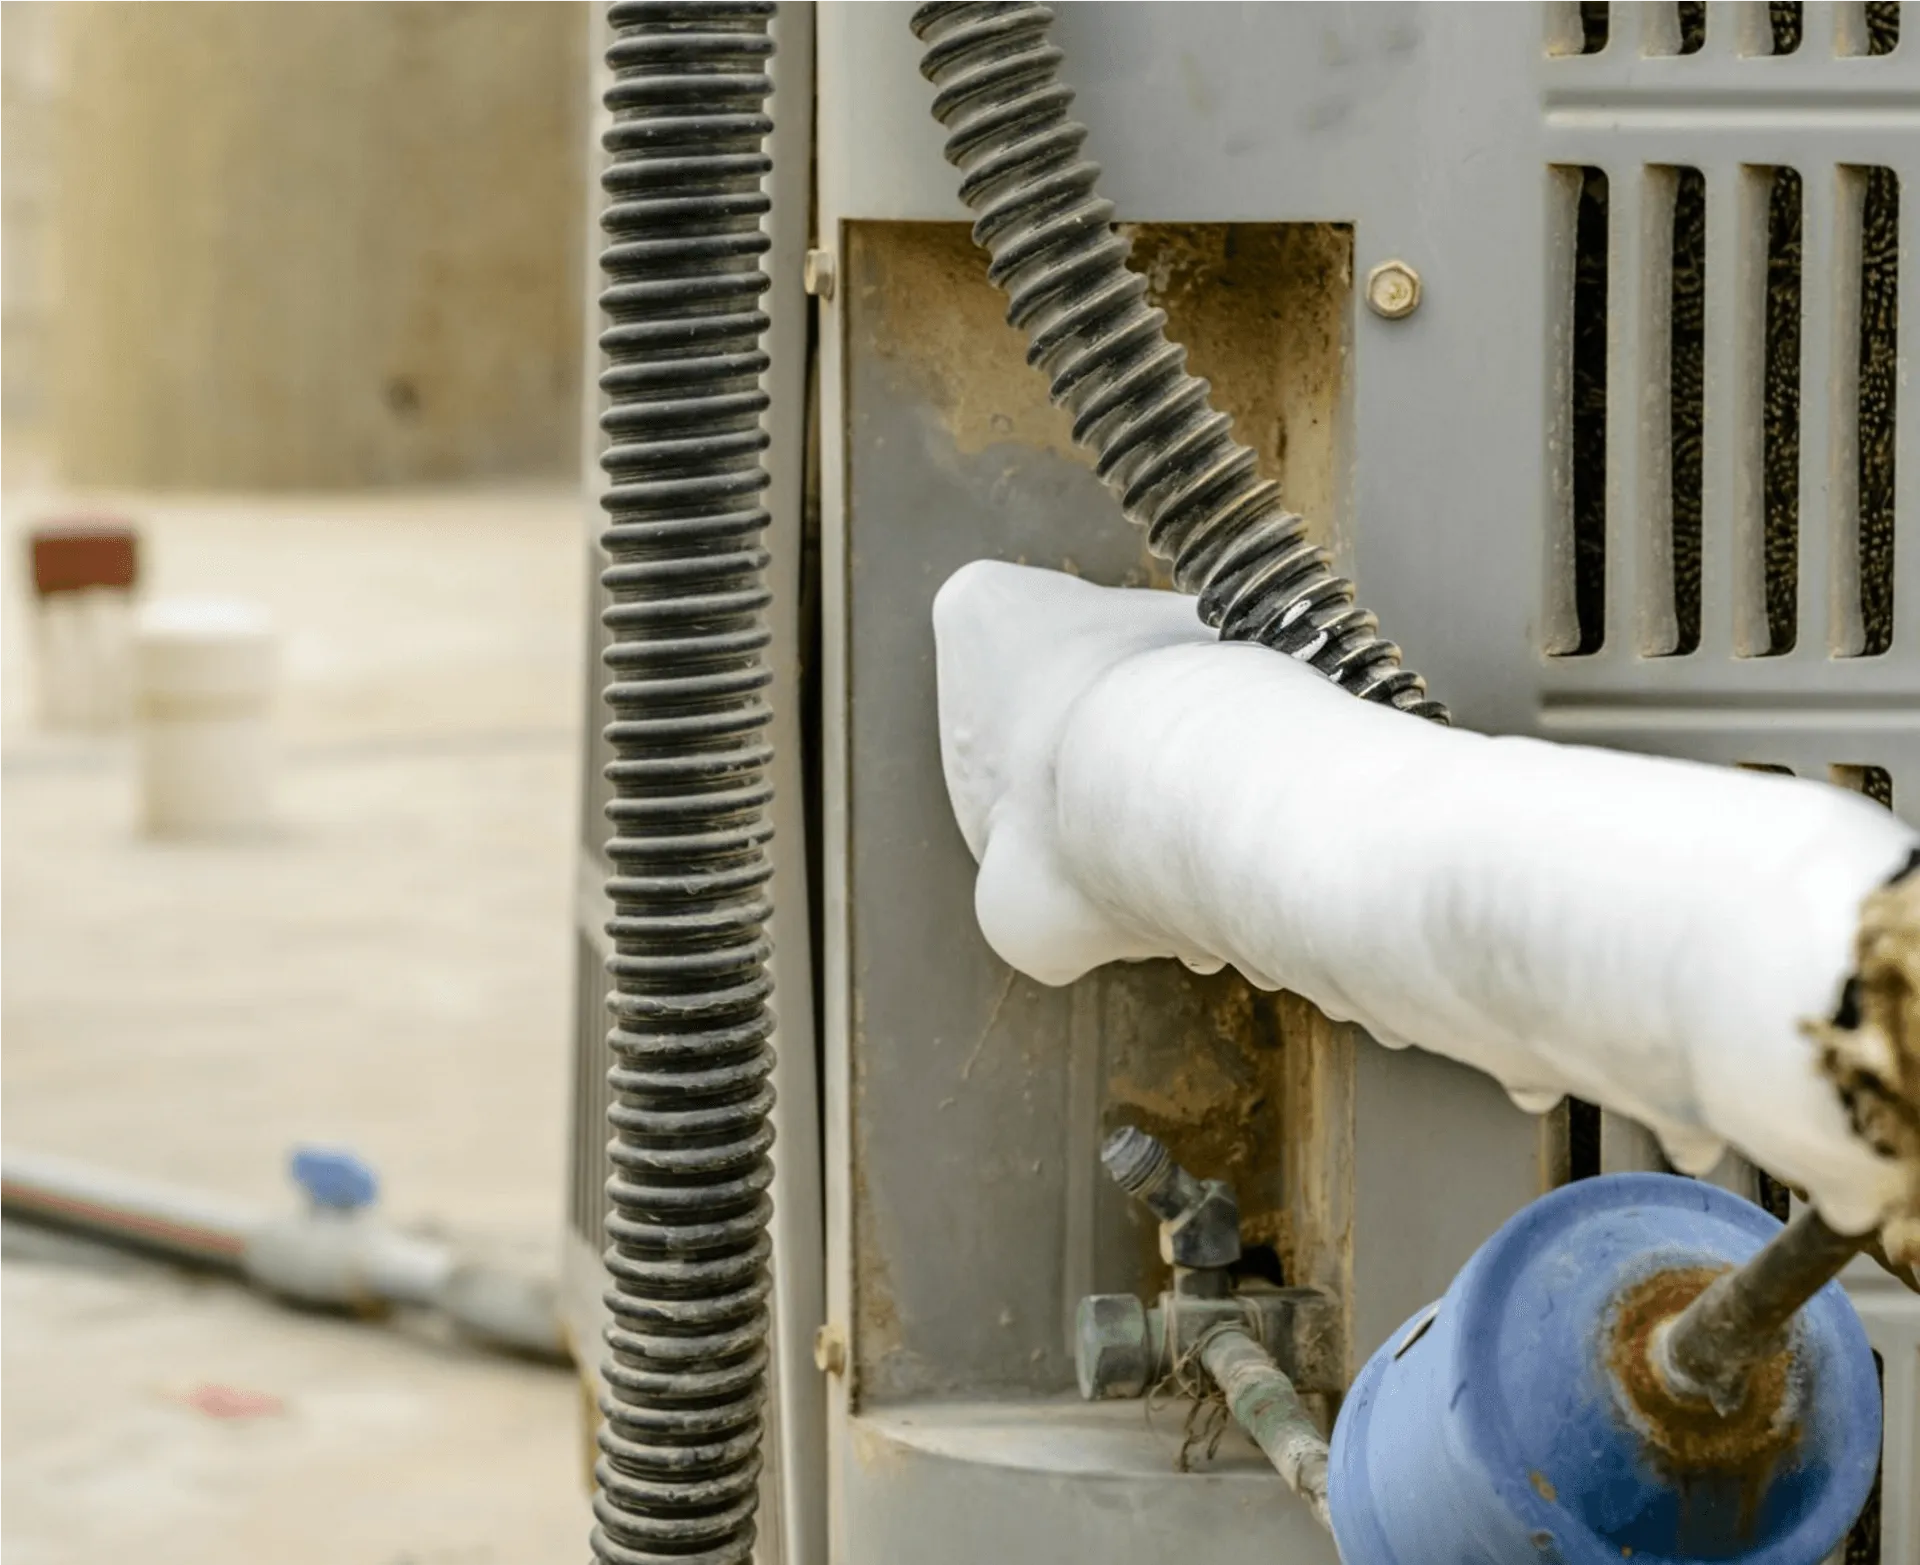
- Locate the Refrigerant Lines: The refrigerant lines connect the evaporator unit to the condenser unit of your air conditioner. These lines are usually located outside your RV, often on the roof. Consult your RV’s owner’s manual or contact the manufacturer to confirm the exact location of the refrigerant lines.
- Inspect the Refrigerant Lines: Examine the refrigerant lines for any visible signs of damage, such as leaks, cracks, or holes. If you notice any significant damage, do not attempt to check the refrigerant levels yourself. It’s best to seek the assistance of a professional HVAC technician.
- Consult a Professional: Checking the refrigerant levels requires specialized equipment and knowledge. It is recommended to hire a professional HVAC technician who has the expertise to handle refrigerant systems. They will have the necessary tools to measure the refrigerant levels accurately.
- Addressing Low Refrigerant Levels: If the professional determines that your RV’s air conditioner has low refrigerant levels, it is important to address the issue promptly. Low levels are often a result of refrigerant leaks. The technician will inspect the system, locate any leaks, and repair them before recharging the refrigerant to the appropriate level.
- Regular Maintenance: To prevent low refrigerant levels and freezing issues in the future, incorporate regular maintenance of your air conditioning system into your routine. This may involve scheduling yearly inspections, which can help detect any potential leaks or issues early on. Timely maintenance and repairs ensure the optimal performance of your RV air conditioner.
Remember, checking refrigerant levels is not a DIY task. It requires expertise and specialized equipment. By consulting a professional and addressing any refrigerant issues promptly, you can maintain the efficiency of your air conditioner, prevent freezing, and ensure a comfortable environment in your RV.
Calibrating the Thermostat
Calibrating the thermostat in your RV is an important step to ensure accurate temperature regulation and prevent freezing of the air conditioner. A properly calibrated thermostat helps maintain the desired temperature and prevents the air conditioner from running excessively, causing the evaporator coil to become excessively cold. Here’s how you can calibrate the thermostat in your RV:
- Verify Temperature Accuracy: Use an external thermometer to verify the accuracy of your thermostat’s temperature reading. Place the thermometer near the thermostat and compare the readings. If there is a significant difference, it may be an indication that your thermostat needs calibration.
- Access the Thermostat Settings: Refer to your RV’s owner’s manual to understand how to access the thermostat settings. Depending on the model, this may involve pressing specific buttons or navigating through a digital menu.
- Reset the Thermostat: Before calibrating, it’s a good idea to reset the thermostat to its default settings. This ensures that any previous adjustments or programming are cleared, and you can start the calibration process from the default state.
- Adjust the Differential Temperature: The differential temperature is the range at which the thermostat operates, determining when the air conditioner turns on and off. Check the manufacturer’s specifications to determine the recommended differential temperature for your RV’s air conditioner.
- Calibrate the Thermostat: Follow the steps outlined in your RV’s owner’s manual or the manufacturer’s instructions to calibrate the thermostat. This may involve adjusting the temperature offset or using specific calibration features provided by the thermostat.
- Test the Thermostat: After calibrating, test the thermostat to ensure accurate temperature control. Set the temperature to a desired level and monitor if the thermostat maintains the correct temperature. Use the external thermometer as a reference to verify the accuracy.
- Repeat if Necessary: If the thermostat is still not reading the temperature accurately, repeat the calibration process. It may take a few attempts to achieve the desired calibration.
- Consider Upgrading to a Programmable Thermostat: If your RV’s thermostat is outdated or consistently challenges calibration, consider upgrading to a programmable thermostat. These thermostats offer more precise temperature control and scheduling options, ensuring better comfort and preventing excessive cooling and freezing of the evaporator coil.
By properly calibrating the thermostat, you can accurately regulate the temperature in your RV and prevent freezing issues. Calibrating the thermostat ensures the efficient operation of your air conditioner and promotes a comfortable environment during your travels.
Avoid Overworking the AC Unit
Overworking your RV’s air conditioning unit can lead to freezing of the evaporator coil. When the air conditioner is pushed beyond its capacity or left running continuously for extended periods, the coils can become excessively cold, causing condensation to freeze on its surface. To prevent this issue and ensure the longevity of your air conditioning unit, it’s important to avoid overworking it. Here are some tips to help you do just that:
- Properly Size Your AC Unit: Ensure that the air conditioning unit in your RV is properly sized for the space it needs to cool. If the unit is too small, it may struggle to cool the RV adequately, leading to continuous operation and potential freezing. Consult with a professional to determine the appropriate size for your specific RV and cooling needs.
- Maintain a Comfortable Temperature: Resist the temptation to set the air conditioner to the coldest temperature setting. Instead, set the temperature to a comfortable level that keeps you cool without straining the air conditioner unnecessarily. A moderate temperature setting helps prevent the evaporator coil from freezing while still providing adequate cooling.
- Utilize Other Cooling Methods: Consider using additional cooling methods in conjunction with your air conditioner. Utilize fans strategically to improve air circulation and create a more comfortable environment. Open windows during cooler periods or when the outside temperature is lower to reduce the workload on the air conditioner.
- Implement Proper Insulation: Insufficient insulation allows the transfer of heat into your RV, making the air conditioner work harder to cool the interior. Properly insulate your RV to minimize heat gain and loss. Consider using insulation in windows, doors, and other areas prone to heat transfer. Enhanced insulation helps maintain a stable temperature and prevents unnecessary strain on the air conditioner.
- Upgrade to a Programmable Thermostat: Upgrading to a programmable thermostat allows you to set specific temperature schedules. This feature enables the air conditioner to run efficiently when needed and reduces operation during times when cooling demands are lower. The ability to schedule temperature changes helps avoid unnecessary strain on the air conditioner.
- Take Breaks: If you’re staying in a location with extremely high temperatures, give your air conditioner periodic breaks. Allowing the air conditioner to rest for short intervals between cooling cycles helps prevent it from running continuously and potentially freezing up the evaporator coil.
By following these tips and being mindful of not overworking your RV’s air conditioning unit, you can maintain its efficiency, prevent freezing, and prolong its lifespan. Remember, a well-maintained and properly used air conditioner ensures a comfortable and enjoyable experience during your RV adventures.
Insulating the RV
Insulating your RV is a critical step in maintaining a comfortable temperature and preventing freezing of the air conditioner. Proper insulation helps to regulate the interior climate by reducing heat transfer and ensuring that the air conditioner operates efficiently. Here are some tips to effectively insulate your RV:
- Check for Gaps and Cracks: Inspect your RV thoroughly for any gaps, cracks, or openings where warm air can enter or cool air can escape. Pay close attention to areas around windows, doors, vents, and electrical penetrations. Seal these openings using weatherstripping, caulk, or foam sealant to prevent heat exchange and maintain a stable temperature.
- Upgrade Insulation Materials: Consider upgrading your RV’s insulation materials for improved thermal efficiency. There are various insulation options available, such as foam panels, reflective insulation, and spray foam insulation. Research the different types and choose the one that best suits your RV and climate conditions to minimize heat transfer and enhance insulation.
- Pay Attention to Windows and Doors: Windows and doors are common areas where heat can enter or escape from your RV. Install thermal or blackout curtains to effectively reduce heat gain or loss through windows. Ensure that windows and doors are properly sealed with weatherstripping and use draft stoppers or door sweeps to prevent air leaks.
- Utilize Skirting: If you are stationary for an extended period, consider using skirting around the bottom of your RV. Skirting acts as a barrier against drafts and helps insulate the underbelly, reducing heat transfer and improving overall energy efficiency.
- Consider Roof Coatings: Apply a reflective roof coating to your RV’s roof. The coating reflects sunlight and reduces heat absorption, thereby decreasing the workload on your air conditioner. It helps to keep the evaporator coil at an optimal temperature and minimizes the risk of freezing.
- Insulate Exposed Pipes and Ducts: Insulate exposed pipes and ducts to prevent heat gain or loss as air travels through them. Wrap them with insulation materials specifically designed for pipes and ductwork. This ensures that the air conditioner’s cooling output is not compromised due to energy loss through uninsulated lines.
By properly insulating your RV, you can minimize heat infiltration, increase energy efficiency, and reduce the risk of freezing the air conditioner. It creates a more comfortable living environment and allows your air conditioner to work more effectively, resulting in a more enjoyable travel experience.
Read more: Why Is My Macbook Air Heating Up
Conclusion
Ensuring that your RV air conditioner is functioning properly is crucial for a comfortable and enjoyable travel experience. Freezing of the air conditioner can disrupt your plans and make your journey uncomfortable, especially during hot summer trips. By understanding the causes of RV air conditioner freezing up and implementing preventive measures, you can minimize the risk of this issue occurring.
We explored various factors that can contribute to the freezing of an RV air conditioner, such as insufficient airflow, dirty air filters, low refrigerant levels, faulty thermostats, overworking the AC unit, and insulation issues. Each of these factors can impact the efficiency and operation of the air conditioner, leading to freezing and decreased cooling performance.
To prevent the freezing of your RV air conditioner, regular maintenance is essential. This includes cleaning the air filter, checking refrigerant levels, calibrating the thermostat, and conducting thorough inspections. Proper maintenance ensures optimal airflow, accurate temperature control, and overall efficiency of the air conditioning system.
Additionally, taking preventive measures like ensuring proper airflow, avoiding overworking the AC unit, and properly insulating your RV can significantly reduce the risk of freezing. Clearing air vents, maintaining comfortable temperatures, utilizing other cooling methods, and upgrading insulation materials all contribute to maintaining a stable temperature and preventing the evaporator coil from becoming excessively cold.
In conclusion, by following the tips provided in this article, you can prevent the freezing of your RV air conditioner and enjoy a comfortable and relaxing journey. Regular maintenance, proper airflow, clean air filters, adequate insulation, and avoiding overworking the AC unit are key to keeping your RV cool and comfortable. Remember to consult a professional for any repairs or maintenance tasks that you are unsure about, ensuring the optimal performance and longevity of your RV air conditioning system.
Frequently Asked Questions about Why Is My RV Air Conditioner Freezing Up
Was this page helpful?
At Storables.com, we guarantee accurate and reliable information. Our content, validated by Expert Board Contributors, is crafted following stringent Editorial Policies. We're committed to providing you with well-researched, expert-backed insights for all your informational needs.