Home>Dining>Table Decor>How To Restore A 1950s Style Kitchen Table
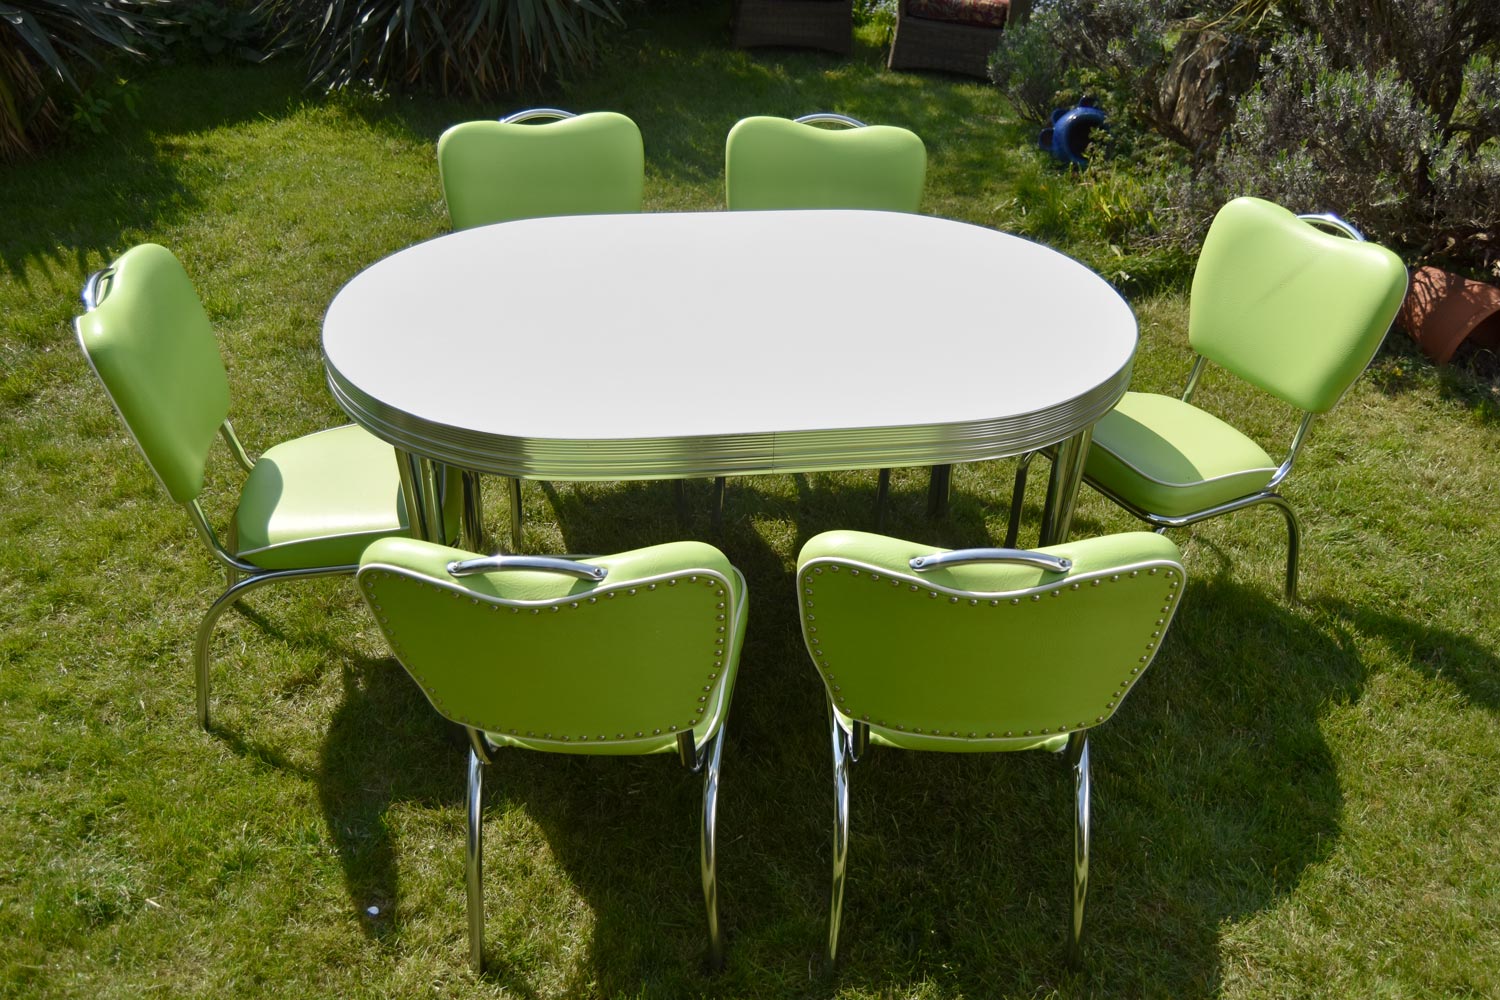
Table Decor
How To Restore A 1950s Style Kitchen Table
Modified: December 7, 2023
Learn how to restore your vintage 1950s style kitchen table with our detailed guide. Discover table decor ideas to bring retro charm to your home.
(Many of the links in this article redirect to a specific reviewed product. Your purchase of these products through affiliate links helps to generate commission for Storables.com, at no extra cost. Learn more)
Introduction
Welcome to the world of vintage charm and timeless beauty! If you have a 1950s style kitchen table that has seen better days, fear not. With a little bit of elbow grease and some TLC, you can restore it to its former glory. Whether you inherited this piece of furniture or stumbled upon it at a flea market, reviving a vintage table allows you to bring a touch of nostalgia and character into your home.
Restoring a 1950s style kitchen table is not only a rewarding DIY project, but it is also a great way to preserve a piece of history. These tables were a staple in many households during the mid-century era, known for their durability and iconic design. By undertaking this restoration process, you are not only breathing new life into the table but also paying homage to the craftsmanship of the past.
In this step-by-step guide, we will walk you through the process of restoring a 1950s style kitchen table. We will cover everything from gathering the necessary tools and materials to the final cleaning and finishing touches. So, put on your DIY hat and get ready to embark on a journey to restore your cherished table.
Before diving into the restoration process, it is important to note that the steps outlined in this guide may vary depending on the current condition of your table. Some tables may require more extensive repairs, while others may simply need a fresh coat of paint or stain. It is always a good idea to assess the condition of your table before starting any restoration work, as this will help you determine the level of effort and resources required.
Now that you have an overview of what lies ahead, let’s get started on transforming your 1950s style kitchen table into a showpiece that will be the envy of your friends and family!
Key Takeaways:
- Reviving a 1950s style kitchen table involves gathering tools, assessing the condition, repairing damages, and adding a fresh coat of paint or stain. The process pays homage to the craftsmanship of the past and brings nostalgia into the home.
- Restoring a vintage table requires careful attention to detail, from removing the old finish to reassembling the table and adding finishing touches. The result is a stunning centerpiece that preserves the timeless beauty of the 1950s.
Step 1: Gather necessary tools and materials
Before you can begin restoring your 1950s style kitchen table, you’ll need to gather the necessary tools and materials. Here’s a list of what you’ll need:
- Protective gear: Safety should always come first. Make sure to have goggles, gloves, and a dust mask to protect yourself from any potential hazards.
- Sanding materials: Depending on the condition of your table, you may need sandpaper or a sanding block. Choose a variety of grits, such as coarse, medium, and fine, to tackle different areas of the table.
- Paint or stain: Decide whether you want to paint or stain your table. Choose a color or finish that complements your kitchen decor and personal style.
- Paintbrushes or foam rollers: These will be used to apply the paint or stain to the table surface. Make sure to choose brushes or rollers appropriate for the size and type of material you’ll be working with.
- Primer (if needed): Depending on the type of paint you’ll be using and the condition of your table, you may need a primer to create a smooth and durable surface for the paint to adhere to.
- Wood filler: If your table has any dents, scratches, or holes, you’ll need wood filler to repair them. Choose a filler that matches the color of your table for a seamless finish.
- Putty knife or scraper: These tools will be used to remove any old paint or finish from the table surface.
- Cleaner and rags: Before starting the restoration process, it’s important to thoroughly clean the table. Use mild soap, water, and a rag to remove any dirt, dust, or grime.
- Sealer or varnish: To protect the newly painted or stained surface and provide a durable finish, you’ll need a sealer or varnish. Choose one that is specifically designed for wood surfaces.
Once you have gathered all the necessary tools and materials, you’ll be well-prepared to tackle the restoration process. Having everything at hand will save you time and ensure a smooth workflow throughout the project.
Now that you’re equipped with the necessary tools, let’s move on to preparing the workspace in the next step.
Step 2: Prepare the workspace
Before you dive into the restoration process, it’s important to prepare your workspace to ensure an efficient and safe working environment. Here are the steps to follow:
- Choose a well-ventilated area: Restoring a 1950s style kitchen table can involve using chemicals, paints, and stains that emit strong fumes. It’s best to work in a well-ventilated area, such as a garage or outdoor space, to minimize the inhalation of fumes.
- Cover the surrounding area: Protect the floor or any nearby furniture with drop cloths or plastic sheets. This will prevent any drips or spills from damaging your surroundings.
- Elevate the table: Place the table on a work surface that allows easy access to all sides. This could be a sturdy workbench, sawhorses, or even a large piece of plywood set on top of a stable surface.
- Set up a work area: Organize your tools and materials within easy reach. Keep them on a separate table or in a designated area to avoid clutter and ensure efficiency during the restoration process.
- Create a cleaning station: Set up a space with water, soap, and rags where you can clean your tools as needed. This will help maintain the cleanliness of your tools and prevent any cross-contamination between different steps of the restoration.
- Ensure good lighting: Adequate lighting is essential for a thorough restoration process. Make sure your workspace is well-lit, whether through natural light or by using additional lighting such as lamps or work lights.
- Consider safety precautions: It’s important to have a fire extinguisher nearby, just in case. Additionally, ensure that all electrical cords are in good condition and not a trip hazard.
By taking the time to properly set up your workspace, you’ll be able to work efficiently and safely throughout the restoration process. A well-organized and clean workspace will also contribute to better results, allowing you to focus on the task at hand.
Now that your workspace is ready, it’s time to assess the current condition of your table in the next step.
Step 3: Assess the current condition of the table
Before you begin any restoration work on your 1950s style kitchen table, it’s crucial to assess its current condition. This step will help you determine the extent of repairs or restoration needed and guide your approach. Here’s how to assess the condition of your table:
- Inspect the tabletop: Carefully examine the tabletop surface for any visible damage, such as deep scratches, dents, or watermarks. Take note of any areas that require special attention.
- Check the legs and frame: Inspect the legs and frame of the table for stability. Look for loose joints, cracks, or structural damage that may need repair. Wiggle the table to check for any noticeable wobbling.
- Examine the finish: Evaluate the existing finish of the table. Determine if it’s in good condition or if it needs to be stripped off. Look for any peeling or chipping paint, or signs of wear and discoloration on stained surfaces.
- Check for wood damage: Look for signs of rot, woodworm, or water damage on the table surface and legs. These issues may require specialized treatment or repair to ensure the table’s longevity.
- Assess hardware and attachments: If your table has any hardware, such as hinges, screws, or brackets, inspect them for damage or looseness. Ensure they are in good condition and will be functional after the restoration process.
Make a thorough assessment by taking notes or photographs of the table’s condition. This will help you track the progress of your restoration and serve as a reference point for any repairs or treatments needed.
Based on your assessment, you’ll have a clear understanding of the level of restoration required for your table. Whether it’s a simple cosmetic touch-up or more extensive repairs, having this knowledge will guide you through the next steps.
Now that you’ve assessed the table’s condition, it’s time to move on to step 4: Removing the old finish or paint.
Step 4: Remove old finish or paint
Removing the old finish or paint from your 1950s style kitchen table is an essential step in the restoration process. This will provide a clean and smooth surface for the next steps of the restoration. Here’s how to remove the old finish or paint:
- Choose the appropriate method: Depending on the type of finish or paint on your table, you can use different techniques to remove it. Common methods include sanding, using chemical strippers, or a combination of both.
- Sanding the surface: If your table has a relatively thin layer of paint or finish, sanding may be sufficient to remove it. Start with a coarse grit sandpaper, such as 80 or 100, and gradually move to finer grits, such as 150 or 200, for a smoother finish.
- Chemical strippers: If your table has multiple layers of paint or a stubborn finish, chemical strippers can be effective. Follow the manufacturer’s instructions and apply the stripper with a brush or a sponge. Allow it to penetrate and soften the finish before scraping it off with a putty knife or scraper.
- Remove all residue: After either sanding or using chemical strippers, make sure to remove all the residue from the surface. Use a damp cloth or a vacuum to clean up the dust or leftover particles.
- Inspect for stubborn spots: Take a closer look at the table and check for any stubborn spots or areas where the old finish or paint may still be present. If needed, repeat the stripping process or sand those areas until the surface is uniformly clean.
Remember to work in a well-ventilated area and wear protective gear, especially when using chemical strippers. Follow proper safety precautions and dispose of any stripping materials or debris according to local regulations.
By removing the old finish or paint, you are preparing the table for the next steps of the restoration process. This step ensures a clean and fresh canvas, ready for the transformation that awaits.
Now that you’ve removed the old finish or paint, let’s move on to step 5: Sanding the table surface.
Read more: How To Restore A Veneer Dining Table
Step 5: Sand the table surface
After removing the old finish or paint, it’s time to sand the surface of your 1950s style kitchen table. Sanding will help smooth out any imperfections, scratches, or uneven spots, creating a clean and uniform surface for the next steps of the restoration process. Here’s how to sand the table surface:
- Start with coarse grit sandpaper: Begin by using a coarse grit sandpaper, around 120 or 150, to remove any remaining roughness or stubborn spots on the table surface. Sand in the direction of the woodgrain, applying even pressure across the entire surface.
- Gradually move to finer grits: As you progress, switch to finer grit sandpapers, such as 220 or 320, to achieve a smoother finish. Repeat the sanding process, focusing on blending any transitional areas and ensuring an even surface.
- Sand edges and corners: Use sanding sponges or folded sandpaper to reach the edges and corners of the table. Be gentle and careful to avoid rounding the edges. Sand in the same direction as the woodgrain to maintain consistency.
- Remove dust between grits: After sanding with each grit, remove the dust from the table surface using a vacuum cleaner or a tack cloth. This will help you see any imperfections that need further attention.
- Final sanding by hand: For a truly smooth finish, consider doing a final sanding by hand using a very fine grit sandpaper, such as 400 or 600. This step will give the table surface a silky feel and prepare it for the next stage of the restoration.
Throughout the sanding process, remember to take breaks and periodically inspect the table surface to ensure you are achieving the desired smoothness. Be mindful of the amount of pressure applied to avoid over-sanding or damaging the wood.
Once you have finished sanding, make sure to remove all the sanding dust from the table surface using a vacuum cleaner or a tack cloth. This will prevent any particles from interfering with the quality of the finish or paint you’ll be applying.
With the table surface now beautifully sanded, it’s time to move on to step 6: Repairing any damages.
When restoring a 1950s style kitchen table, start by sanding down the old finish and applying a fresh coat of paint or stain to bring back its original charm.
Step 6: Repair any damages
During the restoration process of your 1950s style kitchen table, it’s important to address any damages that may be present. Repairing these damages will ensure the table’s structural integrity and enhance its overall appearance. Here’s how to repair any damages:
- Inspect for damages: Take a close look at the table surface, legs, and frame to identify any scratches, dents, cracks, or other signs of damage. Pay attention to areas that may have been previously hidden by the old finish or paint.
- Fill in scratches and dents: Using a wood filler that matches the color of your table wood, fill in any shallow scratches or dents. Follow the manufacturer’s instructions for applying and smoothing the filler. Let it dry completely before moving on to the next step.
- Repair cracks or loose joints: If you notice any cracks or loose joints on the table, you’ll need to apply wood glue and clamp the affected areas. Remove any old glue using a scraper or sandpaper, then apply a generous amount of wood glue and secure the joint with clamps. Wipe off any excess glue and allow it to dry according to the glue manufacturer’s instructions.
- Restoring veneer surfaces: If your table has a veneer surface, take extra care when repairing any damages. Use a small brush to apply wood glue to any lifted or cracked veneer, then carefully press it down and secure it with clamps or heavy books until the glue dries.
- Sand repaired areas: Once the wood filler and glue have dried, sand the repaired areas using a fine grit sandpaper. Blend the repaired spots with the rest of the table surface to create a seamless appearance.
Keep in mind that some damages, especially extensive or structural ones, may require the expertise of a professional furniture restorer. If you are unsure about tackling certain repairs, it’s best to seek professional help to ensure the table is restored properly.
Completing this step will not only address any damages but also contribute to the table’s overall longevity. Taking the time to repair these issues will greatly enhance the final result of your restoration project.
Now that you have repaired any damages, it’s time to move on to step 7: Applying a fresh coat of paint or stain.
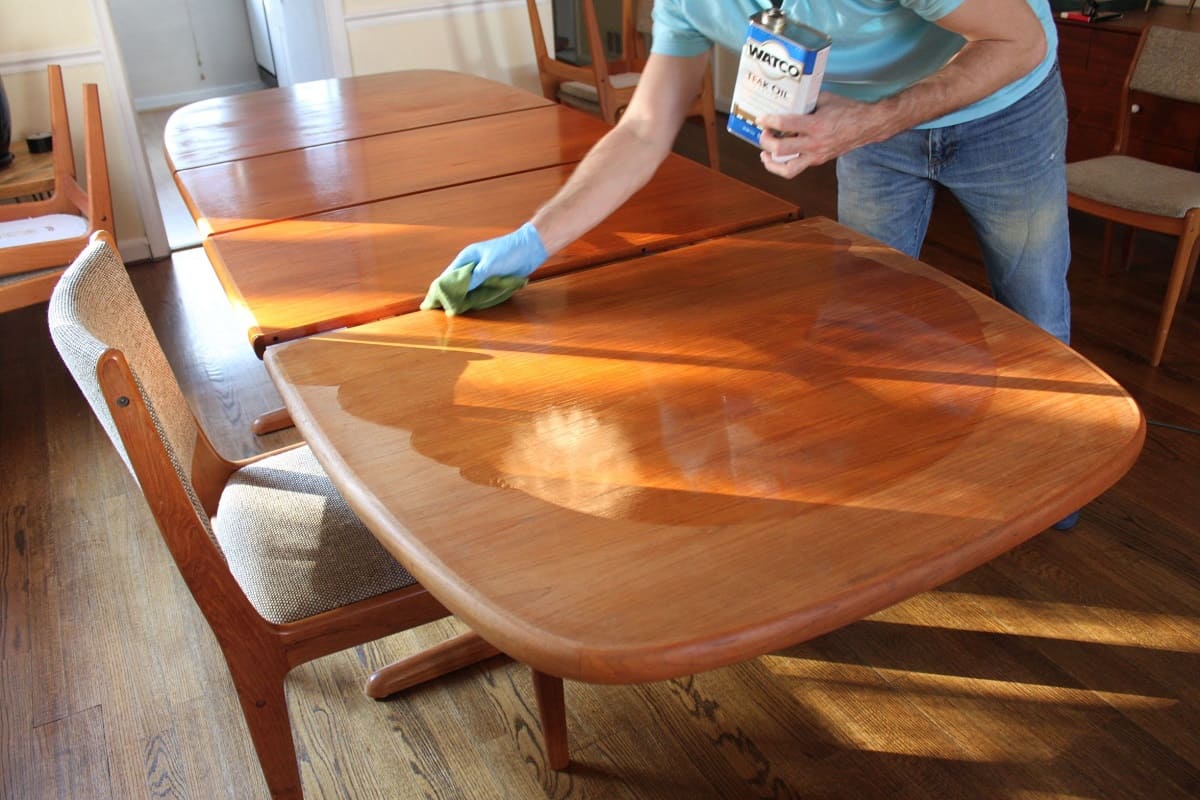
Step 7: Apply a fresh coat of paint or stain
Now that you’ve addressed any damages and the table is repaired, it’s time to give your 1950s style kitchen table a fresh new look with a coat of paint or stain. This step will not only enhance the aesthetic appeal of the table but also provide a protective layer. Here’s how to apply a fresh coat of paint or stain:
- Choose your finish: Decide whether you want to paint the table or apply a stain to enhance the natural beauty of the wood. Consider your personal style, kitchen decor, and the overall look you want to achieve.
- Prepare the surface: Before applying any finish, make sure the table surface is clean, dry, and free of dust. Use a tack cloth or a damp cloth to remove any debris or residue.
- Apply primer (if necessary): If you are painting the table or if the wood has a tendency to bleed, use a primer to create a smooth and even surface. Follow the manufacturer’s instructions for applying and drying time.
- Painting the table: If you’ve chosen to paint the table, apply the paint using a brush or a foam roller, working in the same direction as the woodgrain. Apply thin, even coats, allowing each coat to dry before applying the next one. Follow the drying time specified by the paint manufacturer.
- Staining the table: If you’ve opted for a stain, use a clean brush or a lint-free cloth to apply the stain in the direction of the woodgrain. Work in small sections, wiping off any excess stain with a clean cloth. Allow the stain to dry according to the manufacturer’s instructions.
- Additional coats and touch-ups: Depending on the desired color and intensity, you may need to apply additional coats of paint or stain. Allow each coat to dry completely before applying the next one. Don’t forget to touch up any missed spots or uneven areas as you go.
Remember to work in a well-ventilated area and wear protective gear, especially when working with paint or stain. Follow the instructions provided by the manufacturer for the specific product you’re using.
By applying a fresh coat of paint or stain, you’ll be giving your 1950s style kitchen table a new lease on life. This step will not only protect the wood but also allow you to customize the table to your desired aesthetic.
Now that you’ve applied a fresh coat of paint or stain, it’s time to seal the table surface in step 8.
Step 8: Seal the table surface
After applying a fresh coat of paint or stain to your 1950s style kitchen table, the next step is to seal the surface. Sealing the table will provide additional protection to the finish and enhance its durability. Here’s how to seal the table surface:
- Choose the appropriate sealer: Select a sealer or varnish that is specifically designed for wood surfaces. Consider factors such as the level of sheen you desire and the type of protection you need (e.g., heat resistance, water resistance, etc.)
- Prepare the surface: Ensure that the table surface is clean, dry, and free of dust before applying the sealer. Use a tack cloth or a damp cloth to remove any debris or residue.
- Apply the sealer: Using a brush or a foam applicator, apply the sealer evenly over the entire table surface. Follow the manufacturer’s instructions for the recommended application method and drying time.
- Allow the sealer to cure: After applying the sealer, allow it to cure and dry completely. This may take several hours or even days, depending on the specific sealer product and the recommended curing time.
- Sand between coats (optional): If desired, you can lightly sand the table surface between coats of sealer. This will help create a smoother finish and remove any imperfections that may have occurred during the application.
- Apply additional coats: Depending on the level of protection you desire, you may need to apply multiple coats of sealer. Allow each coat to dry completely before applying the next one, and follow the recommended drying time provided by the manufacturer.
Sealing the table surface not only protects it from everyday wear and tear but also enhances the beauty of the paint or stain. The sealer will provide a protective barrier against moisture, scratches, and other potential damage.
Be sure to follow the instructions provided by the manufacturer for the specific sealer product you’re using. This will ensure the best results and longevity of the finish.
With the table surface properly sealed, you’re one step closer to completing the restoration process. We’re almost there, but first, let’s move on to step 9: Reassembling the table if needed.
Read more: How To Restore A Dining Room Table
Step 9: Reassemble the table if needed
After completing the necessary refinishing and sealing steps, it’s time to reassemble your 1950s style kitchen table if any parts were disassembled during the restoration process. This step will bring the table back together and ensure its stability and functionality. Here’s how to reassemble the table:
- Gather all the parts: Make sure you have all the pieces necessary to reassemble the table. This may include the tabletop, legs, frame, and any additional hardware or attachments.
- Clean and inspect the parts: Before reassembling, clean each part to remove any dust or dirt that may have accumulated during the restoration process. Inspect the parts for any damages or issues that may need to be addressed before assembly.
- Align the parts: Place the tabletop on a soft surface to avoid scratching the newly finished surface. Align the legs and frame with their corresponding positions on the tabletop. If there were any bolts or screws that were removed, ensure they are ready for reattachment.
- Secure the parts: Using the appropriate tools, secure the legs and frame to the tabletop. Depending on the construction of your table, this may involve attaching bolts, screws, or other fasteners. Follow any specific instructions or guidelines provided by the manufacturer.
- Tighten and check stability: Once all the parts are secured, tighten any bolts or screws to ensure stability. Give the table a gentle shake to check for any wobbling or loose joints. If necessary, make any adjustments or tighten the connections further.
Reassembling the table will not only complete the restoration process but also ensure that your table is ready to be used and enjoyed. Take your time during this step to ensure all parts are properly aligned and secured.
If you encounter any difficulties during the reassembly process or if any parts are damaged beyond repair, consider seeking the assistance of a professional furniture restorer or carpenter. They will be able to provide expertise and guidance to ensure a successful reassembly.
With your table reassembled, it’s almost time for the final step. In the next step, we’ll add the finishing touches and give the table a thorough cleaning.
Step 10: Finishing touches and final cleaning
Congratulations! You’re in the final step of restoring your 1950s style kitchen table. Now it’s time to add those finishing touches that will truly bring out the beauty of your restored piece. Here’s what you need to do:
- Inspect for any imperfections: Take a close look at the table for any remaining imperfections or areas that may need touch-ups. Fix any small blemishes or uneven spots using touch-up paint or stain. This will ensure a smooth and flawless finish.
- Reinstall any hardware: If you had removed any hardware during the restoration process, such as hinges or drawer pulls, now is the time to reinstall them. Ensure they are properly aligned and secure.
- Apply protective pads or caps: To protect your floors and prevent scratches, consider adding protective pads or caps to the bottom of the table legs. This will also provide stability and reduce any wobbling.
- Final cleaning: Give the entire table a final cleaning to remove any accumulated dust or debris from the restoration process. Use a mild soap and water solution and a soft cloth to gently wipe down the table surface and all its components.
- Polish and shine: If desired, you can apply a furniture polish or wax to add a final touch of shine and protection to the table. Follow the instructions provided by the manufacturer for the specific product you’re using.
Taking the time to address any final details and giving the table a thorough cleaning will help showcase the results of your hard work and dedication. It’s those final touches that add that extra level of perfection to your restored 1950s style kitchen table.
After completing this step, step back and admire your newly restored table. You have successfully revived a piece of history and created a beautiful centerpiece for your kitchen.
Remember to properly maintain and care for your restored table by avoiding harsh chemicals, excessive moisture, and direct sunlight. With proper care, your 1950s style kitchen table will continue to bring joy and nostalgia to your home for years to come!
Congratulations again on completing the restoration process. Enjoy your beautifully restored 1950s style kitchen table!
Conclusion
Restoring a 1950s style kitchen table is a labor of love that allows you to bring a piece of history back to life. By following the steps outlined in this guide, you’ve learned how to transform a worn-out table into a stunning centerpiece for your kitchen. Throughout this journey, you’ve gathered the necessary tools and materials, prepared your workspace, assessed the table’s condition, removed the old finish or paint, sanded the surface, repaired any damages, applied a fresh coat of paint or stain, sealed the table surface, reassembled the table if needed, added the finishing touches, and given it a final clean.
The restoration process not only enhances the appearance of the table but also preserves its legacy. By breathing new life into a vintage piece, you’ve not only created a beautiful focal point for your kitchen, but you’ve also paid homage to the craftsmanship and design of the mid-century era. Your restored table carries a sense of nostalgia and character that is sure to captivate the admiration of your friends and family.
Remember, the key to a successful restoration is to balance the necessary repairs and refinishing while maintaining the table’s original charm. With careful attention to detail, a bit of creativity, and the right techniques, you can create a stunning transformation that reflects your personal style and preserves the timeless beauty of the 1950s.
As you enjoy your restored 1950s style kitchen table, remember to care for it with caution. Avoid placing hot items directly on the surface, use coasters for glasses and dishes, and clean spills promptly to prevent any damage. Regularly dust and clean the table to maintain its beauty and longevity.
Congratulations on embarking on this rewarding journey of restoring a 1950s style kitchen table. Your dedication and hard work have resulted in a remarkable transformation that brings joy and nostalgia into your home. Be proud of the piece you’ve created and continue to cherish the memories it will create for years to come.
Frequently Asked Questions about How To Restore A 1950s Style Kitchen Table
Was this page helpful?
At Storables.com, we guarantee accurate and reliable information. Our content, validated by Expert Board Contributors, is crafted following stringent Editorial Policies. We're committed to providing you with well-researched, expert-backed insights for all your informational needs.


0 thoughts on “How To Restore A 1950s Style Kitchen Table”