Tableware
How To Restore A Dining Room Table
Modified: October 20, 2024
Learn how to restore your dining room table and bring it back to life with our step-by-step guide. Discover the best techniques and products to remove stains and scratches and make your tableware shine again.
(Many of the links in this article redirect to a specific reviewed product. Your purchase of these products through affiliate links helps to generate commission for Storables.com, at no extra cost. Learn more)
Introduction
Welcome to the world of tableware restoration! If you have a dining room table that has seen better days, don’t despair. With a little time and effort, you can bring it back to its former glory and create a stunning centerpiece for your dining area.
Restoring a dining room table is a rewarding project that allows you to showcase your creativity and craftsmanship. By restoring rather than replacing your table, you not only save money but also help reduce waste.
In this article, we will guide you through the step-by-step process of restoring a dining room table. Whether your table is made of wood, glass, or another material, the techniques shared here can be applied to bring new life to any tableware.
Before you begin, it’s important to gather the necessary materials. This will ensure that you have everything you need to successfully restore your table. Let’s explore the materials you will need in the next section.
Key Takeaways:
- Restoring a dining room table is a labor of love that requires patience and attention to detail. By following the step-by-step process, you can transform an old table into a stunning centerpiece for your dining area.
- From gathering materials to reassembling the table, each step in the restoration process plays a crucial role. Add final touches that reflect your style and maintain your newly restored table for years to come.
Read more: How To Restore A Veneer Dining Table
Gather the Necessary Materials
Before you embark on the journey of restoring your dining room table, it’s essential to gather all the materials you will need for the project. Having everything at hand will save you time and allow for a smoother restoration process. Here are the materials you should have:
- Protective Gear: Ensure you have a pair of gloves, safety goggles, and a mask to protect yourself from dust, chemicals, and potential injuries.
- Stripping Solution: Depending on the type of finish on your table, you may need a chemical stripper. Make sure to choose one that is suitable for your table’s material.
- Scrapers and Putty Knife: These tools will come in handy for removing the old finish and any stubborn residue. Use scrapers to gently scrape away the old finish, and a putty knife to remove any loose or damaged parts.
- Sandpaper and Sanding Block: Get different grits of sandpaper, such as coarse, medium, and fine, to properly prepare the surface of your table for staining. Attach the sandpaper to a sanding block for even pressure.
- Stain and Applicator: Choose a stain that suits your desired color and the type of wood or material of your table. An applicator brush or cloth will be necessary to evenly apply the stain to the surface.
- Protective Finish: To seal and protect the newly stained surface, you will need a clear protective finish. Options include varnish, polyurethane, or wax. Select a finish suitable for your table’s material.
- Paintbrushes and Rags: Paintbrushes are essential for applying the protective finish, while rags can be used for wiping away excess stain and cleaning the table surface.
- Replacement Parts: Assess your table for any damaged or missing parts, such as screws, bolts, or table feet. Ensure you have the necessary replacement parts before you begin the restoration process.
- Drop Cloth or Plastic Sheet: To protect your working area from spills and drips, lay down a drop cloth or plastic sheet that can easily be cleaned up afterward.
Having these materials readily available will ensure that you can proceed smoothly through each step of the restoration process. Now that you’ve gathered all the necessary materials, let’s move on to the next stage: removing the old finish.
Remove the Old Finish
Before applying a new finish to your dining room table, it’s crucial to remove the old finish completely. Removing the old finish will not only help improve adhesion for the new stain but also eliminate any imperfections or damage that may be present in the old finish. Here’s how you can remove the old finish:
- Prepare your working area by covering it with a drop cloth or plastic sheet to catch any debris or chemicals.
- Put on your protective gear, including gloves, safety goggles, and a mask, to protect yourself from any chemicals and dust.
- If you’re using a chemical stripper, carefully follow the instructions on the packaging for application and safety precautions. Apply the stripper to the table’s surface, working in manageable sections.
- Allow the stripper to sit on the surface for the recommended amount of time, usually indicated on the packaging. This will soften the old finish.
- Use a scraper or putty knife to gently scrape away the softened finish. Be cautious not to apply excessive pressure or damage the underlying wood.
- Continue working in small sections until you have removed the old finish from the entire table. If necessary, repeat the stripping process for stubborn or multiple layers of finish.
- Once the old finish has been removed, wipe down the table surface with a clean cloth or rag to remove any residue.
- Inspect the table for any remaining traces of the old finish. If needed, use fine-grit sandpaper to lightly sand the surface and ensure it is smooth and ready for the next step.
Removing the old finish might be a time-consuming and labor-intensive process, but it is crucial for achieving a beautiful and even end result. Take your time and be patient with this step to attain the best possible foundation for the restoration of your dining room table. Next, we’ll discuss how to repair or replace any damaged parts before moving on to sanding the surface.
Repair or Replace any Damaged Parts
During the process of restoring your dining room table, it’s essential to carefully assess the condition of the table and address any damaged or worn-out parts. Repairing or replacing these parts will not only improve the overall aesthetic appeal of the table but also ensure its stability and longevity. Here are the steps to repair or replace any damaged parts:
- Thoroughly inspect the entire table, paying close attention to the legs, joints, and any decorative elements. Look for cracks, chips, loose parts, or any signs of damage.
- If you come across any loose components, such as screws or bolts, tighten them using the appropriate tools. If necessary, consider replacing them with new hardware.
- If the table has any structural issues like cracks or breaks, consider using wood glue to repair them. Apply the glue evenly to both sides of the affected area, then gently align the pieces and hold them together firmly until the glue dries.
- For more significant structural repairs, such as replacing a broken leg, it may be necessary to consult a professional or skilled carpenter to ensure proper stability and alignment.
- If there are any decorative elements, such as inlays or carvings, that are damaged or missing, you can choose to repair or replace them depending on your skill level and desired outcome.
- If the tabletop itself is damaged beyond repair, consider replacing it with a new one. This may require the assistance of a professional or purchasing a pre-made tabletop that fits your table’s dimensions.
- Before proceeding to the next steps, make sure all repaired or replaced parts are secure and properly aligned. This will ensure a solid foundation for the rest of the restoration process.
By taking the time to repair or replace any damaged parts, you can ensure that your dining room table is not only aesthetically appealing, but also strong and stable. Once you have addressed any repairs, you’re ready to move on to the next step: sanding the surface of the table.
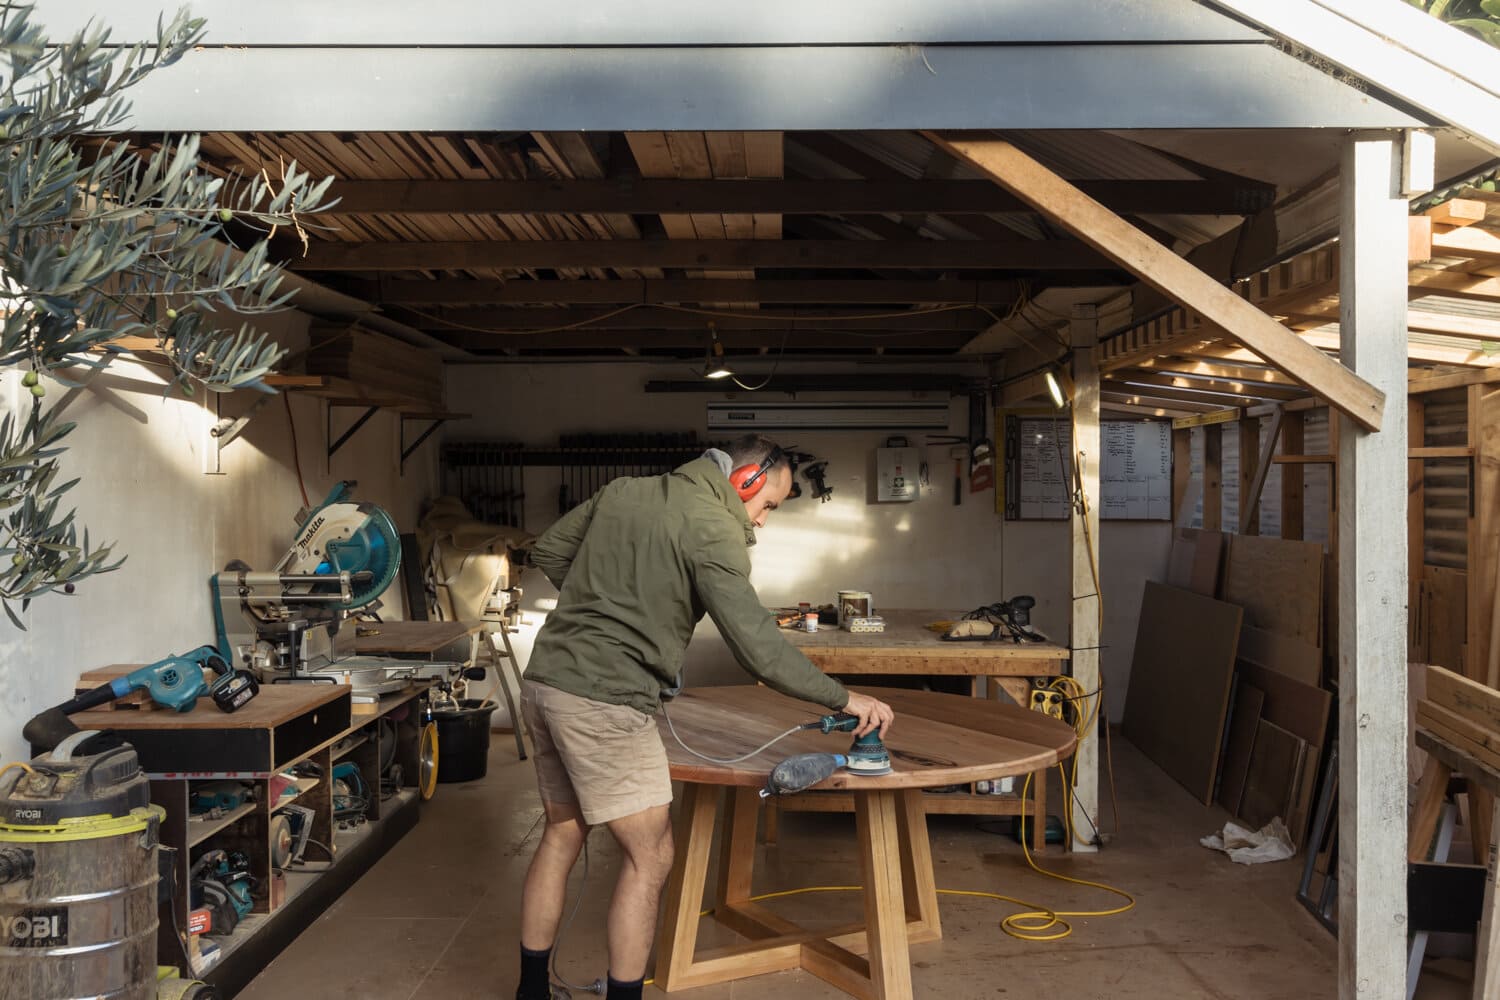
Sanding the Surface
After removing the old finish and addressing any repairs, it’s time to prepare the surface of your dining room table for the next steps of restoration. Sanding the surface will help smooth out imperfections, remove any remaining traces of the old finish, and create a clean and even surface for staining. Follow these steps to sand the surface:
- Begin by selecting the appropriate grit of sandpaper. Coarse sandpaper, such as 80 or 100 grit, is ideal for removing rough patches and old finish, while finer grits, like 150 or 180, can be used for a smoother finish.
- Attach the sandpaper to a sanding block or use a power sander for convenience and more efficient sanding.
- Working in the direction of the grain, lightly sand the entire table surface. Apply even pressure and make long, smooth strokes to avoid creating uneven spots.
- Pay special attention to areas with bumps, scratches, or any remaining traces of the old finish. Sand these areas until they blend seamlessly with the rest of the surface.
- As you progress, switch to finer-grit sandpaper to achieve a smoother and more polished finish. Repeat the sanding process with progressively higher grits until you’re satisfied with the smoothness of the table’s surface.
- Once you’ve completed sanding, use a soft cloth or tack cloth to remove any dust or debris from the surface. This will ensure a clean surface for the staining process.
Sanding the surface of your dining room table is a crucial step in achieving a professional-looking restoration. It not only helps create a smooth and flawless finish but also allows the stain to penetrate the wood evenly. With the sanding complete, it’s time to move on to the exciting part: staining the table!
Use a wood cleaner and a soft cloth to gently remove any dirt or grime from the table surface. Then, apply a wood polish or wax to restore the shine and protect the wood. Repeat this process regularly to keep your dining room table looking its best.
Read more: How To Restore A Teak Dining Table
Staining the Table
Staining your dining room table is where you can truly customize its look and bring out the natural beauty of the wood. Whether you prefer a rich, dark shade or a lighter, more natural tone, staining allows you to achieve the desired color and enhance the overall appearance of your table. Here’s how you can stain the table:
- Start by selecting a stain that matches your desired color and complements the type of wood used in your table. Test the stain on a small, inconspicuous area of the table or on a scrap piece of wood to ensure it achieves the desired result.
- Prepare the surface of the table for staining by ensuring it is clean and free of dust. Use a soft cloth or tack cloth to wipe away any remaining debris.
- Apply a thin and even coat of the stain using a brush or a clean cloth. Work in the direction of the wood grain to ensure an even application.
- Allow the stain to penetrate the wood for the recommended amount of time, usually indicated on the stain’s packaging. The longer the stain sits, the darker the final result will be.
- If you desire a lighter shade, you can remove some of the excess stain by gently wiping the surface with a clean cloth. However, be careful not to remove too much as it may result in an uneven finish.
- For a more intense color or to achieve a richer tone, apply a second coat of stain after allowing the first coat to dry completely. Follow the same instructions for application and drying times.
- Once you’re satisfied with the color, allow the stain to dry completely according to the instructions on the packaging. This typically takes between 24 to 48 hours.
Staining your dining room table gives it character and depth, enhancing its overall appeal. Be sure to follow the manufacturer’s instructions on the stain and take your time to achieve the desired results. After the stain has dried, it’s time to protect your newly stained surface with a protective finish.
Applying a Protective Finish
Applying a protective finish is a crucial step in the table restoration process. The protective finish not only adds a layer of durability but also enhances the beauty of the stained surface. It provides protection against daily wear and tear, spills, and scratches, ensuring that your dining room table remains in top condition for years to come. Here’s how you can apply a protective finish:
- Choose a protective finish that is compatible with the stain and material of your dining room table. Common options include varnish, polyurethane, or wax. Consider factors such as sheen level and ease of application.
- Ensure that the table’s surface is clean and free of any dust or debris. Use a soft cloth or tack cloth to wipe away any remaining particles.
- Begin applying the protective finish using a brush or a clean cloth. Work in long, even strokes in the direction of the wood grain.
- Apply a thin and even coat of the protective finish, avoiding excessive buildup or pooling. This will help prevent drips and uneven spots.
- Allow the first coat to dry completely according to the instructions on the finish’s packaging. This typically takes a few hours.
- If desired, lightly sand the surface with fine-grit sandpaper or steel wool to smooth out any imperfections or bumps. Remove any dust from sanding before applying subsequent coats.
- Repeat the process of applying thin coats of the protective finish, allowing each coat to dry completely before applying the next. Two to three coats are typically recommended for optimal protection and durability.
- Once the final coat has dried, inspect the table for any areas that may require touch-ups. Use a fine brush to carefully correct any imperfections.
Applying a protective finish to your dining room table not only safeguards the surface but also adds a beautiful sheen that enhances the overall appearance. Follow these steps to ensure the best results and prolong the life of your table. Once the protective finish has cured, it’s time to reassemble your table and put on the finishing touches!
Reassembling the Table
Now that you have completed the steps of stripping the old finish, repairing or replacing damaged parts, sanding the surface, staining the table, and applying a protective finish, it’s time to reassemble your dining room table. Here’s how you can proceed with reassembling your table:
- Carefully gather all the components of your table, including the legs, tabletop, and any additional parts or hardware that were removed during the restoration process.
- Inspect each component to ensure they are clean and free of any residue from the stripping, sanding, or finishing process. Clean them with a soft cloth if necessary.
- Begin by attaching the legs to the tabletop using the appropriate tools and hardware. Follow the original assembly instructions or refer to any markings or labels on the components to ensure the proper alignment.
- Tighten all screws or bolts securely, but be careful not to over-tighten and risk damaging the wood or hardware.
- If there were any additional parts or inserts that were removed, such as leaves or extension panels, reinstall them according to the manufacturer’s instructions.
- Take a moment to ensure that the table is stable and level. Adjust the legs or any adjustable components if needed.
- Once you are satisfied with the reassembly, give the table a final inspection to make sure everything is secure and in its proper place.
By taking the time to carefully reassemble your dining room table, you can ensure stability and functionality while enjoying the beautiful restoration work you have accomplished. Now, it’s time to add the final finishing touches and learn some maintenance tips to keep your table looking its best.
Final Touches and Maintenance Tips
With your dining room table fully restored and reassembled, it’s time to add those final touches that will truly make it shine. Here are some final touches you can consider, along with maintenance tips to keep your table looking its best:
- Accessorize: Add a table runner, a centerpiece, or decorative items that complement the style of your dining room. This will enhance the overall aesthetic appeal of your table.
- Protective Measures: Use coasters, placemats, and trivets to protect the table surface from hot dishes, moisture, and scratches. This simple step can significantly prolong the life and appearance of your table.
- Regular Cleaning: Dust your table regularly using a soft cloth, and clean up any spills immediately. Avoid using harsh or abrasive cleaners that can damage the finish.
- Avoid Direct Sunlight: Excessive exposure to direct sunlight can fade the color and damage the finish of your table. Consider using curtains or blinds to protect it from harsh UV rays.
- Periodic Polishing: Depending on the type of finish you applied, you may need to periodically polish your table to maintain its shine. Follow the instructions provided by the manufacturer of the finish.
- Regular Inspections: Take the time to periodically inspect your table for any signs of wear or damage. Address any issues promptly to prevent further damage and ensure its longevity.
- Reapply Protective Finish: Over time, the protective finish may wear off. It is recommended to periodically reapply a fresh coat of finish to keep your table well-protected.
- Enjoy and Use with Care: Your restored dining room table is meant to be enjoyed and used for gatherings, meals, and special occasions. While it’s important to take necessary precautions, don’t be afraid to let it fulfill its purpose as the centerpiece of your dining area.
By following these final touches and maintenance tips, you can ensure that your dining room table remains a beautiful and functional piece of furniture for many years to come. Congratulations on successfully restoring your table!
As you can see, restoring a dining room table is a labor of love that requires patience and attention to detail. However, the end result is well worth the effort. Not only will you have a stunning centerpiece in your dining area, but you will also have the satisfaction of knowing that you have breathed new life into a cherished piece of furniture.
So, go ahead and gather your materials, roll up your sleeves, and let the restoration process begin. With each step, you will be one step closer to transforming your dining room table into a work of art that can be enjoyed for generations to come.
Happy restoring!
Read more: What Is In A Dining Room?
Conclusion
Restoring a dining room table is not only a practical way to save money but also a rewarding endeavor that allows you to showcase your creativity and craftsmanship. By following the step-by-step process outlined in this article, you can transform an old, worn-out table into a stunning centerpiece for your dining area.
From gathering the necessary materials to reassembling the table, each step in the restoration process plays a crucial role in achieving a beautifully restored table. By removing the old finish, repairing or replacing damaged parts, sanding the surface, staining the table, and applying a protective finish, you can breathe new life into your dining room table.
Remember to add the final touches that reflect your personal style and take proper care of your newly restored table. By following maintenance tips such as regular cleaning, protecting the surface from damage, and periodic inspections, you can ensure that your table remains in excellent condition for years to come.
Restoring a dining room table is both an art and a labor of love. The time and effort invested in the process are well worth it when you see the final result—a table that not only serves its purpose but also becomes a statement piece in your home.
So, don’t hesitate to embark on your tableware restoration journey. With a little patience, attention to detail, and the guidance provided in this article, you can transform your dining room table into an exquisite masterpiece.
Remember, whether it’s a family gathering, a holiday celebration, or a casual dinner with friends, your beautifully restored table will be at the center of it all—creating lasting memories and bringing joy to those gathered around it.
Happy restoring and enjoy the fruits of your labor!
Frequently Asked Questions about How To Restore A Dining Room Table
Was this page helpful?
At Storables.com, we guarantee accurate and reliable information. Our content, validated by Expert Board Contributors, is crafted following stringent Editorial Policies. We're committed to providing you with well-researched, expert-backed insights for all your informational needs.


0 thoughts on “How To Restore A Dining Room Table”