Home>diy>Home Improvement>How Long Does A Full Gut Renovation Take
Home Improvement
How Long Does A Full Gut Renovation Take
Modified: October 21, 2024
Find out how long a full gut renovation takes for your home improvement project. Expert advice and tips to help you plan and manage your renovation timeline efficiently.
(Many of the links in this article redirect to a specific reviewed product. Your purchase of these products through affiliate links helps to generate commission for Storables.com, at no extra cost. Learn more)
Introduction
Welcome to the world of home improvement! Whether you’ve just bought a fixer-upper or you’re looking to upgrade your current space, a full gut renovation can completely transform your home. But before you dive into this exciting project, it’s essential to understand how long it might take.
A full gut renovation involves stripping down the interior space of your home to its bare bones and rebuilding it from scratch. This comprehensive project can include demolishing walls, installing new plumbing and electrical systems, replacing flooring, and adding finishing touches. With so many different tasks involved, it’s crucial to have a clear understanding of the timeline for completing a full gut renovation.
Keep in mind that the duration of a gut renovation can vary depending on several factors, such as the size of your home, the complexity of the project, the availability of materials, and the contractor’s schedule. By considering these factors and planning accordingly, you can ensure a smooth and successful renovation experience.
In this article, we will explore the various factors that can influence the duration of a full gut renovation and provide you with a comprehensive timeline to help you plan your project effectively. So let’s dive in and discover how long this exciting journey might take!
Key Takeaways:
- Plan for unexpected delays by considering factors such as weather conditions, material availability, and unforeseen issues to ensure a smooth and successful full gut renovation experience.
- Thoroughly inspect and address any touch-ups during the final phase to ensure that all aspects of the renovation meet required standards and your expectations for a truly revitalized space.
Read more: How Long Does A Full Home Renovation Take
Factors Influencing the Duration of a Gut Renovation
While every gut renovation project is unique, there are several key factors that can significantly impact the duration of the project. By understanding and considering these factors, you can better estimate the time it will take to complete your renovation. Let’s take a closer look at some of the main factors influencing the duration of a gut renovation:
- Size of the Home: Naturally, larger homes will require more time to renovate compared to smaller ones. The number of rooms, bathrooms, and other areas to be renovated will directly impact the overall timeline.
- Scope of Work: The extent of the renovation will play a significant role in determining the duration. If you plan to make extensive structural changes, such as removing load-bearing walls or adding new rooms, it will take longer compared to a project that only involves cosmetic upgrades.
- Contractor Availability: The availability of a reliable and experienced contractor is crucial. If you’re working with a reputable contractor, they may have a busy schedule, and you may need to wait for their availability to start the project.
- Material Selection and Delivery: The selection and procurement of materials can impact the timeline. If you opt for custom or specialized materials that require longer lead times or are back-ordered, it can cause delays in the project. It’s important to plan ahead and order materials well in advance.
- Weather Conditions: If your renovation includes exterior work, such as roofing or outdoor landscaping, weather conditions can affect the schedule. Inclement weather, such as heavy rain or snowstorms, can delay outdoor work and impact the overall timeline.
- Unforeseen Issues: Renovations often uncover unexpected issues, such as hidden plumbing or electrical problems, structural issues, or mold. Dealing with these unforeseen issues can add time to the project as they need to be addressed before continuing with the renovation.
By considering these factors and discussing them with your contractor, you can have a more accurate understanding of the project timeline. Keep in mind that unexpected challenges may arise during the renovation, so it’s essential to build in some flexibility to accommodate potential delays.
Planning and Design Phase
Before you can start the actual renovation work, it’s crucial to go through a thorough planning and design phase. This phase sets the foundation for the entire project and ensures that your renovation goals and requirements are properly communicated to the contractor. During this phase, you will work closely with an architect or designer to create detailed plans and specifications for the renovation.
The planning and design phase includes several essential steps:
- Initial Consultation: You will meet with an architect or designer to discuss your goals, budget, and timeline. They will assess the feasibility of your renovation plans and provide initial recommendations.
- Conceptual Design: Based on your input, the architect will create initial design concepts that align with your vision. This includes floor plans, 3D renderings, and material suggestions.
- Refining the Design: You will review and provide feedback on the initial design concepts, and the architect will make revisions based on your input. This back-and-forth process continues until the design meets your expectations.
- Finalization of Plans and Specifications: Once the design is approved, the architect will create detailed construction documents and specifications. These will include measurements, material selections, and any other necessary details for the project.
- Obtaining Permits: Depending on local regulations, you may need to obtain permits for the renovation. This process can involve submitting the construction documents, paying fees, and waiting for approval.
The duration of the planning and design phase can vary depending on the complexity of your project, how quickly decisions are made, and the availability of the architect or designer. It’s important to allocate enough time for this phase as it sets the stage for a successful renovation.
Once the planning and design phase is complete, you will have a clear understanding of the scope of work, and the contractor can begin with the next steps, including obtaining the necessary permits and licenses.
Obtaining Permits and Licenses
Before any construction work can begin, it is essential to obtain the necessary permits and licenses from the local building department. These permits ensure that your renovation project complies with local building codes and regulations. The process of obtaining permits can vary depending on your location and the complexity of your project.
Here are the main steps involved in obtaining permits and licenses:
- Research Requirements: Start by researching the specific permits and licenses required for your renovation project. This information can usually be found on your local municipality’s website or by contacting the building department directly. Different types of permits may be needed for electrical, plumbing, structural, or general construction work.
- Prepare Documentation: Once you know the necessary permits, gather all the required documentation. This typically includes your construction plans, specifications, proof of ownership, contractor information, and any supporting documents required by the building department.
- Submit Application: Complete the application forms provided by the building department. Ensure that all required information is included and accurately filled out. Depending on the jurisdiction, you may need to pay a fee when submitting the application.
- Wait for Approval: Once the application is submitted, it will go through a review process by the building department. The timeline for approval can vary, but it often takes a few weeks. During this time, the inspectors may request additional information or revisions to your plans.
- Receive Permits: Once your application is approved, you will receive the necessary permits and licenses. These permits typically need to be displayed prominently on the construction site.
It is crucial to obtain the necessary permits before starting any construction work. Failure to do so can result in penalties, work stoppages, or even the need to undo the work already completed.
Keep in mind that the process of obtaining permits can add time to your project timeline. Therefore, it is advisable to start this process well in advance of your intended start date to allow for any potential delays.
By securing the required permits and licenses, you ensure that your gut renovation meets all safety and building standards set forth by the local authorities.
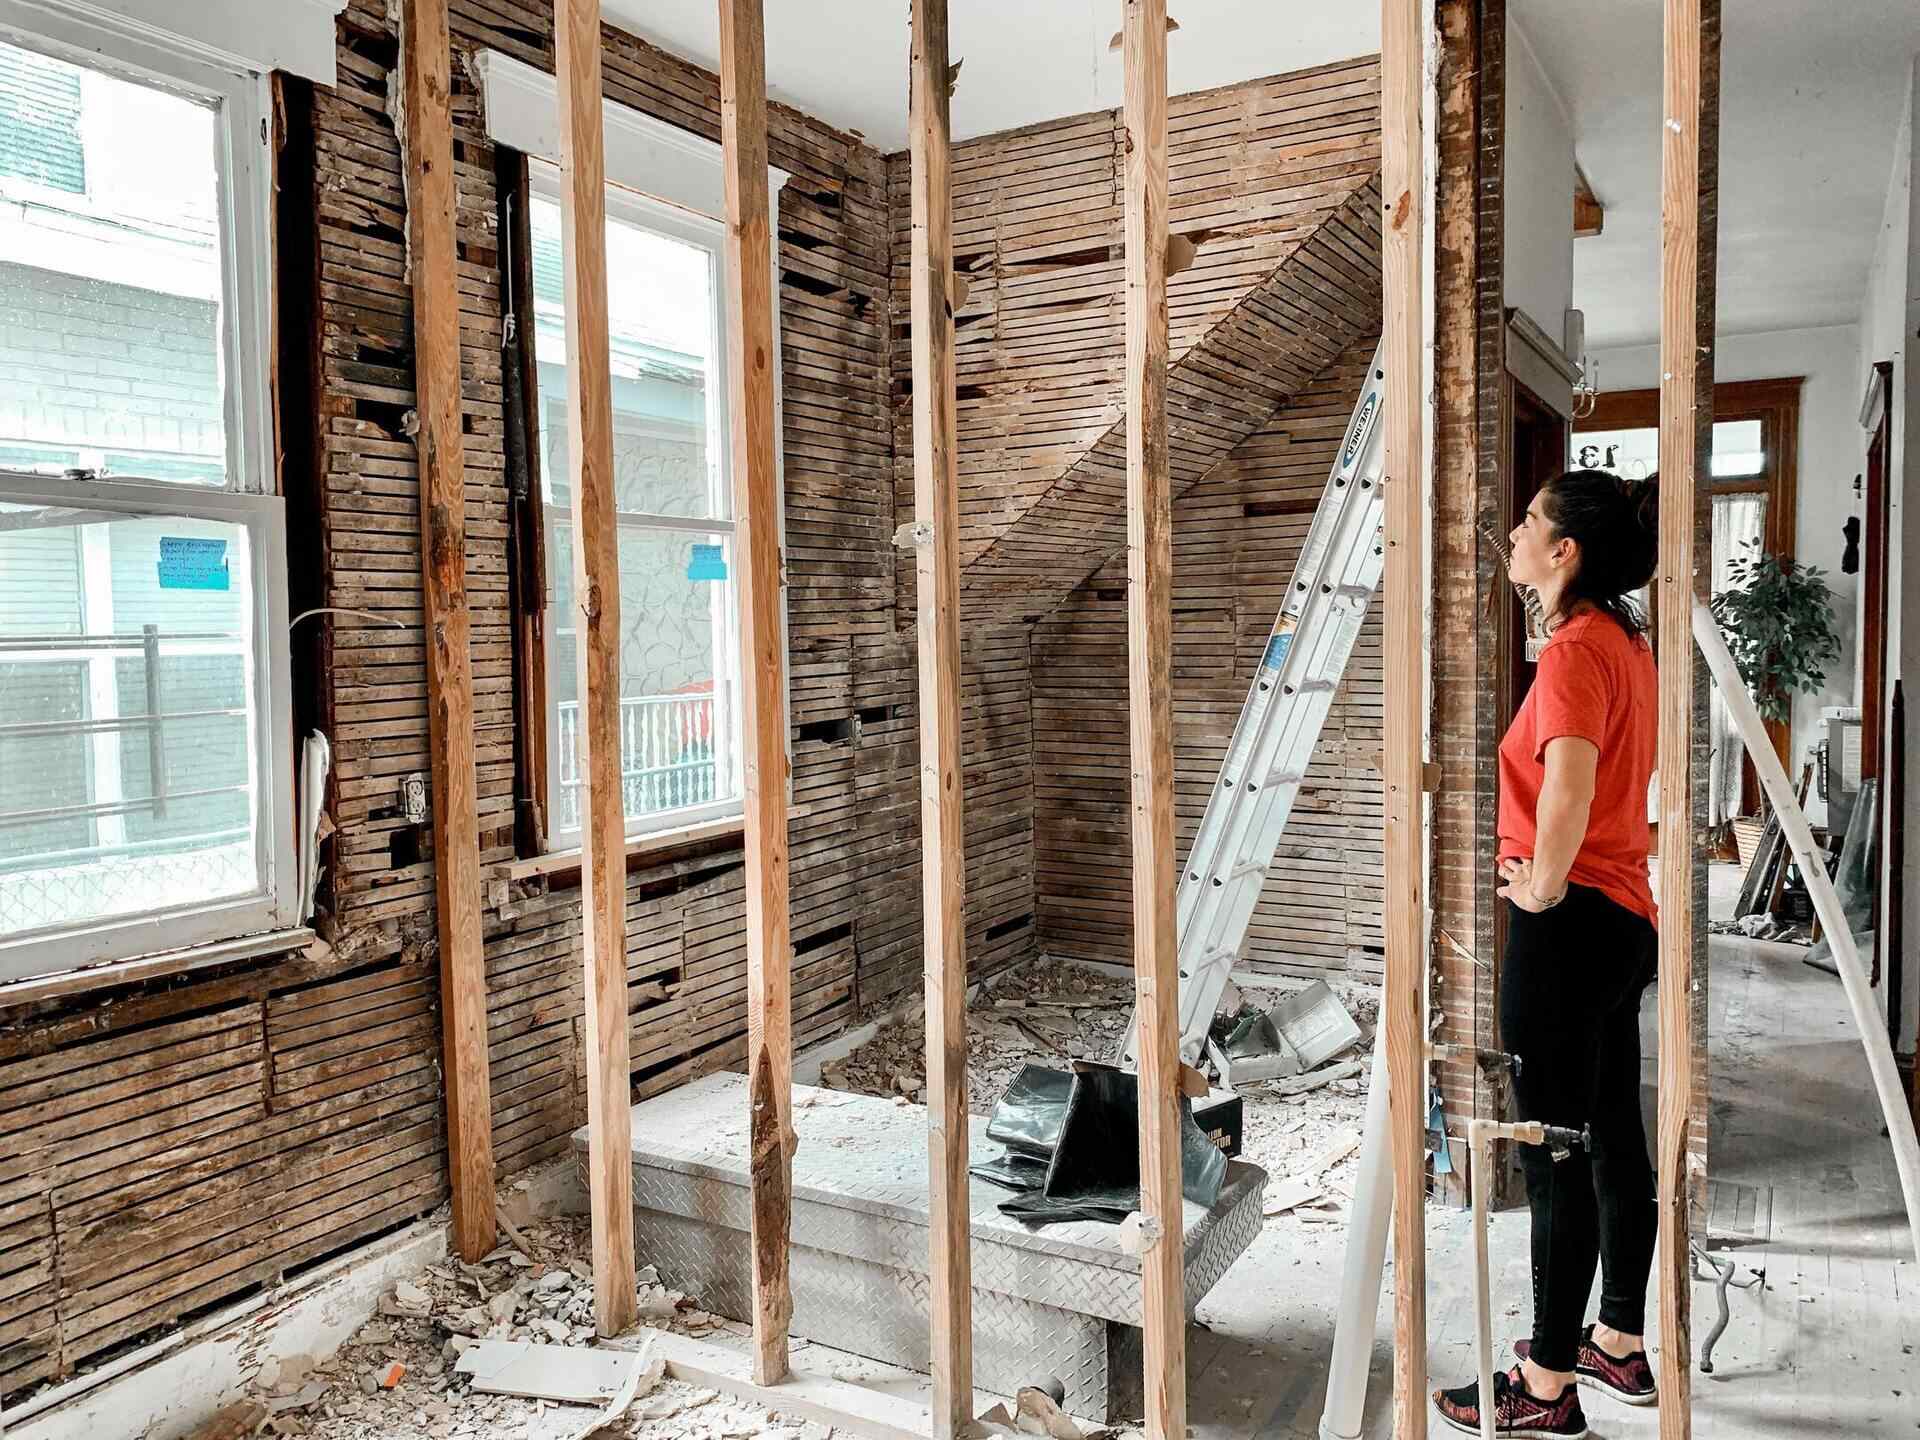
Demolition
One of the most exciting stages of a full gut renovation is the demolition phase. This is when your old space gets stripped down to its bare structure, allowing for a fresh start. Demolition involves removing walls, flooring, fixtures, and other elements that are no longer needed or desired in the remodel.
Here are the main steps involved in the demolition phase:
- Preparation: Before starting the demolition, it is important to take certain precautions. This includes shutting off utilities, such as water, electricity, and gas, to the area being demolished. It is also crucial to protect any areas or items that are not part of the renovation project, such as adjacent rooms, windows, or furniture. Protective barriers, plastic sheets, and drop cloths may be used to minimize dust and debris spread.
- Structural Assessment: Depending on the scope of your renovation, a structural assessment may be necessary. This involves identifying load-bearing walls and structural elements that must remain intact and be supported properly during the demolition process.
- Removal of Fixtures and Fittings: Before demolishing walls and flooring, it is necessary to remove any fixtures and fittings, such as cabinets, countertops, appliances, and plumbing fixtures. These items can either be salvaged for reuse or disposed of responsibly.
- Demolition of Walls and Flooring: With the area cleared of fixtures, the demolition can begin. Walls may be taken down using handheld tools or heavy machinery, depending on the size and strength of the walls. Flooring materials, such as tiles, carpet, or hardwood, are removed entirely to expose the subfloor.
- Disposal of Debris: The debris generated from the demolition process needs to be properly disposed of. This may involve renting a dumpster or hiring a waste removal service to ensure all materials are disposed of in accordance with local regulations.
The duration of the demolition phase can vary depending on the size of the space being demolished, the complexity of the demolition, and whether any unexpected issues arise, such as hidden wiring or plumbing.
It is important to work with a professional contractor during the demolition phase to ensure safety and efficiency. They will have the necessary tools and expertise to carry out the demolition while minimizing potential risks and damage.
Once the demolition phase is complete, you will have a blank canvas ready for the next steps of your gut renovation. It is an exciting milestone that brings you one step closer to achieving your dream home!
Structural Modifications
During a full gut renovation, you may want to make structural modifications to your home to better meet your needs and preferences. These modifications can involve reconfiguring the layout, adding or removing walls, or even expanding the existing structure. Structural modifications require careful planning and expert execution to ensure the integrity and safety of your home.
Here are the main steps involved in the structural modification phase:
- Consultation with an Engineer or Architect: Before making any structural modifications, it is advisable to consult with a structural engineer or architect. They will assess the feasibility of your ideas, provide guidance on load-bearing considerations, and offer suggestions to optimize the design.
- Developing Detailed Plans: Based on the recommendations of the engineer or architect, a detailed plan for the structural modifications will be created. This plan will illustrate the changes to be made, including any necessary reinforcements or support structures.
- Acquiring Permits: Just like any significant renovation, structural modifications often require permits. The plans will need to be submitted to the local building department for approval, along with any other required documentation. This process may take some time, so it’s important to factor in permit acquisition into your project timeline.
- Temporary Supports: Depending on the extent of the modifications, temporary supports might need to be installed to ensure the stability of the existing structure during the construction process. This step is crucial to prevent any collapses or damage to your home.
- Execution of Structural Modifications: With the plans approved and temporary supports in place, the contractor will begin the actual structural modifications. This can involve removing existing walls, adding new beams or columns, or creating openings for doors and windows. It is essential to work with professionals who have the expertise and experience in executing structural modifications safely and efficiently.
- Inspections: Throughout the structural modification phase, inspections by the building department will be required to ensure that the work complies with the approved plans and local building codes. These inspections may occur at various stages of the process, such as after the removal of walls or the installation of new structural elements.
The duration of the structural modification phase will depend on the complexity of the changes, the size of the project, and any unforeseen issues that may arise. It is essential to have patience and flexibility during this phase, as the safety and stability of your home are of utmost importance.
Working closely with a professional contractor and following the guidance of an engineer or architect will help ensure that your structural modifications are executed properly, providing you with a solid foundation for the rest of your gut renovation.
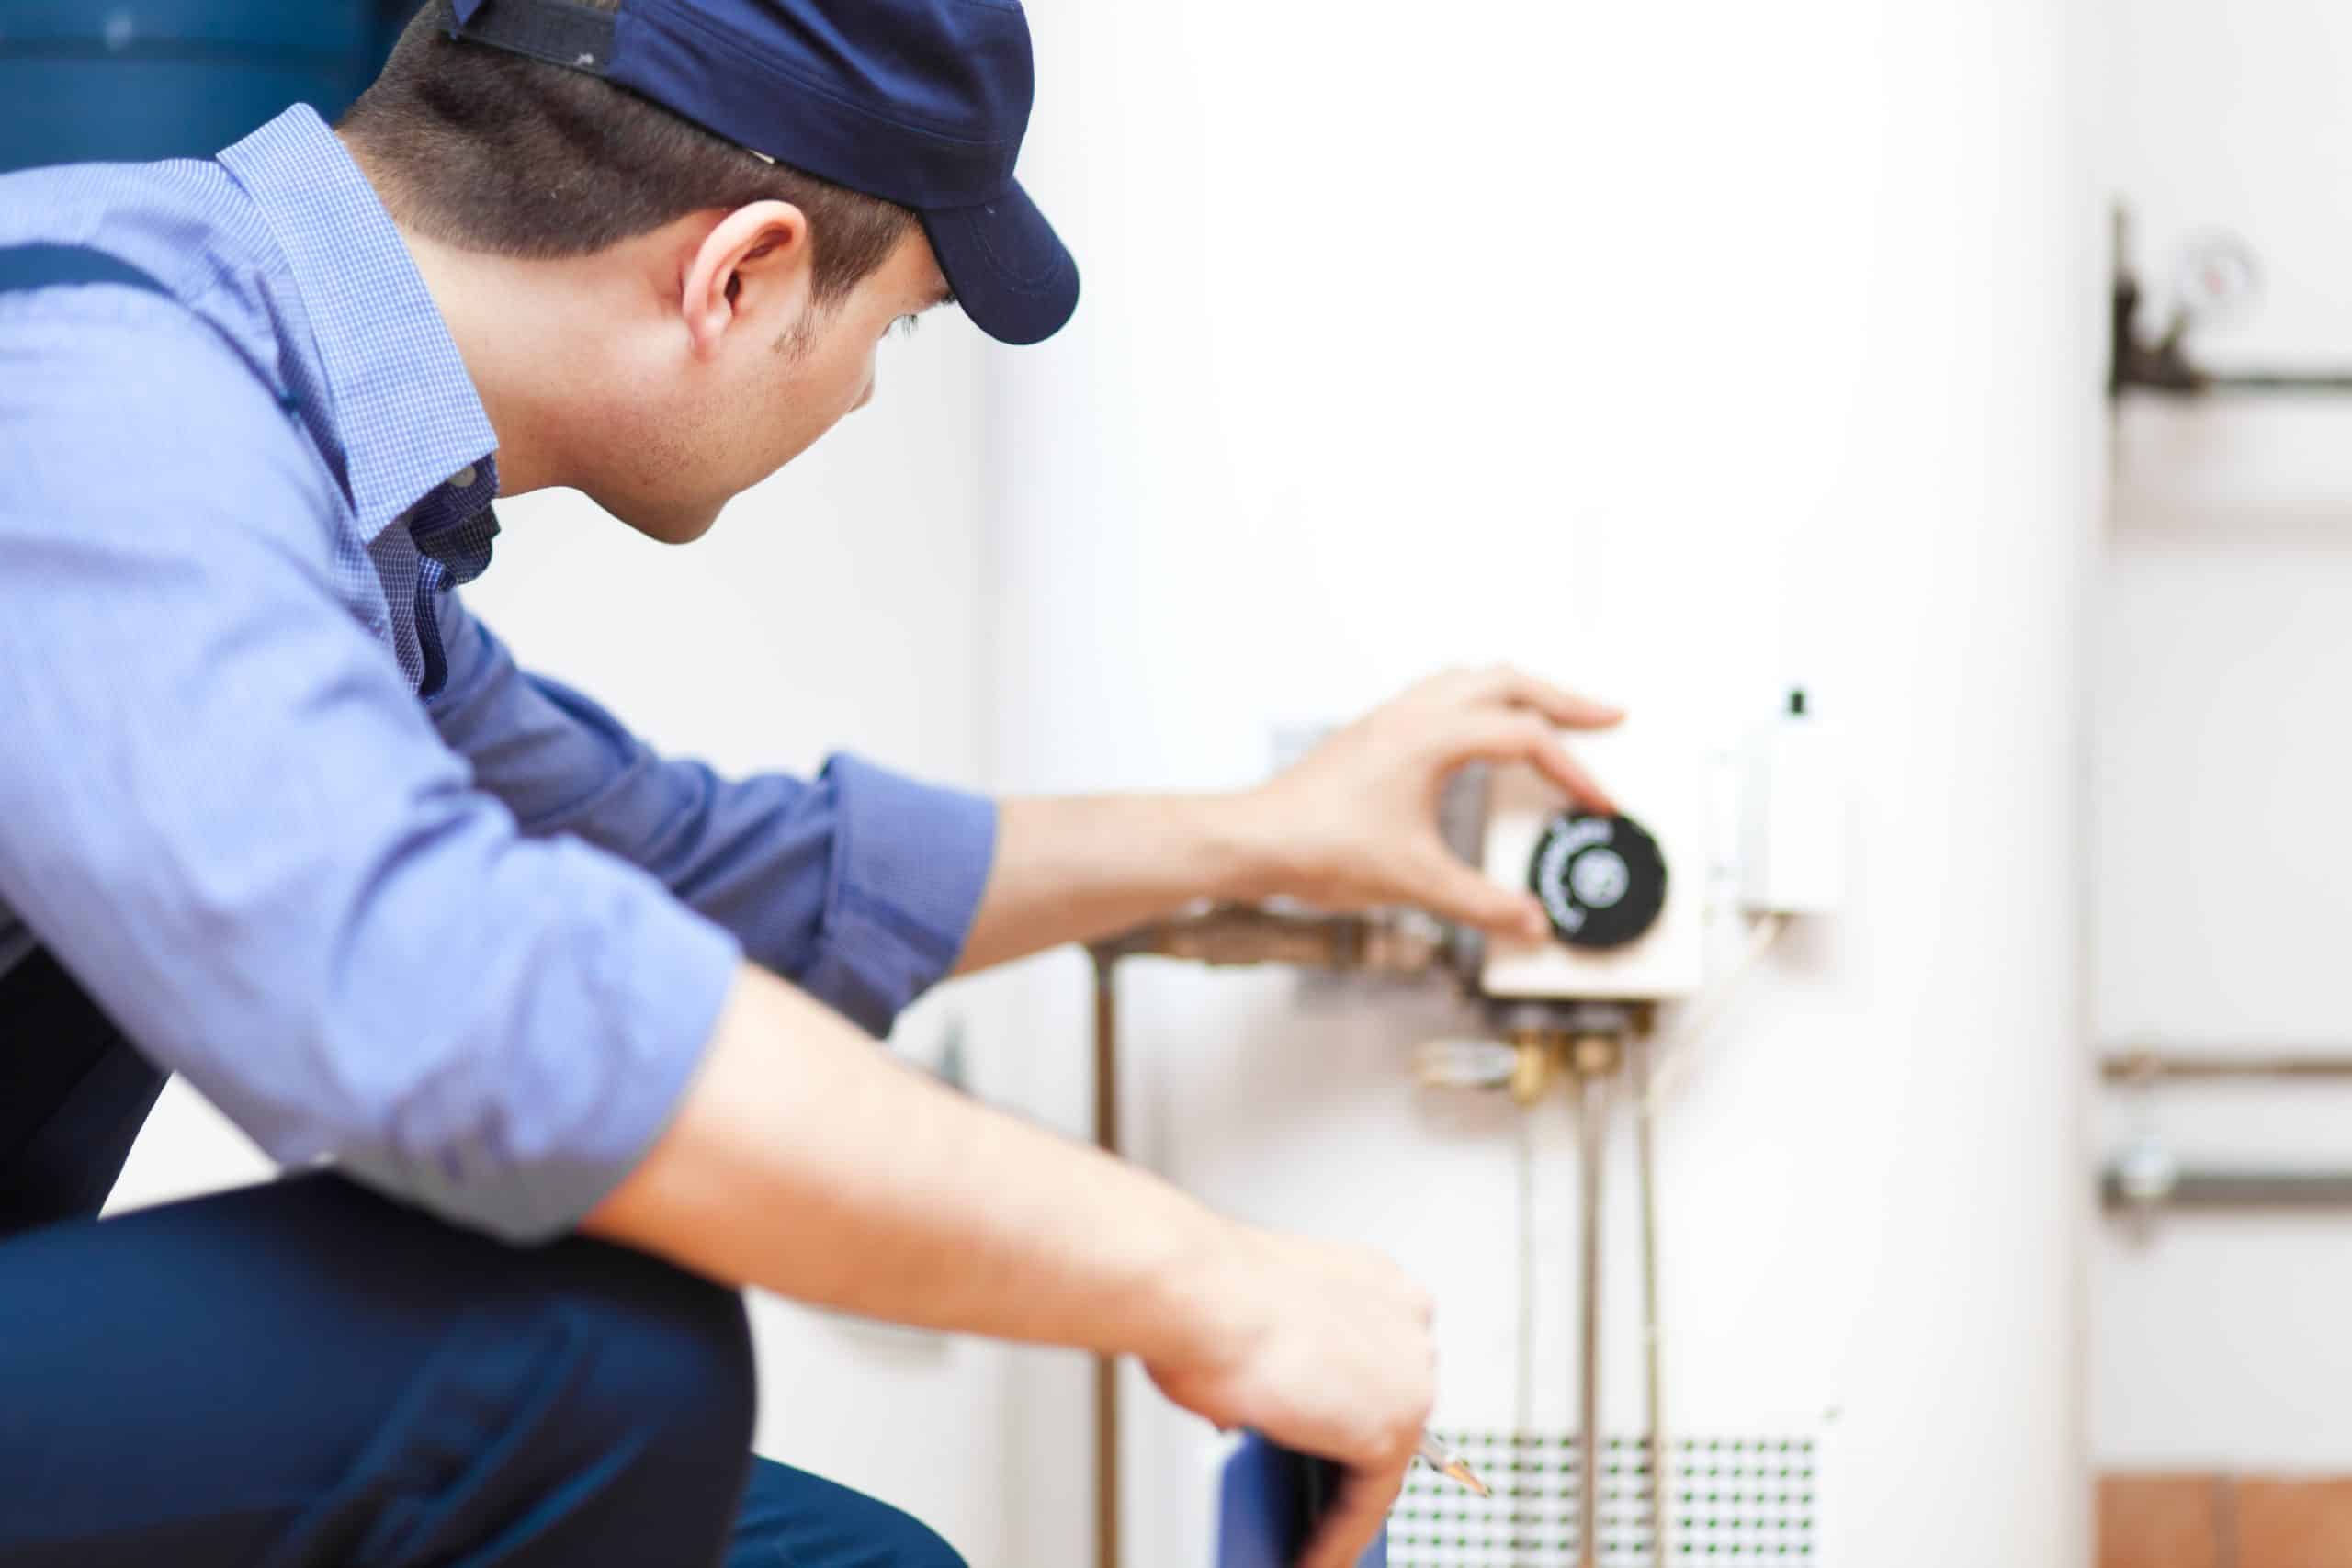
Electrical and Plumbing Works
Updating and renovating the electrical and plumbing systems are two vital components of a full gut renovation. These systems are the backbone of your home, providing essential functions and ensuring your comfort and safety. Upgrading and modernizing these systems require careful planning, skilled professionals, and adherence to local building codes and regulations.
Let’s explore the key aspects of the electrical and plumbing works phase:
- Electrical Works: During a gut renovation, the electrical system will typically be upgraded to accommodate new appliances, lighting fixtures, and power outlets. The electrical works phase involves several key steps:
- Assessment and planning: A professional electrician will assess your home’s electrical needs based on your renovation plans. This includes determining the required electrical load, identifying potential upgrades or replacements, and developing a comprehensive plan.
- Wiring and cabling: The electrician will install new wiring and cabling, ensuring they are safely and properly routed throughout the home. This includes wiring for outlets, switches, lighting fixtures, and any specialized electrical needs, such as home automation systems.
- Panel upgrades: If necessary, the electrical panel may be upgraded to accommodate increased electrical demands. This ensures that your home’s electrical system can handle the load from modern appliances and devices.
- Installation of fixtures and outlets: Once the wiring is complete, the electrician will install light fixtures, switches, outlets, and any other electrical components according to the design plan.
- Testing and safety measures: The electrical system will undergo thorough testing to ensure functionality and compliance with safety regulations. This includes checking for proper grounding, verifying circuit integrity, and conducting safety inspections.
- Plumbing Works: Renovating the plumbing system involves updating pipes, fixtures, and drainage to improve efficiency and functionality. The plumbing works phase typically includes the following steps:
- Assessment and design: A professional plumber will assess the existing plumbing system and design the new layout based on your renovation plans. This includes considering factors such as water supply, drain lines, and fixture placement.
- Pipe installation: The plumber will install new pipes or replace existing ones to ensure proper water supply and drainage. This may include installing pipes for sinks, showers, toilets, and appliances.
- Fixture installation: Once the pipes are in place, the plumber will install new fixtures, such as faucets, showerheads, toilets, and sinks.
- Connection to utilities: The plumbing system will be connected to the main water supply and sewage lines, ensuring proper functionality and adherence to local plumbing codes.
- Pressure testing and inspections: The plumbing system will undergo pressure testing to identify any leaks or issues. Inspections will also be conducted to ensure compliance with building codes and regulations.
It is crucial to work with licensed and experienced electricians and plumbers to ensure that the electrical and plumbing systems are installed correctly and meet safety standards. Always hire professionals who are familiar with local building codes and regulations.
The duration of the electrical and plumbing works phase depends on the complexity of the renovation, the size of the home, and any unexpected complications that may arise. It is essential to allocate sufficient time for these critical tasks to ensure a successful and efficient gut renovation.
A full gut renovation can take anywhere from 3 to 12 months, depending on the size and complexity of the project. Be prepared for unexpected delays and budget for additional time.
HVAC Installation
An important aspect of a full gut renovation is the installation or upgrade of the Heating, Ventilation, and Air Conditioning (HVAC) system. An efficient and properly functioning HVAC system is essential for maintaining comfortable indoor temperatures, improving air quality, and ensuring energy efficiency. Installing or upgrading your HVAC system requires careful planning, professional expertise, and compliance with local building codes and regulations.
Let’s explore the key steps involved in the HVAC installation phase:
- Assessment and Design: Before installing a new HVAC system, a professional HVAC contractor will assess your home’s heating and cooling requirements. They will consider factors such as the size of the space, insulation, ventilation needs, and your specific comfort preferences. Based on this assessment, they will design the system that best suits your needs.
- Selection of Equipment: Once the design is finalized, the HVAC contractor will help you select the appropriate equipment for your home. This includes the HVAC unit, ductwork, thermostats, and any additional components required for your specific system.
- Installation of Equipment: The HVAC contractor will install the HVAC unit and connect it to the ductwork. This involves positioning the indoor and outdoor equipment, running the necessary electrical and refrigerant lines, and ensuring proper ventilation and drainage.
- Ductwork Installation: If your gut renovation involves significant modifications to the layout of your home, the contractor may need to install new ductwork or make adjustments to the existing ductwork. Properly designed and installed ductwork ensures the efficient and even distribution of conditioned air throughout your home.
- Testing and Balancing: Once the HVAC system is installed, the contractor will conduct thorough testing to ensure that the equipment is functioning correctly. They will also perform a balancing process to optimize airflow and temperature distribution in different areas of your home.
- Programming and Controls: The HVAC contractor will set up the thermostat and any other controls associated with your system. They will program it according to your preferences and educate you on how to operate and maintain the HVAC system effectively.
- Inspections and Compliance: The HVAC installation may require inspections from local building authorities to ensure compliance with safety standards and building codes. The contractor will schedule these inspections and address any required adjustments or corrections.
The duration of the HVAC installation phase depends on the complexity of the system, the size of the space, and any additional modifications required. It is important to work with a reputable HVAC contractor who specializes in residential installations and has experience working with your type of renovation project.
By investing in a well-designed and properly installed HVAC system, you can create a comfortable and energy-efficient living environment in your newly renovated home.
Insulation and Drywall
Insulation and drywall are essential components of a full gut renovation that contribute to the comfort, energy efficiency, and overall aesthetic appeal of your home. Insulation helps regulate temperature, reduce energy consumption, and minimize sound transmission, while drywall provides a smooth and strong surface for walls and ceilings. Proper installation of insulation and drywall is crucial to ensure optimal performance and a polished finish to your renovated space.
Let’s explore the key steps involved in the insulation and drywall phase:
- Insulation: Insulation helps create a thermal barrier, preventing heat transfer between the interior and exterior of your home. The insulation material and installation method will depend on factors such as climate, local building codes, and your preferences. Some common insulation materials include fiberglass batts, blown-in cellulose, sprayed foam, or rigid foam panels. The insulation process typically involves:
- Assessment: A professional insulation contractor will assess your home’s insulation needs based on factors like location, climate, and energy efficiency goals. They will identify areas that require insulation, such as walls, floors, ceilings, and attics.
- Preparation: Before insulation installation, the contractor will prepare the space by sealing any air leaks, ensuring proper ventilation, and protecting areas that do not require insulation, such as electrical outlets and fixtures.
- Installation: The insulation material will be installed according to the manufacturer’s instructions and local building codes. This may involve placing batts between wall studs, blowing loose-fill insulation into attics or wall cavities, or installing rigid foam panels.
- Inspection: Once the insulation is installed, the contractor may conduct an inspection to ensure coverage is consistent, and there are no gaps or areas of inadequate insulation.
- Drywall: Drywall, also known as gypsum board or plasterboard, is used to create smooth, durable walls and ceilings. The drywall installation process typically involves the following steps:
- Measurement and Cutting: The drywall sheets are carefully measured and cut to fit the dimensions of the walls and ceilings. This includes accounting for openings such as doors, windows, and electrical outlets.
- Hanging: The drywall sheets are then attached to the framing using screws or nails, ensuring they are properly aligned and secure.
- Taping and Mudding: Drywall joints and screw or nail indentations are covered with joint compound and tape to create a seamless and smooth surface. Multiple layers of compound may be applied and sanded down to achieve a polished finish.
- Finish and Texture: Once the joint compound is dry and smooth, the drywall surface can be finished with texture, such as a smooth finish, orange peel, knockdown, or custom texture, as per your preference.
- Priming and Painting: After the drywall is finished, it is primed and painted with your chosen color or design to complete the overall look and protect the surface.
The duration of the insulation and drywall phase depends on the size of the space, the complexity of the design, and any drying or curing time required for joint compound and paint. It is essential to work with skilled contractors who specialize in insulation and drywall installation to ensure quality workmanship and a professional finish.
Proper insulation and well-finished drywall contribute to the energy efficiency, comfort, and visual appeal of your renovated space, providing a solid foundation for the rest of your project.
Read more: How Long Does Plumbing Take
Flooring Installation
The flooring is a significant component of any home renovation, as it sets the tone for the overall aesthetic and functionality of your living space. Whether you prefer hardwood, tile, laminate, or carpet, the flooring installation phase plays a pivotal role in bringing your vision to life. A well-executed flooring installation not only enhances the appearance of your home but also ensures durability and longevity. Let’s dive into the key steps involved in this phase:
- Preparation: Before the actual installation process begins, it’s crucial to prepare the area properly. This involves removing any remnants of the previous flooring, thoroughly cleaning the subfloor, and addressing any imperfections or damage. The subfloor needs to be smooth, level, and in good condition to ensure a successful flooring installation.
- Acclimation: Depending on the type of flooring chosen, acclimation may be necessary. This process allows the flooring material to adjust to the temperature and humidity conditions of the installation area. It typically involves storing the flooring in the designated room for a specified period, allowing it to reach equilibrium with its surroundings.
- Layout Planning: Before installation begins, careful planning of the layout is essential. This includes determining the starting point, accounting for room dimensions, and considering any obstructions or unique features of the space. It’s crucial to ensure a balanced and aesthetically pleasing arrangement of the flooring material.
- Underlayment Installation: In many cases, an underlayment is necessary to provide cushioning, moisture protection, and noise reduction. The appropriate underlayment material is installed over the prepared subfloor, providing a stable base for the flooring installation.
- Installation: The actual installation process varies depending on the chosen flooring material. Here are a few common methods for popular flooring types:
- Hardwood: Hardwood flooring can be installed using nail-down, glue-down, or floating methods. Each approach has its advantages and is chosen based on factors such as the type of hardwood and the condition of the subfloor.
- Tile: Tile flooring is typically installed using mortar or adhesive to ensure a strong bond between the tiles and the subfloor. Precision and attention to detail are crucial to achieve a level and visually appealing result.
- Laminate and Vinyl: Laminate and vinyl flooring often utilize a floating installation method, where interlocking planks or tiles are laid on top of the underlayment without the need for adhesives.
- Carpet: Carpet installation involves stretching the carpet over a pad and securing it to the subfloor using adhesive or tack strips. Proper stretching and seamless seam placement are critical for a finished look.
- Finishing Touches: Once the majority of the flooring is installed, attention turns to final details. This may involve trimming excess material, installing baseboards or moldings, and ensuring a seamless transition between different flooring types or rooms.
The time required for flooring installation depends on various factors, including the size of the area, the complexity of the design, the type of flooring chosen, and the experience of the installation team. It’s important to work with skilled flooring professionals who can provide expert guidance and a high standard of craftsmanship.
Proper installation and attention to detail in the flooring phase will not only elevate the visual appeal of your renovated space but also contribute to the functionality and longevity of your new flooring.
Painting and Finishing
The painting and finishing phase of a full gut renovation brings the entire project together, adding the final touches and transforming your space into a polished and visually appealing home. Paint not only enhances the aesthetic appeal but also helps protect surfaces from wear and tear. Additionally, finishing details such as trim, molding, and hardware complete the overall look and provide a cohesive design. Let’s explore the key steps involved in this phase:
- Surface Preparation: Before painting can begin, thorough surface preparation is essential. This involves cleaning the walls, repairing any imperfections or damage, sanding or priming as needed, and ensuring a smooth and even surface.
- Color Selection: Choosing the right paint colors is an exciting yet crucial part of the process. Consider the overall design aesthetic you want to achieve and select colors that complement your vision, whether you opt for neutral tones or bold accents. Samples can be tested on the walls to ensure you’re happy with your choices.
- Priming: Applying a primer is often necessary to create a smooth base for the paint and promote proper adhesion. Primer also helps hide stains, seal porous surfaces, and improve the overall durability and finish of the paint job.
- Paint Application: Once the surface is prepared and primed, it’s time to apply the paint. Whether using rollers, brushes, or spray techniques, attention to detail is crucial to achieve even coverage and a professional finish. Multiple coats may be required, allowing sufficient drying time between each coat.
- Finishing Touches: As the paint dries, attention turns to finishing touches. This involves adding trim, baseboards, crown molding, and other decorative elements that enhance the overall aesthetic and provide a sense of completion. These details may require precise cutting, fitting, and painting to ensure a seamless integration with the walls.
- Hardware Installation: Installing hardware such as doorknobs, handles, faucets, and light fixtures adds functionality and style to your renovated space. Proper installation ensures that everything is secure and functions as intended.
- Cleanup: Once the painting and finishing work is complete, it’s essential to clean up the work area, removing any paint droplets or debris. This ensures a clean and inviting space for you to enjoy.
The duration of the painting and finishing phase depends on various factors, including the size of the space, the complexity of the design, the number of coats required, and the drying time between applications. It’s crucial to allocate sufficient time to achieve a high-quality and visually appealing result.
Working with professional painters and finishers who have experience in residential renovations will ensure that the painting and finishing phase is executed to a high standard, leaving you with a beautifully transformed space that reflects your personal style.
Installation of Fixtures and Appliances
The installation of fixtures and appliances is a crucial phase in a full gut renovation as it brings functionality and convenience to your newly renovated space. From plumbing fixtures in the kitchen and bathroom to appliances in the kitchen and laundry room, this phase ensures that all the necessary elements are properly installed and operational. Let’s delve into the key steps involved in this phase:
- Kitchen Fixtures: Installation of kitchen fixtures includes sinks, faucets, and garbage disposals. A professional plumber will ensure proper connection to the water supply and drainage systems, as well as secure mounting and proper sealing to prevent leaks.
- Bathroom Fixtures: Bathroom fixtures such as toilets, sinks, showers, and bathtubs are installed by plumbing professionals. They will ensure proper alignment, sealing, and connection to the water supply and drain lines, ensuring optimal functionality and water efficiency.
- Lighting Fixtures: Installation of lighting fixtures involves mounting and connecting the fixtures to the electrical system. This may include overhead lighting, recessed lighting, pendant lights, and wall sconces. A licensed electrician will handle the wiring and ensure safe and aesthetically pleasing installations.
- Appliance Installation: This step involves installing appliances such as refrigerators, ovens, stovetops, dishwashers, washing machines, and dryers. It’s important to follow manufacturer guidelines and use the necessary hookups and connections for each appliance. Professionals with expertise in appliance installation will ensure proper positioning, level installation, and necessary connections to utilities.
- Cabinetry and Shelving: If your gut renovation includes new cabinets or shelving units, the installation of these fixtures will be an important step. Professional carpenters or cabinet installers will ensure accurate measurements, secure mounting, and proper alignment of doors and drawers.
- Testing and Calibration: After the fixtures and appliances are installed, thorough testing is essential to ensure they are functioning properly. Plumbers may check for leaks, electricians may ensure proper electrical connections, and appliances are tested for functionality and performance. This step ensures that all systems are in working order before you start using your newly renovated space.
- Final Adjustments and Cleanup: Once the fixtures and appliances are successfully installed and tested, any final adjustments or fine-tuning may be needed. This includes tightening connections, aligning doors, and ensuring proper functionality. Afterward, any debris and packaging materials should be removed, leaving the space clean and ready for use.
The duration of the installation of fixtures and appliances phase depends on the number and complexity of the fixtures and appliances being installed, as well as the coordination between different professionals involved. It is important to work with licensed and experienced professionals who specialize in their respective areas of installation to ensure proper functionality and safety.
By completing the installation of fixtures and appliances, you are one step closer to enjoying the full functionality and convenience of your newly renovated space.
Final Inspections and Touch-ups
The final inspections and touch-ups phase of a full gut renovation is the last step before you can truly enjoy your newly transformed space. This phase ensures that all aspects of the renovation meet the required standards, any necessary adjustments are made, and the finishing details are perfected. Let’s explore the key steps involved in this phase:
- Inspections: Before considering the project complete, it’s important to schedule final inspections by local building authorities or relevant professionals. These inspections are conducted to ensure that the renovation work meets safety codes and regulations. Inspections may focus on areas such as electrical systems, plumbing, structural modifications, and fire safety. Any issues identified during the inspections must be addressed and resolved accordingly.
- Quality Assurance: Engaging in a thorough walkthrough of the renovated space allows you to assess the overall quality of the workmanship and ensure that everything meets your expectations. Check for any visible defects, such as scratches, dents, or paint imperfections, and make note of areas that require touch-ups.
- Touch-ups: After identifying any areas that require attention, schedule touch-up work with the respective tradespeople. This could include patching and repainting walls, fixing any loose tiles or flooring, adjusting doors or cabinets, or addressing any minor cosmetic issues that may have been overlooked during the initial construction process.
- Final Cleaning: Thoroughly clean the renovated space, removing any dust, debris, or construction residue. This includes cleaning windows, floors, and surfaces to ensure a fresh and clean environment. Pay special attention to the newly installed fixtures and appliances to ensure they are spotless and ready to use.
- Final Walkthrough: Conduct a final walkthrough of the space with your contractor or project manager. This allows you to address any remaining concerns, ask questions, and ensure that everything has been completed to your satisfaction. Any necessary adjustments or minor fixes can be finalized during this stage.
- Documentation and Warranties: Collect all relevant documentation related to the renovation, including permits, warranties, and instruction manuals for fixtures and appliances. Keep these documents in a safe place for future reference and maintenance needs.
The duration of the final inspections and touch-ups phase will depend on the scale of the renovation, the complexity of any adjustments required, and the coordination between different tradespeople involved. It’s essential to allocate sufficient time for this phase to ensure that all final details are addressed and the project is considered complete.
By conducting final inspections and touch-ups, you can have peace of mind knowing that your gut renovation has been thoroughly reviewed and any necessary adjustments or finishing touches have been made. This final stage marks the completion of your renovation journey, allowing you to fully enjoy your newly revitalized space.
Read more: How Long Does It Take For Brick To Dry
Conclusion
Embarking on a full gut renovation is an exciting and transformative journey that can completely revitalize your home. From planning and design to the final inspections and touch-ups, every phase plays a crucial role in achieving your vision for the space. By understanding the factors that influence the duration of a gut renovation and working with skilled professionals, you can ensure a successful and satisfying renovation experience.
Throughout the process, it’s important to keep in mind key factors such as the size of your home, the complexity of the project, contractor availability, material selection and lead times, weather conditions, and any unforeseen challenges that may arise. By considering these factors and planning accordingly, you can have a more accurate estimate of the timeline for your gut renovation.
Remember that each phase of the renovation project requires attention to detail and proper coordination between various tradespeople. Whether it’s the installation of fixtures and appliances, the painting and finishing touches, or the insulation and drywall work, each step contributes to the overall success and transformation of your home.
As you near the end of your gut renovation, take the time to conduct thorough inspections, address any touch-ups, and ensure that all aspects of the project meet the required standards and your expectations. By completing this final stage with attention to detail, you can fully enjoy your newly renovated space and take pride in the accomplishment.
In conclusion, a full gut renovation is a comprehensive undertaking that requires careful planning, skilled professionals, and attention to detail. By considering the various factors that influence the duration, staying organized, and maintaining open communication with your contractor, you can create a beautiful and functional space that truly reflects your style and enhances your living experience.
Frequently Asked Questions about How Long Does A Full Gut Renovation Take
Was this page helpful?
At Storables.com, we guarantee accurate and reliable information. Our content, validated by Expert Board Contributors, is crafted following stringent Editorial Policies. We're committed to providing you with well-researched, expert-backed insights for all your informational needs.


0 thoughts on “How Long Does A Full Gut Renovation Take”