Home>Furniture & Design>Interior Design Trends>How To Get A Glass Splinter Out

Interior Design Trends
How To Get A Glass Splinter Out
Modified: August 20, 2024
Learn how to safely remove a glass splinter from your skin with these effective techniques. Discover the latest interior design trends to elevate your living space.
(Many of the links in this article redirect to a specific reviewed product. Your purchase of these products through affiliate links helps to generate commission for Storables.com, at no extra cost. Learn more)
Introduction
Dealing with a glass splinter can be a painful and frustrating experience. Whether it's a tiny shard from a broken glass or a sliver from a shattered mirror, getting a glass splinter stuck in your skin can be uncomfortable and potentially dangerous if not handled properly. However, with the right approach and a steady hand, you can safely and effectively remove the splinter at home.
In this comprehensive guide, we will walk you through the step-by-step process of removing a glass splinter from your skin. From gathering the necessary supplies to cleaning the affected area and safely extracting the splinter, we will cover everything you need to know to handle this common yet bothersome issue. By following these instructions, you can alleviate the discomfort and reduce the risk of infection associated with a glass splinter.
So, if you've found yourself dealing with a pesky glass splinter, fear not. With a few simple tools and a bit of patience, you can successfully remove the splinter and promote proper healing. Let's dive into the essential steps to safely and effectively address this common household mishap.
Key Takeaways:
- Don’t panic if you get a glass splinter! Gather tweezers, antiseptic wipes, and a magnifying glass to safely remove it at home. Clean the area, locate the splinter, and care for the wound for a smooth recovery.
- Removing a glass splinter is a step-by-step process. Clean the area, use a magnifying glass to find the splinter, and carefully remove it with tweezers. Afterward, clean and dress the wound for optimal healing.
Read more: How To Get Glass Out Of Carpet
Step 1: Gather necessary supplies
Before embarking on the process of removing a glass splinter, it's crucial to gather the necessary supplies to ensure a smooth and successful procedure. Here's what you'll need:
1. Magnifying Glass or Bright Light
Having a magnifying glass or a bright light source, such as a flashlight, can significantly aid in locating the glass splinter embedded in your skin. The magnification and focused illumination provided by these tools can make it easier to pinpoint the exact location of the splinter, especially if it's tiny or lodged deep within the skin.
2. Tweezers
A pair of fine-tipped tweezers is essential for safely and precisely extracting the glass splinter. Opt for tweezers with a pointed tip to grasp the splinter firmly without causing further injury. Ensure that the tweezers are clean and sanitized before use to minimize the risk of infection.
3. Antiseptic Wipes or Rubbing Alcohol
Before attempting to remove the splinter, it's important to clean the surrounding area thoroughly to minimize the risk of infection. Antiseptic wipes or rubbing alcohol can be used to disinfect the skin around the splinter site, reducing the likelihood of introducing bacteria during the extraction process.
Read more: How To Get Glass Out Of Eye
4. Sterile Gauze or Band-Aids
After successfully removing the glass splinter, it's essential to cover the wound with sterile gauze or a band-aid to protect it from external contaminants and promote healing. Having these supplies on hand will ensure that you can properly dress the wound once the splinter has been removed.
5. Epsom Salt (Optional)
If the skin surrounding the splinter appears inflamed or infected, a warm Epsom salt soak can help alleviate discomfort and reduce swelling. While not mandatory, having Epsom salt available can provide soothing relief following the splinter removal process.
By gathering these essential supplies, you'll be well-prepared to tackle the task of removing a glass splinter from your skin with confidence and precision. With the right tools at your disposal, you can effectively address the issue and promote proper healing without unnecessary hassle or discomfort.
Step 2: Clean the area
After gathering the necessary supplies, the next crucial step in addressing a glass splinter is to thoroughly clean the affected area. Properly disinfecting the skin surrounding the splinter is essential for minimizing the risk of infection and ensuring a hygienic environment for the extraction process.
To begin, use antiseptic wipes or rubbing alcohol to gently cleanse the skin around the splinter site. This initial cleaning step serves to remove any surface dirt, bacteria, or other contaminants that could potentially exacerbate the situation if introduced into the skin during the splinter removal process.
Once the area has been cleansed with antiseptic wipes or rubbing alcohol, it's important to allow the skin to air dry or gently pat it dry with a clean, lint-free cloth. Ensuring that the skin is completely dry before proceeding to locate and remove the splinter helps maintain a clean and optimal environment for the extraction process.
In cases where the skin appears inflamed or irritated, a warm Epsom salt soak can be beneficial at this stage. Prepare a warm water bath and dissolve Epsom salt in it, then soak the affected area for a few minutes. The Epsom salt solution can help reduce swelling, alleviate discomfort, and further cleanse the skin, preparing it for the splinter removal procedure.
By diligently cleaning the area surrounding the glass splinter, you create a sanitized and conducive setting for the subsequent steps of locating and extracting the splinter. This proactive approach not only minimizes the risk of complications post-removal but also sets the stage for a smoother and more hygienic resolution to the splinter predicament.
With the area thoroughly cleansed and prepared, you are now ready to proceed to the next step of locating the glass splinter embedded in the skin. This meticulous approach to cleanliness and hygiene sets the foundation for a successful and uncomplicated splinter removal process, ensuring the best possible outcome for your skin's health and well-being.
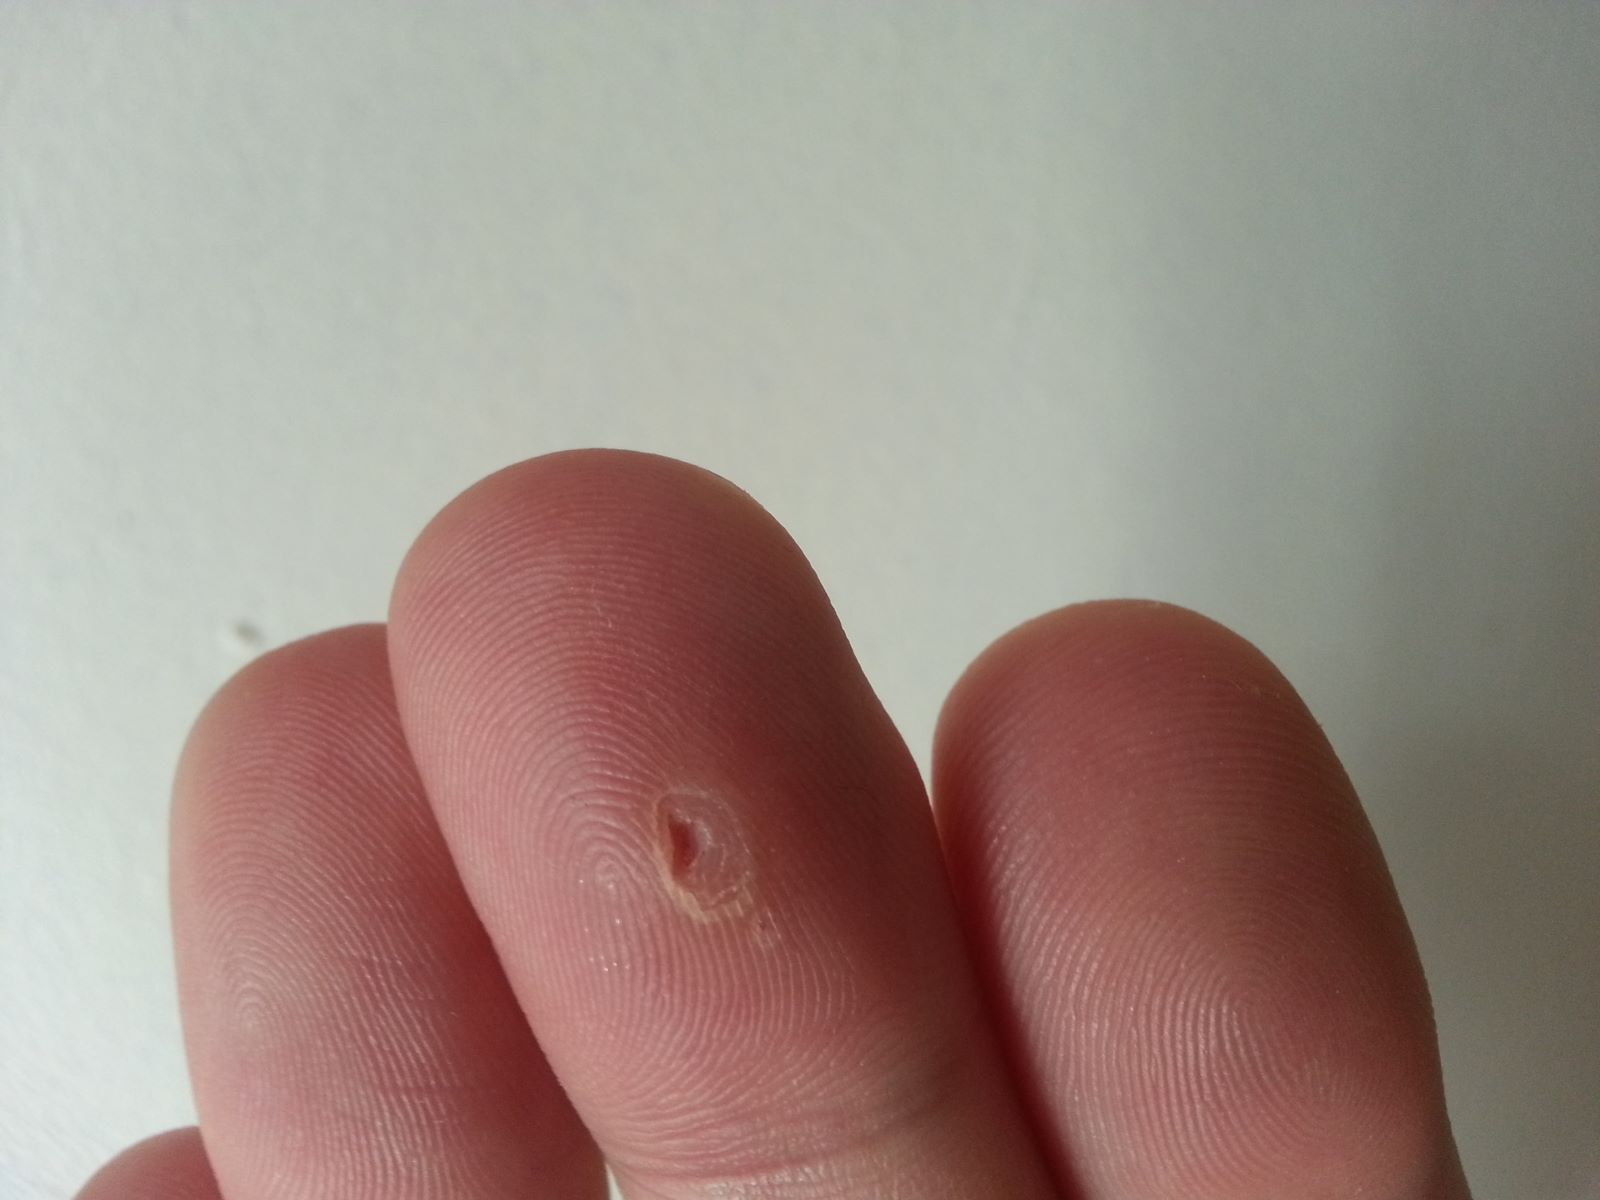
Step 3: Locate the splinter
After preparing the skin and gathering the necessary tools, the next critical step in the process of removing a glass splinter is to accurately locate its position within the skin. This step requires patience and attention to detail, as glass splinters can be minuscule and challenging to pinpoint without proper illumination and magnification.
Begin by positioning yourself in a well-lit area or using a bright light source to illuminate the affected area. If available, a magnifying glass can be incredibly helpful in enhancing visibility and magnifying the skin's surface, making it easier to identify the splinter's exact location. By carefully examining the skin, you can often discern a small, shiny object embedded within or just beneath the skin's surface, indicating the presence of the glass splinter.
In cases where the splinter is deeply lodged or not immediately visible, gently running your fingertip over the area may help locate the precise spot of discomfort or tenderness, signaling the splinter's position. Additionally, observing any signs of redness, swelling, or a tiny entry point where the splinter penetrated the skin can provide valuable clues to its whereabouts.
If the splinter remains elusive, consider using a sterilized needle or pin to gently probe the skin's surface, exercising caution to avoid causing further injury. This delicate probing technique can help identify the exact location of the splinter by detecting any subtle resistance or pinpointing the area of discomfort.
Throughout the process of locating the splinter, it's essential to maintain a steady hand and exercise patience, as rushing the identification process can lead to overlooking the splinter or causing unnecessary trauma to the skin. By methodically examining the affected area and utilizing available tools and techniques, you can effectively pinpoint the splinter's location, setting the stage for its safe and precise removal.
Successfully locating the glass splinter within the skin is a pivotal milestone in the overall process, laying the groundwork for the subsequent step of safely extracting the splinter without causing further discomfort or complications. With the splinter's position identified, you are now prepared to proceed to the next crucial phase of removing the splinter from the skin, bringing you one step closer to resolving this common yet bothersome issue.
Read more: How To Get Glass Out Of Hand
Step 4: Remove the splinter
With the glass splinter located and the necessary supplies at hand, the pivotal moment arrives to delicately extract the splinter from the skin. This step demands precision, patience, and a steady hand to ensure the safe and effective removal of the foreign object without causing further discomfort or injury.
Using the fine-tipped tweezers, carefully grasp the exposed end of the splinter, ensuring a firm yet gentle grip to avoid breakage or slippage. If the splinter is protruding from the skin's surface, gently and steadily pull it out in the same direction it entered, maintaining a consistent, even pressure to prevent fracturing the splinter and leaving any fragments behind.
In cases where the splinter is embedded beneath the skin's surface, it may be necessary to create a small entry point to facilitate its extraction. Sterilize a needle or pin with rubbing alcohol, then gently pierce the skin at a shallow angle near the splinter's location, taking care to minimize discomfort and avoid excessive force.
Once the entry point is established, use the sterilized needle or pin to carefully lift the skin around the splinter, creating a tiny opening through which the splinter can be accessed. With the splinter partially exposed, employ the tweezers to grasp it firmly and steadily pull it out in the direction of entry, maintaining a controlled and gentle motion to minimize trauma to the surrounding tissue.
Throughout the extraction process, it's crucial to remain attentive to any resistance or discomfort experienced by the individual, adjusting the extraction technique as needed to ensure a smooth and uneventful removal. If the splinter proves challenging to extract or causes significant discomfort, it may be prudent to seek professional medical assistance to avoid potential complications.
Upon successfully removing the glass splinter, carefully examine the extraction site to ensure that no fragments remain embedded in the skin. If any tiny remnants are detected, use the tweezers or the sterilized needle to delicately lift them out, taking care to avoid causing additional injury or irritation to the skin.
With the splinter fully extracted and any residual fragments removed, proceed to cleanse the area once more with antiseptic wipes or rubbing alcohol to disinfect the skin and minimize the risk of infection. Once the area is thoroughly cleansed, cover the wound with sterile gauze or a band-aid to protect it from external contaminants and promote proper healing.
By following these meticulous steps, you can effectively and safely remove a glass splinter from the skin, mitigating discomfort and reducing the risk of complications. With the splinter successfully extracted and the wound dressed and cared for, you have taken a significant stride toward resolving this common household mishap with confidence and precision.
Step 5: Clean and care for the wound
After successfully removing the glass splinter, it is essential to prioritize the proper cleansing and care of the wound to promote optimal healing and minimize the risk of infection. This crucial step involves thorough cleaning, application of antiseptic, and appropriate wound dressing to safeguard the affected area.
Begin by gently cleansing the extraction site with antiseptic wipes or a mild, non-stinging antiseptic solution to ensure that any residual debris or bacteria are effectively removed. Carefully pat the area dry with a clean, lint-free cloth to maintain a hygienic environment for the subsequent wound care steps.
Once the area is clean and dry, apply a thin layer of antibiotic ointment to the wound to provide an additional barrier against potential infection and promote healing. The antibiotic ointment serves to safeguard the wound from external contaminants while fostering an environment conducive to the skin's natural recovery process.
Following the application of the antibiotic ointment, cover the wound with sterile gauze or a band-aid to shield it from external elements and minimize the risk of further injury. The dressing serves as a protective barrier, preventing dirt, bacteria, and other foreign particles from coming into contact with the wound, thereby reducing the likelihood of infection and promoting undisturbed healing.
It is important to monitor the wound regularly for any signs of infection, such as increased redness, swelling, warmth, or discharge. If any concerning symptoms manifest or if the wound does not show signs of improvement within a few days, seeking medical attention is advisable to ensure proper treatment and prevent potential complications.
Throughout the healing process, it is crucial to keep the wound clean and dry, avoiding excessive moisture or exposure to unhygienic conditions. By maintaining diligent care and attention to the wound, you can facilitate its healing and minimize the risk of adverse outcomes, allowing the skin to recover effectively and restore its natural integrity.
By diligently cleaning and caring for the wound following the removal of the glass splinter, you can optimize the healing process and reduce the likelihood of complications. This proactive approach to wound care ensures that the affected area receives the necessary attention and protection, fostering a smooth and uneventful recovery.
With the wound properly cleansed, treated, and dressed, you have taken the final step in addressing the glass splinter incident, setting the stage for the skin to heal and restore itself to its optimal condition.
Use a piece of tape to gently press against the area with the splinter and then pull it off. The splinter should stick to the tape and come out easily.
Conclusion
In conclusion, successfully removing a glass splinter from the skin requires a methodical approach, attention to detail, and the use of essential tools and supplies. By following the step-by-step process outlined in this comprehensive guide, individuals can confidently address the discomfort and potential risks associated with a glass splinter, promoting proper healing and minimizing the likelihood of complications.
From gathering the necessary supplies to meticulously cleaning the affected area, locating the splinter, delicately extracting it, and caring for the wound post-removal, each step plays a vital role in ensuring a safe and effective resolution to this common household mishap. By adhering to these guidelines, individuals can navigate the splinter removal process with confidence and precision, alleviating discomfort and promoting the skin's recovery.
Furthermore, maintaining a hygienic environment, exercising patience, and seeking professional medical assistance if needed are essential considerations throughout the splinter removal process. These measures contribute to a successful outcome and reduce the risk of infection or other potential complications, safeguarding the individual's well-being and promoting optimal healing.
Ultimately, by approaching the removal of a glass splinter with attentiveness, patience, and the appropriate tools and techniques, individuals can effectively address this common nuisance and facilitate the skin's recovery. The proactive approach to wound care and the meticulous extraction process outlined in this guide empower individuals to navigate the situation with confidence, promoting a smooth and uneventful resolution to the glass splinter predicament.
With the splinter safely removed and the wound properly cared for, individuals can rest assured that they have taken the necessary steps to address the issue and promote their skin's well-being. By following these comprehensive guidelines, individuals can confidently handle the removal of a glass splinter, fostering a positive outcome and ensuring a smooth recovery process.
Frequently Asked Questions about How To Get A Glass Splinter Out
Was this page helpful?
At Storables.com, we guarantee accurate and reliable information. Our content, validated by Expert Board Contributors, is crafted following stringent Editorial Policies. We're committed to providing you with well-researched, expert-backed insights for all your informational needs.


0 thoughts on “How To Get A Glass Splinter Out”