Home>Furniture & Design>Office Furniture>How To Fix Peeling Leather On An Office Chair

Office Furniture
How To Fix Peeling Leather On An Office Chair
Modified: January 14, 2024
Learn how to repair peeling leather on your office chair with our expert tips and restore your office furniture to its former glory. Discover effective solutions for office furniture maintenance and design.
(Many of the links in this article redirect to a specific reviewed product. Your purchase of these products through affiliate links helps to generate commission for Storables.com, at no extra cost. Learn more)
Introduction
Welcome to the ultimate guide on how to fix peeling leather on an office chair. Few things can be as disheartening as discovering that the luxurious leather on your beloved office chair is starting to peel. This not only affects the aesthetics of your workspace but also diminishes the comfort and durability of the chair. However, before you consider investing in a new chair, it's important to understand that peeling leather can be remedied with the right techniques and products.
In this comprehensive guide, we will delve into the causes of peeling leather, how to assess the damage, and the step-by-step process of restoring your office chair to its former glory. Whether you are a DIY enthusiast or simply want to gain a deeper understanding of leather care, this guide is designed to equip you with the knowledge and confidence to tackle this common issue.
So, roll up your sleeves, gather your materials, and let's embark on a journey to revitalize your office chair by addressing the pesky problem of peeling leather. Let's dive in and discover how to bring new life to your worn-out office chair!
Key Takeaways:
- Don’t fret if your office chair’s leather is peeling! You can fix it by cleaning, applying a repair compound, and conditioning the leather. With some TLC, your chair will look good as new.
- Peeling leather on your office chair can be caused by sunlight, friction, and neglect. By understanding the causes and following the restoration process, you can bring your chair back to life.
Read more: How To Fix An Office Chair Armrest
Understanding the Causes of Peeling Leather
Before delving into the restoration process, it’s crucial to grasp why leather on office chairs may start to peel. Understanding the root causes can help prevent future occurrences and guide you in choosing the most effective repair methods.
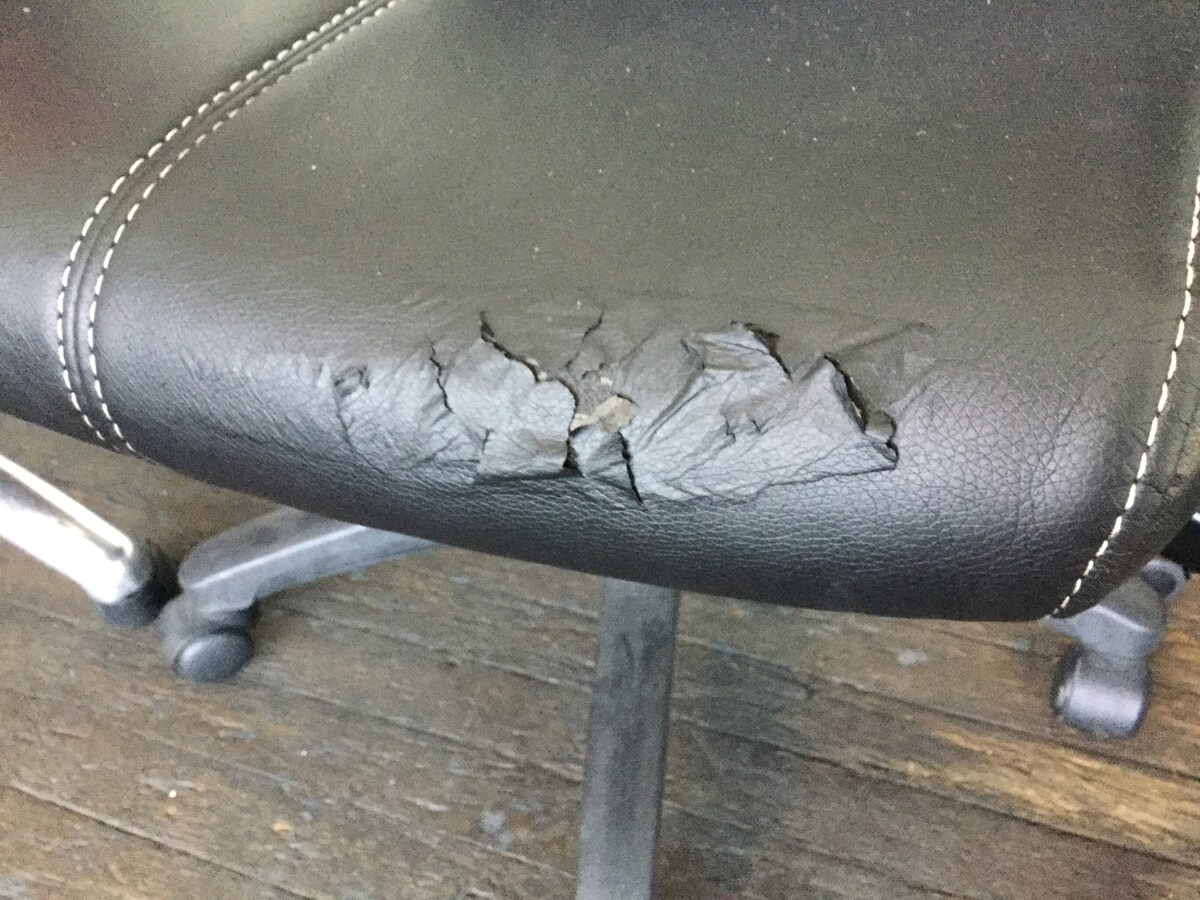
One common cause of peeling leather is prolonged exposure to sunlight and heat. Over time, UV rays and high temperatures can lead to the breakdown of the leather’s natural oils and fibers, resulting in dryness and eventual peeling. Additionally, frequent use and friction, particularly in high-contact areas such as the seat and armrests, can accelerate the deterioration of the leather’s surface.
Inferior quality or poorly maintained leather can also contribute to peeling. Low-grade leather, often found in budget-friendly office chairs, may lack the necessary protective coatings and resilience to withstand daily wear and tear. Furthermore, neglecting proper cleaning and conditioning routines can leave the leather vulnerable to cracking and peeling.
Another factor to consider is excessive dryness. In environments with low humidity levels, leather can lose moisture, leading to brittleness and peeling. Conversely, high humidity can promote the growth of mold and mildew, which can also damage the leather’s integrity.
Furthermore, the use of harsh cleaning agents and chemicals can strip the leather of its natural oils, accelerating the peeling process. It’s essential to use gentle, leather-specific cleaning products to maintain the material’s strength and suppleness.
By recognizing these underlying causes, you can take proactive measures to mitigate the risk of peeling and preserve the quality of your office chair’s leather upholstery. In the next section, we will explore how to assess the extent of the damage and determine the most suitable course of action.
Assessing the Damage
Before embarking on the restoration process, it’s essential to assess the extent of the damage to the leather on your office chair. This evaluation will provide valuable insights into the severity of the peeling and help determine the most effective approach for repair.
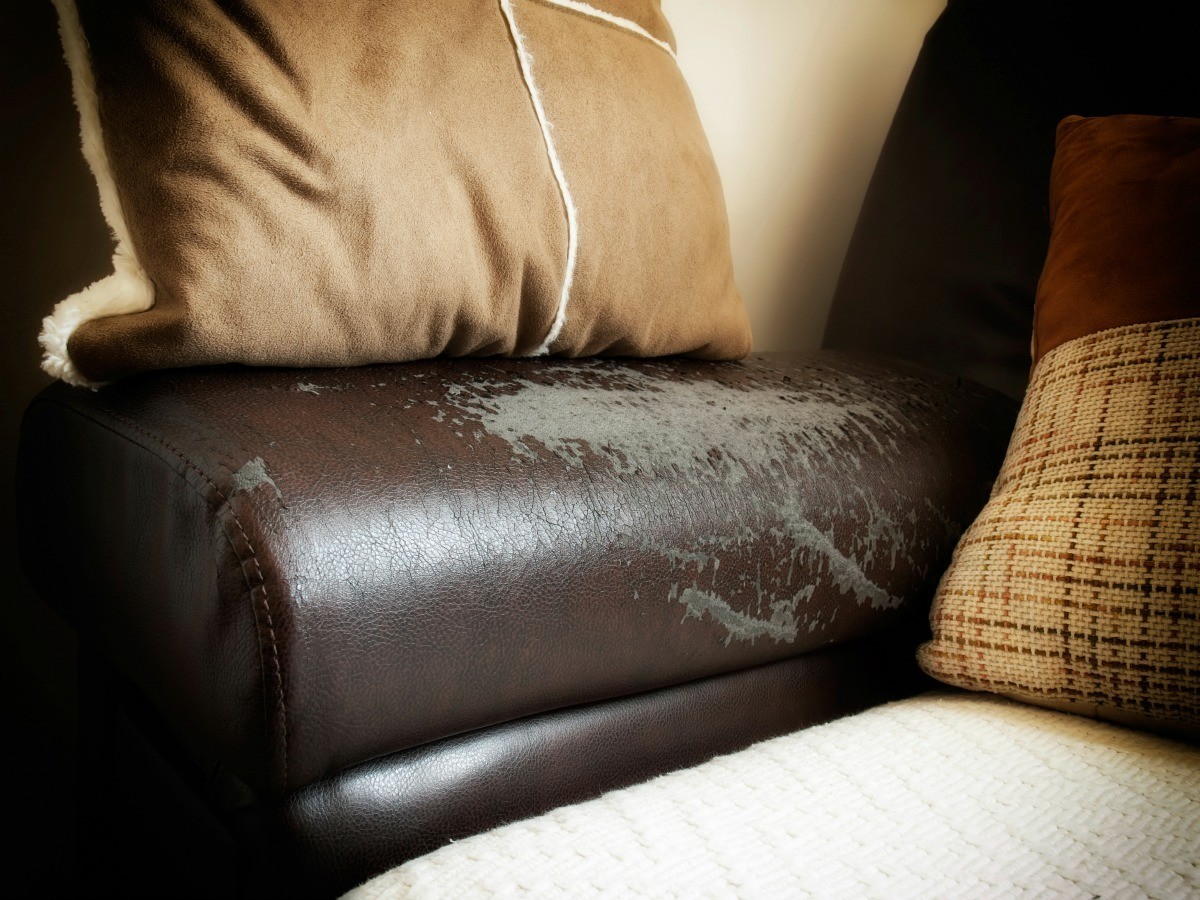
Begin by closely examining the areas where the leather is peeling. Take note of the size and location of the affected areas, as well as the depth of the peeling. Some chairs may exhibit superficial peeling, where only the topmost layer of the leather is affected, while others may display more extensive damage, with the underlying layers also compromised.
Next, assess the overall condition of the leather. Look for signs of dryness, cracking, or discoloration in addition to the peeling. Understanding the leather’s current state will guide you in selecting the appropriate restoration products and techniques.
It’s also important to consider the chair’s usage patterns. High-contact areas such as the seat, armrests, and headrest are more susceptible to peeling due to frequent friction and body weight. Evaluating these areas will help prioritize the areas that require immediate attention.
Additionally, take into account any previous attempts at repair or maintenance. If the leather has been treated with certain products or methods in the past, it can impact the adhesion and compatibility of new repair compounds and conditioners.
Finally, consider the overall structural integrity of the chair. Ensure that the frame, padding, and mechanical components are in good condition, as addressing the leather issues alone may not fully restore the chair’s functionality and comfort.
By thoroughly assessing the damage, you can develop a clear understanding of the scope of the restoration project and make informed decisions regarding the repair process. With a comprehensive evaluation in hand, you are now ready to proceed to the next crucial steps in restoring your office chair’s leather upholstery.
Cleaning and Preparing the Leather
Before initiating the repair process, it is imperative to thoroughly clean and prepare the leather surface. This crucial step not only removes dirt, oils, and other contaminants but also creates an optimal foundation for the subsequent repair compounds and conditioners.
Begin by gently vacuuming the surface of the leather to remove any loose debris and dust. Utilize a soft brush attachment to prevent scratching or further damaging the leather. Pay close attention to seams, creases, and areas prone to accumulation, ensuring a comprehensive cleaning process.
Next, use a mild leather cleaner specifically formulated for the removal of dirt and oils without causing drying or discoloration. Apply the cleaner to a soft, lint-free cloth and gently wipe the entire leather surface. Work in small sections, ensuring even coverage and thorough removal of grime and residues. Avoid using harsh chemicals or household cleaning agents, as they can exacerbate the peeling and damage the leather.
After cleaning, allow the leather to thoroughly dry before proceeding. It’s essential to ensure that the surface is completely free of moisture to prevent any interference with the adhesion of the repair products.
Once the leather is dry, carefully inspect the cleaned surface for any remaining traces of dirt, stains, or stubborn residues. Address any lingering imperfections with targeted spot cleaning using the appropriate leather-safe cleaning solutions and techniques.
Following the cleaning process, it’s time to prepare the leather for the application of the repair compound. Lightly sand the peeling edges and surrounding areas using fine-grit sandpaper. This gentle abrasion helps smooth the edges, remove loose fibers, and promote better adhesion of the repair compound.
After sanding, wipe the leather surface with a damp cloth to eliminate any sanding dust and residue. Once again, ensure that the leather is completely dry before proceeding to the next phase of the restoration process.
By meticulously cleaning and preparing the leather, you set the stage for successful repair and rejuvenation. With the surface now primed and free of contaminants, you are ready to embark on the application of the leather repair compound, a pivotal step in restoring the integrity and appearance of your office chair’s leather upholstery.
To fix peeling leather on an office chair, you can use a leather repair kit to patch up the peeling areas. Clean the surface, apply the repair compound, and let it dry for a seamless fix.
Applying Leather Repair Compound
Once the leather surface is thoroughly cleaned and prepared, the next step in restoring peeling leather on an office chair involves the application of a high-quality leather repair compound. This specialized product is designed to mend the damaged areas, reinforce the integrity of the leather, and create a seamless finish.
Begin by selecting a premium leather repair compound that closely matches the color and texture of your office chair’s leather. It’s essential to choose a product specifically formulated for repairing peeling, cracking, and discoloration, ensuring optimal results and a natural-looking finish.
Using a small, flexible spatula or palette knife, carefully apply a thin layer of the repair compound to the peeling areas, working it into the affected areas and ensuring even coverage. Take care to feather the edges of the compound to blend seamlessly with the surrounding leather, creating a smooth transition between the repaired and original surfaces.
As you apply the repair compound, work in small sections, gradually building up the layers as needed to achieve a level surface and proper adhesion. Be mindful of any textural or grain patterns in the leather, aiming to replicate the natural characteristics for a cohesive and authentic appearance.
For areas with deeper peeling or damage, consider using a flexible leather filler to reinforce and build up the compromised areas before applying the repair compound. This approach helps restore the structural integrity of the leather and ensures a durable, long-lasting repair.
After applying the repair compound, allow it to cure and set according to the manufacturer’s instructions. This typically involves a designated drying period to ensure that the compound bonds securely to the leather surface. Avoid using or placing stress on the repaired areas during this curing phase to allow for optimal results.
Once the repair compound has fully cured, assess the repaired areas to ensure that the application is smooth, cohesive, and seamlessly integrated with the surrounding leather. Any minor imperfections or unevenness can be addressed in the subsequent sanding and smoothing phase, which plays a pivotal role in refining the repaired surface.
By skillfully applying a high-quality leather repair compound, you can effectively address the peeling and damage, restoring the visual appeal and structural integrity of your office chair’s leather upholstery. With the repair compound in place, the next step involves refining the surface to achieve a flawless and professional finish.
Read more: How To Fix Hydraulics On An Office Chair
Sanding and Smoothing the Surface
After applying the leather repair compound, the next critical phase in the restoration process involves sanding and smoothing the repaired areas to achieve a seamless and professional finish. This meticulous step aims to refine the texture, blend the repair compound with the surrounding leather, and create a cohesive surface that closely mirrors the original appearance.
Begin by gently sanding the repaired areas using fine-grit sandpaper or a specialized sanding pad designed for leather. The goal is to feather the edges of the repair compound, smooth any unevenness, and blend the texture to match the surrounding leather. Employ light, circular motions while maintaining a consistent pressure to achieve a uniform surface.
As you sand, periodically assess the progress and texture of the repaired areas. Pay attention to the transition between the repaired sections and the original leather, ensuring that the surface remains level, smooth, and free of any noticeable discrepancies. This iterative process allows for precise adjustments and refinements to achieve an impeccable result.
For areas with intricate grain patterns or textures, employ a delicate touch to preserve the natural characteristics of the leather. Carefully navigate around these details, ensuring that the repair seamlessly integrates with the existing texture for a harmonious and authentic appearance.
Following the initial sanding, wipe the repaired areas with a clean, damp cloth to remove any residual dust and debris. This step provides a clear view of the refined surface and allows for further assessment before proceeding to the next stage of the restoration process.
If necessary, perform a secondary sanding to address any remaining imperfections or irregularities. This meticulous approach ensures that the repaired areas blend seamlessly with the surrounding leather, creating a unified and aesthetically pleasing result.
After completing the sanding process, thoroughly inspect the repaired areas to ensure that the surface is uniform, smooth, and indistinguishable from the original leather. Any lingering unevenness or textural disparities can be further refined in the subsequent conditioning and protecting phase, which plays a pivotal role in enhancing the resilience and luster of the leather upholstery.
By skillfully sanding and smoothing the repaired areas, you can achieve a flawless and professional finish, effectively concealing the previous damage and revitalizing the appearance of your office chair’s leather upholstery. With the surface now refined, the next step involves conditioning and protecting the leather to ensure long-lasting beauty and durability.
Conditioning and Protecting the Leather
With the repaired areas now seamlessly integrated and refined, the final phase of restoring peeling leather on an office chair involves conditioning and protecting the leather to enhance its resilience, luster, and longevity. This crucial step not only nourishes the leather but also safeguards it against future damage, ensuring that your office chair maintains its impeccable appearance and comfort.
Begin by selecting a premium leather conditioner specifically formulated to replenish moisture, restore suppleness, and protect against drying and cracking. It’s essential to choose a product that is compatible with the type of leather used in your office chair, whether it’s full-grain, top-grain, or bonded leather, to ensure optimal results.
Apply a small amount of the leather conditioner to a soft, lint-free cloth and gently massage it into the entire leather surface of the chair. Work in circular motions, ensuring thorough coverage and absorption of the conditioner into the leather fibers. Pay particular attention to the repaired areas, as they may benefit from additional conditioning to seamlessly blend with the surrounding leather.
As you condition the leather, observe the immediate transformation as the conditioner enriches the color, texture, and sheen of the upholstery. This revitalizing process not only enhances the visual appeal but also imparts a luxurious feel and supple touch to the leather, elevating the overall comfort and aesthetics of your office chair.
After conditioning, allow the leather to absorb the conditioner and air dry according to the manufacturer’s recommendations. This resting period enables the conditioner to penetrate the leather, nourishing it from within and fortifying its natural resilience against environmental stressors and wear.
Once the leather has fully absorbed the conditioner, gently buff the surface with a clean, dry cloth to reveal a rich, lustrous finish. This final touch enhances the sheen and smoothness of the leather, showcasing the rejuvenated appearance and inviting texture of your office chair’s upholstery.
To further safeguard the leather against potential damage, consider applying a protective leather spray or cream designed to repel spills, stains, and UV rays. This additional layer of protection helps maintain the integrity of the leather and simplifies routine maintenance, ensuring that your office chair remains a timeless and enduring centerpiece of your workspace.
By diligently conditioning and protecting the leather, you not only enhance its beauty and resilience but also invest in the long-term preservation of your office chair’s upholstery. With the restoration process now complete, take a moment to admire the transformation and revel in the renewed elegance and comfort of your revitalized office chair.
Conclusion
Congratulations on successfully restoring the peeling leather on your office chair! By following the comprehensive steps outlined in this guide, you have not only rejuvenated the appearance and comfort of your chair but also gained valuable insights into leather care and maintenance.
Throughout this journey, you have delved into the causes of peeling leather, assessed the damage, meticulously cleaned and prepared the leather, skillfully applied a repair compound, and refined the surface to achieve a seamless finish. Additionally, you have nourished and protected the leather, ensuring its long-lasting beauty and resilience.
As you reflect on this transformative process, take pride in your dedication to preserving and enhancing the quality of your office furniture. Your commitment to restoring the leather upholstery exemplifies the value of proactive maintenance and the gratifying results it yields.
Furthermore, the skills and knowledge you have acquired empower you to address similar challenges in the future, whether it involves leather furniture, accessories, or automotive upholstery. Your newfound expertise in leather restoration positions you as a capable steward of fine leather craftsmanship, capable of revitalizing and maintaining its allure.
Remember, regular care and maintenance are key to preserving the beauty and longevity of leather upholstery. By adhering to a consistent cleaning, conditioning, and protection routine, you can safeguard your office chair against future damage and ensure that it continues to exude sophistication and comfort for years to come.
As you bask in the renewed splendor of your office chair, consider sharing your newfound expertise with others who may benefit from your insights. Whether it’s guiding a friend through a similar restoration project or offering advice on leather care, your experience and knowledge can positively impact those seeking to revitalize their cherished leather furnishings.
With your office chair now revitalized and your expertise in leather restoration solidified, take a moment to appreciate the transformation you have accomplished. Your commitment to preserving and enhancing the beauty of your surroundings exemplifies the profound impact of proactive care and the enduring allure of fine leather craftsmanship.
May your revitalized office chair continue to inspire productivity, comfort, and admiration, serving as a testament to the transformative power of dedicated maintenance and the timeless elegance of leather upholstery.
Frequently Asked Questions about How To Fix Peeling Leather On An Office Chair
Was this page helpful?
At Storables.com, we guarantee accurate and reliable information. Our content, validated by Expert Board Contributors, is crafted following stringent Editorial Policies. We're committed to providing you with well-researched, expert-backed insights for all your informational needs.



0 thoughts on “How To Fix Peeling Leather On An Office Chair”