Home>Furniture>Living Room Furniture>How To Reupholster A Chaise Lounge
Living Room Furniture
How To Reupholster A Chaise Lounge
Modified: October 19, 2024
Learn how to reupholster your chaise lounge with our step-by-step guide. Upgrade your living room furniture and give it a fresh new look.
(Many of the links in this article redirect to a specific reviewed product. Your purchase of these products through affiliate links helps to generate commission for Storables.com, at no extra cost. Learn more)
Introduction
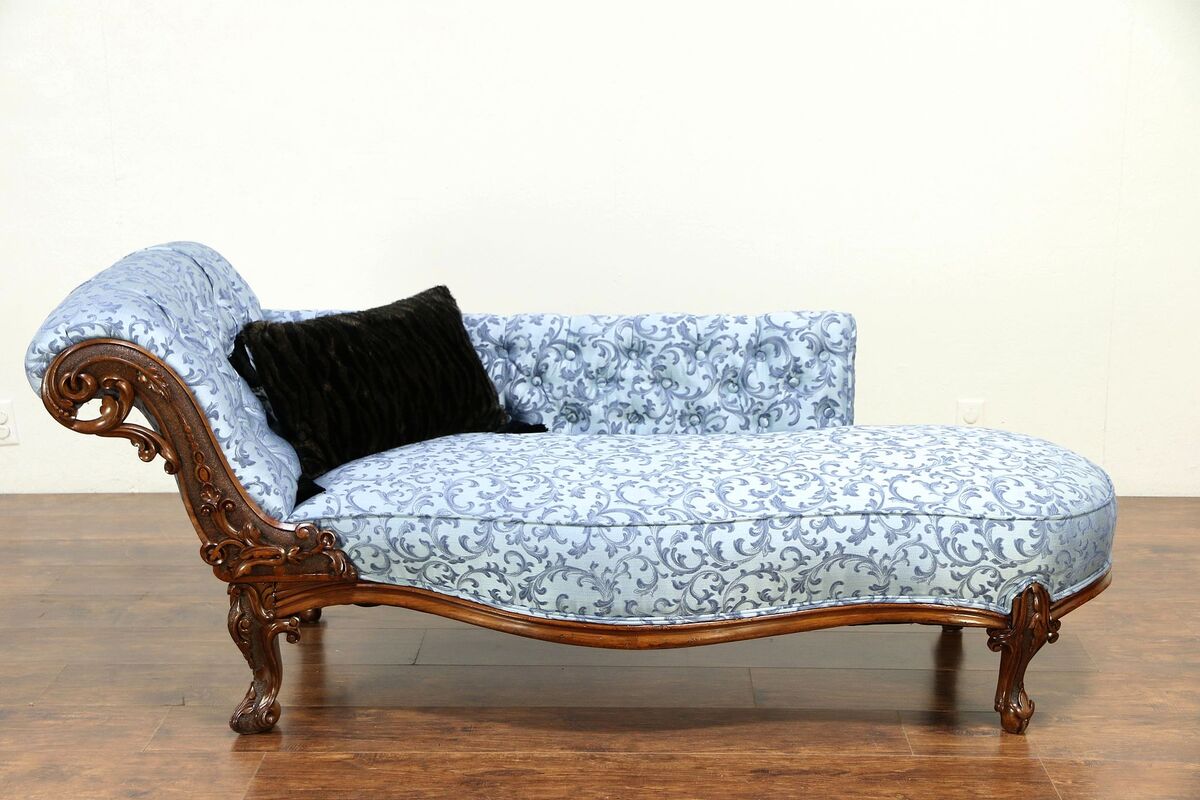
Welcome to our comprehensive guide on how to reupholster a chaise lounge! If you have a worn-out or outdated chaise lounge that needs a fresh new look, reupholstering it can breathe new life into your living room furniture. Reupholstering not only allows you to personalize your chaise lounge to match your style and decor, but it also helps extend its lifespan.
In this step-by-step tutorial, we will walk you through the process of reupholstering a chaise lounge. From gathering the necessary materials to finishing the edges, we will cover everything you need to know to successfully reupholster your chaise lounge and turn it into a stunning centerpiece of your living room.
Whether you are a DIY enthusiast looking to take on a new project or someone wanting to save money on furniture repairs, this guide is here to help you. With a little time, patience, and the right tools, you can transform your chaise lounge into a beautiful and comfortable piece of furniture that you can enjoy for years to come.
Before we dive into the reupholstering process, it’s important to note that the specific steps may vary depending on the design and construction of your chaise lounge. However, the general principles and techniques outlined in this guide can be applied to most chaise lounge styles.
Now that you’re ready, let’s get started on giving your chaise lounge a stunning makeover!
Key Takeaways:
- Give your old chaise lounge a stunning makeover by reupholstering it with a fabric that matches your style and decor. With the right materials and tools, you can transform your worn-out furniture into a beautiful centerpiece for your living room.
- Reupholstering a chaise lounge is a rewarding DIY project that requires patience and attention to detail. From removing the old upholstery to adding padding and finishing touches, each step contributes to the longevity and beauty of your revamped furniture.
Read more: What Is A Chaise Lounge?
Step 1: Gather necessary materials
Before you begin reupholstering your chaise lounge, it’s essential to gather all the necessary materials. Having them prepared and organized will streamline the process and ensure that you have everything you need to complete the project successfully. Here is a list of materials you’ll need:
- Fabric: Choose a durable, high-quality fabric that complements your decor and suits your personal style. Measure the dimensions of your chaise lounge to determine how much fabric you’ll need.
- Upholstery Foam: Check the condition of the existing foam in your chaise lounge. If it’s worn out or sagging, consider replacing it with new upholstery foam of the appropriate thickness.
- Padding: In addition to upholstery foam, you may need additional padding to provide extra comfort and support. This is especially important for seat cushions and backrests.
- Staple Gun: A staple gun is an essential tool for securing the fabric to the chaise lounge frame. Make sure to choose a sturdy staple gun designed for upholstery work.
- Staples or Upholstery Tacks: Depending on your preference, you can use either staples or upholstery tacks to secure the fabric. Staples are more common and easier to use, while upholstery tacks can add a decorative touch.
- Scissors and/or Rotary Cutter: These tools will be necessary for cutting the fabric to the correct size and shape. A pair of sharp fabric scissors is essential, but a rotary cutter can also make the process faster and more precise.
- Measuring Tape: Accurate measurements are crucial for cutting and fitting the fabric properly. Have a measuring tape on hand to ensure precise dimensions.
- Pliers: Pliers can be handy for removing old staples or upholstery tacks and for making any adjustments to the frame during the reupholstering process.
- Additional Tools: Depending on the specific design of your chaise lounge, you may need additional tools such as a hammer, screwdriver, or wrench to disassemble and reassemble certain parts.
Once you have gathered all the necessary materials and tools, you’ll be well-prepared to tackle the reupholstering process. Remember, investing in high-quality materials and tools will ensure a professional-looking result and a chaise lounge that will stand the test of time.
Step 2: Remove old upholstery
Now that you have gathered all your materials, it’s time to start the reupholstering process by removing the old upholstery from your chaise lounge. This step is essential to create a clean slate for your new fabric and to assess the condition of the frame. Here are the steps to remove the old upholstery:
- Prepare your workspace: Find a well-lit and spacious area where you can work comfortably. Lay down a protective sheet or drop cloth to catch any debris or dust.
- Inspect and document: Carefully examine the chaise lounge and take note of how the old upholstery is attached to the frame. Take photos or make sketches to help you remember the order and placement of the pieces.
- Remove cushions and fabric: Start by removing any cushions or loose pieces of fabric from the chaise lounge. These can usually be easily detached and set aside for later.
- Detach the fabric: Using pliers or a staple remover, carefully remove the staples or upholstery tacks securing the fabric to the frame. Work slowly and methodically to avoid damaging the fabric or frame.
- Strip the fabric: Once the staples or tacks are removed, gently pull away the old fabric from the frame. Be cautious not to rip or tear the fabric, as you may need certain pieces as references for cutting your new fabric.
- Remove any additional features: If your chaise lounge has buttons, trims, or other decorative elements, take the time to detach them carefully. These can usually be unscrewed or popped off.
- Inspect the frame: With the old upholstery removed, thoroughly examine the frame for any signs of damage or wear. Look for loose joints, cracked wood, or rusted metal. If you notice any issues, it’s important to address them before proceeding with the reupholstering process.
Remember, patience and carefulness are key during this step. Take your time to remove old upholstery without causing any damage to the frame or cushions. By completing this step properly, you’ll have a clean canvas to work with and ensure the longevity of your newly reupholstered chaise lounge.
Step 3: Assess and repair the frame
After removing the old upholstery from your chaise lounge, it’s crucial to assess the condition of the frame. This step will help you identify any repairs or reinforcements needed to ensure the structural integrity of your chaise lounge. Here’s what you need to do:
- Clean the frame: Start by thoroughly cleaning the frame of your chaise lounge. Remove any dust, dirt, or old adhesive residue using a gentle cleaner and a soft cloth. This will allow you to have a clear view of the frame’s condition.
- Check for loose joints: Carefully inspect the joints and connections of the frame. Look for any signs of looseness or wobbliness. If you find any loose joints, use a wrench or screwdriver to tighten them. In some cases, you may need to apply wood glue to reinforce the joints.
- Repair or replace damaged parts: Look for any cracks, splits, or broken pieces in the frame. Depending on the extent of the damage, you may need to repair or replace these parts. Use wood glue, clamps, or screws to mend broken sections. If the damage is severe, consider seeking professional help or consulting a carpenter.
- Reinforce weak areas: Pay close attention to areas where the frame feels weak or unstable. You can reinforce these areas by adding extra support using metal brackets or braces. This will help prevent future damage and ensure the longevity of your chaise lounge.
- Sand and refinish: If the frame has any rough or uneven spots, lightly sand them down to create a smooth surface. This will also allow better adhesion of the new upholstery fabric. After sanding, you can choose to refinish the frame with a fresh coat of paint or stain, if desired.
Assessing and repairing the frame is a critical step in the reupholstering process. It ensures that your chaise lounge is structurally sound and ready for the new upholstery. Taking the time to address any issues and reinforce weak areas will greatly contribute to the overall durability and quality of your reupholstered chaise lounge.
Step 4: Measure and cut new fabric
Once you have assessed and repaired the frame of your chaise lounge, it’s time to move on to measuring and cutting the new fabric. This step is crucial for ensuring a precise and proper fit of the upholstery. Follow these steps to measure and cut your new fabric:
- Gather your tools: Make sure you have a measuring tape, fabric scissors or a rotary cutter, and a flat surface to work on.
- Take accurate measurements: Begin by measuring the different sections of your chaise lounge that need to be covered with the new fabric. This includes the seat, backrest, armrests, and any other individual pieces.
- Add an allowance: When measuring, add an extra few inches to each measurement to account for seam allowances and ensure a snug fit. It’s better to have some extra fabric to work with than to be short on material.
- Mark and cut the fabric: Using your measurements, mark the dimensions on the backside of the new fabric. Double-check your measurements before cutting. Use fabric scissors or a rotary cutter to carefully cut along the marked lines.
- Label each piece: As you cut the fabric, label each piece with a removable marker or a pinned note. This will help you keep track of which section of the chaise lounge each fabric piece corresponds to.
- Consider pattern placement: If your fabric has a pattern or design, think about how you want it to appear on the chaise lounge. Align the pattern and ensure it is centered or placed in a way that is visually appealing.
Remember to work with precision and take your time during this step. Accurate measurements and clean cuts will greatly contribute to the overall appearance and quality of your reupholstered chaise lounge. It’s also a good idea to keep any excess fabric scraps, as they may come in handy for future repairs or small projects.
With the new fabric cut and ready, you’re now one step closer to giving your chaise lounge a fresh and stylish makeover!
Read more: How To Build A Chaise Lounge Chair
Step 5: Attach new fabric to the frame
Now that you have measured and cut the new fabric for your chaise lounge, it’s time to attach it to the frame. This step requires patience and attention to detail to ensure a smooth and professional-looking finish. Follow these steps to properly attach the new fabric:
- Prepare the work area: Lay your new fabric flat on a clean and spacious work surface. Make sure you have easy access to all sides of the fabric.
- Start with the seat: Begin by positioning the fabric over the seat of the chaise lounge. Ensure the fabric is centered and smooth out any wrinkles or folds.
- Secure the fabric: Using a staple gun or upholstery tacks, start securing the fabric to the underside of the seat. Work from the center outward, pulling the fabric taut as you go. Be sure to staple or tack close to the edge but not too close to avoid tearing the fabric.
- Continue with the backrest and armrests: Once the seat is secured, move on to the backrest and armrest sections. Repeat the process of positioning, smoothing, and stapling or tacking the fabric in place. Take care to align any patterns or designs to maintain a uniform appearance.
- Trim the excess fabric: Once all sections are securely attached, trim any excess fabric, leaving a small margin for finishing. Be cautious not to trim too close to the staples or tacks, as this may weaken the fabric’s hold.
- Double-check for wrinkles or unevenness: Take a step back and inspect the newly attached fabric for any wrinkles, unevenness, or sagging. Smooth out any imperfections and make any necessary adjustments.
Remember to work slowly and carefully, ensuring that the fabric is pulled tightly and evenly across the chaise lounge frame. Take the time to make adjustments as needed to ensure a professional and polished appearance.
Continue to the next step, where we’ll cover how to add padding and foam if necessary.
When reupholstering a chaise lounge, start by removing the old fabric and padding carefully. Take note of the order in which the pieces were removed to help with reassembly. Keep track of any screws or other hardware to ensure everything goes back together properly.
Step 6: Add padding and foam if needed
Adding padding and foam to your chaise lounge can greatly enhance the comfort and support of the seat and backrest. This step is especially important if the existing padding is worn out or lacks adequate cushioning. Follow these steps to add padding and foam to your chaise lounge:
- Assess the existing padding: Start by evaluating the condition of the existing padding in your chaise lounge. Determine whether it needs to be replaced or supplemented with additional padding.
- Decide on the type and thickness: Depending on your preference and comfort needs, choose the appropriate type and thickness of padding or foam. Consider using high-density foam or layered batting for optimal comfort and durability.
- Measure and cut the padding: Using the measurement of the seat and backrest, cut the padding to fit the desired areas. You can use a serrated knife or an electric carving knife for a clean and precise cut.
- Place the padding: Carefully position the cut padding on the seat and backrest sections of the chaise lounge. Ensure it covers the desired areas and provides adequate cushioning.
- Secure the padding: Use adhesive spray or a staple gun to secure the padding in place. If using adhesive spray, allow it to dry according to the manufacturer’s instructions before moving on to the next step.
- Add additional layers if necessary: If you feel the need for enhanced cushioning, add additional layers of foam or batting on top of the base layer. This can help create a plush and comfortable seating experience.
- Smooth out any wrinkles or bumps: Once the padding is securely in place, check for any wrinkles or bumps. Smooth them out by gently tugging on the fabric or adjusting the placement of the padding.
Adding padding and foam to your chaise lounge will not only enhance the comfort but also improve the overall aesthetic appeal. By taking the time to provide adequate cushioning, you’ll be able to enjoy a cozy and relaxing seating experience on your reupholstered chaise lounge.
Next, we’ll move on to the next step, where we’ll cover how to secure the fabric to the frame using staples or upholstery tacks.
Step 7: Secure the fabric with staples or upholstery tacks
Securing the fabric to the frame of your chaise lounge is a crucial step to ensure a polished and long-lasting reupholstery job. You have the option to use either staples or upholstery tacks, depending on your preference and the desired aesthetic. Follow these steps to secure the fabric to the frame:
- Position the fabric: Start by aligning the newly cut fabric over the section of the chaise lounge where it needs to be attached. Make sure it is centered and properly positioned.
- Start from the center: Begin securing the fabric from the center of each section, whether it is the seat, backrest, or armrests. This will help ensure an even distribution of tension and prevent wrinkling or bunching.
- Use a staple gun or upholstery tacks: If using a staple gun, place one staple in the center and work your way out towards the edges, spacing the staples evenly. Make sure to pull the fabric tight as you staple, keeping it smooth and wrinkle-free. If using upholstery tacks, position them evenly and space them out along the edges of the fabric.
- Work your way around: Continue attaching the fabric, moving outward from the center towards the edges, maintaining an even tension on the fabric. This will ensure a secure and neat attachment.
- Trim any excess fabric: Once the fabric is securely attached, trim any excess fabric, leaving a small margin for finishing. Be careful not to cut too close to the staples or tacks.
- Repeat for other sections: If your chaise lounge has multiple sections, such as a separate seat and backrest, follow the same process for each section, ensuring a consistent and tight fit.
- Double-check for loose areas: After securing the fabric, inspect the surface for any loose areas or wrinkles. Smooth out any imperfections and readjust the tension if necessary.
Remember to work carefully and consistently to achieve a neat and professional result. Whether you choose staples or upholstery tacks, it’s important to ensure that the fabric is secure and tightly stretched to avoid any future sagging or loosening.
Next, we will discuss how to finish the edges and corners to give your reupholstered chaise lounge a refined look.
Step 8: Finish the edges and corners
Finishing the edges and corners of your reupholstered chaise lounge adds a polished and professional touch to the overall appearance. It helps to ensure that the fabric is neatly secured and prevents fraying over time. Follow these steps to finish the edges and corners:
- Tuck and fold the fabric: Start by tucking any excess fabric towards the underside of the chaise lounge frame. You can use a flat-headed screwdriver or a butter knife to help push the fabric into the crevices.
- Create neat folds: As you tuck the fabric, create neat and even folds along the edges and corners. Smooth out any wrinkles or bulges to achieve a clean and tailored look.
- Secure with staples or upholstery tacks: Use a staple gun or upholstery tacks to secure the folded fabric in place. Space the staples or tacks evenly along the edges, making sure they are positioned close to the frame for a secure hold.
- Trim excess fabric: Once the edges and corners are neatly finished, trim any excess fabric, leaving a small margin for a clean and seamless finish. Be careful not to cut too close to the staples or tacks.
- Check for any loose areas: After finishing the edges and corners, inspect the chaise lounge for any loose or unfixed areas. Secure any loose fabric with additional staples or tacks.
By taking the time to properly finish the edges and corners, you’ll achieve a refined and professional look for your reupholstered chaise lounge. The neat and secure finish will not only enhance the overall aesthetic but also contribute to the durability of the fabric.
Now that your chaise lounge is almost complete, let’s move on to the next step, where we’ll discuss how to reattach any additional features such as buttons, trims, or embellishments.
Read more: How Long Is A Chaise Lounge Chair
Step 9: Reattach any additional features (buttons, trims, etc.)
Adding buttons, trims, or other decorative elements can elevate the visual appeal of your reupholstered chaise lounge. If your chaise lounge originally had these features, or if you want to incorporate them for a personalized touch, follow these steps to reattach them:
- Gather the necessary materials: Depending on the type of feature you want to reattach, gather the appropriate materials such as buttons, trims, or embellishments. Make sure you have the necessary tools, such as a needle and thread, hot glue gun, or upholstery tacks.
- Refer to previous markings or sketches: If your chaise lounge had buttons or trims that were previously attached, refer to any markings or sketches you made during the initial assessment. This will help guide you in reattaching them in the correct locations.
- Position the feature: Place the button, trim, or embellishment in the desired location on the fabric. Take your time to position it accurately and ensure that it aligns with the overall design of the chaise lounge.
- Sew or glue the feature in place: If you’re reattaching buttons, use a needle and thread to pass through the fabric and secure them tightly. If you’re using trims or embellishments, you can either sew them in place or use a hot glue gun to ensure a strong bond. If using upholstery tacks, carefully position them and tap them into the frame with a hammer.
- Double-check and make adjustments: After attaching the additional features, step back and inspect the chaise lounge. Ensure that they are securely fastened and aligned properly. Make any necessary adjustments to achieve the desired look.
Reattaching buttons, trims, or other decorative elements can add a touch of elegance and sophistication to your reupholstered chaise lounge. Take the time to carefully position and secure these features, as they can significantly enhance the overall aesthetic appeal of your furniture piece.
Now that your chaise lounge is almost complete, let’s move on to the final step, where we’ll cover how to clean and polish your newly reupholstered chaise lounge for a fresh and pristine finish.
Step 10: Clean and polish the chaise lounge
After completing the reupholstering process, it’s time to give your chaise lounge a final touch by cleaning and polishing it. This step will enhance the overall appearance and ensure that your newly reupholstered piece looks clean and vibrant. Follow these steps to clean and polish your chaise lounge:
- Vacuum the fabric: Use a vacuum cleaner with a brush attachment to gently remove any dust, debris, or loose fibers from the upholstery. Pay attention to the seams, crevices, and any decorative elements that may collect dirt.
- Spot clean any stains: If you notice any stains or spills on the fabric, spot clean them using a mild detergent or upholstery cleaner. Always test the cleaning solution on a small, inconspicuous area first to ensure it doesn’t cause any damage or discoloration.
- Wipe down the frame: Use a soft cloth or microfiber cloth to wipe down the frame of your chaise lounge. If the frame is made of wood, you can use a wood cleaner or furniture polish to restore its shine and remove any smudges or fingerprints.
- Condition leather or faux leather: If your chaise lounge is upholstered in leather or faux leather, apply a leather conditioner or cleaner to moisturize and protect the material. Follow the manufacturer’s instructions for best results.
- Check and tighten screws or bolts: Inspect the frame of your chaise lounge for any loose screws or bolts. Use a screwdriver or wrench to tighten them, ensuring that all components are secure.
- Inspect and adjust the upholstery: Take one final look at the reupholstered fabric and make any adjustments if needed. Smooth out any wrinkles or creases and ensure that all sections are properly aligned.
By following these cleaning and polishing steps, you’ll be able to enjoy a freshly rejuvenated and visually appealing chaise lounge. Regular maintenance and care will help to preserve the beauty and longevity of your newly reupholstered piece.
Congratulations! You have successfully reupholstered your chaise lounge and transformed it into a stunning addition to your living room. Sit back, relax, and enjoy the comfort and beauty of your newly revamped furniture!
Conclusion
Reupholstering a chaise lounge is a rewarding and creative project that allows you to give new life to your living room furniture. By following the step-by-step process outlined in this guide, you have learned how to transform your worn-out or outdated chaise lounge into a stunning centerpiece that reflects your personal style and enhances your home decor.
We began by gathering the necessary materials and removing the old upholstery, carefully assessing and repairing the frame along the way. Next, we measured and cut the new fabric, ensuring a precise fit for each section of the chaise lounge. We then moved on to secure the fabric to the frame using either staples or upholstery tacks, followed by finishing the edges and corners to create a clean and polished look.
After reattaching any additional features, such as buttons or trims, we concluded the reupholstering process by cleaning and polishing the chaise lounge. This final step ensures that your furniture piece looks fresh, vibrant, and well-maintained.
Remember, reupholstering a chaise lounge requires time, patience, and attention to detail. Each step plays a vital role in the overall result, so take your time and enjoy the process. The knowledge and skills you have acquired will not only enable you to rejuvenate your chaise lounge but may also inspire you to take on future DIY upholstery projects for other furniture pieces.
Now that you have successfully reupholstered your chaise lounge, take a moment to appreciate your hard work and the beautiful transformation you have achieved. Your newly reupholstered chaise lounge will surely become a cherished piece in your home, providing comfort, style, and personality for years to come.
Enjoy your revamped chaise lounge and the countless memories you’ll create while relaxing in it or entertaining guests. Congratulations on a job well done!
Frequently Asked Questions about How To Reupholster A Chaise Lounge
Was this page helpful?
At Storables.com, we guarantee accurate and reliable information. Our content, validated by Expert Board Contributors, is crafted following stringent Editorial Policies. We're committed to providing you with well-researched, expert-backed insights for all your informational needs.


0 thoughts on “How To Reupholster A Chaise Lounge”