Home>Garden Essentials>How Long Does It Take Red Clover To Germinate
Garden Essentials
How Long Does It Take Red Clover To Germinate
Modified: August 17, 2024
Looking to grow red clover in your garden? Find out how long it takes for red clover seeds to germinate and have a lush garden in no time!
(Many of the links in this article redirect to a specific reviewed product. Your purchase of these products through affiliate links helps to generate commission for Storables.com, at no extra cost. Learn more)
Introduction
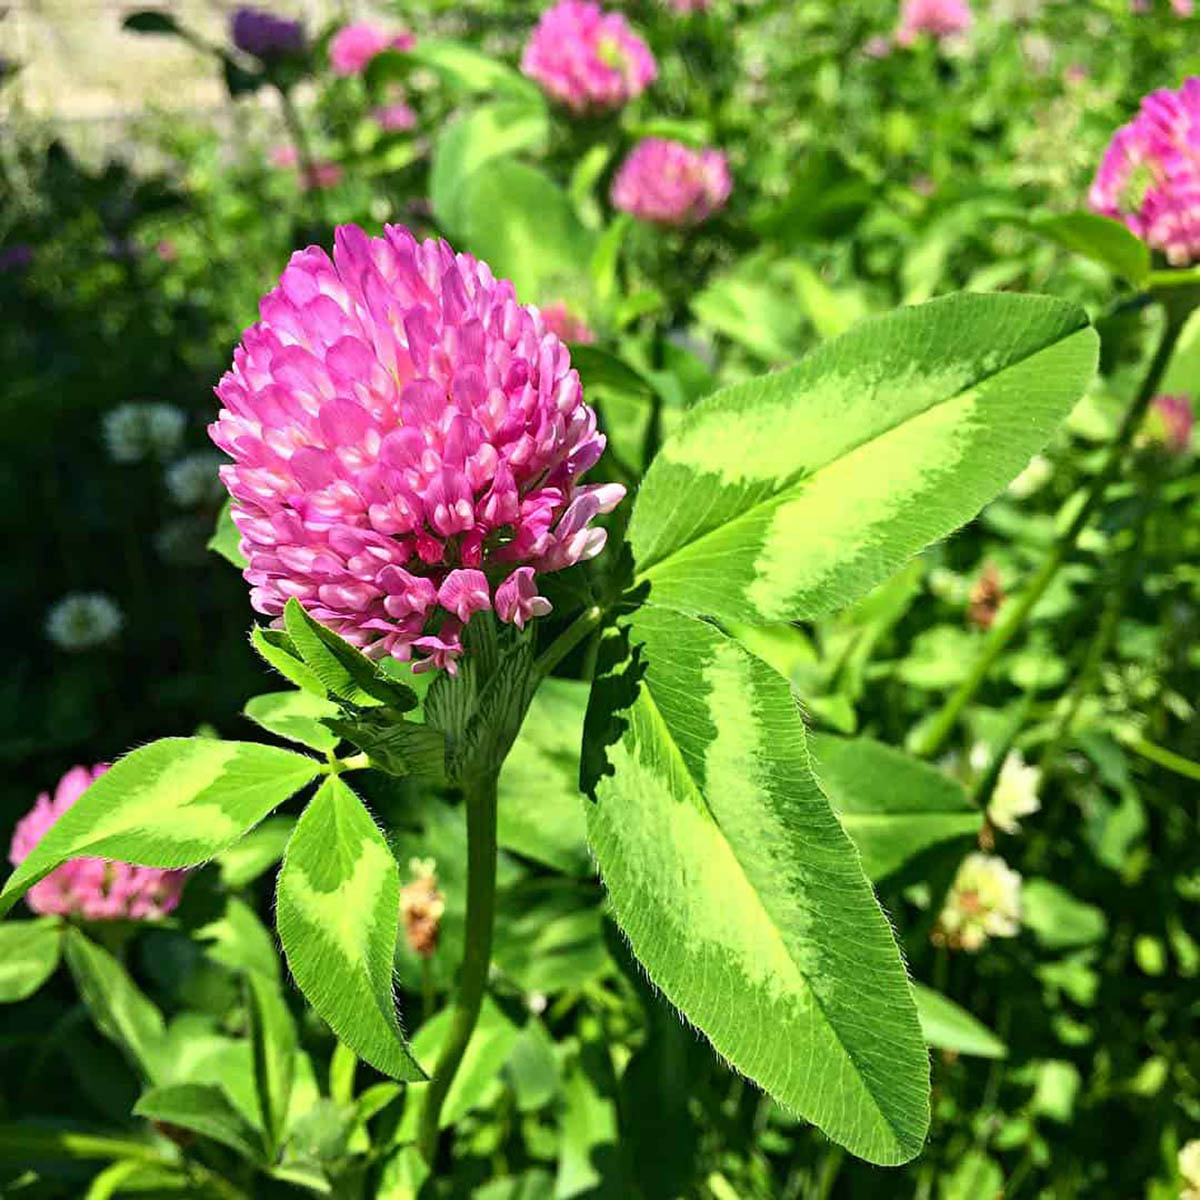
Gardening enthusiasts and farmers often turn to red clover to add beauty and fertility to their landscapes. Red clover (Trifolium pratense) is a popular legume with stunning purple flowers that not only enhance the aesthetic appeal of a garden but also provide numerous benefits for the soil and surrounding plants. However, before you can enjoy the vibrant display and reap the benefits of red clover, you need to understand the germination process.
In this article, we will delve into the fascinating world of red clover germination. We will explore the factors that influence the germination process, the ideal soil conditions for success, and some tips for enhancing germination. So, if you’re ready to learn how long it takes for red clover to germinate and how to optimize this process, let’s dive in!
Key Takeaways:
- Red clover seeds typically germinate within 7 to 14 days, but factors like temperature, moisture, and seed quality can influence the process. Providing optimal conditions and care can enhance germination success.
- To enhance red clover germination, choose high-quality seeds, pre-soak them, manage soil moisture, and address common issues like poor root development and weed competition. Patience and proper care are key to successful germination.
Read more: How Long Does It Take Clover To Germinate
Overview of Red Clover Germination
Germination is the process by which a seed begins to grow and develop into a seedling. For red clover, this is a critical stage as it marks the beginning of its life cycle. Understanding the germination process is crucial for gardeners and farmers who want to successfully cultivate red clover in their landscapes.
Red clover seeds are typically small and round, with a smooth surface. They contain all the necessary genetic information and vital nutrients needed for the development of the plant. When exposed to the right conditions, these seeds can sprout, sending out roots and shoots, and eventually growing into mature red clover plants.
Like all plants, red clover seeds require favorable conditions to germinate. Adequate moisture, oxygen, and temperature play essential roles in triggering germination. When these conditions align, the seed coat softens, and water is absorbed, activating enzymes responsible for breaking down stored nutrients within the seed. This process provides the energy needed for the seed to burst open and begin its journey towards becoming a seedling.
Red clover germination typically occurs within a specific range of temperatures. It prefers cooler weather, with the optimal germination temperature ranging between 15 to 20 degrees Celsius (59 to 68 degrees Fahrenheit). Temperatures above or below this range can slow down or inhibit germination altogether.
It’s important to note that the germination process can be influenced by several factors, including seed quality, soil conditions, and external environmental factors. Understanding and optimizing these factors can significantly improve the germination success rate and ensure a strong, healthy red clover crop.
Factors Affecting Red Clover Germination
The germination success of red clover seeds can be influenced by various factors. By understanding and addressing these factors, you can increase the chances of successful germination and establish a thriving red clover crop in your garden. Here are some key factors to consider:
- Seed Quality: The quality of the red clover seeds you are using plays a crucial role in germination. High-quality seeds have a higher germination rate and are more likely to produce vigorous seedlings. When purchasing red clover seeds, ensure that they are fresh, properly stored, and obtained from reputable sources. Inspect the seeds for any signs of damage or decay.
- Moisture: Adequate moisture is essential for red clover seed germination. The seeds need to be consistently moist but not saturated. Overly wet conditions can lead to rotting, while dry conditions can prevent germination. It’s important to strike a balance by regularly watering the seeds or ensuring that they receive sufficient rainfall.
- Soil Conditions: The quality and composition of the soil greatly impact red clover germination. Red clover prefers well-draining soils that provide good aeration. Ensure that the soil is free from debris and large clumps, as these can impede seedling emergence. Additionally, red clover prefers slightly acidic to neutral soil with a pH range of 6.0 to 7.0.
- Temperature: Temperature is another vital factor affecting red clover germination. As mentioned earlier, red clover prefers cooler temperatures for optimal germination. The recommended temperature range is between 15 to 20 degrees Celsius (59 to 68 degrees Fahrenheit). It’s important to monitor the temperature and adjust planting times accordingly.
- Light: While red clover seeds do not require light to germinate, they do need access to sunlight once they emerge as seedlings. Therefore, it’s important to plant the seeds at the appropriate depth, ensuring that they receive sufficient light once they begin to sprout. Planting too deeply can hinder seedling emergence.
- Weed Competition: Red clover seedlings are susceptible to competition from weeds. Weeds can compete for resources such as moisture, nutrients, and sunlight, which can hinder the growth and establishment of red clover. It’s essential to keep the planting area free from weeds or take appropriate measures to control their growth.
- Timing: Choosing the right time to sow red clover seeds is crucial for successful germination. Red clover is a cool-season plant, so it’s best to sow the seeds in early spring or late summer to take advantage of favorable temperatures and moisture conditions. It’s important to consider the climate and local growing conditions when determining the optimal time for planting.
By taking these factors into account and making the necessary adjustments, you can greatly enhance the germination success rate of your red clover seeds. Providing the ideal conditions will give your red clover seeds the best chance to transform into healthy, resilient seedlings.
Ideal Soil Conditions for Red Clover Germination
Creating the perfect soil environment is essential for successful red clover germination. Red clover thrives in specific soil conditions that provide the right balance of nutrients, moisture, and aeration. By understanding the ideal soil conditions, you can ensure optimal germination and cultivate a flourishing red clover crop. Here are the key factors to consider:
- Well-Drained Soil: Red clover prefers well-drained soil that allows water to percolate through easily. Waterlogged soil can suffocate the seeds and lead to rotting. To improve drainage, you can incorporate organic matter into the soil, such as compost or well-rotted manure. This helps to create a loose, crumbly texture that allows excess water to drain away.
- Soil pH: Red clover thrives in slightly acidic to neutral soil with a pH range of 6.0 to 7.0. You can test the pH level of your soil using a simple soil test kit available at garden centers or through a soil testing service. If the pH level is too low or too high, you can make adjustments by adding soil amendments, such as lime to raise the pH or sulfur to lower it.
- Fertility: Red clover benefits from soil that is rich in nutrients, especially phosphorus and potassium. Before sowing red clover seeds, it’s a good practice to conduct a soil test to determine the nutrient levels. If the soil is deficient in nutrients, you can amend it with organic fertilizers or compost to provide the necessary nutrients for seed germination and subsequent growth.
- Adequate Organic Matter: Incorporating organic matter into the soil improves its structure, enhances water retention, and promotes nutrient availability. Red clover responds well to soil that is high in organic matter. You can add compost, leaf mold, or well-rotted manure to the soil before planting. This will not only support germination but also contribute to long-term soil health.
- Minimal Soil Compaction: Red clover seeds require good soil-to-seed contact for successful germination. Soil compaction can hinder seedling emergence. Therefore, it is important to prepare the planting area by loosening the soil with a garden fork or tiller. Avoid excessive foot traffic or heavy machinery on the soil, as this can lead to compaction.
By ensuring that the soil meets these ideal conditions, you are creating an optimal environment for red clover germination. Remember to regularly monitor the soil moisture levels, adjust watering accordingly, and provide necessary care to establish healthy red clover seedlings.
Sowing Red Clover Seeds
Sowing red clover seeds properly is crucial for successful germination and the establishment of a healthy crop. Here are some guidelines to follow when sowing red clover seeds:
- Prepare the soil: Begin by preparing the planting area. Remove any weeds or debris and loosen the soil using a garden fork or tiller. This helps create a loose, crumbly texture that allows for easy root penetration and seedling emergence.
- Choose the right time: Red clover is a cool-season plant, so it’s best to sow the seeds in early spring or late summer. These seasons provide optimal temperature and moisture conditions for germination. Consider your local climate and growing conditions when determining the best time to sow.
- Select the seeding method: Red clover seeds can be sown by broadcasting or using a seed drill. Broadcasting involves spreading the seeds evenly by hand over the prepared soil surface. This method works well for small-scale plantings. Alternatively, you can use a seed drill to ensure even seed placement at a specific depth. This method is more suitable for larger areas.
- Sow at the recommended depth: Red clover seeds should be planted at a depth of approximately 0.6 to 1.3 centimeters (¼ to ½ inch). Planting too shallow can result in poor germination, while planting too deep can inhibit seedling emergence. It’s important to follow the recommended depth guidelines to optimize germination.
- Ensure proper seed-to-soil contact: After sowing the red clover seeds, gently press them into the soil using the back of a rake or by walking lightly over the area. This helps improve seed-to-soil contact, which is essential for successful germination. Avoid compacting the soil excessively, as this may impede seedling emergence.
- Keep the soil moist: Moisture is crucial for red clover seed germination. After sowing, water the area thoroughly to ensure the soil is evenly moist. Continue to monitor moisture levels throughout the germination period and provide supplemental watering if necessary. Be careful not to overwater, as excessively wet conditions can lead to rotting.
- Mulch the area: Applying a thin layer of organic mulch, such as straw or shredded leaves, can help conserve moisture, suppress weed growth, and regulate soil temperature. Mulching also protects the emerging seedlings from extreme weather conditions.
By following these steps and providing the proper care, you can increase the likelihood of successful red clover seed germination. Remember to monitor the planting area regularly, provide adequate moisture, and protect the emerging seedlings from weed competition and extreme weather conditions.
Red clover seeds typically germinate within 7-14 days when planted in moist, well-drained soil and kept at a temperature of 60-70°F. Keep the soil consistently moist to help the seeds germinate more quickly.
Germination Timeframe of Red Clover
The germination timeframe of red clover can vary depending on various factors, including environmental conditions, seed quality, and soil preparation. On average, red clover seeds will begin to germinate within 7 to 14 days after planting.
However, it’s important to note that germination is a process that occurs over a range of time, rather than a single event. Some seeds may germinate earlier, while others may take longer. Factors such as temperature, moisture levels, and seed quality can influence the speed and success of germination.
Red clover is a cool-season plant, so it tends to germinate more quickly when exposed to cooler temperatures within the optimal range of 15 to 20 degrees Celsius (59 to 68 degrees Fahrenheit). If the temperature is too high or too low, germination may be delayed or inhibited.
Moisture is essential for red clover seed germination. The seeds require consistent moisture to absorb and activate the enzymes responsible for breaking down stored nutrients and initiating the growth process. It’s important to keep the soil evenly moist during the germination period. However, be cautious not to overwater, as excessively wet conditions can lead to seed rotting or fungal diseases.
The quality of red clover seeds also plays a role in germination timeframe. High-quality seeds typically have a higher germination rate and can sprout more consistently and quickly. When purchasing red clover seeds, ensure that they are fresh, properly stored, and obtained from reputable sources.
Once red clover seeds germinate, they will send out roots and shoots, eventually growing into seedlings. At this stage, it’s important to provide ongoing care, including proper irrigation, weed control, and protection from pests and diseases. By providing optimal growing conditions, you can maximize the growth and development of your red clover crop.
Keep in mind that germination is just the first step in the growth process of red clover. It will take several weeks or even months for the seedlings to mature into established plants. Red clover plants typically reach their full growth and bloom within six to eight weeks after germination under ideal conditions.
By understanding the germination timeframe and the factors that influence it, you can plan accordingly, monitor progress, and provide the necessary care to ensure successful red clover germination and the establishment of a healthy, vibrant crop.
Tips for Enhancing Red Clover Germination
Enhancing red clover germination is crucial for establishing a successful and healthy crop. Here are some tips to help optimize the germination process:
- Choose high-quality seeds: Select red clover seeds that are fresh, well-stored, and obtained from reputable sources. High-quality seeds have a higher germination rate and are more likely to produce robust seedlings.
- Pre-soak the seeds: To kickstart the germination process, you can pre-soak red clover seeds in water overnight before planting. This helps to soften the seed coat and promotes quicker germination.
- Perform a soil test: Conduct a soil test to check the nutrient levels and pH of the soil. Red clover thrives in slightly acidic to neutral soil with a pH range of 6.0 to 7.0. Make any necessary amendments, such as adding organic matter or adjusting pH, to provide an optimal growing environment for the seeds.
- Prepare the soil properly: Ensure the planting area is free from weeds, debris, and large clumps. Loosen the soil to improve its structure and encourage good root penetration. This prepares an ideal seedbed for red clover germination.
- Moisture management: Keep the soil consistently moist during the germination period. Regularly monitor the moisture levels and water as needed to prevent the soil from drying out. However, avoid overwatering, as this can lead to seed rotting or fungal diseases.
- Provide shade or mulch: To prevent the soil surface from drying out too quickly and to regulate soil temperature, you can provide temporary shade or apply a thin layer of organic mulch, such as straw or shredded leaves, over the planted area.
- Control weeds: Weeds can compete with red clover seedlings for resources, hindering their growth and establishment. Keep the planting area free from weeds through regular weeding or using mulch to suppress weed growth.
- Monitor temperature: Red clover is a cool-season crop and prefers cooler temperatures for optimal germination. Pay attention to the local climate and sow the seeds during the recommended temperature range of 15 to 20 degrees Celsius (59 to 68 degrees Fahrenheit).
- Provide adequate sunlight: While red clover seeds do not require light to germinate, proper sunlight is essential once the seedlings emerge. Therefore, ensure that the seeds are planted at the appropriate depth to allow for seedling emergence into light.
By following these tips and providing the necessary care, you can enhance red clover germination and increase the chances of establishing a vibrant and productive red clover crop. Always monitor the progress of the seedlings, provide ongoing care, and address any issues that may arise promptly.
Troubleshooting Common Germination Issues
Despite our best efforts, sometimes germination issues can arise with red clover seeds. Understanding and troubleshooting these common problems can help improve the germination rate and ensure a successful red clover crop. Here are some common germination issues and their possible solutions:
- Poor germination rate: If you notice a low germination rate, it could be due to several factors. One common cause is low seed viability. Ensure that you are using fresh, high-quality red clover seeds. If the seeds are old or improperly stored, their viability may decline, resulting in poor germination. Additionally, factors such as unfavorable temperatures, inadequate moisture, or poor soil conditions can affect germination. Address these issues by providing optimal growing conditions and addressing any deficiencies.
- Uneven germination: Uneven germination can occur if the seeds are not planted at a consistent depth. Ensure that you are sowing the seeds at the recommended depth of approximately 0.6 to 1.3 centimeters (¼ to ½ inch) to promote even germination. If seeds are planted at variable depths, they may experience different environmental conditions, leading to uneven germination. Take care to sow the seeds evenly and press them gently into the soil for proper seed-to-soil contact.
- Seed rotting: Seed rotting can occur if the soil is excessively wet or if there is poor drainage. Overwatering or excessive rainfall can lead to waterlogged conditions, putting the seeds at risk of rotting. To prevent seed rotting, ensure that the soil is well-drained and avoid overwatering. Monitor the moisture levels closely, and adjust water accordingly to keep the soil consistently moist but not saturated.
- Seedling damping-off: Damping-off is a fungal disease that affects young seedlings, causing them to rot at the base and eventually collapse. It is often caused by excessive moisture and poor air circulation. To prevent damping-off, ensure proper soil drainage, avoid overwatering, and provide adequate spacing between seedlings for better air circulation. Using sterile potting mix or starting seeds in a clean and sanitized environment can also help prevent fungal diseases.
- Poor root development: Poor root development can occur if the soil is compacted or lacks proper aeration. Compacted soil prevents roots from penetrating and growing properly. Before planting, ensure that the soil is loosened and free from excessive compaction. Incorporating organic matter into the soil can also improve its structure and promote root development. Avoid excessive foot traffic or heavy machinery on the planting area to prevent compaction.
- Weed competition: Weeds can compete with red clover seedlings for nutrients, moisture, and sunlight, hindering their growth. Keep the planting area free from weeds through regular weeding or using organic mulch to suppress weed growth. This helps provide a favorable environment for red clover seedlings to establish and grow without competition.
By identifying and addressing these common germination issues, you can maximize the chances of successful red clover germination and ensure the establishment of a healthy and productive crop. Remember to monitor the plants closely, provide appropriate care, and make necessary adjustments to optimize germination and the overall growth of your red clover crop.
Conclusion
Red clover germination is a critical step in establishing a vibrant and productive crop. By understanding the factors that influence germination and following the tips mentioned, gardeners and farmers can enhance the success rate of red clover germination.
Creating the ideal soil conditions, including well-drained soil, optimal pH levels, and adequate nutrients, provides a favorable environment for red clover seeds to germinate and thrive. Proper seed selection, sowing techniques, and moisture management are also key to successful germination.
However, germination issues can sometimes arise despite our best efforts. It’s important to troubleshoot these issues by addressing factors such as poor seed quality, uneven planting depth, excessive moisture, seedling damping-off, poor root development, and weed competition.
By closely monitoring the germination process, providing necessary care and adjustments, and following best practices, gardeners and farmers can increase the chances of successful red clover germination. This will lead to the establishment of healthy, resilient red clover plants that contribute to the beauty and fertility of gardens and farmlands.
Remember, patience and persistence are key when it comes to red clover germination. With proper attention and care, you can enjoy the vibrant foliage and beautiful purple flowers of red clover, while also benefiting from its nitrogen-fixing properties and ability to improve soil health.
So roll up your sleeves, prepare your soil, select high-quality seeds, and sow them with confidence. With the knowledge and tips shared in this article, you are well-equipped to embark on a successful red clover germination journey. May your garden flourish with the beauty and bounty of red clover!
Frequently Asked Questions about How Long Does It Take Red Clover To Germinate
Was this page helpful?
At Storables.com, we guarantee accurate and reliable information. Our content, validated by Expert Board Contributors, is crafted following stringent Editorial Policies. We're committed to providing you with well-researched, expert-backed insights for all your informational needs.

0 thoughts on “How Long Does It Take Red Clover To Germinate”