Home>Garden Essentials>How Long To Germinate Bitter Gourd
Garden Essentials
How Long To Germinate Bitter Gourd
Modified: August 17, 2024
Discover how long it takes for bitter gourd seeds to germinate in your garden. Get expert tips and advice for successful gardening.
(Many of the links in this article redirect to a specific reviewed product. Your purchase of these products through affiliate links helps to generate commission for Storables.com, at no extra cost. Learn more)
Introduction
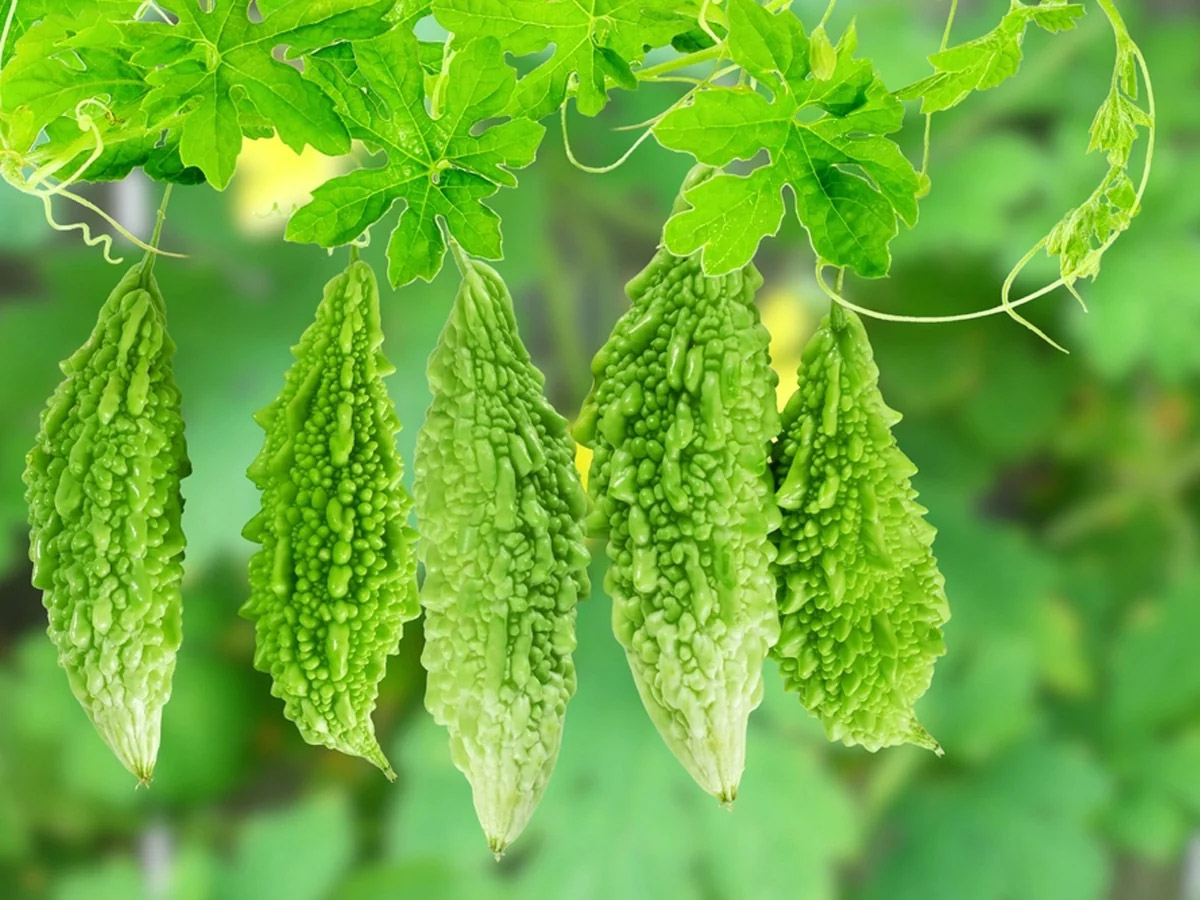
Welcome to the world of gardening! If you have a green thumb and a love for fresh produce, growing your own bitter gourd can be a rewarding experience. Bitter gourd, also known as bitter melon or karela, is a unique vegetable with a distinctive taste that is beloved in many culinary traditions across the globe.
But before you can start enjoying the fruits of your labor, it’s important to understand the germination process of bitter gourd seeds. Germination refers to the time it takes for a seed to sprout and develop into a seedling. Proper understanding and management of this crucial stage can significantly impact the success of your bitter gourd garden.
In this article, we will delve into the factors that affect bitter gourd germination time, the ideal conditions for germinating bitter gourd seeds, techniques to improve germination rates, common mistakes to avoid, and how to monitor the progress of germination. Let’s get started and uncover the secrets of successful bitter gourd germination.
Key Takeaways:
- Bitter gourd seeds take 10 to 14 days to germinate under optimal conditions, but factors like temperature, moisture, and seed quality can affect the process.
- To improve bitter gourd seed germination, consider techniques like soaking, scarification, and pre-sprouting, while avoiding common mistakes such as overwatering and using old seeds.
Read more: How Long Before Gourds Germinate
Understanding Bitter Gourd Germination
Before we explore the factors that influence bitter gourd germination time, let’s first understand the process itself. Bitter gourd seeds are typically small and oblong in shape. Like most plant seeds, they contain an embryo, which is essentially a miniature version of the plant, and a food source to sustain it until it can establish roots and photosynthesize on its own.
Germination begins when the seed takes up moisture from the surrounding environment. This hydration signals the seed to break dormancy and start the growth process. As the seed absorbs water, it swells and the embryonic tissues inside start to enlarge. Eventually, a tiny root, known as the radicle, emerges from the seed coat and begins to grow downward into the soil.
Once the radicle is established, the seedling continues its upward growth, pushing through the soil as the shoot emerges. The first set of leaves, known as cotyledons, unfurl, and the true leaves follow shortly after. At this point, the seedling has successfully germinated and is ready for further growth and development.
It’s important to note that bitter gourd seeds have a relatively long germination period compared to some other vegetables. On average, it can take anywhere from 10 to 14 days for bitter gourd seeds to fully germinate under optimal conditions. However, this timeframe can vary depending on various factors, which we will explore in the next section.
Factors Affecting Bitter Gourd Germination Time
Several factors play a role in determining the germination time of bitter gourd seeds. Understanding these factors can help you optimize your growing conditions and improve the success rate of germination. Here are the key factors to consider:
- Temperature: Bitter gourd seeds germinate best in warm temperatures between 75 to 85 degrees Fahrenheit (24 to 29 degrees Celsius). Lower temperatures can significantly slow down the germination process while excessively high temperatures can inhibit germination altogether. Maintaining a consistent and favorable temperature range is crucial for prompt germination.
- Moisture: Adequate moisture is essential for seed germination. The seeds need to be consistently moist during the germination process. Too much water, however, can lead to rotting or fungal diseases. It is important to strike the right balance by providing enough moisture for the seeds to absorb, but also allowing excess water to drain away.
- Light: Bitter gourd seeds do not require light to germinate and actually prefer a dark environment. This is why it is common practice to plant the seeds at a depth of around 1 inch (2.5 centimeters) to ensure they are shielded from light. Keep the seed trays covered until the seedlings emerge.
- Seed Quality: The quality and viability of the seeds can also impact germination time. It is recommended to purchase seeds from reputable sources to ensure they are fresh and of good quality. Older or low-quality seeds may have lower germination rates or take longer to sprout.
- Seed Treatment: Some gardeners choose to pre-treat bitter gourd seeds to improve germination rates. One common method is soaking the seeds in water overnight before planting. This can help soften the seed coat and promote faster germination. Another technique is scarification, which involves nicking or scratching the seed coat to aid water absorption.
By considering these factors and making the necessary adjustments in your gardening practices, you can create optimal conditions for bitter gourd seed germination, leading to healthier and more robust seedlings.
Ideal Conditions for Germinating Bitter Gourd Seeds
Creating the ideal conditions for germinating bitter gourd seeds is crucial for successful germination and the subsequent growth of healthy seedlings. Here are some key factors to consider:
- Temperature: Bitter gourd seeds require warm temperatures for optimal germination. Aim for a temperature range between 75 to 85 degrees Fahrenheit (24 to 29 degrees Celsius). Consider using a seedling heat mat or placing the seed tray in a warm location, such as near a sunny window or on top of a refrigerator. Maintaining a consistently warm environment will help expedite germination.
- Moisture: Bitter gourd seeds need to be kept consistently moist but not overly saturated. Ensure that the soil or growing medium is well-draining to prevent waterlogged conditions. Water the seeds gently and avoid overwatering, as excessive moisture can lead to rotting. Regularly check the moisture level and adjust watering accordingly.
- Planting Depth: Bitter gourd seeds should be planted at a depth of about 1 inch (2.5 centimeters). This provides the seeds with the necessary darkness they prefer for germination. Planting too shallow or too deep can affect the germination process.
- Growing Medium: Choose a well-draining and nutrient-rich growing medium for planting the bitter gourd seeds. A mixture of peat moss, perlite, and compost can create an ideal medium. Avoid heavy soils that tend to retain moisture and impede drainage.
- Container: Using seed trays or small pots with drainage holes can help provide the optimal growing environment for bitter gourd seeds. These containers allow excess water to drain away and prevent waterlogged conditions. Consider using individual cells or pots to give each seed ample space for growth.
- Light Exposure: Bitter gourd seeds prefer darkness during the germination process, so it is best to cover the seed trays with a plastic dome or plastic wrap until the seeds sprout. Once the seedlings emerge, move them to a well-lit area or provide them with 12-14 hours of bright, indirect sunlight each day.
By ensuring the right balance of temperature, moisture, planting depth, growing medium, container type, and light exposure, you can create the ideal conditions for germinating bitter gourd seeds. Consistency and attention to these factors will greatly increase the chances of successful germination and healthy seedling development.
Techniques for Germinating Bitter Gourd Seeds
Germinating bitter gourd seeds can sometimes be a bit challenging due to their tough seed coat and longer germination period. However, with a few techniques and strategies, you can improve germination rates and ensure successful seedling development. Here are some effective techniques to consider:
- Soaking: Before planting, consider soaking the bitter gourd seeds in water overnight. This process helps soften the seed coat and promotes faster germination. Fill a bowl with room temperature water and place the seeds in it. Allow them to soak for 12 to 24 hours, then drain and proceed with planting.
- Scarification: Another technique to enhance germination is scarification. Bitter gourd seeds have a hard outer coat that can inhibit water absorption. By carefully nicking or scratching the seed coat with a sharp knife or sandpaper, you create small openings that allow water to penetrate and initiate the germination process. Be gentle and make small incisions to avoid damaging the embryo inside.
- Stratification: For some gardeners, stratification has shown positive results in improving germination rates. This technique involves simulating the natural winter dormant period by exposing the seeds to cold temperatures. Place them in a moist paper towel or a dampened vermiculite bag and store them in the refrigerator for 1 to 2 weeks. After stratification, plant the seeds as usual for germination.
- Pre-sprouting: If you want to get a head start on the germination process, consider pre-sprouting the bitter gourd seeds before planting them. Take a damp paper towel or cotton cloth and place the seeds on it. Fold the towel over to cover the seeds and keep it in a warm location. Check regularly to ensure the towel remains moist. Once the seeds have sprouted, gently transfer them to the prepared growing medium.
- Using a Seedling Heat Mat: Bitter gourd seeds germinate best in warm temperatures. Utilizing a seedling heat mat underneath the seed tray or pots can provide a consistent warmth that promotes faster and more uniform germination. Follow the specific instructions for the heat mat to ensure it is set at the appropriate temperature for bitter gourd seeds.
By employing these techniques, you can overcome the challenges of bitter gourd seed germination and increase your chances of successful sprouting. Experiment with different methods to find the ones that work best for you and your growing conditions.
Bitter gourd seeds usually take 7-14 days to germinate. Keep the soil consistently moist and provide warmth for best results.
Read more: How Long To Germinate Pitaya
Common Mistakes to Avoid
When germinating bitter gourd seeds, it’s important to be mindful of common mistakes that can hinder the germination process and affect the success of your seedlings. By avoiding these pitfalls, you can increase your chances of achieving healthy and robust bitter gourd plants. Here are some common mistakes to be aware of:
- Overwatering: Excessive moisture can lead to rotting of the seeds or damping-off disease, which causes seedlings to die. Avoid overwatering by ensuring that the soil or growing medium is well-draining and only watering when necessary. Let the top inch of soil dry out slightly between waterings to prevent waterlogged conditions.
- Planting too deep: Bitter gourd seeds should be planted at a depth of about 1 inch (2.5 centimeters). Planting them too deep can prevent the seedlings from breaking through the soil surface, resulting in weak and stunted growth. Follow the recommended planting depth to promote successful germination.
- Insufficient warmth: Bitter gourd seeds require warm temperatures for optimal germination. Placing them in a cold or drafty area can significantly delay or inhibit germination. Make sure the seeds are in a consistently warm environment with temperatures between 75 to 85 degrees Fahrenheit (24 to 29 degrees Celsius).
- Lack of proper light exposure: While bitter gourd seeds prefer darkness during the germination process, once the seedlings emerge, they require adequate light to grow strong and healthy. Insufficient light can lead to leggy seedlings with weak stems. Ensure that the seedlings receive 12-14 hours of bright, indirect sunlight or provide them with supplemental grow lights.
- Using old or low-quality seeds: The quality of the seeds can greatly impact germination. Using old or low-quality seeds may result in lower germination rates or even no germination at all. Purchase fresh and reliable bitter gourd seeds from reputable sources to increase your chances of successful germination.
- Not providing proper ventilation: Good air circulation is essential for preventing fungal diseases and promoting healthy growth. Ensure that your growing area has adequate ventilation to prevent stagnant air and humidity buildup. Avoid overcrowding seed trays or pots, as this can inhibit airflow and increase the risk of disease.
By being aware of these common mistakes and taking steps to avoid them, you can set yourself up for a successful germination process and promote the healthy development of your bitter gourd seedlings. Remember to monitor the conditions carefully, make adjustments as needed, and learn from any challenges or setbacks along the way.
Monitoring Germination Progress
Monitoring the germination progress of your bitter gourd seeds is an important task to ensure that everything is progressing as expected and to address any issues that may arise. Here are some key steps to effectively monitor the germination progress:
- Record the planting date: Keep track of the date you planted the bitter gourd seeds. This will help you estimate the expected germination time and allow you to monitor the progress accordingly.
- Observation: Regularly check the seed trays or pots for any signs of germination. Look for small cracks or emerging seedlings poking through the soil surface. Depending on the conditions and seed quality, germination may occur within 10 to 14 days.
- Patience: Bitter gourd seeds have a relatively longer germination period compared to some other vegetables. It’s important to exercise patience and avoid the temptation to dig up the seeds to check for progress. Disturbing the germinating seeds can disrupt the process and harm delicate roots.
- Careful watering: Monitor the moisture levels in the soil or growing medium and water accordingly. Avoid overwatering, as it can lead to rotting or fungal diseases. Keep the soil slightly moist but not waterlogged. Remember that consistently moist conditions are vital for successful germination.
- Thinning seedlings: Once the bitter gourd seedlings have emerged and have a few sets of true leaves, you may need to thin them out if they are overcrowded. This allows the remaining seedlings ample space to grow and reduces competition for nutrients and light. Be gentle when removing excess seedlings to avoid damaging the roots of the remaining ones.
- Noting abnormalities: Regularly inspect the seedlings for any abnormalities, such as discolored or stunted growth, wilting, or signs of pests or diseases. Early detection of any issues allows for prompt actions to be taken to remedy the situation and prevent further damage.
- Adjusting growing conditions: Based on your observations, make necessary adjustments to the growing conditions if needed. This may include adjusting the temperature, light exposure, or watering frequency to optimize the growth of your bitter gourd seedlings.
By closely monitoring the germination progress of your bitter gourd seeds, you can stay informed about their development and address any potential issues. Regular observations and proactive care will help set the stage for strong and healthy seedlings, laying the foundation for a successful bitter gourd garden.
Harvesting Bitter Gourd
Harvesting bitter gourd is an exciting reward for your efforts in growing this unique vegetable. Knowing the right time to harvest and the proper techniques ensures that you can enjoy the fruits of your labor at their peak flavor and quality. Here are essential tips for harvesting bitter gourd:
1. Determining maturity: Bitter gourd is typically harvested when it reaches the desired size and maturity. The fruit should be firm, well-shaped, and have a smooth surface. As the name suggests, bitterness is a desirable characteristic of bitter gourd, but the intensity varies. Some prefer to harvest when the fruit is still green and young, while others wait until it turns yellowish and slightly wrinkled to enhance its bitter taste.
2. Checking for readiness: To determine if a bitter gourd is ready for harvest, gently press the fruit with your thumb. If it feels firm and slightly yields to pressure, it is likely mature enough to harvest. Avoid harvesting bitter gourds that are soft, mushy, or have dark spots, as they may be overripe or damaged.
3. Using pruning shears or a knife: To harvest bitter gourd, use clean and sharp pruning shears or a knife. Cut the stem about half an inch above the fruit to avoid damaging the plant. Be careful not to apply excessive force that could harm the plant or adjacent fruits.
4. Handling with care: Bitter gourd has a fragile skin that can easily be bruised or punctured. Handle the harvested fruits with care to prevent damage. Avoid dropping or tossing them into containers that may cause bruising. Place the harvested bitter gourds in a basket or tray lined with a soft material to cushion them during transport.
5. Storing bitter gourd: Bitter gourd is best consumed when fresh, as it tends to lose its flavor and quality over time. If you have harvested more bitter gourds than you can immediately use, store them in a cool, dry place away from direct sunlight. Wrapping them individually in newspaper or placing them in a breathable container can help prolong their freshness.
6. Seed collection: If you are interested in saving seeds for future planting, allow a few bitter gourds to fully ripen on the vine. Once the fruits turn yellowish and start to split open, carefully remove the seeds and dry them in a cool, well-ventilated area. Store the dried seeds in a sealed container in a cool and dry place until the next planting season.
By following these tips for harvesting bitter gourd, you can ensure that you enjoy the flavors of this unique vegetable at its peak. Remember, harvesting at the right time and handling the fruits with care contribute to the overall satisfaction and success of your bitter gourd gardening endeavors.
Conclusion
Growing bitter gourd from seed to harvest can be a rewarding and fulfilling experience for any gardening enthusiast. By understanding the germination process, considering the factors that affect germination time, and providing the ideal conditions, you can increase the chances of successful seed germination and the development of healthy bitter gourd seedlings.
Remember to monitor the germination progress closely, making necessary adjustments to temperature, moisture levels, and light exposure. Avoid common mistakes like overwatering, planting too deep, and using old or low-quality seeds. Instead, implement techniques such as soaking, scarification, and strategic pre-sprouting to optimize germination rates.
Once your bitter gourd seedlings have successfully sprouted, continue to care for them diligently by providing proper watering, adequate ventilation, and appropriate lighting. Thinning out seedlings if overcrowding occurs and monitoring for any abnormalities will help ensure the health and vigor of your bitter gourd plants.
Finally, the time will come to harvest your bitter gourd. Determine the maturity of the fruits by checking their firmness and shape, deciding whether to harvest them green or wait for a slightly ripe, yellowish appearance. Be gentle when using pruning shears or a knife to harvest, protecting the fragile skin of the bitter gourd. Proper handling and storage will help preserve the flavors until you are ready to enjoy the fruits of your labor.
As you embark on your bitter gourd growing journey, remember that each step, from germination to harvest, requires attentive care. By applying the knowledge and techniques shared in this article, you are well-equipped to successfully grow and harvest your own bitter gourd. Enjoy the process, embrace the unique flavors, and savor the satisfaction of cultivating this delicious and nutritious vegetable.
Frequently Asked Questions about How Long To Germinate Bitter Gourd
Was this page helpful?
At Storables.com, we guarantee accurate and reliable information. Our content, validated by Expert Board Contributors, is crafted following stringent Editorial Policies. We're committed to providing you with well-researched, expert-backed insights for all your informational needs.


0 thoughts on “How Long To Germinate Bitter Gourd”