Home>Garden Essentials>How Long For Milkweed To Germinate
Garden Essentials
How Long For Milkweed To Germinate
Modified: August 17, 2024
Learn how long it takes for milkweed to germinate in your garden and get helpful tips for successful cultivation.
(Many of the links in this article redirect to a specific reviewed product. Your purchase of these products through affiliate links helps to generate commission for Storables.com, at no extra cost. Learn more)
Introduction
Milkweed, a beautiful and beneficial plant, is a favorite among gardeners and nature enthusiasts alike. Its vibrant flowers and essential role in supporting pollinators make it a must-have for any garden. But before you can enjoy the beauty of milkweed, you need to know how long it takes for the seeds to germinate.
Germination refers to the process by which a seed develops into a new plant. In the case of milkweed, germination can vary depending on several factors, including seed moisture content, temperature, light conditions, and seed stratification. Understanding these factors is essential for successfully germinating milkweed seeds and ensuring your garden thrives with these magnificent plants.
In this article, we will explore the different factors that can affect milkweed germination and provide you with insights into the germination time for different milkweed species. Additionally, we will discuss various germination methods and offer tips to help you achieve successful milkweed germination.
So let’s dive in and unravel the mysteries of milkweed germination, empowering you to cultivate a flourishing garden filled with these enchanting plants.
Key Takeaways:
- Proper moisture, warmth, and light are essential for milkweed seeds to sprout. Monitoring seedling growth and providing care leads to successful germination and healthy milkweed plants.
- Choosing high-quality seeds, storing them properly, and monitoring their progress are key to growing vibrant milkweed plants that support pollinators and add natural beauty to your garden.
Read more: How Long Does It Take Milkweed To Germinate
Factors Affecting Milkweed Germination
The germination of milkweed seeds is influenced by several key factors. Understanding these factors and their impact can greatly increase your chances of successful germination. Let’s explore them in more detail:
Seed Moisture Content: Before germination can occur, milkweed seeds require adequate moisture. If the seeds are too dry, germination may be delayed or prevented altogether. On the other hand, if the seeds are too wet, they can become susceptible to mold or rot. It is crucial to strike the right balance by providing moist, well-drained soil for optimal germination.
Temperature: Milkweed seeds have specific temperature requirements for germination. Most milkweed species prefer warm temperatures ranging from 70°F to 85°F (21°C to 29°C). Cooler temperatures can inhibit germination, while excessively high temperatures can also have a negative impact. It is essential to consider the temperature requirements of the specific milkweed species you are cultivating.
Light Conditions: Light plays a vital role in milkweed germination. In general, milkweed seeds require exposure to light for successful germination. This means that they should be planted on the soil surface or only lightly covered with a thin layer of soil. If the seeds are buried too deeply, they may struggle to germinate. Ensure that the seeds receive adequate light to stimulate germination.
Seed Stratification: Some milkweed species have dormancy mechanisms that prevent them from germinating immediately after sowing. These species require a period of cold stratification to break their dormancy and initiate germination. Cold stratification can be achieved by placing the seeds in a moist medium, such as peat moss, and exposing them to temperatures between 32°F to 41°F (0°C to 5°C) for a specific period, usually 4 to 8 weeks. This process mimics the natural winter conditions that milkweed seeds would experience in their native habitats.
By taking these factors into consideration and providing the ideal conditions for milkweed germination, you can enhance your chances of successful seed sprouting. The next section will delve into the specific germination times for different milkweed species, granting you a deeper understanding of their individual requirements.
Seed Moisture Content
Seed moisture content plays a crucial role in the germination process of milkweed seeds. Adequate moisture is necessary for seeds to absorb water and trigger germination. However, it’s important to strike a balance, as excessive moisture can lead to fungal growth or seed rot.
When it comes to planting milkweed seeds, it’s recommended to provide moist, well-drained soil. This ensures that the seeds have access to the water they need while avoiding the risks associated with overly wet conditions. Sandy or loamy soil types are ideal for milkweed germination, as they offer good drainage and prevent waterlogging.
To maintain the proper moisture levels, it’s essential to water the seeds consistently during the germination process. Ensure that the soil remains evenly moist but not saturated. Overwatering can lead to poor oxygen circulation around the seeds, hindering germination.
When sowing milkweed seeds, it’s helpful to perform a simple moisture test. Gently press a small handful of soil where the seeds will be planted. If the soil holds together and feels moist, it is at the ideal moisture level. However, if it crumbles apart or feels excessively dry, it’s time to water. Regularly monitor the soil moisture and adjust your watering schedule accordingly to ensure optimal growing conditions for your milkweed seeds.
If you’re sowing milkweed seeds indoors or in containers, using a well-draining potting mix is essential. This ensures proper moisture retention while allowing excess water to drain away. Consider using a moisture meter to monitor the moisture levels in the potting mix and adjust your watering accordingly.
In summary, maintaining the right moisture content is crucial for milkweed germination. Providing moist, well-drained soil and monitoring the soil moisture levels will help create the ideal conditions for your seeds to sprout and thrive. By paying attention to this factor, you are setting the stage for successful milkweed germination and the growth of beautiful, beneficial plants in your garden.
Temperature
Temperature plays a significant role in the germination process of milkweed seeds. Different milkweed species have specific temperature requirements for optimal germination. Understanding these temperature preferences will help you create the ideal conditions for successful seed sprouting.
Most milkweed species prefer warm temperatures for germination, typically ranging from 70°F to 85°F (21°C to 29°C). Within this temperature range, the seeds can absorb water and initiate the germination process effectively. It’s important to ensure that the seeds are kept consistently warm throughout the germination period.
If the temperatures are too cold, germination may be delayed, or the seeds might not germinate at all. On the other hand, excessively high temperatures can also have a detrimental effect on germination. It’s crucial to strike the right balance and maintain an appropriate temperature range to optimize germination success.
To regulate the temperature, consider starting milkweed seeds indoors or in a greenhouse. This allows you to control the environment and provide consistent warmth. Using a seed starting heat mat or placing the seed containers near a heat source can help maintain the desired temperature range for germination.
If you’re planning to sow the seeds directly in the garden, it’s important to consider the local climate and planting timing. Wait until the soil temperature has reached the ideal range for the specific milkweed species before sowing the seeds. Monitoring the soil temperature using a soil thermometer can be helpful in determining the optimal planting time.
In colder regions, where the soil temperature might still be below the desired range in spring, starting milkweed seeds indoors can give them a head start. This allows the seedlings to develop and become more robust before transplanting them outside once the soil has warmed up.
Additionally, providing protection from extreme temperature fluctuations, such as using mulch to insulate the soil, can help create a more stable and favorable environment for milkweed germination. Mulching also helps to conserve moisture, which is an added benefit.
By understanding and carefully managing the temperature conditions, you can create an environment that promotes successful germination of milkweed seeds. Adjusting the temperature to meet the specific requirements of your chosen milkweed species will greatly increase your chances of seeing healthy seedlings emerge and eventually mature into beautiful milkweed plants.
Light Conditions
Light is a crucial factor in the germination process of milkweed seeds. Different milkweed species have varying light requirements for successful germination. Understanding these light preferences will help you provide the optimal conditions for your seeds to sprout and thrive.
In general, milkweed seeds require exposure to light for germination. This means that they should be planted on the soil surface or only lightly covered with a thin layer of soil. If the seeds are buried too deeply, it can inhibit their ability to receive the necessary light for germination.
When sowing milkweed seeds, place them on the soil surface and then gently press them into the soil to ensure good seed-to-soil contact. This allows the seeds to absorb water while still being exposed to the light they need. Avoid covering the seeds with excessive soil, as it can hinder germination.
By providing the right amount of light, you are giving the milkweed seeds the signal they need to start germinating. Natural sunlight is the best source of light for milkweed germination. Place the seed trays or containers in a bright location that receives direct or indirect sunlight for a significant part of the day.
If you are starting milkweed seeds indoors, you can use artificial grow lights to simulate sunlight. Choose full-spectrum fluorescent or LED grow lights to provide the appropriate spectrum of light for optimal germination and seedling growth. Position the lights about 6 to 12 inches above the seed trays, and keep them on for about 12 to 16 hours a day.
It’s important to note that although milkweed seeds require light for germination, they also need a period of darkness for the embryo to develop properly. Therefore, avoid exposing the seeds to continuous light 24/7. Providing a regular light-dark cycle is crucial for the germination process.
Maintaining a consistent light source throughout the germination period will help ensure that the milkweed seeds receive the appropriate light conditions for successful germination. By striking the right balance between light exposure and darkness, you are giving your milkweed seeds the best chance to sprout and thrive in your garden.
Read more: How Long To Germinate Pitaya
Seed Stratification
Seed stratification is a process used to break the dormancy of certain milkweed seeds, promoting successful germination. Some milkweed species have dormancy mechanisms that prevent immediate germination after sowing. These species require a period of cold stratification to overcome dormancy and initiate the germination process.
Cold stratification mimics the natural winter conditions that milkweed seeds would experience in their native habitats. During this process, the seeds are exposed to a period of cold, moist conditions. The cold temperature combined with moisture helps to break down the seed coat and prepare the embryo for germination.
To stratify milkweed seeds, follow these steps:
1. Start by placing the milkweed seeds in a moist medium. Peat moss or vermiculite are commonly used for this purpose. Moisten the medium but ensure it is not excessively wet.
2. Place the seeds and the moist medium in a plastic bag or container. Label the container with the seed species and date of stratification.
3. Seal the container or zip the plastic bag, creating a semi-airtight environment to retain moisture.
4. Store the container or bag in a refrigerator, preferably in the crisper drawer. The temperature should be consistently between 32°F to 41°F (0°C to 5°C).
5. Most milkweed species require a stratification period of 4 to 8 weeks. However, it’s essential to research the specific requirements of the milkweed species you are working with, as stratification times may vary.
6. Regularly check the seeds during the stratification period to ensure they remain moist. If the medium becomes dry, mist it lightly with water to rehydrate it.
After the stratification period, the milkweed seeds can be removed from the refrigerator and planted according to the recommended planting guidelines for the particular species. The cold stratification process should have broken the seed dormancy, and the seeds should be ready to germinate.
It’s important to note that not all milkweed species require stratification. Some species have seeds that are ready to germinate immediately after sowing, while others may have different requirements, such as scarification or stratification at a different temperature.
Understanding the stratification needs of the milkweed species you are working with is crucial for successful germination. By following the proper stratification process, you can unlock the dormant potential of milkweed seeds and embark on a journey of successful milkweed cultivation.
Germination Time for Different Milkweed Species
The germination time for milkweed seeds can vary between different species. While some milkweed seeds germinate relatively quickly, others may take longer to sprout and establish. It’s essential to understand the germination characteristics of specific milkweed species to manage your expectations and provide the necessary care during the germination process.
Here are the estimated germination times for some common milkweed species:
Common Milkweed (Asclepias syriaca): Common milkweed seeds typically germinate within 10 to 20 days under optimal conditions. However, it’s important to note that some seeds may take longer to sprout, so patience is required.
Butterfly Milkweed (Asclepias tuberosa): Butterfly milkweed seeds have a slightly longer germination period compared to common milkweed. It can take anywhere from 20 to 30 days for the seeds to sprout and show signs of growth. However, like other milkweed species, some seeds may germinate earlier or later.
Swamp Milkweed (Asclepias incarnata): Swamp milkweed seeds typically have a germination period of around 14 to 21 days. They tend to germinate relatively quickly compared to other milkweed species.
Showy Milkweed (Asclepias speciosa): Showy milkweed seeds have a more extended germination period, often ranging from 20 to 30 days. Some seeds may take even longer, so it’s important to provide the necessary care and patience during the germination process.
Whorled Milkweed (Asclepias verticillata): Whorled milkweed seeds typically have a germination period of around 10 to 20 days. However, germination can sometimes be slower, taking up to 30 days for some seeds.
Bear in mind that these germination times are approximate and can vary depending on various factors such as temperature, light conditions, and seed quality. It’s essential to provide optimal growing conditions and monitor the progress of your milkweed seeds regularly.
While waiting for your milkweed seeds to germinate, it’s important to keep the soil moist but not waterlogged. Avoid overwatering, as it can lead to seed rot or damping-off disease. Maintaining consistent temperature and light conditions, as discussed earlier, will also contribute to successful germination.
Remember, the germination process may require patience and careful attention, but the reward of seeing beautiful milkweed seedlings emerge and eventually mature into fully grown plants is well worth the wait.
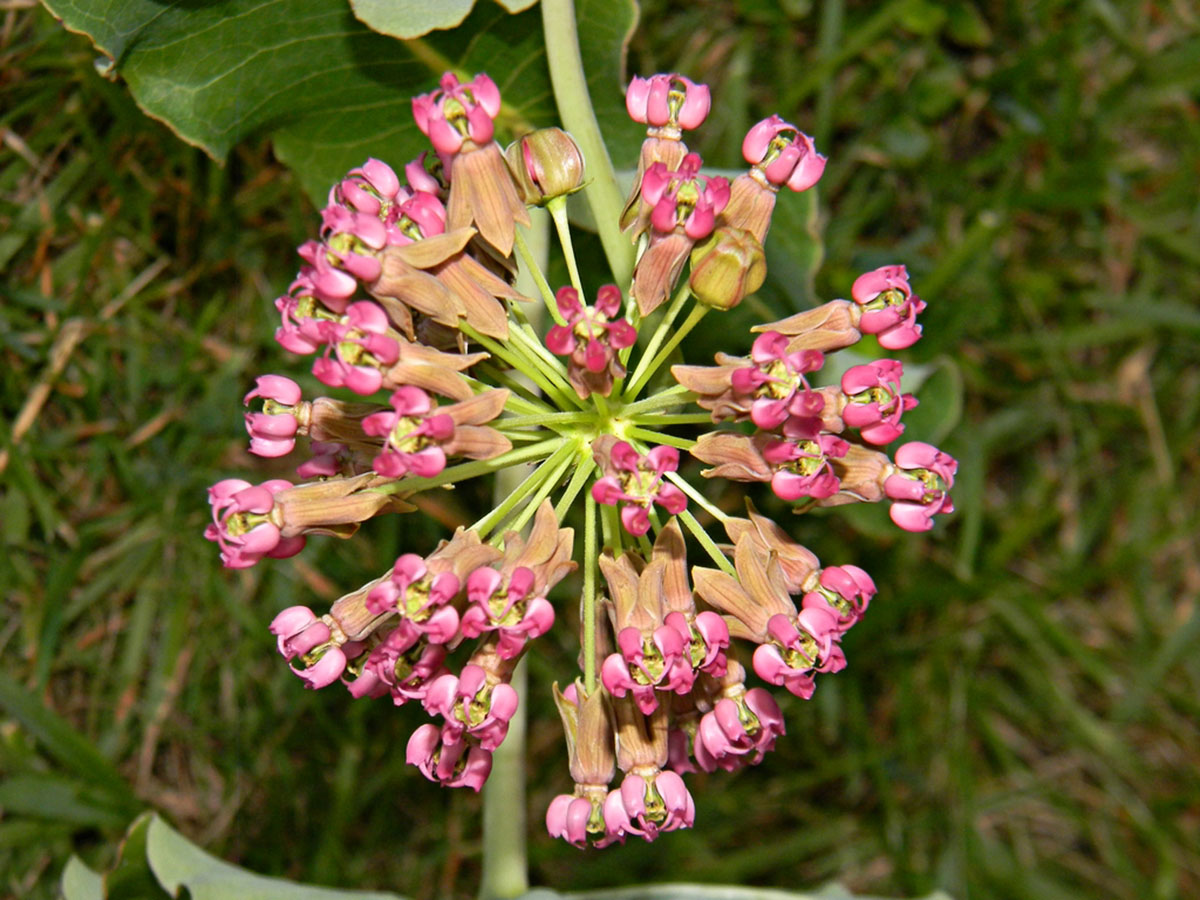
Common Milkweed (Asclepias syriaca)
Common milkweed (Asclepias syriaca) is a well-known and widely distributed species of milkweed native to North America. It is a popular choice for gardens and is highly valued for its stunning flowers and its significance in supporting pollinators, particularly Monarch butterflies. Understanding the germination process and requirements for common milkweed seeds is essential for successfully cultivating this beautiful plant.
Common milkweed seeds typically germinate within a range of 10 to 20 days under optimal conditions. However, it’s important to note that germination times can vary depending on factors such as temperature, light conditions, and the overall health and quality of the seeds.
To germinate common milkweed seeds, first, ensure that you are using high-quality seeds from a reputable source. High-quality seeds have a higher chance of germinating successfully and producing healthy seedlings.
When sowing common milkweed seeds, it’s important to follow the right planting method. Since milkweed seeds require light for germination, sow them directly on the soil surface or lightly press them into the soil, ensuring good seed-to-soil contact. Avoid burying the seeds too deeply, as this can hinder germination.
Maintaining the appropriate temperature is crucial for successful germination. Common milkweed prefers warm temperatures, typically around 70°F to 85°F (21°C to 29°C). It is best to sow the seeds after the last frost date in your region, when the soil has warmed up and is within the ideal temperature range for germination.
Consistent moisture is also necessary during the germination process. Keep the soil evenly moist but not waterlogged. Overwatering can lead to seed rot or fungal diseases. Regularly monitor the soil moisture and adjust your watering schedule accordingly.
Providing ample sunlight is another important factor for common milkweed germination. Place the seed trays or containers in a bright location that receives direct or indirect sunlight for a significant part of the day. If you are starting the seeds indoors, you can use artificial grow lights to provide the necessary light spectrum.
During the germination period, regularly monitor the progress of your common milkweed seeds. It’s normal for some seeds to germinate earlier than others, so be patient and continue providing the appropriate care. As the seedlings emerge, ensure they receive adequate water and gradually acclimate them to outdoor conditions if you plan to transplant them into the garden.
By understanding the germination process and meeting the specific requirements of common milkweed seeds, you can successfully cultivate this iconic plant in your garden. Enjoy the process of watching these magnificent plants grow and thrive, attracting pollinators and adding natural beauty to your landscape.
Butterfly Milkweed (Asclepias tuberosa)
Butterfly milkweed (Asclepias tuberosa) is a stunning perennial milkweed species native to North America. It is highly valued for its vibrant orange flowers and its role in attracting and supporting pollinators, particularly butterflies. Understanding the germination process and requirements for butterfly milkweed seeds is essential for successfully growing this beautiful plant in your garden.
Butterfly milkweed seeds typically have a germination period of around 20 to 30 days, although some seeds may sprout earlier while others may take longer. Patience and proper care are essential during the germination process.
When sowing butterfly milkweed seeds, it’s crucial to start with high-quality seeds from a reputable source. High-quality seeds have a higher chance of successful germination and producing strong, healthy seedlings.
To germinate butterfly milkweed seeds, provide them with the right conditions. The seeds require light for germination, so sow them directly on the soil surface or lightly press them into the soil, ensuring good seed-to-soil contact. Avoid burying the seeds too deep as this can inhibit germination.
Maintaining the appropriate temperature is important for successful germination. Butterfly milkweed prefers warm temperatures, ideally between 70°F to 85°F (21°C to 29°C). It’s best to sow the seeds after the last frost date in your region, when the soil has warmed up and is within the ideal temperature range for germination.
Consistent moisture is crucial during the germination process. Keep the soil evenly moist but not waterlogged. Overwatering can lead to seed rot or fungal diseases. Regularly monitor the soil moisture and adjust your watering schedule accordingly.
Placement in a bright location that receives direct or indirect sunlight for a significant part of the day is essential. If you are starting butterfly milkweed seeds indoors, you can use artificial grow lights to provide the necessary light spectrum and ensure adequate light exposure.
During the germination period, keep a close eye on your butterfly milkweed seeds. Some seeds may germinate earlier than others, and this is completely normal. Water them regularly and provide proper care as the seedlings emerge and grow.
Butterfly milkweed is a drought-tolerant plant once established, but it’s important to provide consistent moisture during the early stages of growth. Gradually acclimate the seedlings to outdoor conditions if you plan to transplant them into the garden.
By understanding the germination requirements of butterfly milkweed seeds and providing the optimal conditions, you can successfully cultivate this magnificent plant in your garden. Enjoy the process of watching the colorful flowers bloom, attracting butterflies and other pollinators, and enhancing the beauty and ecological value of your landscape.
Read more: How Long For Oregano To Germinate
Swamp Milkweed (Asclepias incarnata)
Swamp milkweed (Asclepias incarnata) is a stunning perennial milkweed species native to North America. It is well-adapted to moist environments and is commonly found in wetland areas. Swamp milkweed is highly valued for its beautiful pink flowers and its contribution to attracting pollinators, particularly butterflies and bees. Understanding the germination process and requirements for swamp milkweed seeds is essential for successfully growing this captivating plant.
Swamp milkweed seeds typically have a germination period of around 14 to 21 days under favorable conditions. However, it’s important to note that germination times can vary depending on factors such as temperature, light conditions, and seed quality.
To germinate swamp milkweed seeds, start with high-quality seeds obtained from a reputable source. Good seed quality increases the chances of successful germination and healthy seedling development.
When sowing swamp milkweed seeds, provide them with the right conditions to thrive. Since milkweed seeds require light for germination, sow them directly on the soil surface or lightly press them into the soil while ensuring good seed-to-soil contact. Avoid burying the seeds too deeply, as this can hinder their ability to receive the light necessary for germination.
Maintaining the appropriate temperature is crucial for successful germination. Swamp milkweed prefers warm temperatures, ideally between 70°F to 85°F (21°C to 29°C). It’s best to sow the seeds after the last frost date in your region when the soil has warmed up and is within the ideal temperature range for germination.
Consistent moisture is vital during the germination process. Keep the soil evenly moist but not waterlogged. Overwatering can lead to seed rot or fungal diseases. Regularly monitor the soil moisture and adjust your watering schedule accordingly to prevent the soil from drying out.
Providing ample sunlight is also essential for swamp milkweed germination. Place the seed trays or containers in a bright location that receives direct or indirect sunlight for a significant part of the day. If you are starting the seeds indoors, you can use artificial grow lights to provide the necessary light spectrum.
During the germination period, closely monitor the progress of your swamp milkweed seeds. Some seeds may germinate earlier than others, so be patient and continue providing appropriate care. As the seedlings emerge, make sure they receive adequate water and, if transplanting into the garden later, gradually acclimate them to outdoor conditions.
By understanding the germination process and meeting the specific requirements of swamp milkweed seeds, you can successfully cultivate this remarkable plant in your garden. Enjoy the beauty of the pink flowers, the benefits it provides to pollinators, and the overall ecological value it adds to your landscape.
Showy Milkweed (Asclepias speciosa)
Showy milkweed (Asclepias speciosa) is a captivating perennial milkweed species native to North America. It is known for its impressive flower clusters and its essential role in supporting pollinators, particularly butterflies and bees. To successfully grow this beautiful plant in your garden, it’s important to understand the germination process and requirements for showy milkweed seeds.
Showy milkweed seeds typically have a germination period of around 20 to 30 days, although some seeds may sprout earlier while others may take longer. It’s important to be patient and provide the necessary care during the germination process.
When sowing showy milkweed seeds, start with high-quality seeds from a reputable source. High-quality seeds have a higher chance of successful germination and producing healthy seedlings.
To germinate showy milkweed seeds, ensure they are provided with the right conditions. Since milkweed seeds require light for germination, sow them directly on the soil surface or lightly press them into the soil, ensuring good seed-to-soil contact. Avoid burying the seeds too deep, as this can hinder germination.
Maintaining the appropriate temperature is crucial for successful germination. Showy milkweed prefers warm temperatures, ideally between 70°F to 85°F (21°C to 29°C). Wait until after the last frost date in your region to sow the seeds when the soil has warmed up and is within the desired temperature range for germination.
Consistent moisture is important during the germination process. Keep the soil evenly moist but not waterlogged. Overwatering can lead to seed rot or fungal diseases. Regularly monitor the soil moisture and adjust your watering accordingly.
Showy milkweed requires ample sunlight for optimal germination. Place the seed trays or containers in a bright location that receives direct or indirect sunlight for a significant part of the day. If starting the seeds indoors, artificial grow lights can be used to provide the necessary light spectrum.
During the germination period, closely monitor the progress of your showy milkweed seeds. Some seeds may germinate earlier than others, so be patient and continue providing appropriate care. As the seedlings emerge, ensure they receive adequate water and gradually acclimate them to outdoor conditions if transplanting them into the garden.
By understanding the germination requirements and meeting the specific needs of showy milkweed seeds, you can successfully cultivate this stunning plant in your garden. Enjoy the beauty of its flower clusters, attract pollinators, and contribute to the preservation of these magnificent species.
Milkweed seeds typically germinate within 7-14 days when planted in warm, moist soil. Keep the soil consistently moist to help speed up the germination process.
Whorled Milkweed (Asclepias verticillata)
Whorled milkweed (Asclepias verticillata) is a fascinating perennial milkweed species native to North America. It is characterized by its unique whorled leaf arrangement and delicate white flowers. Whorled milkweed is a valuable plant for attracting pollinators, particularly butterflies and bees. To successfully grow this enchanting plant in your garden, it’s important to understand the germination process and requirements for whorled milkweed seeds.
Whorled milkweed seeds typically have a germination period of around 10 to 20 days, although germination times can vary depending on factors such as temperature, light conditions, and seed quality.
To germinate whorled milkweed seeds, start with high-quality seeds obtained from a reputable source. High-quality seeds have a higher chance of successful germination and producing healthy seedlings.
When sowing whorled milkweed seeds, provide them with the right conditions. Since milkweed seeds require light for germination, sow them directly on the soil surface or lightly press them into the soil, ensuring good seed-to-soil contact. Avoid burying the seeds too deeply, as this can hinder germination.
Maintaining the appropriate temperature is crucial for successful germination. Whorled milkweed prefers warm temperatures, ideally between 70°F to 85°F (21°C to 29°C). Sow the seeds after the last frost date in your region when the soil has warmed up and is within the ideal temperature range for germination.
Consistent moisture is essential during the germination process. Keep the soil evenly moist but not waterlogged. Overwatering can lead to seed rot or fungal diseases. Regularly monitor the soil moisture and adjust your watering schedule accordingly.
Whorled milkweed requires ample sunlight for optimal germination. Place the seed trays or containers in a bright location that receives direct or indirect sunlight for a significant part of the day. If starting the seeds indoors, use artificial grow lights to provide the necessary light spectrum.
During the germination period, closely monitor the progress of your whorled milkweed seeds. Some seeds may germinate earlier than others, so be patient and continue providing appropriate care. As the seedlings emerge, ensure they receive adequate water and gradually acclimate them to outdoor conditions if transplanting them into the garden.
By understanding the germination requirements and meeting the specific needs of whorled milkweed seeds, you can successfully cultivate this unique plant in your garden. Enjoy the beauty of its whorled leaves and delicate white flowers, attract pollinators, and contribute to the conservation of these remarkable species.
Germination Methods for Milkweed Seeds
There are two main methods for germinating milkweed seeds: direct sowing and indoor seed starting. Understanding and utilizing these methods will help you successfully germinate milkweed seeds and establish healthy plants in your garden.
Direct Sowing: Direct sowing involves planting milkweed seeds directly into the ground or desired growing location outdoors. This method works well for milkweed species that do not require stratification and can tolerate outdoor conditions. Here are the steps to follow for direct sowing:
1. Prepare the soil: Choose a well-drained area with loose, fertile soil. Remove any weeds or grass to create a clear space for the milkweed seeds.
2. Sow the seeds: Scatter the milkweed seeds evenly over the prepared soil surface. Lightly press the seeds into the soil or cover them with a thin layer of soil.
3. Water and maintain moisture: After sowing, water the area gently to ensure good seed-to-soil contact and initiate germination. Maintain consistent moisture levels by watering as needed, but avoid overwatering, as it can lead to seed rot or fungal diseases.
4. Provide sunlight: Position the planting area in a location that receives full or partial sunlight, depending on the specific light requirements of the milkweed species. This will help stimulate seed germination and seedling growth.
5. Monitor and care for seedlings: Once the seeds germinate and seedlings emerge, provide regular care, including watering, weeding, and protecting the plants from pests or extreme weather conditions. Gradually acclimate the seedlings to outdoor conditions, allowing them to establish and grow.
Indoor Seed Starting: Indoor seed starting involves germinating milkweed seeds indoors, allowing you to provide controlled and optimal conditions for germination. This method is especially useful for milkweed species that require stratification or for starting seeds in regions with shorter growing seasons. Here’s how to start milkweed seeds indoors:
1. Gather supplies: Collect seed trays, pots, or seed starting cells, along with a well-draining seed starting mix. Ensure the containers have drainage holes to prevent waterlogging.
2. Sow the seeds: Fill the containers with the seed starting mix, and sow the milkweed seeds on the surface. Lightly press the seeds into the mix or cover them with a thin layer of mix.
3. Provide warmth: Place the containers in a warm location or on a seed starting heat mat to provide the ideal temperature range for germination. Most milkweed species prefer temperatures around 70°F to 85°F (21°C to 29°C).
4. Maintain moisture: Keep the seed starting mix consistently moist but not soggy. Use a spray bottle or watering can with a fine mist setting to water the seeds gently, ensuring the surface remains moist.
5. Provide light: Position the containers under bright fluorescent or LED grow lights. Adjust the lights to maintain a distance of 6 to 12 inches above the seedlings, and keep them on for about 12 to 16 hours a day.
6. Monitor and care for seedlings: Regularly check the moisture levels and adjust watering as needed. Rotate the containers to promote even growth. Once the seedlings have developed a few sets of true leaves, they can be transplanted into larger pots or hardened off before being planted outdoors.
Both direct sowing and indoor seed starting methods have their advantages, but the choice depends on the specific milkweed species, the local climate, and your preferences. By utilizing these germination methods, you can increase the chances of successful milkweed seed sprouting and establish vibrant milkweed plants in your garden, supporting pollinators and adding natural beauty.
Read more: How Long To Germinate Hydroseeding
Direct Sowing
Direct sowing is a simple and effective method for germinating milkweed seeds directly into the ground or desired growing location outdoors. This method is suitable for milkweed species that do not require stratification and can withstand outdoor conditions. Direct sowing allows the seeds to experience natural environmental cues that facilitate germination. Here’s a step-by-step guide for direct sowing milkweed seeds:
1. Prepare the soil: Choose a well-drained area in your garden or preferred growing location for the milkweed seeds. Remove any weeds, grass, or debris from the area to create a clean space for sowing.
2. Sow the seeds: Scatter the milkweed seeds evenly over the prepared soil surface. Alternatively, you can sow them in small clusters or rows, depending on your preference. Milkweed seeds are relatively small and do not need to be planted deeply in the soil.
3. Lightly cover the seeds: Gently press the seeds into the soil or cover them with a thin layer of soil. The goal is to ensure good seed-to-soil contact without burying the seeds too deeply, as milkweed seeds require light for germination.
4. Water and maintain moisture: After sowing, water the area gently to initiate germination and promote moisture penetration into the soil. It’s important to keep the soil consistently moist but not waterlogged. Regularly monitor the soil moisture and adjust watering as needed.
5. Provide sunlight: Position the planting area in a location that receives full or partial sunlight, depending on the specific light requirements of the milkweed species you are growing. Sunlight is crucial for stimulating seed germination and supporting seedling growth.
6. Monitor and care for seedlings: As the seeds germinate and seedlings emerge, continue to provide them with regular care. Monitor moisture levels and water as needed, ensuring the soil remains moist but not waterlogged. Protect the seedlings from pests and extreme weather conditions, and weed the area to prevent competition for resources.
7. Gradual acclimation: If you plan to transplant the seedlings into the garden later, it’s important to gradually acclimate them to outdoor conditions. This process, known as hardening off, involves exposing the seedlings to outdoor conditions for increasing durations over a period of days or weeks.
Direct sowing is a convenient and natural method for germinating milkweed seeds. It allows the seeds to grow in their intended growing location from the beginning, avoiding the need for transplanting. By following these steps and providing proper care, you can successfully grow milkweed plants that contribute to pollinator habitats, add beauty to your garden, and support the conservation of these essential species.
Indoor Seed Starting
Indoor seed starting is a popular method for germinating milkweed seeds indoors, providing controlled conditions that optimize germination success. This method is especially useful for milkweed species that require stratification or for gardeners in regions with shorter growing seasons. Here’s a step-by-step guide for indoor seed starting of milkweed seeds:
1. Gather supplies: Collect seed trays, pots, or seed starting cells. Ensure the containers have drainage holes to prevent waterlogging. Use a well-draining seed starting mix, specifically formulated for starting seeds.
2. Sow the seeds: Fill the containers with the seed starting mix, leaving a small gap at the top. Sow the milkweed seeds on the surface of the mix, spacing them according to the recommended seed spacing for the specific milkweed species. Lightly press the seeds into the mix or cover them with a thin layer of seed starting mix.
3. Provide warmth: Place the containers in a warm location or on a seed starting heat mat. Most milkweed species prefer a temperature range of around 70°F to 85°F (21°C to 29°C) for successful germination.
4. Maintain moisture: Keep the seed starting mix consistently moist but not saturated. Use a spray bottle or watering can with a fine mist setting to water the seeds gently. Avoid overwatering, as excessive moisture can lead to damping-off disease or seed rot.
5. Provide sufficient light: Position the containers under bright fluorescent or LED grow lights. Adjust the lights to maintain a distance of 6 to 12 inches above the seedlings, and keep them on for about 12 to 16 hours a day. Providing sufficient light is crucial for the healthy growth of seedlings.
6. Monitor and care for seedlings: Regularly check moisture levels and adjust watering as needed to prevent the seed starting mix from drying out or becoming waterlogged. Rotate the containers periodically to ensure even exposure to light. Once the seedlings have developed a few sets of true leaves, they can be transplanted into larger pots or hardened off before being planted outdoors.
7. Harden off and transplant: Before transplanting the seedlings into the garden, it’s important to gradually acclimate them to outdoor conditions. Start by exposing the seedlings to outdoor conditions for a few hours a day and gradually increase the duration over a period of days or weeks.
Indoor seed starting allows you to control the growing environment and ensure optimal conditions for milkweed seed germination. It also extends the growing season and provides an opportunity for early establishment before transplanting outdoors. By following these steps and providing proper care, you can nurture robust milkweed seedlings that will thrive when transplanted into your garden, providing essential habitat for pollinators and enhancing the beauty of your landscape.
Tips for Successful Milkweed Germination
Germinating milkweed seeds can be a rewarding and exciting process. To increase your chances of successful germination and nurture healthy milkweed plants, here are some helpful tips to keep in mind:
1. Choose High-Quality Seeds: Start with high-quality milkweed seeds from a reputable source. High-quality seeds have a higher chance of germination and produce strong, healthy seedlings.
2. Proper Seed Storage: Store milkweed seeds in a cool, dark, and dry place before planting. Proper seed storage helps maintain seed viability and ensures better germination rates.
3. Timing is Key: Pay attention to the appropriate planting time for milkweed seeds specific to their species. Sow the seeds after the last frost date in your region when the soil has warmed up and is conducive to germination.
4. Provide Adequate Water and Drainage: Keep the soil consistently moist during the germination period. However, avoid overwatering, as it can lead to seed rot or fungal diseases. Use well-draining soil and monitor the moisture levels regularly.
5. Optimal Temperature: Provide the ideal temperature range for germination based on the specific milkweed species you are growing. Most milkweed species prefer warm temperatures ranging from 70°F to 85°F (21°C to 29°C).
6. Light Exposure: Milkweed seeds require exposure to light for successful germination. Sow the seeds on the soil surface or lightly cover them with a thin layer of soil, allowing them to receive the necessary light for germination.
7. Be Patient: Remember that germination times can vary for different milkweed species. Some seeds may sprout sooner, while others may take longer. Be patient and provide consistent care during the germination period.
8. Monitor Germination Progress: Regularly check the germination progress of your milkweed seeds. Observe the emergence of seedlings and address any issues promptly, such as lack of moisture, pests, or disease.
9. Consider Stratification: If growing milkweed species that require stratification, follow the proper cold stratification process to break seed dormancy and increase germination rates. Research and implement the specific stratification requirements for each species.
10. Transplant Carefully: When transplanting seedlings into the garden, handle them gently and ensure they have sufficient root development. Gradually acclimate the seedlings to outdoor conditions by hardening them off before permanent planting.
By following these tips, you can enhance your success in germinating milkweed seeds and cultivating thriving milkweed plants. Remember that milkweed is not only beautiful but also crucial for supporting pollinators and contributing to a healthy ecosystem. Enjoy the process and the rewards of growing these magnificent plants in your garden.
Choosing High-Quality Seeds
Choosing high-quality seeds is essential for successful milkweed germination and cultivating healthy plants in your garden. Here are some key considerations to keep in mind when selecting milkweed seeds:
1. Source: Purchase seeds from reputable suppliers or nurseries that specialize in native plants or milkweed species. Look for companies with a good track record and positive customer reviews to ensure you are getting quality seeds.
2. Species Verification: Confirm that the seeds are labeled correctly with the scientific name of the milkweed species you intend to grow. This is important because different milkweed species have different germination requirements, growth habits, and geographic suitability.
3. Freshness: Choose seeds that are fresh, as their viability decreases over time. Look for seeds from the current or previous growing season, as they tend to have a higher germination rate. Avoid outdated or improperly stored seeds, as they may have low viability.
4. Seed Appearance: Examine the seeds for signs of damage, discoloration, or deformities. Healthy milkweed seeds are typically plump, firm, and have a uniform color. Avoid seeds that appear shriveled, discolored, or damaged, as they may have lower germination potential.
5. Seed Viability: Check if the seeds have been tested for germination rate or viability by the seed supplier. Look for information indicating the germination percentage or a high-quality germination test result. This helps ensure that you are investing in seeds that have a good chance of sprouting.
6. Native Species: Opt for native milkweed species that are specific to your region or geographic zone. Native milkweeds are better adapted to local conditions, have higher chances of successful germination, and provide optimal support for local pollinators.
7. Ecotype Consideration: If possible, choose seeds from local ecotypes or regional sources. These seeds have a higher likelihood of thriving in your specific climate and soil conditions, as they are adapted to the local environment.
8. Organic or Chemical-Free: Consider organic or chemical-free seeds if you prioritize environmentally friendly gardening practices. Organic seeds are grown without the use of synthetic pesticides or fertilizers, supporting a more sustainable approach to gardening.
9. Research and Recommendations: Conduct thorough research on the milkweed species you intend to grow. Seek recommendations from local gardening organizations, native plant societies, or experienced gardeners who have successfully grown milkweed in your area.
By carefully selecting high-quality seeds, you increase the chances of successful germination and establish healthy milkweed plants in your garden. Remember that milkweed plays a vital role in supporting pollinators and promoting biodiversity, making it a valuable addition to any garden or landscape. Enjoy the process of nurturing these incredible plants and contributing to the conservation of these essential species.
Read more: How Long Cilantro Germinate
Proper Seed Storage
Proper seed storage is crucial for maintaining seed viability and maximizing germination success. When it comes to milkweed seeds, following appropriate storage practices will help preserve their quality and ensure optimal germination rates. Here are some tips for proper seed storage:
1. Cool and Dark Environment: Milkweed seeds should be stored in a cool, dark environment to maintain their viability. Choose a storage location that is consistently cool, ideally between 32°F to 41°F (0°C to 5°C), such as a basement, root cellar, or refrigerator.
2. Dry Conditions: Ensure that the storage area is dry to prevent the seeds from absorbing excess moisture, which can lead to mold, rot, or germination issues. Avoid storing seeds in humid places like a damp basement or near water sources.
3. Airtight Containers: Use airtight containers to store milkweed seeds and protect them from humidity, pests, and oxygen exposure. Choose containers made of glass, metal, or plastic that have tight-fitting lids to create a moisture-free environment.
4. Desiccant Packets: Adding desiccant packets to the seed storage containers can help absorb any excess moisture and maintain the desired moisture level for the seeds. Silica gel packets or powdered milk can be used as desiccants.
5. Labeling and Organization: Properly label the seed containers with the milkweed species, date collected or purchased, and any other relevant information. Keep seeds organized by species to easily locate and identify them when needed.
6. Avoid Freezing: While a cool temperature is important for seed storage, avoid freezing milkweed seeds. Freezing can damage the cells and lower seed viability. Instead, opt for a refrigerator or cool storage area that maintains a stable above-freezing temperature.
7. Duration of Storage: Keep in mind that milkweed seeds gradually lose viability over time. It’s best to use fresh seeds, ideally within the same growing season or up to a year after harvest or purchase. Older seeds may have reduced germination rates, although they can still be viable.
8. Quality Packaging: If purchasing milkweed seeds, choose reputable suppliers that provide seeds in quality packaging. Look for sealed packets or containers that protect the seeds from moisture and ensure their freshness.
9. Test Germination Rate: If storing seeds for an extended period, periodically test the germination rate. This involves sowing a sample of the stored seeds and observing the percentage of seeds that successfully germinate. If the germination rate is low, consider refreshing your seed stock with fresh seeds.
By practicing proper seed storage techniques, you can prolong the viability of milkweed seeds and increase your chances of successful germination. Maintaining a cool, dry, and dark storage environment will help preserve the quality of the seeds, ensuring their readiness for future planting. Enjoy the satisfaction of growing milkweed and supporting pollinators with healthy, vibrant plants in your garden.
Providing Adequate Water and Drainage
Proper watering and drainage are crucial for the successful germination of milkweed seeds and the overall health of milkweed plants. Here are some important considerations to ensure adequate water supply and optimum drainage:
1. Soil Moisture: Maintain consistent soil moisture during the germination process to provide the seeds with the necessary water for sprouting. Keep the soil evenly moist but not waterlogged, as excessive moisture can lead to seed rot or fungal diseases. Regularly monitor soil moisture and adjust watering accordingly.
2. Watering Frequency: Water the soil gently and regularly to ensure uniform moisture distribution. Avoid heavy watering that can displace seeds or lead to soil compaction. Use a watering can or a gentle spray attachment to moisten the soil surface without disturbing the seeds.
3. Deep Watering: When the milkweed plants are established, deep watering is important to encourage deep root growth. Water deeply and allow the water to penetrate the soil until it reaches the root zone. This promotes stronger and more resilient plants.
4. Don’t Overwater: Overwatering can be just as detrimental as underwatering. Excessive moisture can lead to root rot, disease, and poor growth. Ensure that the soil has good drainage to prevent water from pooling around the roots. Avoid excessive watering or watering too frequently.
5. Well-Draining Soil: Milkweed plants prefer well-draining soil to prevent waterlogging and promote healthy root development. Amend heavy soils with organic matter, such as compost or well-rotted manure, to improve drainage. This helps ensure that excess water drains away from the root zone.
6. Mulching: Applying a layer of organic mulch around milkweed plants can help conserve moisture and regulate soil temperature. Mulch also aids in preventing weed growth, which reduces competition for water and nutrients. Use a thin layer of natural materials, such as wood chips, straw, or shredded leaves.
7. Avoid Watering Leaves: When watering milkweed plants, direct the water at the soil level and avoid wetting the leaves. Wet foliage can increase the risk of disease development, such as powdery mildew. Directing the water to the soil also ensures that it reaches the root zone where it is needed the most.
8. Rainfall Considerations: If you rely on natural rainfall for watering milkweed plants, monitor the rainfall patterns and supplement watering during dry periods. Be mindful of local weather conditions and adjust your watering schedule accordingly.
By providing adequate water and ensuring proper drainage, you create an environment conducive to successful milkweed germination and healthy plant growth. Balancing moisture levels and promoting good drainage will help your milkweed plants flourish and provide essential support for pollinators in your garden.
Monitoring Germination Progress
Monitoring the germination progress of milkweed seeds is an important aspect of successful seed sprouting and plant establishment. By regularly checking and assessing the germination process, you can make adjustments as needed to ensure optimal conditions for seedlings. Here are some key tips for effectively monitoring germination progress:
1. Observation: Regularly observe the seed trays, pots, or planting area where you sowed the milkweed seeds. Look for signs of seed germination, such as the emergence of seedlings and the appearance of roots and cotyledons (first leaves).
2. Germination Time: Familiarize yourself with the typical germination time for the specific milkweed species you are growing. Monitor the time elapsed since sowing to have an idea of whether the seeds are germinating within the expected timeframe or if they require additional time.
3. Germination Rates: Assess the percentage of seeds that have successfully germinated. Count the number of germinated seeds relative to the total number of seeds planted to determine the germination rate. This information can help you evaluate the success of your germination efforts.
4. Seedling Development: Monitor the growth and development of the emerging seedlings. Observe the progression from seedling emergence to the development of true leaves and the strengthening of the stems. Look for signs of healthy growth, such as vibrant green leaves, upright stems, and vigorous root development.
5. Seedling Appearance: Pay attention to the appearance of the seedlings. Healthy seedlings should have sturdy stems, well-formed leaves, and a vibrant color. Watch out for any signs of disease, pest infestation, or abnormalities, such as stunted growth or discoloration.
6. Moisture Levels: Regularly check soil moisture levels throughout the germination period. Ensure that the soil remains consistently moist but not waterlogged. Adjust watering schedules or methods as needed to maintain optimal moisture conditions for seed germination and seedling growth.
7. Environmental Conditions: Monitor the temperature and light levels in the germination area. Ensure that the temperature remains within the recommended range for the specific milkweed species. Adequate exposure to light is also important for healthy seedling development.
8. Record Keeping: Document your observations and the progress of the germination process. Maintain records of the number of seeds sown, the germination rates, and any noteworthy observations. Keeping track of this information will help you evaluate your techniques and improve future germination attempts.
By actively monitoring the germination progress, you can identify any issues early on and take appropriate action to optimize the conditions for seedling growth. Regular observations allow you to provide necessary care, adjust watering or lighting, and intervene if any problems arise. This attentive approach will increase the chances of successful milkweed germination and create a strong foundation for the growth of healthy milkweed plants in your garden.
Conclusion
Germinating milkweed seeds and successfully cultivating healthy milkweed plants is a rewarding journey that not only adds beauty to your garden but also supports pollinators and contributes to biodiversity. Understanding the factors that affect milkweed germination, such as seed moisture content, temperature, light conditions, and seed stratification, is essential for creating the optimal conditions for seed sprouting.
By choosing high-quality seeds and practicing proper seed storage, you can ensure the viability of your milkweed seeds and increase the chances of successful germination. Additionally, adopting suitable germination methods, whether through direct sowing or indoor seed starting, allows you to provide the necessary care and control the growing environment for optimal results.
Monitoring the germination progress of milkweed seeds enables you to make informed decisions and adjustments, ensuring that the seedlings receive adequate water, proper drainage, and the right environmental conditions. Regular observation of seedling development, moisture levels, and environmental factors helps identify any issues that may arise and allows for timely intervention if needed.
Remember to be patient during the germination period, as different milkweed species have varying germination times. With perseverance and care, you will witness the emergence of vibrant seedlings, eventually maturing into beautiful milkweed plants that attract and support pollinators in your garden.
As you embark on your milkweed gardening journey, keep in mind the importance of providing a suitable habitat for milkweed and maintaining a pesticide-free environment. Milkweed plays a vital role in supporting butterflies, bees, and other pollinators, contributing to the health of ecosystems and the conservation of these magnificent species.
In conclusion, by utilizing proper germination techniques, providing adequate water and drainage, monitoring germination progress, and nurturing milkweed plants, you can create a thriving habitat that upholds the intricate web of life in your garden. Embrace the beauty of milkweed, cherish the pollinators it attracts, and contribute to a sustainable and vibrant natural environment.
Frequently Asked Questions about How Long For Milkweed To Germinate
Was this page helpful?
At Storables.com, we guarantee accurate and reliable information. Our content, validated by Expert Board Contributors, is crafted following stringent Editorial Policies. We're committed to providing you with well-researched, expert-backed insights for all your informational needs.


0 thoughts on “How Long For Milkweed To Germinate”